Unity UI Optimization
This article discusses the optimization of UI-elements of projects made in Unity. Based on information from official documentation and personal experience, I tried to clearly explain the principles of operation of UI elements. Also here you will find practical tips that will help improve the performance of your project with regard to the user interface.
- Terminology
- Introductory
- Unity UI rendering
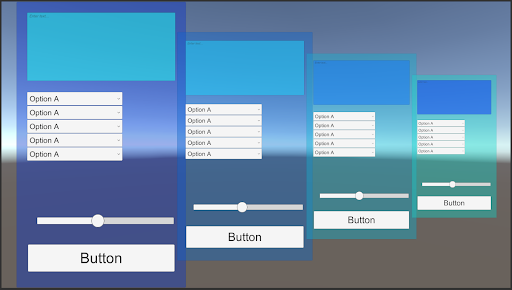
- Redesigning the user interface
- Meshing
- General UI Optimization Tips
- Work with text and its optimization
- Sprite Atlases
- Summarize optimization methods
- Sources
Terminology
UI elements are all elements in Unity related to building a user interface. This includes, for example: button, text, picture, drop-down menu, etc.
Canvas (canvas) - the basic element of the UI, which is a container for the rest of the elements.
Mesh - a set of parameters describing a 3D model.
A quad is a mesh that is a quadrangle.
Batching - combining object meshes into one large mesh for faster rendering.
Draw-call - a command to draw from the engine to the graphics API (for example, OpenGL or Direct3D).
Transparent queue - a queue for rendering transparent objects.
Alpha blending (Alpha blending) - an algorithm for mixing pixels on the alpha channel to obtain an image with transparency.
Atlas (Atlas) - a type of resource that combines several textures into one.
Introductory
In UI optimization, there are no universal rules that work in any situation. It all comes down to finding a balance between the cost of batching and the number of draw calls. Four main problems can be distinguished:
- GPU load too high (excess load on the render);
- too much CPU load when rebuilding the canvas;
- too many changing elements leading to the rebuilding of the canvas;
- Too much CPU load when generating meshes (usually associated with text).
Unity UI rendering
The basic element of the Unity user interface is the canvas. He is responsible for generating, sorting, and rendering meshes of child interface elements. All UI elements must be children of any canvas, otherwise they will not be displayed in the game.
Rendering occurs from the farthest to the furthest object from the camera (back-to-front) in the Transparent queue with alpha blending.
Separately, it should be noted that the transparency of the UI elements does NOT affect performance. Even if the element consists entirely of “opaque” pixels, it will still be rendered using alpha blending.
It is also important to understand that when rendering, all pixels of all active elements are processed. It does not depend on whether they are visible, overlapped by other objects, or even completely transparent.
Redesigning the user interface
Redesigning the user interface is a multi-step process, including building the meshes of each UI element, and trying to patch these meshes in order to minimize the number of draw calls .
Rebuilding takes place in four stages:
- Structures of elements are analyzed.
- The meshes of all active elements, including elements with zero transparency, are rebuilt.
- Rebuilds materials for meshing element meshes.
- All elements are drawn according to their order.
The rebuilt canvas is cached and reused until one of the elements in the canvas is marked as modified.
Dirty objects are marked that have been activated or deactivated; who have changed material, position, scale, rotation; The text value of the text component has changed. reassignment of the parent, etc.
In this case, the canvas rebuilding again contains at least one changed element. True, this applies only to the canvas in which the element is located. That is, changes to elements in child canvases do not affect parent ones.
The more elements in the canvas, the greater the cost of analyzing and sorting objects.
Meshing
Merging meshes, or batching, helps reduce the load on the GPU by reducing the number of draw calls. During the batching process, the meshes are sorted by depth and checked for overlap. When passing from the distant element to the near element (or from the upper element to the lower one in the hierarchy) within the same canvas, objects with the same materials or textures are combined into one mesh. For this, there should not be objects with other materials between them. Also, objects with other materials should not overlap the baked objects with their overall containers. The batching operation is multi-threaded, its performance varies greatly depending on the number of cores in the processor.
Text may flutter with other text if they have the same font. It doesn’t matter if the same or different font size and style settings are selected. If the fonts are different, then the text will not roll.
It should also be borne in mind that text can overlap an object with its overall container, and such an overlap can be easily skipped.
Consider an example. There are three objects A, B, and C arranged in a hierarchy this way:
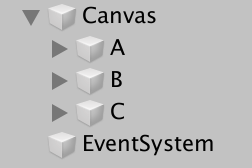
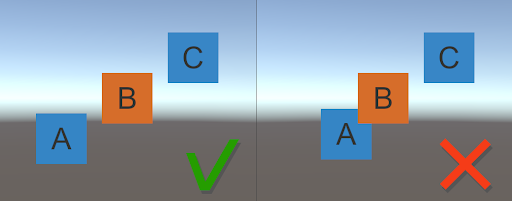
In the image on the left, objects A and C will be merged, because have the same material and do not intersect with object B. In the image on the right, objects A and C will not be combined, because there is an intersection with object B.
General UI Optimization Tips
Before you begin optimization, it is highly recommended that you profile UI. This will help identify bottlenecks leading to loss of performance (if any). For profiling, there are many tools, both built-in to Unity (Unity Profiler), and third-party ones. But we will not discuss UI profiling issues in this article.
Here are some suggestions for optimizing your UI in Unity:
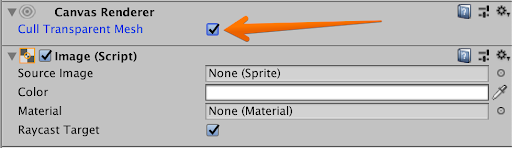
- Turn off invisible objects. If an element is overlapped by an opaque element, then you need to disable its GameObject or the parent GameObject of the overlapped element. At the same time, interface elements with alpha set to 0 will still be drawn. For such objects, you need to enable Cull Transparent Mesh in the Canvas Renderer component or simply disable invisible objects.
- Disable world objects hidden by an opaque interface. If the interface does not cover the whole world, you can save it in the Render Texture, and turn off the world camera.
- Minimize the number of pixels to draw. Combine as many images as possible into one. For example, it makes sense to make the buttons a single sprite, rather than separate layers with a background, stroke, button body, etc. This will reduce the flexibility of working with such elements and may lead to resource clogging, so a compromise must be sought.

- Avoid empty elements that serve only to organize the structure (do not use elements as the names of “folders” in the document hierarchy).
- Avoid crossing objects that cannot bake with each other. If possible, it is best to change the position in the hierarchy, the size of the container, or the position of overlapping and non-caking elements.
- Use separate or nested canvas for dynamic elements. So you minimize the cost of sorting and rebuilding the structure of the canvas containing a large number of elements. Nested canvases are more convenient because inherit the settings of the parent canvas. At the same time, when changing the parent canvas, all nested ones will also be rebuilt. This is quite rare, but it happens (for example, when changing the screen resolution). Keep in mind that objects from different canvases or nested canvases are NOT baked for joint rendering. It is recommended to divide the canvases by the regularity of updating elements. Static elements need to be placed in a separate canvas, then they will be drawn only once. If there are elements that are constantly changing, then it is better to combine them in another canvas, because they will still cause each other to rebuild. Changing objects can also be divided into several canvases by the refresh rate. For example, elements updated every frame are put in one canvas, and elements updated less often in another.
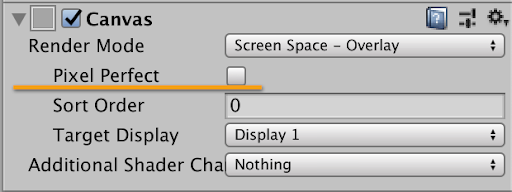
- Disabling Pixel Perfect will significantly increase productivity. This is especially true for constantly updated objects with a large number of elements (for example, scrolling inventory).
Canvas

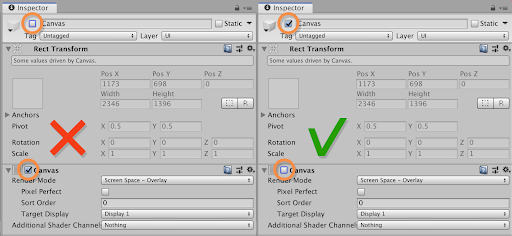
Nested canvas - If you need to disable the canvas, do not disable the object containing it (via the SetActive function). The next time you turn on the elements of this canvas are marked as changed, and all elements are rebuilt. It’s better to turn off the canvas component itself, then the whole structure and baked data will not change and the next time you turn on the canvas component, they just start their drawing.
- For canvases with Screen Space - Camera or World Space selected in the Render Mode parameter, always install a camera. If you do not install it, then the user interface system in each frame will search it through Object.FindObjectWithTag to find Camera.main , and this will affect performance.
- In order not to create several identical textures, you can create one in shades of gray and “paint” it through the Image component by selecting the desired color.
- Leave the Raycast Target flag only on items that need input events, and remove the rest. By default, Raycast target is enabled on many elements (Image, Text, etc.). This complicates and slows down the work of the Raycaster component, which handles input events in Unity UI. When clicking or taping, it goes through the entire hierarchy of elements and searches for all graphic components with the Raycast Target flag set, then checks them for the possibility of input events and, after passing the checks successfully, adds them to the hit list. After that, the hit list is sorted by depth, objects outside the screen are discarded. As a result, it gives the final hit list.
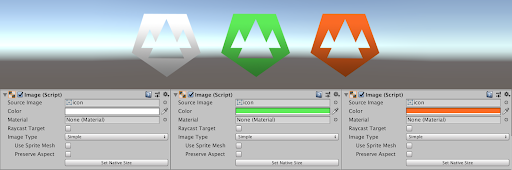
In Unity UI, many components (Image, Text, etc.) have the Raycast Target flag.

Raycast Target on the image component.
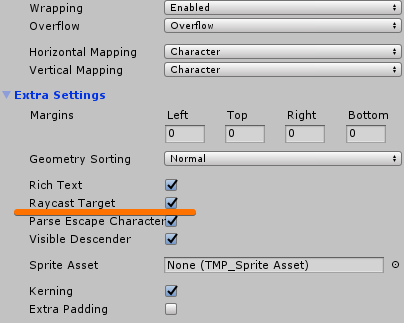
TextMeshPro has it hidden in the Extra Settings tab.
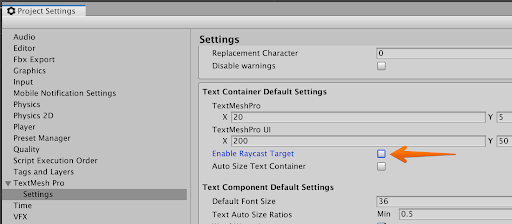
For TextMeshPro, you can set the default Raycast Target setting in Player Settings -> TextMest Pro -> Settings -> Enable Raycast Target .
Elements are tested when:
- Raycast Target enabled
- the element itself is turned on and activated;
- the insertion point is at the intersection with RectTransform.
It also makes sense to remove the Raycast Target flag from children if the root object already has it and completely overlaps the children with its geometry. For example, the standard Unity UI button.
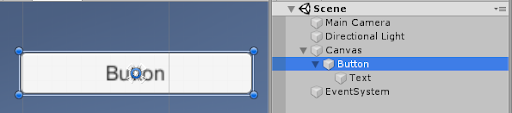
The image completely overlaps the text with its shape, in this case you can remove the Raycast Target from the text component.
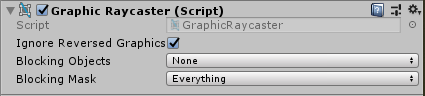
If all canvas elements do not wait for input events, then you can remove the Graphic Raycaster component from the canvas / nested canvas.
Work with text and its optimization
The text in the Unity interface consists of grids in which each symbol is created its own quad. The mesh is rebuilt each time the value of the text changes. Rebuild also occurs if the text component or its parent has been turned off and on again.
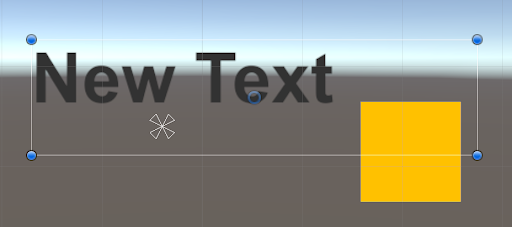
By default, fonts in Unity are added as dynamic. For each dynamic font used in the text component on the stage, an atlas is created. Only used characters are included in this atlas. For example, if the text field contains the text “New Text”, then the atlas created for it will contain the characters “N”, “e”, “w”, “T”, “x” and “t”. For each character that is different in size or style, a representation will be created in the atlas.

Text on stage
Font atlas
If during the execution of the program the content of the text component changes and there appear characters that are not in the atlas, the entire atlas will be rebuilt. If there is free space in the texture of the atlas, then the necessary symbols will simply be added there. At the same time, characters that are not currently in use will not be deleted. If the atlas does not have enough space for new characters, its size will be doubled and filled again based on the characters used in the active text components.
If a strictly defined number of characters is specified for a project, for example, only the Latin alphabet, then it is worth using static fonts that are stored permanently in memory. If your project allows a large number of characters, then it is better to dwell on dynamic fonts.
You can also improve performance by replacing the text component with a sprite. For example, the numbers appearing in the game (score) can be made using sprites from one atlas containing a set of only the necessary characters. In this case, there will be no costs for rebuilding the canvas and the atlas of the font.
The use of fallback fonts, listed in the Font Names field in the font settings, increases the memory used. This is especially noticeable in pictographic fonts.
It is not recommended to use Best Fit , as this option leads to a quick overflow of the atlas and causes its restructuring.
Best fit ignores the font size settings and tries to fit the text into the outline rectangle of the text component.
Now a few words about TextMeshPro (TMP) , a popular replacement for the standard Unity text component. TextMeshPro also rebuilds its grid every time the value of the text changes. However, TMP text does not use dynamic fonts. For it, atlases of fonts are generated in advance, which include all the necessary characters. If for some text on the scene there is no character in the font assigned to its component, then TMP starts searching in the backup fonts. If there is nothing there, then TMP will try to find this character in all downloaded fonts.
Best Fit in TMP does not create problems like a regular text component, so it can be used.
A large number of fonts with different localizations or large atlases of fonts can take up a lot of memory. Therefore, it is better to use preload only the fonts necessary for a specific localization.
World Space recommends using TextMeshPro instead of TextMeshProUGUI .
TextMeshProUGUI is used in canvases.
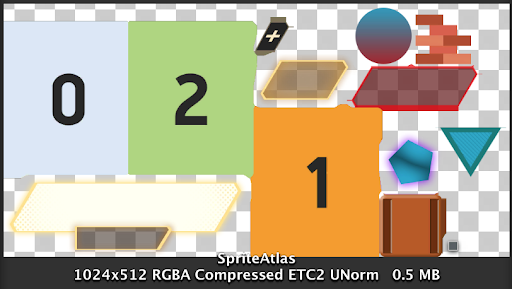
Sprite Atlases
Sprite atlases are a type of resource that combines several textures into one. They allow you to reduce the number of draws ( draw calls ) and increase productivity.
Atlas creation.
Create an atlas: Asset> Create> Sprite Atlas .
Select the atlas and put the necessary sprite in Objects for Packing .
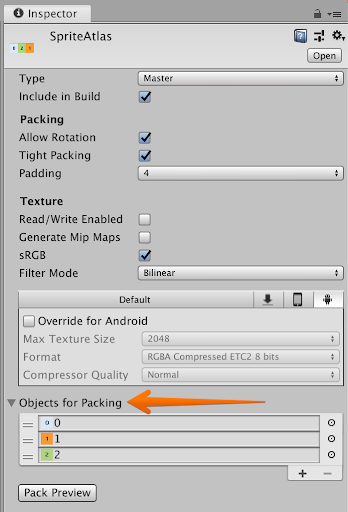
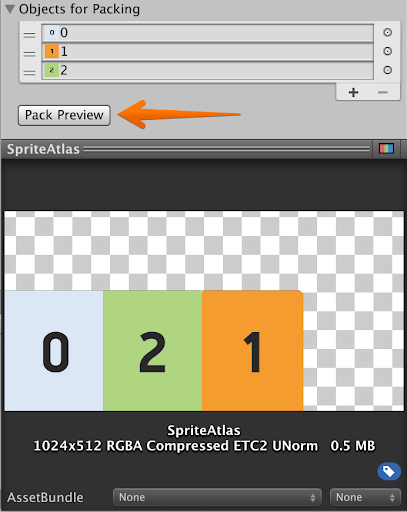
Click Pack Preview to preview the atlas.
It should be borne in mind that even if one or several sprites from an atlas are used on a scene, the atlas will still be loaded in its entirety. Therefore, it makes no sense to try to embed all the images in one giant atlas, which on devices with small RAM can take its tangible part. It is better to break into some smaller atlases, for example, the atlas of the user interface of the game menu and the atlas of the interface of the game mode.
Avoid large empty spaces in the atlas, so as not to occupy excess memory space. To do this, you can resize the atlas or add additional images to fill the empty space as much as possible.

For images that are not in the atlas, you must select the correct settings.
For each compression format, there are requirements under which it will work efficiently. The most common image requirements:
- width and height must be a multiple of the power of two;
- width and height must be a multiple of 4;
- both previous paragraphs together.
Otherwise, the texture will not be compressed and additional device memory costs will occur.
When choosing a compression format, Unity will tell you if any requirements for the selected format are not met.

Also do not forget that the formats are different from the target device. For more information and recommendations on formats, see the official documentation :
Summarize optimization methods
- Disable invisible and transparent objects
- Minimize the number of items
- Avoid crossing objects that cannot bake with each other
- Distribute items by canvas based on refresh rate
- For canvases with frequently updated elements, disable Pixel Perfect
- Disable Raycast Target on non-clickable items
- Remove the Graphic Raycaster component on the canvas for which all elements are not clickable
- For normal text components do not use Best Fit
- For TextMeshPro In World Space, use TextMeshPro instead of TextMeshProUGUI. TextMeshProUGUI is used in canvases.
- Set the camera in the canvas settings, if necessary
- Disable canvas by disabling the canvas component
- Use grayscale sprites and colorize the image component settings
- Use sprite atlases
- Use the correct size and compression format for textures not in the atlas
Sources:
Comprehensive Unity UI Optimization Information
Another official source on this topic contains information in a more concise form.
Additional Information on Texture Compression Formats
All Articles