How to manage React Data Grid through Redux
This is a continuation of the previous article: Why write your React Data Grid in 2019
What is Redux for? There are many answers. For example, to work with shared data in different React components. But you can take Redux as a way to manipulate a component. The look itself is interesting: any React component can control another React component through Redux.
Take a React component that displays data in the form of rows and columns (Data Grid, grid). What functionality can she manage? The composition of the columns and rows. Allocation. It would be nice to scroll the data.

For example, a certain React component (Some Component) could manage the grid like this:
- display such rows and columns;
- highlight the occurrence of such a word;
- select such a line;
- scroll to a certain line.
Managing columns is not difficult. It is enough to put column settings in Redux: names, order, widths, data mapping. The grid will take these settings and apply. The data approach is the same.
But let's complicate the task. Suppose there are a lot of lines. They cannot be downloaded from the server at once, and cannot be displayed at once. Therefore, portioned data loading and portioned data mapping are needed.
For portion display, we take the virtual scrolling described in the previous article . And try to cross it with portion loading and storage in Redux. We will also enable other components to manipulate the downloaded data and the scroll position through Redux.
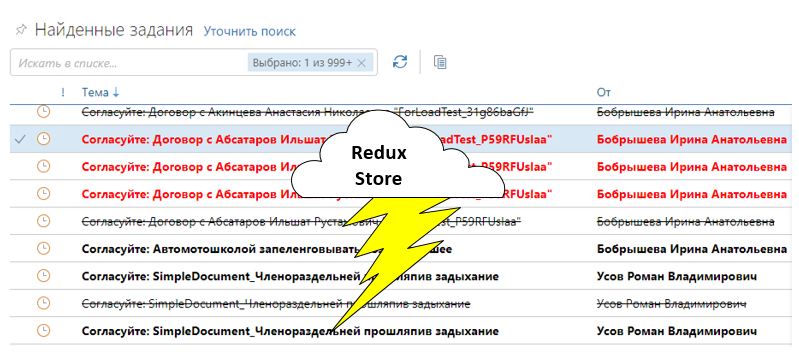
This is not an abstract task, but a real task from the ECM system we are developing:
Arrange the requirements. What do you want to get?
- so that when scrolling, new pieces of data are loaded;
- so that the loaded pieces of data are in Redux;
- so that loaded portions can be manipulated from other components. Through Redux add-delete-modify rows, and the grid picked up these changes;
- so that the scroll position can be controlled from other components. Through Redux, scroll to the desired line.
We will consider these tasks.
A small digression: virtual scrolling from the previous article allows you to quickly scroll to any part of the grid. For example, at the end. Grid should load the latest portion of data, excluding all intermediate ones, so as not to pull thousands of lines from the server. Therefore, portions are not always loaded sequentially; they can be loaded from different parts of the list.
We have chosen the following scheme for loading and storing data:
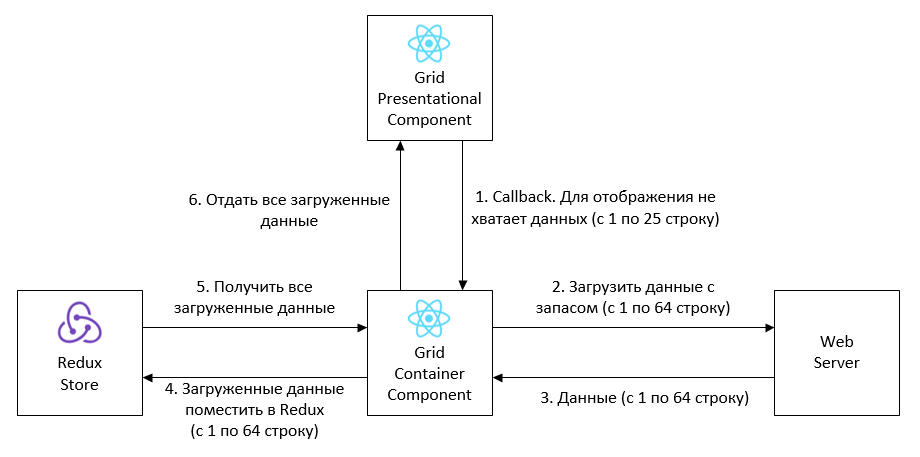
Grid in this scheme is divided into two parts - components Presentational and Container. Presentational only deals with data display - this is view. The data is shown in pages (this was described in the previous article). Container is responsible for loading data and interacting with Redux.
Let's go through the arrows of the diagram:
- Presentational does not load data, it only tells via callback what data it lacks to display. Presentational does not know about Redux, it does not perform dispatch actions and does not connect to the Redux repository.
- Container is responsible for loading the data. This component sends a request to the server when calling callback. A Container can request more data than it needs to display in order to minimize the number of requests to the server.
- The server sends data.
- Container sends the received data to Redux. Redux stores all uploaded portions of data, not just the last uploaded portion.
- As soon as the next piece of data gets into Redux, the Container will pull out all the pieces from Redux.
- And give them Presentational. Presentational is not required to draw all the data received, it displays only what falls into the viewport. At the same time, the loaded data and rendered pages are not the same thing. 1000 records can be loaded in one block, and 50 records are displayed in two pages.
Here is the pseudo-code of this circuit:
class GridContainer extends React.Component<Props> { props: Props; render(): React.Element<any> { return <Grid // . dataSource={this.props.data} // Callback . loadData={this.props.loadData} />; } }
const mapStateToProps = (state) => { return { data: state.data }; }; const mapDispatchToProps = (dispatch) => { return { loadData: async (skip: number, take: number) => { // . const page: Page = await load(skip, take); // Redux. dispatch({ type: ADD_PAGE, page }); } }; }; export default connect(mapStateToProps, mapDispatchToProps)(GridContainer);
Used types in pseudo-code:
type Props = { data: DataSource, loadData: (skip: number, take: number) => void }; type DataSource = { // . pages: Array<Page>, // . totalRowsCount: number }; type Page = { // , . startIndex: number, // . rows: Array<Object> };
They coped with the first task - to portionwise load and store data in Redux. Now let's move on to manipulation. The most common task is to add-delete-modify rows. We want every component of the web application to be able to do this. The scheme is simple:

Some Component is a component of a web application that wants to manage grid data.
Let's go through the scheme:
- All data manipulations are performed through Redux reducers. To add-delete-change the line, it is enough to match the corresponding action (ADD_ROW, DELETE_ROW, UPDATE_ROW). Reducers will adjust the data in the Redux repository.
- As soon as the data changes in Redux, the Grid Container will pull the current data from Redux.
- And give them Presentational. Presentational updates rendered pages.
Scrolling through Redux
Managing scrolling programmatically is a necessary feature. The most common situation is to scroll to the highlighted entry. For example, the user creates a new entry in the list. A record with sorting is in the middle of the list. You need to programmatically select it and scroll to it. And it would be nice to do this through Redux.

Managing selections through Redux is not difficult, but how do you control scrolling?
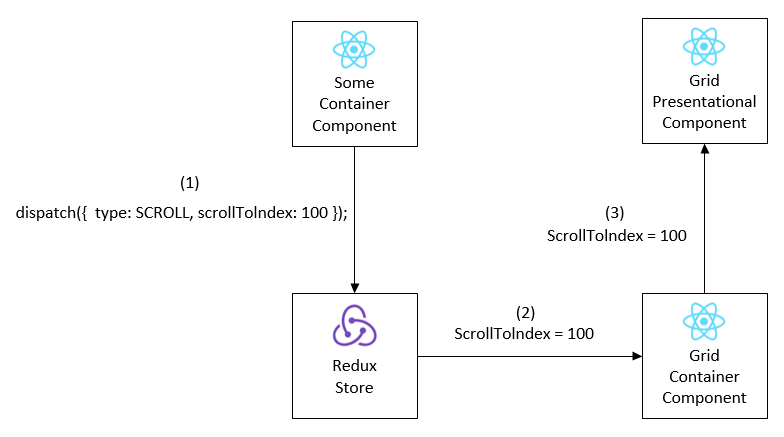
To do this, in the Redux Store we will put two fields:
// , . scrollToIndex: ?number, // , . scrollSignal: number
The scrollToIndex field is understandable. If you want to scroll, then set the number of the desired line in scrollToIndex. This number will be transferred to the grid, and the grid will immediately scroll to it:
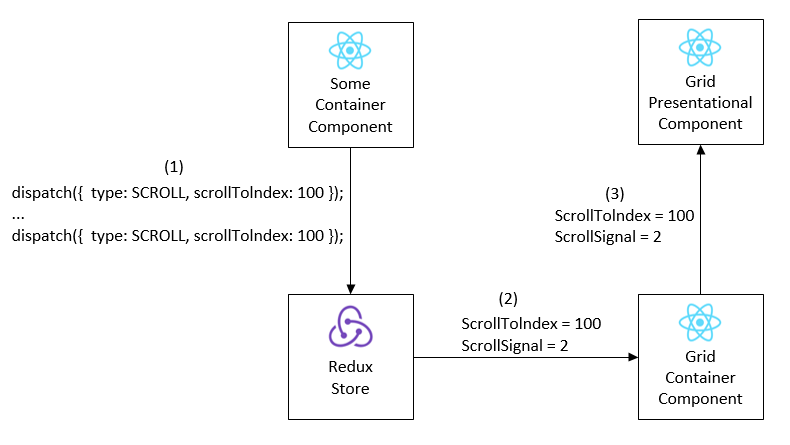
What is the scrollSignal field for? It solves the problem of re-scrolling to the same index. If we have already performed software scrolling to index 100, then scrolling to the same index will not work again. Therefore, the scrollSignal field is used, when changed, the grid will re-scroll to scrollToIndex. ScrollSignal is incremented automatically in the reducer when processing a SCROLL action:
Scrolling control pseudo code:
class GridContainer extends React.Component<Props> { props: Props; render(): React.Element<any> { return <Grid // . dataSource={this.props.data} // , .. scrollToIndex={this.props.scrollToIndex} // , . scrollSignal={this.props.scrollSignal} />; } }
const mapStateToProps = (state) => { return { data: state.data, scrollToIndex: state.scrollToIndex, scrollSignal: state.scrollSignal }; }; export default connect(mapStateToProps)(GridContainer);
Used types in pseudo-code:
type Props = { data: DataSource, scrollToIndex: ?number, scrollSignal: number };
Conclusion (by Redux)
The proposed interaction schemes with Redux, of course, are not universal. They are suitable for the grid we developed, because we optimized the grid for these schemes, made the appropriate API for it. These schemes will not work for any third-party grid, so take the article as one example of implementing interaction with Redux.
Final conclusion (on articles 1 and 2)
When developing our grid, it came to understand that the grid, ideally, is not part of our application, but an independent project, which is worth posting on github and developing. Therefore, they did not use the subject terms of our application in the code and add unnecessary dependencies. But with the expansion of functionality, it is becoming increasingly difficult to adhere to this, because we have not allocated it to a separate project, but we should have done it right away. Github is still in the plans.
Writing your own grid was the right decision for us. We had enough time to implement everything we wanted (virtualization, working with redux, batch loading, working with the keyboard, working with columns, like-search with backlighting and much more). Initially, we invested heavily in a third-party grid, in the hope that it would take off in our situations. Using it, we understood how grids work in general, what problems exist, how to solve them, and what we ultimately want to get. And made their decision.
All Articles