React VRライブラリを使用すると、 WebVR API上でJavaScriptとReactを使用して仮想現実のWebアプリケーションを作成できます。 この仕様は、Chrome、Firefox、およびEdgeブラウザーの最新(場合によっては実験的)バージョンでサポートされています。 このため、VRメガネは必要ありません。
WebVR Experimentsは、 WebVRの機能を示すショーケースサイトです。 私の注目は、 Mozilla VRチームによって開発されたWebVRのWebフレームワークであるA-Frameを使用したGoogle Creative Labの素晴らしい人によって作成されたプロジェクトThe Musical Forestに引き付けられました。
Musical Forestでは、WebSocketのおかげで、ユーザーは幾何学的図形をクリックすることでリアルタイムで一緒に音楽を再生できます。 しかし、使用可能な機能と技術が使用されているため、アプリケーションは非常に複雑でした( ソースコード )。 では、プッシャーベースのマルチユーザーサポートを使用して、React VRで同様のリアルタイムアプリケーションを作成してみませんか?
React VR / Pusherのバージョンは次のとおりです。
ユーザーは、URLにチャネル識別子を入力できます。 3次元の図形をクリックすると、サウンドが再生され、プッシャーイベントが発行されます。これは、同じチャンネルの他のユーザーが同じサウンドを受信して聞くものです。
イベントを公開するには、Node.jsバックエンドを使用するため、JavaScriptとReactの経験が必要です。 React VRとVRで使用される概念を初めて使用する場合は、まずこの記事をご覧ください。
ダウンロードリンク(試してみてください):
→ React VRプロジェクト 。
→ Node.jsバックエンド 。
VRプロジェクトをセットアップする
React VR CLIツールをインストール(または更新)することから始めましょう。
npm install -g react-vr-cli
新しいReact VRプロジェクトを作成します。
react-vr init musical-exp-react-vr-pusher
彼が作成したディレクトリに移動し、コマンドを実行して開発サーバーを起動します。
cd musical-exp-react-vr-pusher npm start
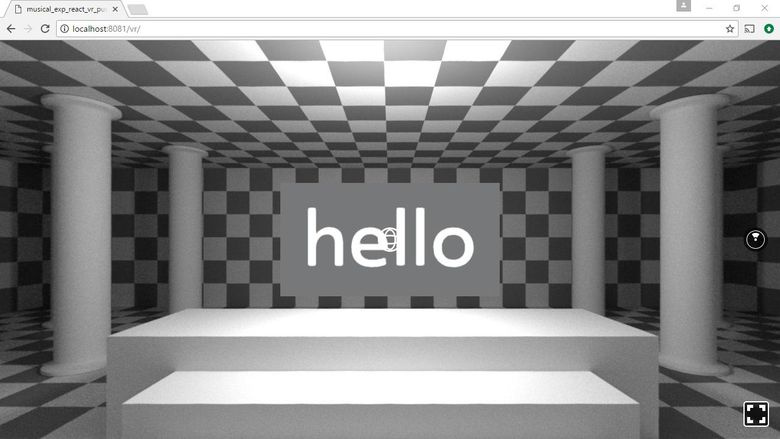
ブラウザで、アドレスhttp:// localhost:8081 / vr /に移動します。 これが表示されます:
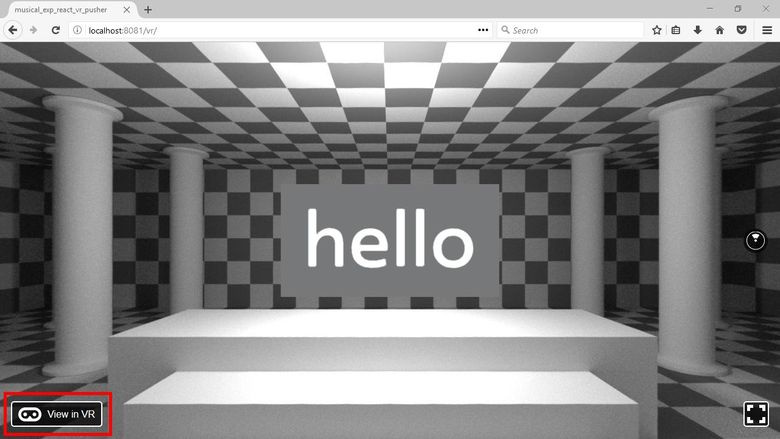
互換性のあるブラウザー(Windows版Firefox Nightlyなど)を使用している場合は、 [VRで表示]ボタンも表示されます。これにより、VRメガネでアプリケーションを表示できます。
プログラミングに移りましょう。
背景を作成する
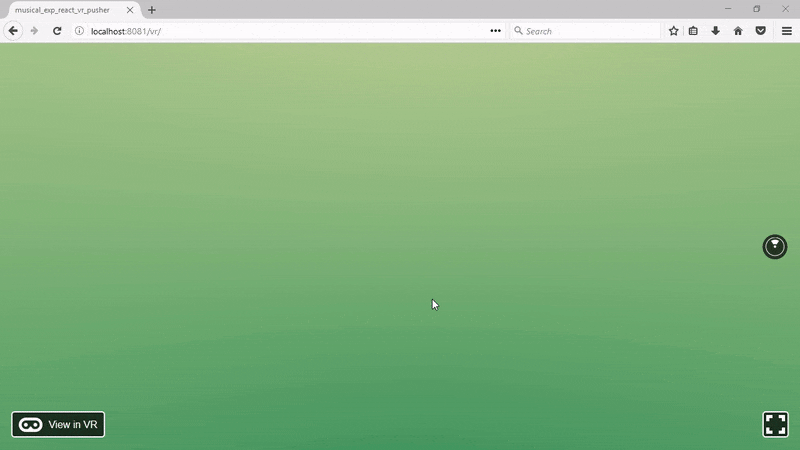
背景として、 正距円筒図法を見てみましょう。 このような画像の主な特徴は、幅が高さのちょうど2倍であることです。 お気に入りのグラフィックエディターを開き、4096×2048のグラデーション塗りつぶし画像を作成します。 あなたの好みの色。

アプリケーションルートのstatic_assetsディレクトリ内で、新しい画像フォルダを作成し、そこに画像を保存します。 index.vr.jsファイルを開き、renderメソッドのコンテンツを次のように置き換えます。
render() { return ( <View> <Pano source={asset('images/background.jpg')} /> </View> ); }
ページをリロード(またはホットリロードをアクティブ化) すると 、次のように表示されます。
ツリーをエミュレートするには、 Cylinderを使用します。 実際、ユーザーの周囲に森林を確保するには100人が必要です。 ファイルjs / components / background-objects.jsの元のMusical Forestでは、ツリーを生成するアルゴリズムを見つけることができます。 コードをプロジェクトのReactコンポーネントに適応させると、次のようになります。
import React from 'react'; import { View, Cylinder, } from 'react-vr'; export default ({trees, perimeter, colors}) => { const DEG2RAD = Math.PI / 180; return ( <View> {Array.apply(null, {length: trees}).map((obj, index) => { const theta = DEG2RAD * (index / trees) * 360; const randomSeed = Math.random(); const treeDistance = randomSeed * 5 + perimeter; const treeColor = Math.floor(randomSeed * 3); const x = Math.cos(theta) * treeDistance; const z = Math.sin(theta) * treeDistance; return ( <Cylinder key={index} radiusTop={0.3} radiusBottom={0.3} dimHeight={10} segments={10} style={{ color: colors[treeColor], opacity: randomSeed, transform: [{scaleY : 2 + Math.random()}, {translate: [x, 3, z]},], }} /> ); })} </View> ); }
機能コンポーネントは3つのパラメーターを取ります。
-
trees
フォレスト内で取得する必要がある木の数。 -
perimeter
-ユーザーからレンダリングツリーの範囲を制御できる値 -
colors
木の色の値の配列。
Array.apply(null, {length: trees})
を使用すると、空の値の配列を作成できます。これにマップ関数を適用して、 Viewコンポーネント内のランダムな色、透明度、位置の円柱の配列を描画します。
コンポーネントディレクトリ内のForest.jsファイルにコードを保存し、index.vr.js内で使用できます。
... import Forest from './components/Forest'; export default class musical_exp_react_vr_pusher extends React.Component { render() { return ( <View> <Pano source={asset('images/background.jpg')} /> <Forest trees={100} perimeter={15} colors={['#016549', '#87b926', '#b1c96b']} /> </View> ); } }; ...
これはブラウザに表示されます。 さて、背景の準備ができました。サウンドを作成する3Dオブジェクトを作成します。
3D形状を作成する
6つの3Dフォームを作成する必要があります。それぞれにタッチすると、6つの異なるサウンドが再生されます。 小さなアニメーションは、カーソルをオブジェクトに配置したり、オブジェクトから削除したりするときにも役立ちます。
フォームを作成するには、 VrButton 、 Animated.View 、 Box 、 CylinderおよびSphereが必要です。 ただし、すべてのフォームは異なるため、コンポーネントをカプセル化するだけなので、同じになります。 次のコードをcomponents / SoundShape.jsファイルに保存します。
import React from 'react'; import { VrButton, Animated, } from 'react-vr'; export default class SoundShape extends React.Component { constructor(props) { super(props); this.state = { bounceValue: new Animated.Value(0), }; } animateEnter() { Animated.spring( this.state.bounceValue, { toValue: 1, friction: 4, } ).start(); } animateExit() { Animated.timing( this.state.bounceValue, { toValue: 0, duration: 50, } ).start(); } render() { return ( <Animated.View style={{ transform: [ {rotateX: this.state.bounceValue}, ], }} > <VrButton onEnter={()=>this.animateEnter()} onExit={()=>this.animateExit()} > {this.props.children} </VrButton> </Animated.View> ); } };
カーソルがボタン領域に入ると、 Animated.spring
はthis.state.bounceValue
の値を0から1に変更し、跳ね返る効果を示します。 カーソルがボタン領域から離れると、 Animated.timing
はthis.state.bounceValue
の値を50ミリ秒間1から0に変更します。 これが機能するように、 VrButton
をAnimated.View
コンポーネントにラップします。これにより、状態が変更されるたびにビューのrotateX変換が変更されます。
SpotLight
をSpotLight
追加し(他のタイプの光源を選択してそのプロパティを変更できます)、 SoundShape
コンポーネントを使用して、シリンダーを作成SoundShape
ます。
... import { AppRegistry, asset, Pano, SpotLight, View, Cylinder, } from 'react-vr'; import Forest from './components/Forest'; import SoundShape from './components/SoundShape'; export default class musical_exp_react_vr_pusher extends React.Component { render() { return ( <View> ... <SpotLight intensity={1} style={{transform: [{translate: [1, 4, 4]}],}} /> <SoundShape> <Cylinder radiusTop={0.2} radiusBottom={0.2} dimHeight={0.3} segments={8} lit={true} style={{ color: '#96ff00', transform: [{translate: [-1.5,-0.2,-2]}, {rotateX: 30}], }} /> </SoundShape> </View> ); } }; ...
もちろん、3Dフォームのプロパティを変更したり、 3Dモデルに置き換えたりすることもできます 。
次に、ピラミッド(半径ゼロ、半径4セグメントの円柱)を追加します。
<SoundShape> <Cylinder radiusTop={0} radiusBottom={0.2} dimHeight={0.3} segments={4} lit={true} style={{ color: '#96de4e', transform: [{translate: [-1,-0.5,-2]}, {rotateX: 30}], }} /> </SoundShape>
キューブ:
<SoundShape> <Box dimWidth={0.2} dimDepth={0.2} dimHeight={0.2} lit={true} style={{ color: '#a0da90', transform: [{translate: [-0.5,-0.5,-2]}, {rotateX: 30}], }} /> </SoundShape>
平行六面体:
<SoundShape> <Box dimWidth={0.4} dimDepth={0.2} dimHeight={0.2} lit={true} style={{ color: '#b7dd60', transform: [{translate: [0,-0.5,-2]}, {rotateX: 30}], }} /> </SoundShape>
範囲:
<SoundShape> <Sphere radius={0.15} widthSegments={20} heightSegments={12} lit={true} style={{ color: '#cee030', transform: [{translate: [0.5,-0.5,-2]}, {rotateX: 30}], }} /> </SoundShape>
そして三角柱:
<SoundShape> <Cylinder radiusTop={0.2} radiusBottom={0.2} dimHeight={0.3} segments={3} lit={true} style={{ color: '#e6e200', transform: [{translate: [1,-0.2,-2]}, {rotateX: 30}], }} /> </SoundShape>
インポート後、ファイルを保存してブラウザーを更新します。 これが判明するはずです:
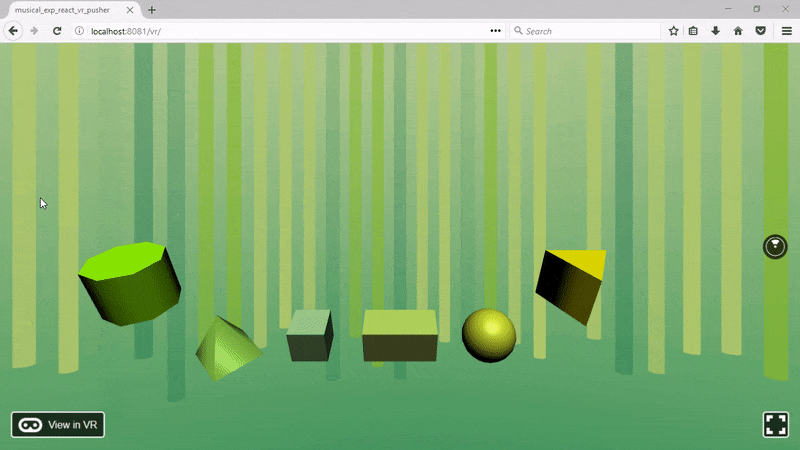
サウンドを追加してください!
音を追加する
とりわけ、React VRはwav、mp3、oggファイルをサポートしています。 完全なリストはこちらです。
Freesoundまたは別の同様のサイトからサンプルを取得できます。 好きなものをダウンロードして、ディレクトリにstatic_assets / soundsを置いてください。 このプロジェクトでは、 鳥 、 別の鳥 、 別の鳥 、 猫 、 犬 、 クリケットの6匹の動物の音を取ります(ビットレートを下げるには最後のファイルを保存する必要があります。そうしないと、React VRは再生しません)。
React VRには、サウンドを再生するための3つのオプションがあります。
- VrSoundEffects
- VrButtonボタンのonClickSoundイベント。
- コンポーネントサウンド 。
ただし、3D /サラウンドサウンドはSound
コンポーネントのみをサポートしているため、リスナーがステージ上を移動したときや頭を回したときに左右のチャンネルのバランスが変化します。 SoundShape
のonClick
イベントのように、 SoundShape
コンポーネントに追加しVrButton
。
... import { ... Sound, } from 'react-vr'; export default class SoundShape extends React.Component { ... render() { return ( <Animated.View ... > <VrButton onClick={() => this.props.onClick()} ... > ... </VrButton> <Sound playerState={this.props.playerState} source={this.props.sound} /> </Animated.View> ); } }
再生を制御するには、 MediaPlayerStateを使用します 。 それらはコンポーネントのプロパティとして渡されます。
index.vr.jsからの情報を使用して、配列を定義します。
... import { ... MediaPlayerState, } from 'react-vr'; ... export default class musical_exp_react_vr_pusher extends React.Component { constructor(props) { super(props); this.config = [ {sound: asset('sounds/bird.wav'), playerState: new MediaPlayerState({})}, {sound: asset('sounds/bird2.wav'), playerState: new MediaPlayerState({})}, {sound: asset('sounds/bird3.wav'), playerState: new MediaPlayerState({})}, {sound: asset('sounds/cat.wav'), playerState: new MediaPlayerState({})}, {sound: asset('sounds/cricket.wav'), playerState: new MediaPlayerState({})}, {sound: asset('sounds/dog.wav'), playerState: new MediaPlayerState({})}, ]; } ... } And a method to play a sound using the MediaPlayerState object when the right index is passed: ... export default class musical_exp_react_vr_pusher extends React.Component { ... onShapeClicked(index) { this.config[index].playerState.play(); } ... }
このすべての情報をSoundShapeコンポーネントに転送するだけです。 3Dフォームを配列にグループ化し、マップ関数を使用してコンポーネントを生成します。
... export default class musical_exp_react_vr_pusher extends React.Component { ... render() { const shapes = [ <Cylinder ... />, <Cylinder ... />, <Box ... />, <Box ... />, <Sphere ... />, <Cylinder ... /> ]; return ( <View> ... {shapes.map((shape, index) => { return ( <SoundShape onClick={() => this.onShapeClicked(index)} sound={this.config[index].sound} playerState={this.config[index].playerState}> {shape} </SoundShape> ); })} </View> ); } ... }
ブラウザを再起動し、オブジェクトをクリックしてみてください、異なる音が聞こえます。
プッシャーを使用して、リアルタイムのマルチユーザーサポートをReact VRアプリケーションに追加します。
プッシャーをカスタマイズする
https://pusher.com/signupで無料のアカウントを作成します 。 アプリケーションを作成すると、何かを構成するように求められます。
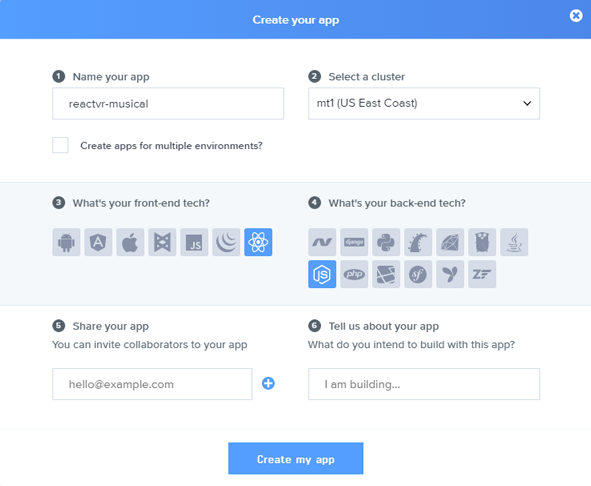
名前を入力し、フロントエンドとしてReactを選択し、バックエンドとしてNode.jsを選択します 始めるためのコード例:
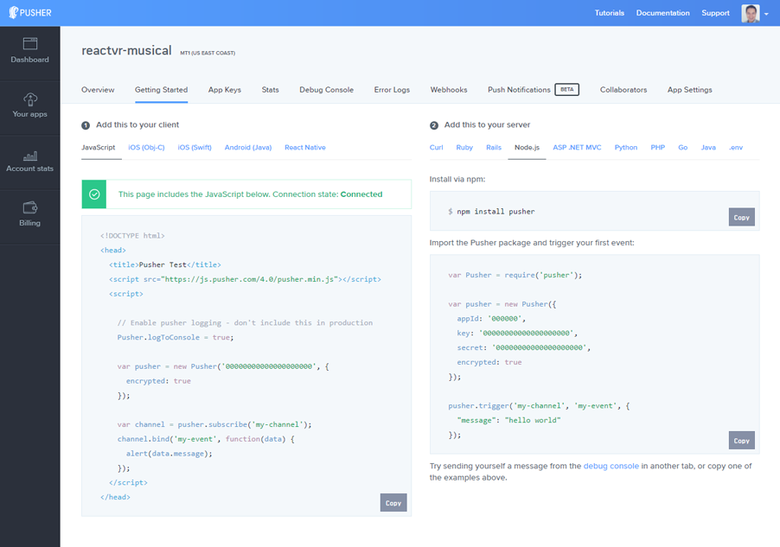
心配する必要はありません。特定のテクノロジーセットに固執する必要はありません。いつでも変更できます。 ライブラリの任意の組み合わせをPusherで使用できます。
クラスターID(この例ではmt1のアプリケーション名の後にあります)、アプリケーションID、キー、および秘密情報をコピーします。これらは必要です。 これはすべて、[ アプリキー ]タブでも確認できます。
イベントを公開
React VRはWeb Workerのように機能します ( ビデオの React VRアーキテクチャの詳細)。そのため、index.vr.jsにPusher workerスクリプトを含める必要があります。
... importScripts('https://js.pusher.com/4.1/pusher.worker.min.js'); export default class musical_exp_react_vr_pusher extends React.Component { ... }
満たさなければならない2つの条件があります。 最初に、URLを介して識別子を渡すことができる必要があります( http:// localhost:8081 / vr /?Channel = 1234のように )。ユーザーはどのチャンネルに行き、友人と共有するかを選択できます。
これを行うには、URLを読み取る必要があります。 幸いなことに、React VRには、window.locationオブジェクトのプロパティをReactコンテキストで使用できるようにするネイティブの Location モジュールが付属しています。
次に、接続されているすべてのクライアントもイベントを再生できるように、プッシャーイベントを発行するサーバーに接続する必要があります。 ただし、イベントを生成するクライアントも受信する必要はありません。この場合、サウンドが2回再生されるためです。 そして、ユーザーがオブジェクトをクリックするとすぐに、イベントがサウンドを再生するのを待つポイントは何ですか?
各プッシャー接続には、一意のソケットIDが割り当てられます。 受信者がプッシャーでイベントを受信できないようにするには、イベントが発生したときに除外するクライアントをsocket_id
サーバーに転送する必要があります(詳細はこちら )。
したがって、プッシャーに正常に接続するときにgetParameterByName
関数をわずかに調整してURLパラメーターを読み取り 、 socketId
を保存することで、両方の要件を確認できます。
... import { ... NativeModules, } from 'react-vr'; ... const Location = NativeModules.Location; export default class musical_exp_react_vr_pusher extends React.Component { componentWillMount() { const pusher = new Pusher('<INSERT_PUSHER_APP_KEY>', { cluster: '<INSERT_PUSHER_APP_CLUSTER>', encrypted: true, }); this.socketId = null; pusher.connection.bind('connected', () => { this.socketId = pusher.connection.socket_id; }); this.channelName = 'channel-' + this.getChannelId(); const channel = pusher.subscribe(this.channelName); channel.bind('sound_played', (data) => { this.config[data.index].playerState.play(); }); } getChannelId() { let channel = this.getParameterByName('channel', Location.href); if(!channel) { channel = 0; } return channel; } getParameterByName(name, url) { const regex = new RegExp("[?&]" + name + "(=([^&#]*)|&|#|$)"); const results = regex.exec(url); if (!results) return null; if (!results[2]) return ''; return decodeURIComponent(results[2].replace(/\+/g, " ")); } ... }
URLにチャネルパラメータがない場合、デフォルトでID 0が割り当てられ、このIDはプッシャーチャネルに追加されて一意になります。
最後に、イベントを公開するサーバー側でエンドポイントを呼び出す必要があり、クライアントソケットIDとイベントが公開されるチャネルを渡します。
... export default class musical_exp_react_vr_pusher extends React.Component { ... onShapeClicked(index) { this.config[index].playerState.play(); fetch('http://<INSERT_YOUR_SERVER_URL>/pusher/trigger', { method: 'POST', headers: { 'Accept': 'application/json', 'Content-Type': 'application/json', }, body: JSON.stringify({ index: index, socketId: this.socketId, channelName: this.channelName, }) }); } ... }
Reactパーツのコードはこれですべてです。 次に、サーバーを把握しましょう。
Node.jsバックエンドを作成する
コマンドを使用して、package.jsonファイルを生成します。
npm init -y
依存関係を追加します。
npm install --save body-parser express pusher
そして、このコードをファイルに保存します。
const express = require('express'); const bodyParser = require('body-parser'); const Pusher = require('pusher'); const app = express(); app.use(bodyParser.json()); app.use(bodyParser.urlencoded({ extended: false })); /* , React VR . , middleware */ app.use((req, res, next) => { res.header("Access-Control-Allow-Origin", "*") res.header("Access-Control-Allow-Headers", "Origin, X-Requested-With, Content-Type, Accept") next(); }); const pusher = new Pusher({ appId: '<INSERT_PUSHER_APP_ID>', key: '<INSERT_PUSHER_APP_KEY>', secret: '<INSERT_PUSHER_APP_SECRET>', cluster: '<INSERT_PUSHER_APP_CLUSTER>', encrypted: true, }); app.post('/pusher/trigger', function(req, res) { pusher.trigger(req.body.channelName, 'sound_played', { index: req.body.index }, req.body.socketId ); res.send('ok'); }); const port = process.env.PORT || 5000; app.listen(port, () => console.log(`Running on port ${port}`));
ご覧のとおり、Expressサーバー、Pusherオブジェクト、およびルート/プッシャー/トリガーを設定します。これらは、再生するサウンドインデックスと、イベントレシーバーを除外するsocketIDを持つイベントを発生させるだけです。
すべて準備完了です。 テストしてみましょう。
テスト中
次のコマンドでNode.jsバックエンドを実行します。
node server.js
index.vr.jsでサーバーのURLを更新し(localhostの代わりにIPを使用)、2つのブラウザーウィンドウでhttp:// localhost:8081 / vr /?Channel = 1234のようなアドレスを開きます。 3Dフォームをクリックすると、2回再生された音が聞こえます(これは、異なるコンピューター上の友人と一緒に行う方がはるかに楽しいです)。
おわりに
React VRは、特にReact / React Nativeをすでに知っている場合は特に、VRプロジェクトを簡単に作成できる優れたライブラリです。 これにプッシャーを追加すると、強力な新世代のWebアプリケーション開発コンプレックスが得られます。
任意のWebサーバーにデプロイするために、このプロジェクトの製品リリースをコンパイルできます: https : //facebook.github.io/react-vr/docs/publishing.html
また、色、形、音を変更したり、オリジナルのミュージカルフォレストの機能を追加したりすることもできます。
GitHubリポジトリからプロジェクトコードをダウンロードできます。