使用するのは非常に理解しやすく、問題はありませんでした。 しかし、何年も経って、WebSocketサポートをすぐに実装したAkka HTTPに移行しました。
WebSocketで作業するために、Akkaの担当者はAkka Streamを使用することを提案します。これにより、ストリーミングデータで生活を簡素化し、同時に複雑にします。 Akka Streamの理解はそれほど簡単ではありません。 次に、基本的な実用例を示してみます。
Akka Streamについて簡単に
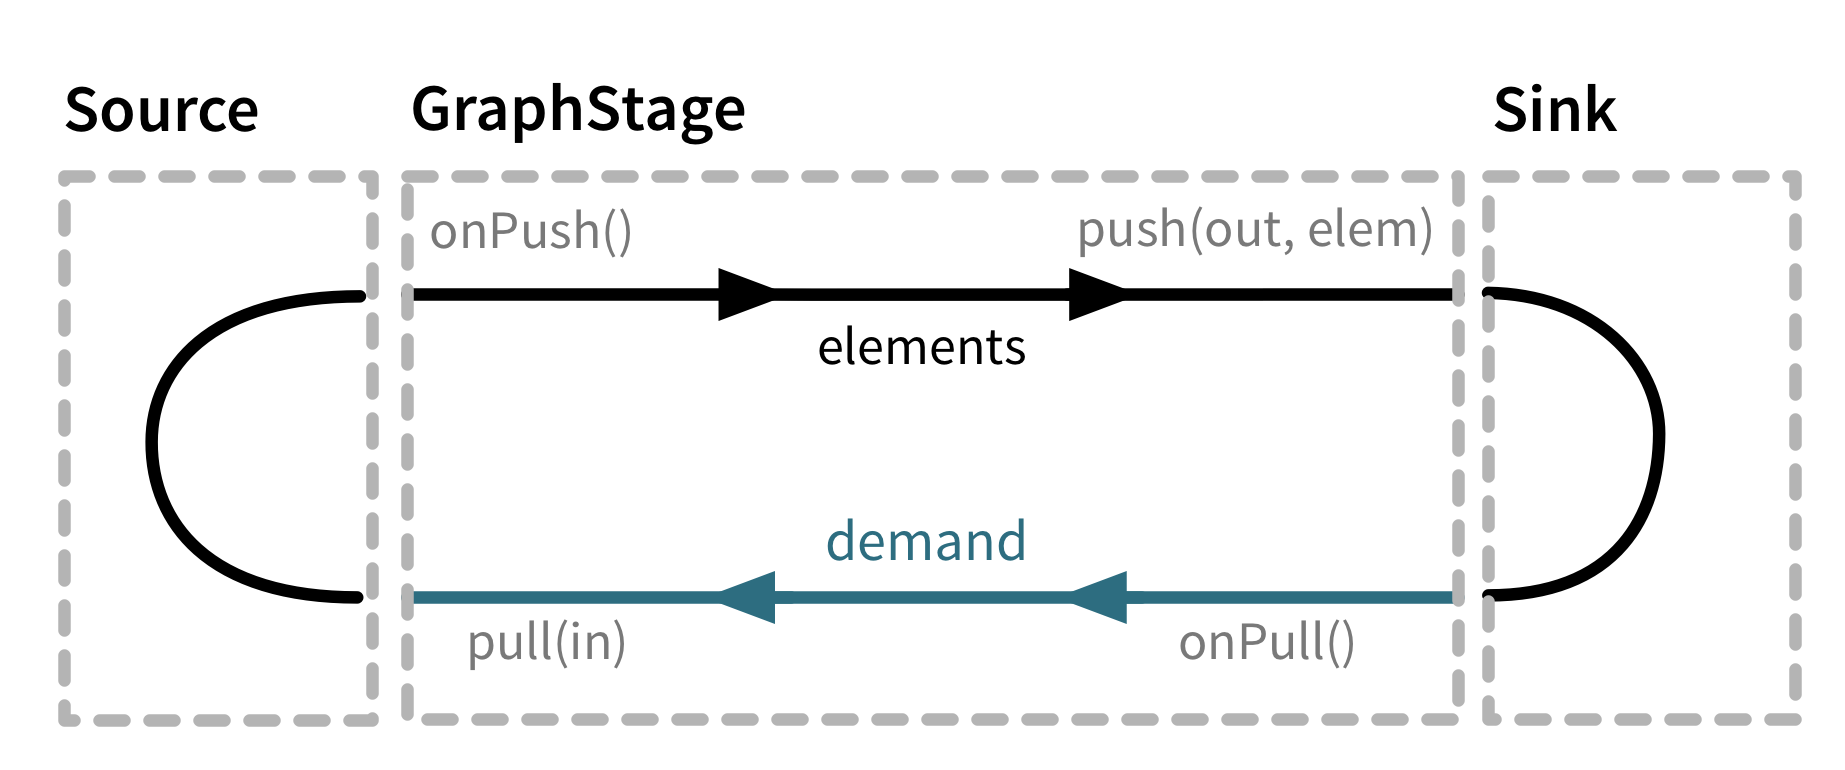
これは一種のデータ処理パイプラインであり、その各反復処理は、データが落下することで何かを行います。 フローは、ソース、GraphStage、シンクの3つのコンポーネントに分かれています。
これは、ドキュメントの図に最もよく示されています。

WebSocketを実装するには、GraphStageを実装する必要があります。 ソースはakkaによって提供されます。これはまさに彼からのメッセージを送信するクライアントです。 そして、シンクはクライアントにメッセージを送信しています。
俳優スタイル
おそらく最も効率の悪い処理方法の1つですが、最も理解しやすい方法です。
彼の考えは、すべての着信メッセージがアクターに分類され、クライアントにデータを直接送信するActorRefがあったということです。
import akka.actor.{Actor, ActorLogging, ActorRef, ActorSystem, Props, Terminated} import akka.http.scaladsl.Http import akka.http.scaladsl.model.ws._ import akka.stream.{ActorMaterializer, OverflowStrategy} import akka.stream.scaladsl._ import akka.http.scaladsl.server.Directives._ import scala.io.StdIn object Boot extends App { implicit val system = ActorSystem("example") implicit val materializer = ActorMaterializer() def flow: Flow[Message, Message, Any] = { val client = system.actorOf(Props(classOf[ClientConnectionActor])) val in = Sink.actorRef(client, 'sinkclose) val out = Source.actorRef(8, OverflowStrategy.fail).mapMaterializedValue { a ⇒ client ! ('income → a) a } Flow.fromSinkAndSource(in, out) } val route = path("ws")(handleWebSocketMessages(flow)) val bindingFuture = Http().bindAndHandle(route, "localhost", 8080) println(s"Server online at http://localhost:8080/\nPress RETURN to stop...") StdIn.readLine() import system.dispatcher bindingFuture .flatMap(_.unbind()) .onComplete(_ ⇒ system.terminate()) } class ClientConnectionActor extends Actor { var connection: Option[ActorRef] = None val receive: Receive = { case ('income, a: ActorRef) ⇒ connection = Some(a); context.watch(a) case Terminated(a) if connection.contains(a) ⇒ connection = None; context.stop(self) case 'sinkclose ⇒ context.stop(self) case TextMessage.Strict(t) ⇒ connection.foreach(_ ! TextMessage.Strict(s"echo $t")) case _ ⇒ // ingone } override def postStop(): Unit = connection.foreach(context.stop) }
クライアント接続ごとに、 ClientConnectionActorアクターを作成します。 また、 Sourceは、受信したメッセージをフローする別のアクターになります。 mapMaterializedValueメソッドを使用して作成した後、そのリンクを取得します。 さらに、すべてのメッセージをClientConnectionActorに送信するシンクを作成します。
したがって、 ClientConnectionActorはソケットからすべてのメッセージを受信します。 彼に飛んだActorRefを介して送信し、クライアントに配信します。
短所:サイドアクターを監視する必要があります。 OverflowStrategyをきちんと使用してください。 すべてのメッセージを処理するために、アクターは1つしかありません。そのため、パフォーマンスの問題が発生する可能性があるため、シングルスレッドです。
ActorPublisherとActorSubscriberを使用した派生バージョンは、公式ドキュメントから判断して
フロースタイル
このアプローチの背後にある考え方は、Akka Streamを完全に使用して目標を達成することです。 その一般的なビューは、着信クライアントメッセージを処理するためのパイプラインの構築に限定されます。
スケルトン
この場合、テキストメッセージのみを処理して変更します。 次に、 TextMessageがクライアントに送信されます。
import akka.actor.ActorSystem import akka.http.scaladsl.Http import akka.http.scaladsl.model.ws._ import akka.stream.ActorMaterializer import akka.stream.scaladsl._ import akka.http.scaladsl.server.Directives._ import scala.io.StdIn object Boot extends App { implicit val system = ActorSystem("example") implicit val materializer = ActorMaterializer() def flow: Flow[Message, Message, Any] = { Flow[Message].collect { case TextMessage.Strict(t) ⇒ t }.map { text ⇒ TextMessage.Strict(s"echo: $text") } } val route = path("ws")(handleWebSocketMessages(flow)) val bindingFuture = Http().bindAndHandle(route, "localhost", 8080) println(s"Server online at http://localhost:8080/\nPress RETURN to stop...") StdIn.readLine() import system.dispatcher bindingFuture .flatMap(_.unbind()) .onComplete(_ ⇒ system.terminate()) }
この場合、テキストメッセージのみを処理して変更します。 次に、 TextMessageがクライアントに送信されます。
次に、スケルトンを少し複雑にして、解析とJSONシリアル化を追加しましょう。
シリアル化のクラス
trait WsIncome trait WsOutgoing @JsonCodec case class Say(name: String) extends WsIncome with WsOutgoing implicit val WsIncomeDecoder: Decoder[WsIncome] = Decoder[Say].map[WsIncome](identity) implicit val WsOutgoingEncoder: Encoder[WsOutgoing] = { case s: Say ⇒ s.asJson }
フローを変更する
Flow[Message] .collect { case tm: TextMessage ⇒ tm.textStream } .mapAsync(CORE_COUNT * 2 - 1)(in ⇒ in.runFold("")(_ + _).flatMap(in ⇒ Future.fromTry(parse(in).toTry.flatMap(_.as[WsIncome].toTry)))) .collect { case Say(name) ⇒ Say(s"hello: $name") } .mapAsync(CORE_COUNT * 2 - 1)(out ⇒ Future(TextMessage(out.asJson.noSpaces)))
まず、すべてのバイナリメッセージを切り取り、次に受信ストリームをJSONで解析し、処理し、クライアントに送信するためにテキストにシリアル化します。
各クライアントにコンテキストを追加することにより、設計を簡素化します。 StatefulMapConcatはこれを支援します。
クライアントコンテキスト
class ClientContext { @volatile var userName: Option[String] = None } object ClientContext { def unapply(arg: ClientContext): Option[String] = arg.userName } @JsonCodec case class SetName(name: String) extends WsIncome @JsonCodec case class Say(text: String) extends WsIncome with WsOutgoing implicit val WsIncomeDecoder: Decoder[WsIncome] = Decoder[Say].map[WsIncome](identity) .or(Decoder[SetName].map[WsIncome](identity))
def flow: Flow[Message, Message, Any] = { Flow[Message] .collect { case tm: TextMessage ⇒ tm.textStream } .mapAsync(CORE_COUNT * 2 - 1)(in ⇒ in.runFold("")(_ + _).flatMap(in ⇒ Future.fromTry(parse(in).toTry.flatMap(_.as[WsIncome].toTry)))) .statefulMapConcat(() ⇒ { val context = new ClientContext m ⇒ (context → m) :: Nil }) .mapConcat { case (c: ClientContext, SetName(name)) ⇒ c.userName = Some(name) Nil case a ⇒ a :: Nil } .collect { case (ClientContext(userName), Say(text)) ⇒ Say(s"$userName: $text") case (_, Say(text)) ⇒ Say(s"unknown: $text") } .mapAsync(CORE_COUNT * 2 - 1)(out ⇒ Future(TextMessage(out.asJson.noSpaces))) }
別の方法があります: GraphStage [FlowShape [A、A]]を継承することでフィルター/マップを実装できます。
例(前のコードに適合していません)
このオプションでは、認証メッセージが受信されるまで、すべてのメッセージがフィルタリングされます。 認証が成功すると、メッセージはユーザープロファイルとともにさらに進みます。
class AuthFilter(auth: ws.AuthMessage ⇒ Future[Option[UserProfile]])(implicit ec: ExecutionContext) extends GraphStage[FlowShape[ws.WsIncomeMessage, ws.WsContextIncomeMessage]] { val in = Inlet[ws.WsIncomeMessage]("AuthFilter.in") val out = Outlet[ws.WsContextIncomeMessage]("AuthFilter.out") val shape = FlowShape.of(in, out) override def createLogic(inheritedAttributes: Attributes): GraphStageLogic = { new GraphStageLogic(shape) { @volatile var profile: Option[UserProfile] = None setHandler(in, new InHandler { override def onPush(): Unit = profile match { case Some(p) ⇒ push(out, ws.WsContextIncomeMessage(p, grab(in))) case _ ⇒ grab(in) match { case a: ws.AuthMessage ⇒ auth(a) onComplete { case Success(p) ⇒ profile = p pull(in) case Failure(e) ⇒ fail(out, e) } case _ ⇒ pull(in) } } }) setHandler(out, new OutHandler { override def onPull(): Unit = pull(in) }) } } }
このオプションでは、認証メッセージが受信されるまで、すべてのメッセージがフィルタリングされます。 認証が成功すると、メッセージはユーザープロファイルとともにさらに進みます。
そして最後に、現在の時刻を接続されているすべてのユーザーに1秒ごとに行きましょう。
case object Tick extends WsOutgoing implicit val WsOutgoingEncoder: Encoder[WsOutgoing] = { case s: Say ⇒ s.asJson case Tick ⇒ Json.obj("time" → DateTime.now.toIsoDateTimeString().asJson) } ... val broadcast = Source.tick[WsOutgoing](1.second, 1.second, Tick) ... .collect { case (ClientContext(userName), Say(text)) ⇒ Say(s"$userName: $text") case (_, Say(text)) ⇒ Say(s"unknown: $text") } .merge(broadcast) .mapAsync(CORE_COUNT * 2 - 1)(out ⇒ Future(TextMessage(out.asJson.noSpaces)))
これらは、プロジェクトにWebSocketサポートを実装する方法の基本的な例です。 Akka Streamパッケージは大きく多様です。スケーリングと並列化を心配することなく、かなり大きなタスク層を解決するのに役立ちます。
PS:多かれ少なかれ負荷のかかったプロジェクトで新しいテクノロジーを使用して、負荷テストを実行し、メモリとコードのホットセクションを監視することを忘れないでください( ガトリングはこれに役立ちます)。 すべてに良い。