Introduction
The article discusses the "Y-method" of assembling the Rubik's cube - it is easy to understand and remember. It is based on just one sequence, which is called "Y-movement." Having understood this algorithm, you are unlikely to forget how to assemble the cube yourself.
If you try to google the assembly instructions for the Rubik's Cube, then there are many options with a description of the "simple assembly", including on Wikipedia . Which, in general, are really quite simple to understand, but have a significant drawback. In order to assemble a cube, you need to know about five or more non-trivial sequences (algorithms) to rearrange individual cubes, to assemble a Rubik's cube into layers. In this connection, it is difficult to remember and reproduce these instructions independently. Recently, I accidentally stumbled upon the mention of the algorithm “ The Ultimate Solution to Rubik's Cube ”, which was claimed to be easy to remember and understand, and it uses only two sequences. And when I began to find out in more detail, I also found another algorithm - the " Y-method ", also simple and using only one sequence.
Unfortunately, I did not find a description of this algorithm in Russian, so I decided to fill this gap. It also seems to me that the main thing in this method is understanding how it works. Therefore, here I do not offer ready-made sets of movements for specific situations, but instead I tried to describe in more detail what is happening.
Images in this article were generated using the tool on ruwix.com . Links on pictures will open this tool with parameters corresponding to the picture. This is either the described state of the cube and you can rotate it with the mouse, or, in some cases, the described movements are specified there, which can be "lost" back and forth.
Y movement
The basis of this algorithm is the Y-movement. And a rather important component of the algorithm is to understand the mechanics of this movement.
This sequence of turns is called so because the cubes that it touches look like the letter “Y”, made up of three edges coming out of one corner of the cube.
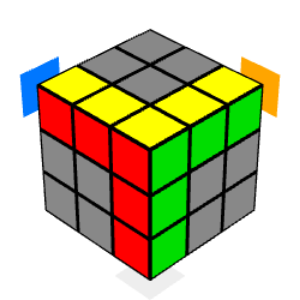
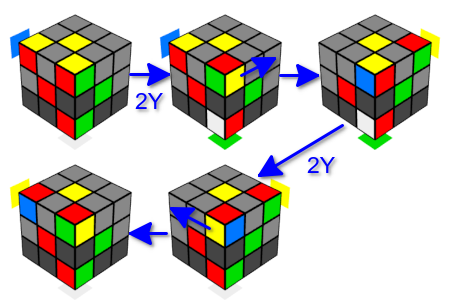
The Y-movement is quite simple and consists of four turns of two adjacent faces, for example, the right and the front. In a common rotation notation for a Rubik's Cube, it looks like this: R 'FR F'. What can be described as follows:
- right side counterclockwise a quarter of a turn
- front face clockwise a quarter of a turn
- right side quarter-turn clockwise
- front face quarter-turn counterclockwise
That is, the faces first turn in turn “towards themselves”, and then in the reverse order “from themselves”.
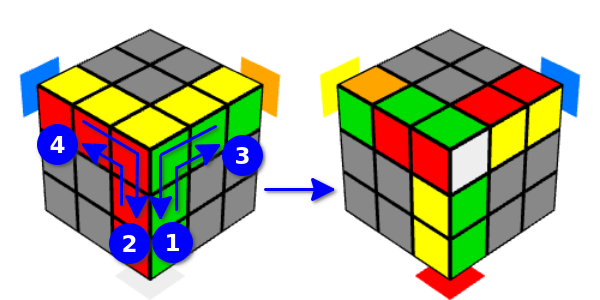
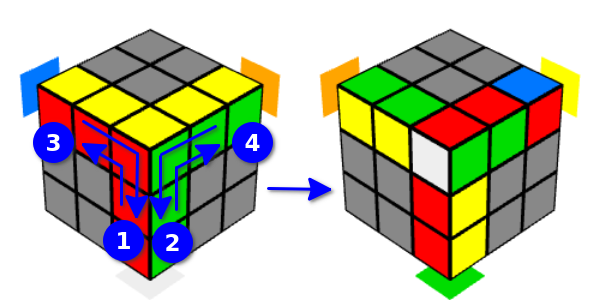
We will call this option the “right Y-movement” (since the face is first rotated to the right). In this case, the position of the cubes on the edge changes, which is common for these faces and on the upper edges. If you start turns from the front face, then the same cubes will be affected, we will call this option “left Y-movement” (since the face is turned first from the left).
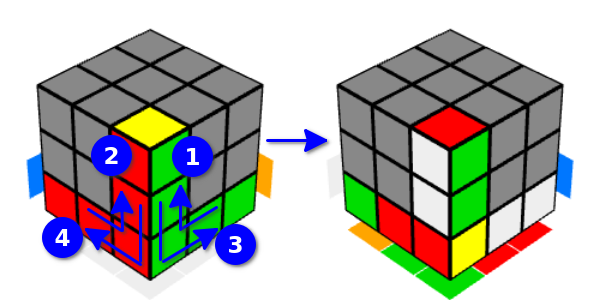
You can also start with turns “on your own” - it would be the same if we flipped the cube and started with turns “on ourselves”, so we will call such options “right and left inverted Y-movement”. With inverted Y-motions, the adjacent rib will also be affected, as well as not the upper, but the lower edges adjacent to it.
Of course, there is no fundamental difference in all these movements. Such a variety is for convenience only.
We list some properties of Y-motions:
- The right and left Y-motions are inverse to each other, i.e. the sequence of right and left or left and right movements will not change the state of the cube.
- One Y-movement causes two corner cubes on an adjacent face and two other corner cubes to change places in a pair. And three cubes located in the middle of the edges (edges) move in a circle.
- As you might guess, after two movements, the corner cubes return to their places. But at the same time they are turned.
- And if you perform three times in two movements, then the cubes will rotate three times and as a result will return to their original state.
- The edge cubes return to their original state after a cycle of three movements.
- Thus, if you perform the Y-movement six times in a row, then the state of the cube will return to its original state.
- After one Y-movement, the edge cubes move in the direction of the first rotation, while two cubes seem to rotate along the corresponding faces (around their axis), and the third also rotates, but turns over. The cube that moves between the upper edges is flipped over in the case of a normal (not inverted) Y-movement.
Cube assembly sequence
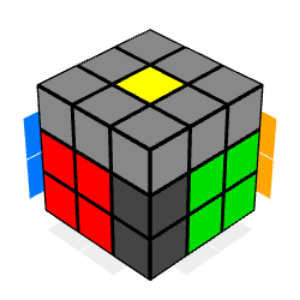
First, the two lower layers of the cube are assembled, with the exception of one vertical edge passing through these layers. We reserve this place as a space for maneuver. The lower cross and lower corner cubes are assembled quite simply, but if there are difficulties, it is not so difficult to adapt the Y-movement for this or see one of the instructions for a simple layered assembly of the cube.
Next, you need to collect the middle cubes on the vertical edges (edges). To do this, rotate the top face with the desired cube so that it is on one of the faces adjacent to the target edge. And also temporarily (do not forget then to return to the place) to rotate the bottom face so that in place of the target edge there is a cube that we specially left unassembled. Now you can use the Y-movement to move the cube from the top face to the place we need. The Y-movement must be done so that this edge cube rotates in the right direction towards the rib and, if necessary, it turns over.

If the desired cube is not on the upper face, then it is necessary to “free” it from there beforehand, also by Y-movement, without forgetting again to substitute the unassembled corner on the lower face.
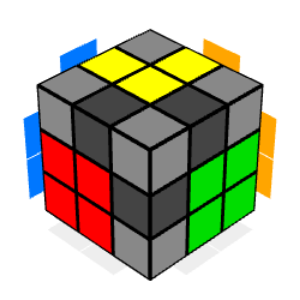
So far, we have collected the two lower layers without one edge. Next, we will need to collect two edge cubes on the upper edges, which do not border on what we do not specifically collect. After this, out of the edge cubes there will remain only three unassembled, on the edges that form the letter “Y”: the vertical one that we did not collect, and the two upper edges adjacent to it.
And, of course, we collect them using one or more Y-movements, turning them over and putting them in the right places. Here you only need to take into account one moment with the number of permutations, which is described below.
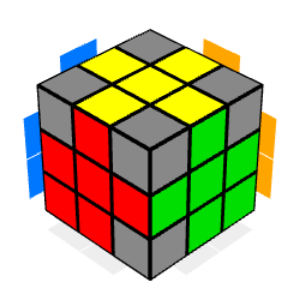
At this point, we will have an almost assembled cube in which only the corner cubes on the upper face and on the vertical edge that we did not collect are not assembled. Using the methods described below, we first rearrange the corners with each other so that they are in their places, possibly incorrectly oriented. And then we deploy them.
Hooray, our cube is assembled!
We consider the permutations
What you need to pay attention to when we collect the last five edge cubes. When there are only three of them left, then in order for everything to work out with their rearrangement within the letter “Y”, it is necessary that either they are all in their places (possibly upside down) or all are out of place. This is due to the fact that the Y-movement rearranges three edge cubes simultaneously. If we consider this from the point of view of pairwise exchanges of cubes in places on adjacent edges, then there are two exchanges (permutations). Now it should be clear why, in the case when we have exactly two cubes out of place, then we will not be able to collect them. Because we need to make one permutation, and with the help of Y-movements we can only make an even number of permutations.
What to do in this case? Note that if you rotate the face of the cube, then we will swap simultaneously four edge cubes, which will be equivalent to three permutations, i.e. an odd number, which is what we need. From this it follows that the upper side must be correctly oriented so that we can collect the last three edge cubes. If it so happened that the last three edge cubes require one permutation, then this means that you need to rearrange the two edge cubes that are already assembled on the upper face in adjacent places.
In addition, we can calculate in advance, before assembling the first two cubes of this five, the number of permutations that will be required to put all five edge cubes in place. If this number is even, then the upper bound is oriented correctly. And if it’s odd, then you need to turn it once in any direction. Thus, we can immediately put those two dice in the right places.
Work with corner cubes
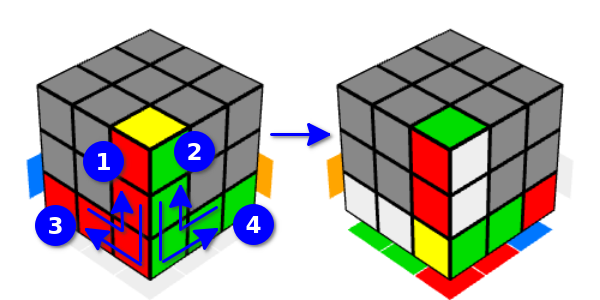
At the last stage of the assembly, we need to rearrange the corner cubes in places and rotate them. To do this, we use the previously listed Y-motion properties with respect to corner cubes. Because it’s more convenient to work with corner cubes located on the upper face, then for this we will use the inverted Y-movement more suitable (it starts with a turn “away from you”). In this section, these options will be used without further clarification. Let us immediately note that this movement changes the state of only one cube on the upper face - this is an angular cube on the "adjacent edge".
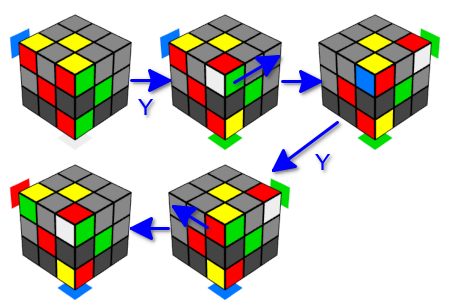
To rearrange the corner cubes, we note that a single Y-movement (both left and right) swaps a pair of corner cubes on the “adjacent edge”, and that the sequential use of the left and right Y-movements (or right and left) returns the entire cube in the initial state. Let's think about what happens if we turn the upper line between these movements. As we have already noticed, on the top face, only one corner cube changes, which is rearranged with a pair cube on the edge. In this case, we will have two exchanges of corner cubes on the edge, but each time a different angle will be substituted on top, and all the other cubes will remain as they were (of course, you must still remember to rotate the top face to its original state). Thus, we exchanged the places of three corner cubes - one from the bottom and two from the top.
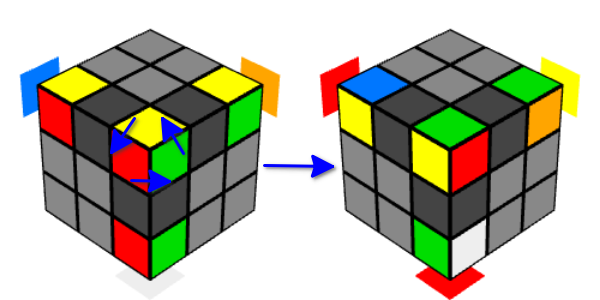
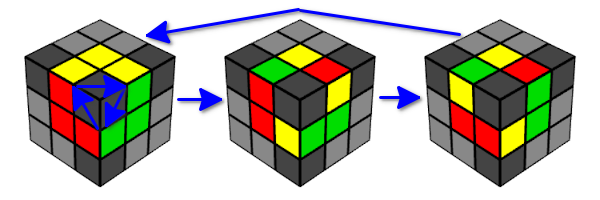
Now we will deal with the rotation of the cubes. To do this, use a similar trick. We will do two consecutive Y-movements in one direction. As a result of this, the corner cubes remain in place, but change their orientation. Here we are interested in two options for a combination of movements: three double movements in one direction (left or right) or double movement in one direction and double movement in the opposite direction. In each of these options, the entire cube returns to its original state. And again, between double movements, we will substitute the next angle we need in place of the upper corner of the “adjacent rib”. Thus, we can rotate either three corner cubes on one face in one direction, or two corner cubes on one face in different directions, without changing the state of the remaining cubes. Note that after a double movement, the upper cube of an adjacent rib rotates in the same direction in which the first Y-movement is performed.
Conclusion
I don’t know how it will be in your case, but for me the advantage of this algorithm is not only that it is easy to remember and you don’t need to cram assembly instructions. But also in the fact that now, collecting the cube, I assemble it myself, understanding what is happening, instead of almost mechanically following the instructions, and this is much more pleasant. What I wish you too!