When you render a 3D object, you always need to add some material to it so that it is visible and looks the way you want; it doesn’t matter if you do this in special programs or in real time via WebGL.
Most of the materials can be simulated using the built-in tools of libraries like Three.js, but in this tutorial I will show you how to make objects look like glass in three steps using - you guessed it - Three.js.
Step 1: Setup and Front Reflections
In this example, I will use the geometry of diamond, but you can use a simple cube or any other shape.
Let's set up our project. We need a visualizer, a scene, a camera, and geometry. In order to visualize our surface, we need material. The creation of this material will be the main purpose of the lesson. So, go ahead, create a new SharedMaterial object with vertex and fragment shaders.
Contrary to your expectations, our material will not be transparent, in fact we will distort what will be behind the diamond. To do this, we will need to visualize the scene (without diamond) in the texture. I just render a plane the size of the entire scope using an orthogonal camera, but you can also render a scene with other objects. The easiest way to separate the background surface from the diamond in Three.js is to use Layers.
this.orthoCamera = new THREE.OrthographicCamera( width / - 2,width / 2, height / 2, height / - 2, 1, 1000 ); // 1 (0 ) this.orthoCamera.layers.set(1); const tex = await loadTexture('texture.jpg'); this.quad = new THREE.Mesh(new THREE.PlaneBufferGeometry(), new THREE.MeshBasicMaterial({map: tex})); this.quad.scale.set(width, height, 1); // 1 this.quad.layers.set(1); this.scene.add(this.quad);
Our visualization cycle will look like this:
this.envFBO = new THREE.WebGLRenderTarget(width, height); this.renderer.autoClear = false; render() { requestAnimationFrame( this.render ); this.renderer.clear(); // fbo this.renderer.setRenderTarget(this.envFbo); this.renderer.render( this.scene, this.orthoCamera ); // this.renderer.setRenderTarget(null); this.renderer.render( this.scene, this.orthoCamera ); this.renderer.clearDepth(); // this.renderer.render( this.scene, this.camera ); };
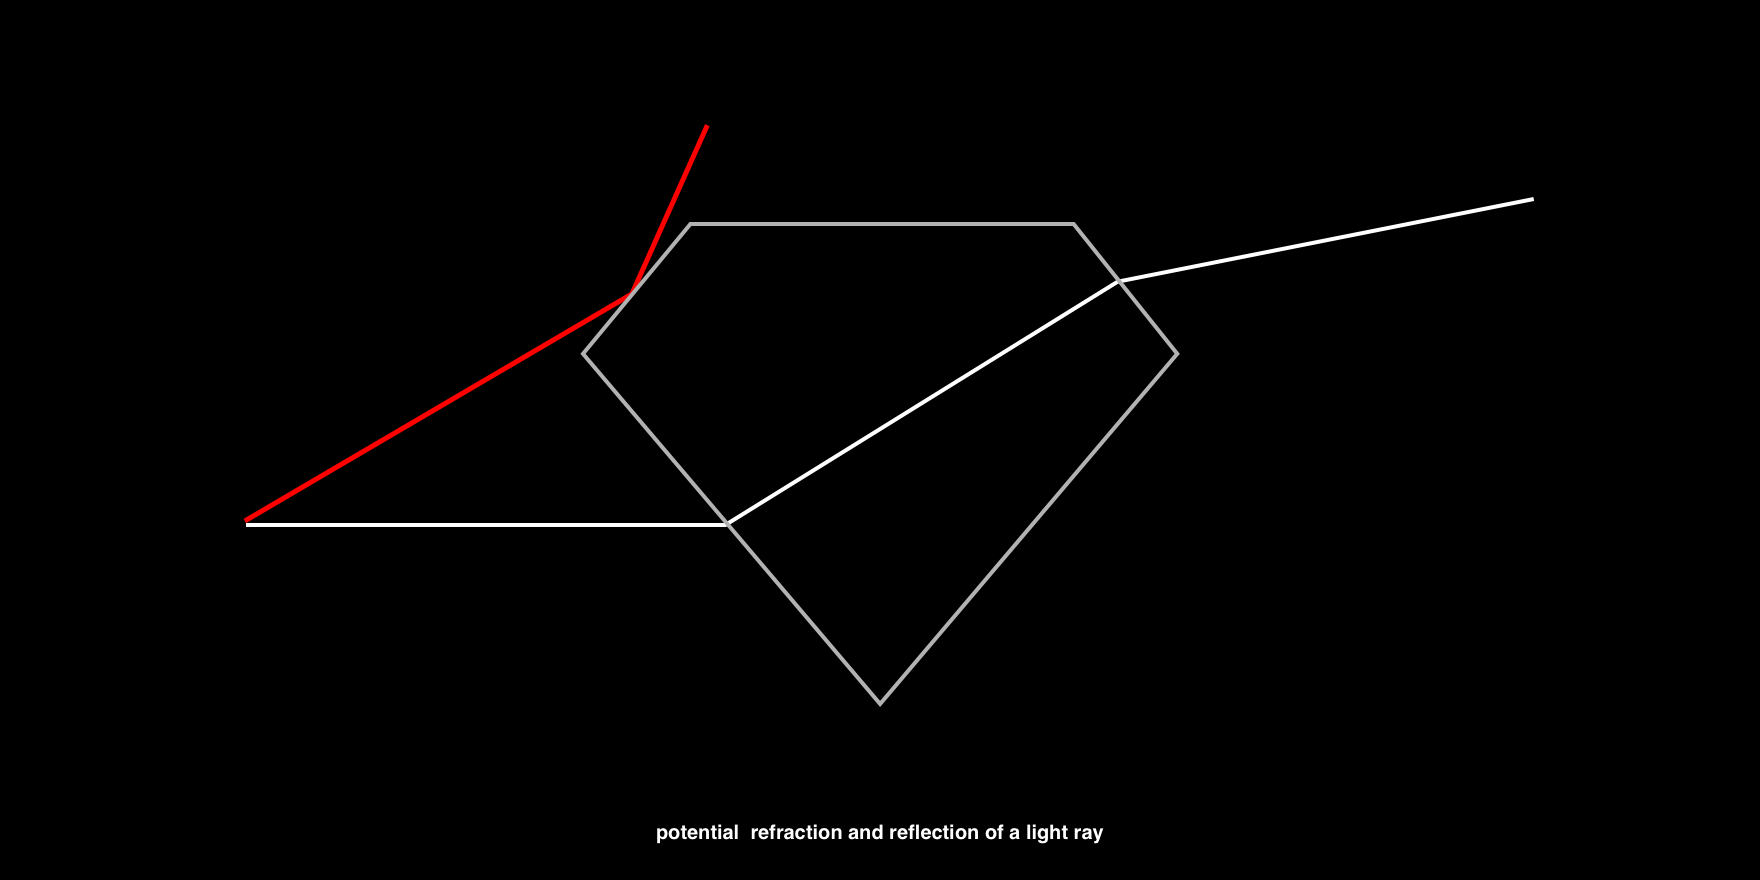
Great, time for a little excursion into theory. Transparent materials like glass are visible because they refract light. This is because light passes through the glass more slowly than through air, and when the light beam collides with such an object at an angle, the difference in speed causes the light to change direction. This change in direction is what is meant by refraction.

To repeat this in code, we need to know the angle between the gaze direction vector and the surface normal. Let's change the vertex shader to count these vectors.
varying vec3 eyeVector; varying vec3 worldNormal; void main() { vec4 worldPosition = modelMatrix * vec4( position, 1.0); eyeVector = normalize(worldPos.xyz - cameraPosition); worldNormal = normalize( modelViewMatrix * vec4(normal, 0.0)).xyz; gl_Position = projectionMatrix * modelViewMatrix * vec4(position, 1.0); }
In the fragment shader, we can now use eyeVector
and worldNormal
as the first two parameters in the refract function built into refract
. The third parameter is the ratio of refractive indices, that is, the refractive index (IOR) of our dense medium - glass. In our case, it will be 1.0 / 1.5, but you can change this value to achieve the desired result. For example, the refractive index of water is 1.33, and that of diamond is 2.42.
uniform sampler2D envMap; uniform vec2 resolution; varying vec3 worldNormal; varying vec3 viewDirection; void main() { // get screen coordinates vec2 uv = gl_FragCoord.xy / resolution; vec3 normal = worldNormal; // calculate refraction and add to the screen coordinates vec3 refracted = refract(eyeVector, normal, 1.0/ior); uv += refracted.xy; // sample the background texture vec4 tex = texture2D(envMap, uv); vec4 output = tex; gl_FragColor = vec4(output.rgb, 1.0); }
Fine! We have successfully written a shader. But the diamond is barely visible ... Partly because we processed only one property of the glass. Not all light will pass through it and be refracted; in fact, part will be reflected. Let's see how to achieve this!
Step 2: Reflections and the Fresnel equation
For the sake of simplicity, in this lesson we will not calculate the refractions for real, but simply use white color for the refracted light. We go further: how do you know when to reflect, and when to refract? In theory, this depends on the refractive index of the material: when the angle between the incident vector and the surface normal is greater than the threshold value, the light will be reflected.
In the fragment shader, we will use the Fresnel equation in order to calculate the proportions between the reflected and refracted rays. Unfortunately, glsl does not have this equation, you can copy it from here:
float Fresnel(vec3 eyeVector, vec3 worldNormal) { return pow( 1.0 + dot( eyeVector, worldNormal), 3.0 ); }
We can simply mix the texture color of the refracted ray with the reflected white color using the proportion we just calculated.
uniform sampler2D envMap; uniform vec2 resolution; varying vec3 worldNormal; varying vec3 viewDirection; float Fresnel(vec3 eyeVector, vec3 worldNormal) { return pow( 1.0 + dot( eyeVector, worldNormal), 3.0 ); } void main() { // get screen coordinates vec2 uv = gl_FragCoord.xy / resolution; vec3 normal = worldNormal; // calculate refraction and add to the screen coordinates vec3 refracted = refract(eyeVector, normal, 1.0/ior); uv += refracted.xy; // sample the background texture vec4 tex = texture2D(envMap, uv); vec4 output = tex; // calculate the Fresnel ratio float f = Fresnel(eyeVector, normal); // mix the refraction color and reflection color output.rgb = mix(output.rgb, vec3(1.0), f); gl_FragColor = vec4(output.rgb, 1.0); }
It already looks much better, but something else is missing ... Exactly, we do not see the back of the transparent object. Let's fix it!
Step 3: Multilateral Refraction
Considering what we have already learned about refractions and reflections, we can understand that light can run back and forth inside an object many times before leaving it.
To achieve the correct result, from a physical point of view, we will have to track every ray, but, unfortunately, such calculations are too heavy for real-time visualization. So instead, I will show you how to use the approximation to at least show the hidden edges of the diamond.
We will need a normal map and front and back faces in one fragment shader. Since we cannot visualize both sides at the same time, first we need to get the back edges as a texture.

Create a new ShaderMaterial
as in the first step, but now we will render the normal map in gl_FragColor
.
varying vec3 worldNormal; void main() { gl_FragColor = vec4(worldNormal, 1.0); }
Next, we update the visualization cycle and add the processing of the back faces.
this.backfaceFbo = new THREE.WebGLRenderTarget(width, height); ... render() { requestAnimationFrame( this.render ); this.renderer.clear(); // render background to fbo this.renderer.setRenderTarget(this.envFbo); this.renderer.render( this.scene, this.orthoCamera ); // render diamond back faces to fbo this.mesh.material = this.backfaceMaterial; this.renderer.setRenderTarget(this.backfaceFbo); this.renderer.clearDepth(); this.renderer.render( this.scene, this.camera ); // render background to screen this.renderer.setRenderTarget(null); this.renderer.render( this.scene, this.orthoCamera ); this.renderer.clearDepth(); // render diamond with refraction material to screen this.mesh.material = this.refractionMaterial; this.renderer.render( this.scene, this.camera ); };
Now use a texture with normals in the material.
vec3 backfaceNormal = texture2D(backfaceMap, uv).rgb;
And finally, the normals of the front and back faces are compatible.
float a = 0.33; vec3 normal = worldNormal * (1.0 - a) - backfaceNormal * a;
In this equation, a is just a scalar quantity that shows how many normals of the trailing edges to use.
Happened! All sides of the diamond are visible only with the help of reflections and refractions, which we added to the material.
Limitations
As I have already explained, it is not very possible to obtain transparent materials in real time using the correct method from the physical point of view. Another problem is to visualize several glass objects facing each other. Since we visualize the background only once, it will not work to see it through a series of objects. And finally, the reflections in the field of visibility that I demonstrated here will not work normally at the borders of the screen, because the rays can refract with values that go beyond the boundaries of the plane, and we will not be able to catch these cases when rendering the scene into a texture.
Of course, there are ways to get around these limitations, but not all of them will be great WebGL solutions.
I hope you enjoyed this tutorial and learned something new. I wonder what you will do with it now! Let me know on Twitter . And feel free to ask me about everything!