A translation of the article was prepared specifically for students of the Kubernetes-based Infrastructure Platform course.
Setting up a basic microservice in Kubernetes is deceptively simple. In a recent article, we talked about how easy it is to start working with containers. We built a simple Docker image, deployed it using Kubernetes, and ran the application request. It was not difficult, but in life, cloud architectures are usually more complicated. They include dozens and even hundreds of services with databases, authentication, and other elements that are necessary in reality.
To administer them sometimes is a continuous headache. In this article, we’ll talk about Istio, a tool for the service mesh (we looked at this architecture earlier ) that takes the management of large cloud deployments to the next level.
Microservices give you great scalability, and the service mesh complements them with the centralization benefits typical of monolithic environments (like logs and version control). We wrote more about the features and benefits of service mesh in a previous article in this series.
The same publication focuses on the capabilities of Istio to implement a cloud architecture pattern using mesh networks. We will learn how to configure the control plane, consider the strengths of Istio and, finally, take the Kubernetes service that we worked with last time, add a sidecar proxy to it and connect it to the newly created control plane.
Introducing the data plane and sidecar proxy
The two main architectural terms in Istio are the data plane and the control plane. The data plane works with data that is moved in the application, transferred to various service instances, and processed by the services themselves. For its implementation, mainly sidecar proxies are used. At the management level, the order of service instantiation, the location of telemetry data and service information are determined. The main elements of the control plane include Pilot and Mixer. Let's see how it all works.
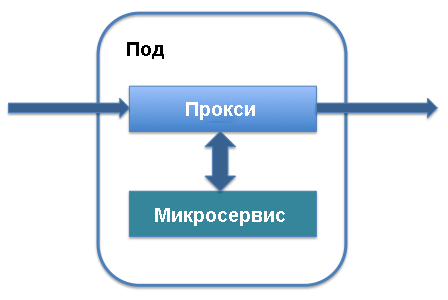
Sidecar proxy runs along with the hearth that defines your service in Kubernetes. It is added to the main components of the service and works with the traffic that goes to this service. You can add a sidecar proxy to the existing service definition in the hearth: the lines that define the sidecar proxy will simply be added to the service and it will start working.
In return, you’ll get a list of the benefits that underlie the Istio cloud mesh network. Sidecar proxy intercepts traffic entering the service and allows intelligent routing. We are talking about simple tasks, such as load balancing or handling TLS interrupts, which significantly speed up the work, and more complex processes, such as version control, phased deployment of a new version of a service, and collecting indicators of resource utilization. Sidecar-proxy allows you to add all these features to the existing architecture of microservices without reorganizing the entire system .
As the initial purpose of the sidecar proxy becomes clear, the benefits of Istio and the cloud service mesh as a whole become apparent. In fact, all sidecar-proxy architectures in the aggregate, functioning as unified connecting elements between the service pods, pass through all the traffic passing through the application. This means that, if necessary, to strengthen the protection, they act as a single location where you can add authentication processes and the HTTPS protocol between services, keep an event log to check for anomalies, and deploy traffic control and filtering tools for authentication.
In addition, since sidecar proxies act as central endpoints for communication between services, they increase the fault tolerance of the application and add an additional level of scalability. One of the drawbacks of microservices is that all server pods are isolated, and if something is wrong with the microservice, requests can be slowly processed or completely reset. Thanks to sidecar proxies, you can centrally add timeouts, configure intelligent load balancing and expand monitoring capabilities.
Centralization: the control plane
In addition to the data plane, Istio includes a control plane. It plays the role of a controller for all sidecar proxies executed in the application, and a central repository for all information (such as log entries and version information), which is perceived by services on the network as a single source of reliable data.

When working with Istio, Kubernetes is the primary way to interact with the control plane. After installing Istio packages and adding definitions, you can use the kubectl
commands that control the state of the system to access the control plane. For example, the process of updating a hearth to a new version using kubectl
begins with updating the variables of the local control plane.
This is easiest to see using the get-svc
command as part of kubectl
- you will get a list of services related to a particular library. To check which Istio components are running, you can use the following command:
kubectl get svc -n istio-system
A list of the main Istio control plane elements running in the background is displayed. You may already be familiar with some of them, such as Citadel, a service that manages the protection of traffic between services.
Install Istio
Let's see what features Istio supports by default. We will set up the Istio management plane to administer the basic HTTP API that was described in the previous article . This API service was defined in Kubernetes and implemented as a single one under Kubernetes with an API running in it.
To install Istio, follow the steps described in the quick official guide . Start by downloading the latest version of Istio from the appropriate page . The program is still actively developing, so working best with its latest releases. Just download the file and make sure it is available in the correct directory.
Then add Istio definitions to Kubernetes so that you can use them with the kubectl
command-line kubectl
. Add the previously obtained .yaml
files to the installation directory using the kubectl apply
:
kubectl apply -f install/kubernetes/helm/istio/templates/crds.yaml
Then activate the Istio installation by choosing the authentication method. I will use the default mutual HTTPS authentication, which is great for demonstrations and getting started. To add a service mesh to an existing project, you need to understand a little more about the available options. At this stage, you can run the following command:
kubectl apply -f install/kubernetes/istio-demo-auth.yaml
After that you can continue. You will need to add the Istio structure to the pods that were created earlier, and for new pods, add Istio as a dependency.
Helloworld application deployment
We will use the trial application helloworld, which is described in our earlier publication . Will be created: one deployment, one service, one gateway and one virtual service. Update the configuration file to match the following:
helloworld.yaml
apiVersion: v1 kind: Service metadata: name: helloworld spec: type: ClusterIP ports: - port: 80 targetPort: 8080 selector: app: helloworld --- apiVersion: apps/v1 kind: Deployment metadata: name: helloworld-v1 spec: replicas: 1 selector: matchLabels: app: helloworld template: metadata: labels: app: helloworld version: v1 spec: containers: - name: helloworld-kubernetes - image: haseebm/helloworld-kubernetes ports: - containerPort: 8080 --- apiVersion: networking.istio.io/v1alpha3 kind: Gateway metadata: name: helloworld-gateway spec: selector: istio: ingressgateway # use istio default controller servers: - port: number: 80 name: http protocol: HTTP hosts: - "*" --- apiVersion: networking.istio.io/v1alpha3 kind: VirtualService metadata: name: helloworld spec: hosts: - "*" gateways: - helloworld-gateway http: route: - destination: host: helloworld port: number: 80
Manual Istio sidecar proxy
Istio uses the sidecar proxy sample to place the Istio sidecar proxy container in one hearth with the helloworld application container.
$ kubectl apply -f <(istioctl kube-inject -f helloworld.yaml) service/helloworld created deployment.extensions/helloworld-v1 created gateway.networking.istio.io/helloworld-gateway created virtualservice.networking.istio.io/helloworld created
Check that the pods and service are performed:
$ kubectl get pod,svc | grep helloworld pod/helloworld-v1-1cbca3f8d5-achr2 2/2 Running service/helloworld ClusterIP 10.160.58.61
Now check the traffic for the helloworld application:
$ curl a2******.ap-southeast-1.elb.amazonaws.com/api/hello
Hello world v1
Next steps
Istio is a great way to get to know cloud technology mesh networks and intelligent management of microservices in general. As we have already written more than once, properly administered microservices have many technical advantages, including in terms of scaling. However, to get these benefits, you need to use existing technologies effectively.
In the future, we will look at other scenarios for using Istio and cloud mesh networks to improve the security and manageability of our trial architecture. So, the next article will focus on managing deployments and version upgrades in Istio to efficiently distribute code updates without disruption or damage deployments.
Asad Faizi
Founder and CEO, CloudPlex.io, Inc
asad@cloudplex.io
www.cloudplex.io