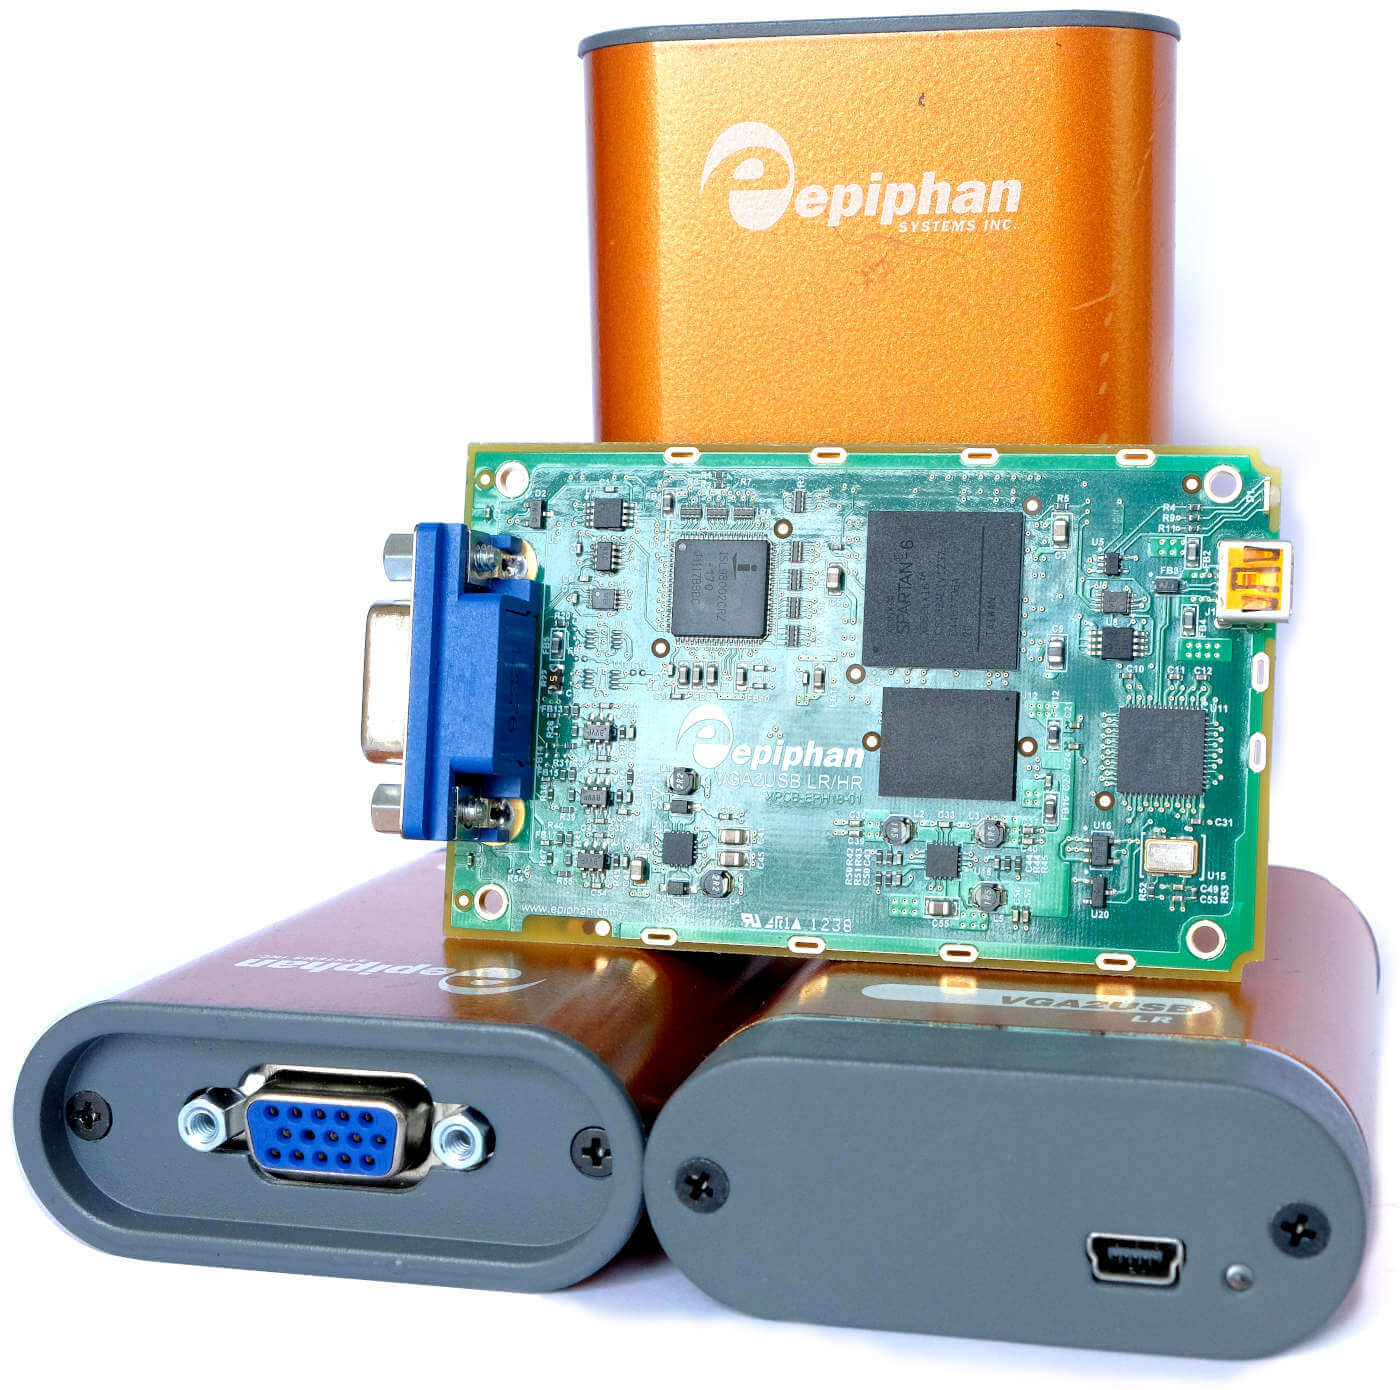
Recently on eBay I came across a batch of interesting USB devices (Epiphan VGA2USB LR), which receive VGA input and send video to USB as a webcam. I was so delighted with the idea that I would never have to bother with VGA monitors again, and given the declared support for Linux, I took a chance and bought the whole batch for about 20 pounds (25 US dollars).
Having received the package, I connected the device, but it did not even think to appear in the system as UVC . What's wrong?
I studied the manufacturer’s website and found that a special driver was required to work. For me, this was a new concept, because the kernel of my Linux distribution usually has drivers for all devices.
Unfortunately, driver support for just these devices ended in Linux 4.9. Thus, none of my systems will see it (Debian 10 on Linux 4.19 or the latest version of LTS Ubuntu on Linux 5.0).
But it can be fixed, right? Of course, the files come in the DKMS package , which, on demand, collects the driver from the source code, like many ordinary drivers ...
It’s sad. But here it is not so.
Inside the package was only the precompiled binary
vga2usb.o
. I began to study it, wondering the complexity of reverse engineering, and found some interesting lines:
$ strings vga2usb.ko | grep 'v2uco' | sort | uniq v2ucom_autofirmware v2ucom_autofirmware_ezusb v2ucom_autofirmware_fpga
So is it really FPGA -on-a-stick? How to make something like this work?
Another funny and slightly disturbing find was the line with the DSA private key parameters. This made me wonder: what can it protect inside the driver?
$ strings vga2usb.ko | grep 'epiphan' | sort | uniq epiphan_dsa_G epiphan_dsa_P epiphan_dsa_Q
To study the driver in its normal environment, I picked up a Debian 9 virtual machine (the latest supported release) and made KVM USB Passthrough to give direct access to the device. Then I installed the driver and made sure that it works.
After that, I wanted to see what the communication protocol looks like. I was hoping the device would send raw or almost raw frames, as that would make it easier to write a driver for user space.
To do this, I loaded the
usbmon
module on the host of the virtual machine and launched Wireshark to capture USB traffic to and from the device during startup and video capture.

I found that when launched, a large number of small packets are transmitted to the device before it begins to capture the picture. It is likely based on the FPGA platform without data storage. Each time after the connection, the driver transmitted the firmware in the form of FPGA bitstream to the device.
I was convinced of this by opening one of the boxes:
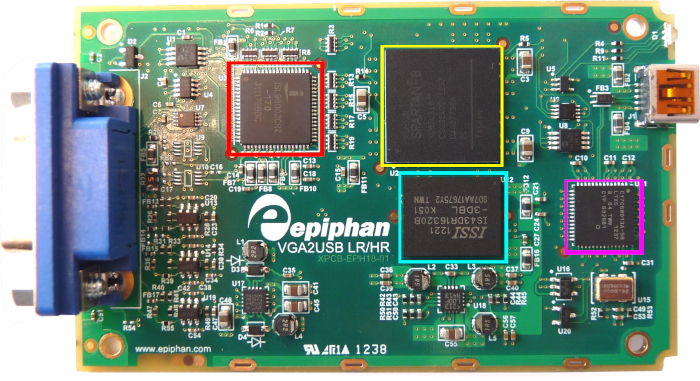
Red | ISL98002CRZ-170 - Works as ADC for VGA Signals |
Yellow | XC6SLX16 - Xilinx Spartan 6 FPGA |
Cyanogen | 64 MB DDR3 |
Magenta | CY7C68013A - USB controller / frontend |
Since to “download” the device you need to send him a bitstream / firmware, you have to look for it in precompiled binaries. I ran
binwalk -x
and started looking for some compressed objects (zlib). To do this, I wrote a hex sequence search script - and specified three bytes from the intercepted packet.
$ bash scan.sh "03 3f 55" trying 0.elf trying 30020 trying 30020.zlib trying 30020.zlib.decompressed ... trying 84BB0 trying 84BB0.zlib trying 84BB0.zlib.decompressed trying AA240 trying AA240.zlib trying AA240.zlib.decompressed 000288d0 07 2f 03 3f 55 50 7d 7c 00 00 00 00 00 00 00 00 |./.?UP}|........| trying C6860 trying C6860.zlib
After unpacking the AA240.zlib file, it turned out that there was not enough data there for a complete bitstream. So I decided to grab the firmware from the USB packages.
Both tshark and tcpdump can read USB packets from pcap files, but both only partially save them. Since each utility had different parts of the puzzle, I wrote a small program that combines the output of both programs into go structures in order to play the packets back to the device.
At this point, I noticed that the download takes place in two stages: first a USB controller, and then FPGA.
I was stuck for several days: it seemed that the entire bitstream was loading, but the device did not start, although the packages from the real driver and my simulation look similar.
In the end, I solved the problem by carefully studying pcap taking into account the response time for each packet - and noticed a big time difference in one specific package:
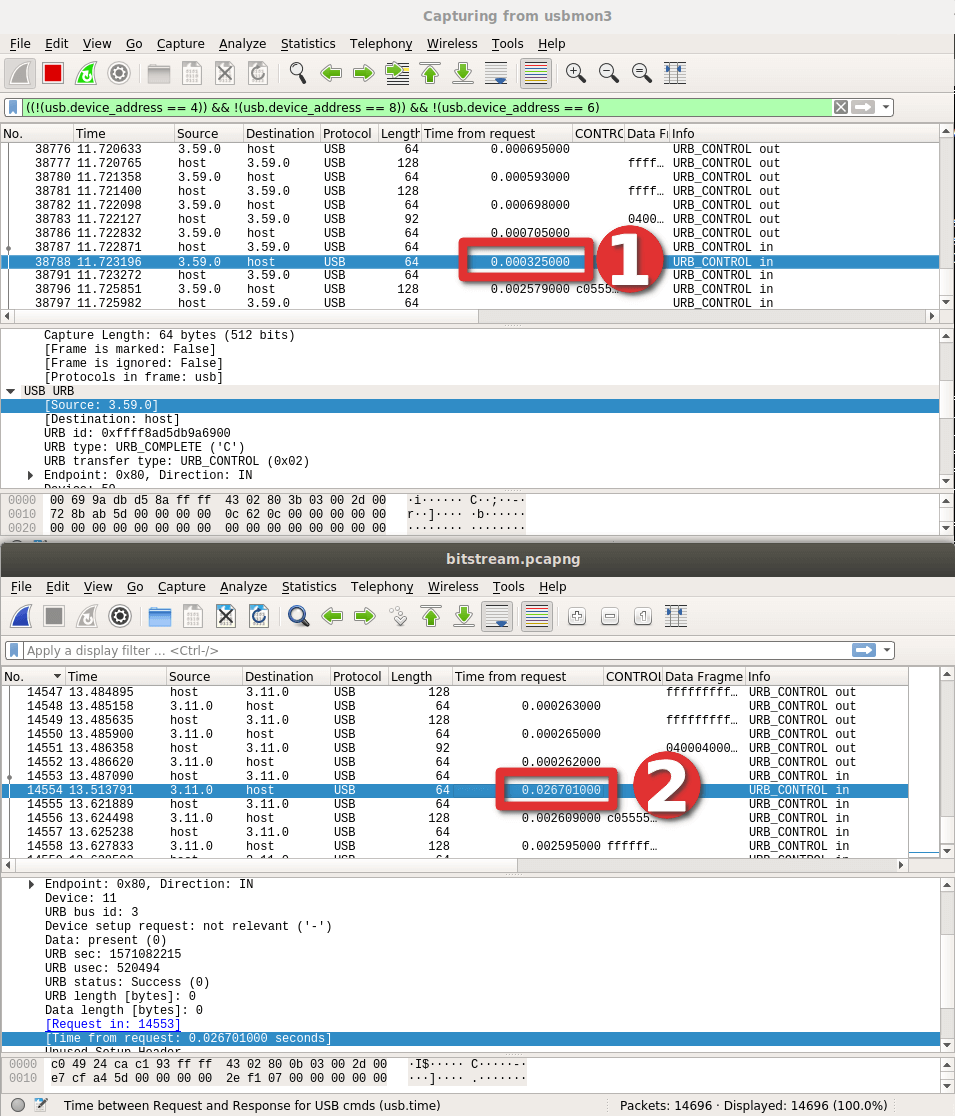
It turned out that due to a small typo, the recording occurred in the wrong area of the device. It will be a lesson to me how to enter values manually ...
However, the LED finally blinked on the device! A huge achievement!
It was relatively easy to replicate the same packages that triggered the data transfer, so I could write the USB Bulk endpoint and flush the data to disk instantly!
This is where the real difficulties began. Because after analysis it turned out that the data was not explicitly encoded in any way.
To get started, I ran perf to get a general idea of tracing the driver stack at runtime:

Although I could catch functions with frame data, I could not understand the encoding of the data itself.

To better understand what is going on inside the real driver, I even tried the Ghidra tool from the NSA:
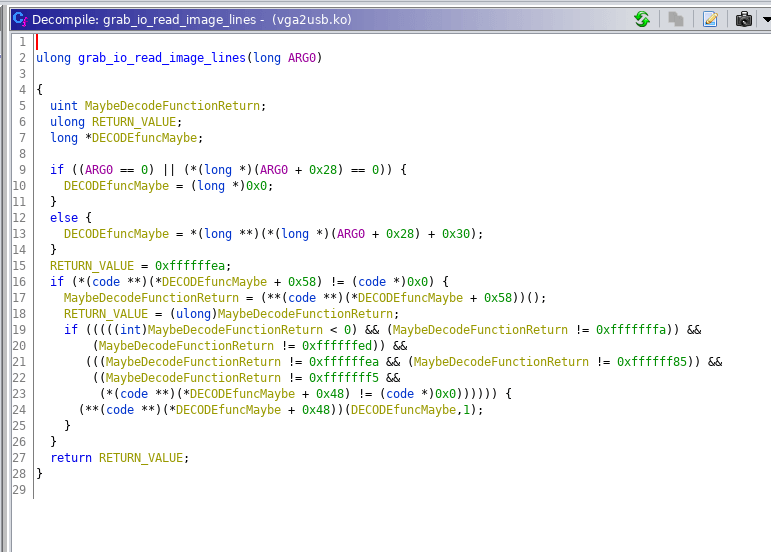
Although Ghidra is incredible (when I first used it instead of IDA Pro), it’s still not good enough to help me understand the driver. Reverse engineering required a different path.
I decided to pick up the Windows 7 virtual machine and take a look at the Windows driver, suddenly it will throw up ideas. And then I noticed that there is an SDK for devices. One of the tools turned out to be especially interesting:
PS> ls Directory: epiphan_sdk-3.30.3.0007\epiphan\bin Mode LastWriteTime Length Name ---- ------------- ------ ---- -a--- 10/26/2019 10:57 AM 528384 frmgrab.dll -a--- 10/27/2019 5:41 PM 1449548 out.aw -a--- 10/26/2019 10:57 AM 245760 v2u.exe -a--- 10/26/2019 10:57 AM 94208 v2u_avi.exe -a--- 10/26/2019 10:57 AM 102400 v2u_dec.exe -a--- 10/26/2019 10:57 AM 106496 v2u_dshow.exe -a--- 10/26/2019 10:57 AM 176128 v2u_ds_decoder.ax -a--- 10/26/2019 10:57 AM 90112 v2u_edid.exe -a--- 10/26/2019 10:57 AM 73728 v2u_kvm.exe -a--- 10/26/2019 10:57 AM 77824 v2u_libdec.dll PS> .\v2u_dec.exe Usage: v2u_dec <number of frames> [format] [compression level] <filename> - sets compression level [1..5], - captures and saves compressed frames to a file v2u_dec x [format] <filename> - decompresses frames from the file to separate BMP files
This tool allows you to "grab" single frames, and initially they are not compressed, so that it is possible to process frames later on a faster machine. This is almost perfect, and I replicated the USB packet sequence to get these uncompressed blobs. The number of bytes corresponded to approximately three (RGB) per pixel!
The initial processing of these images (just accepting the output and writing it as RGB pixels) gave something vaguely reminiscent of the real picture that the device received via VGA:
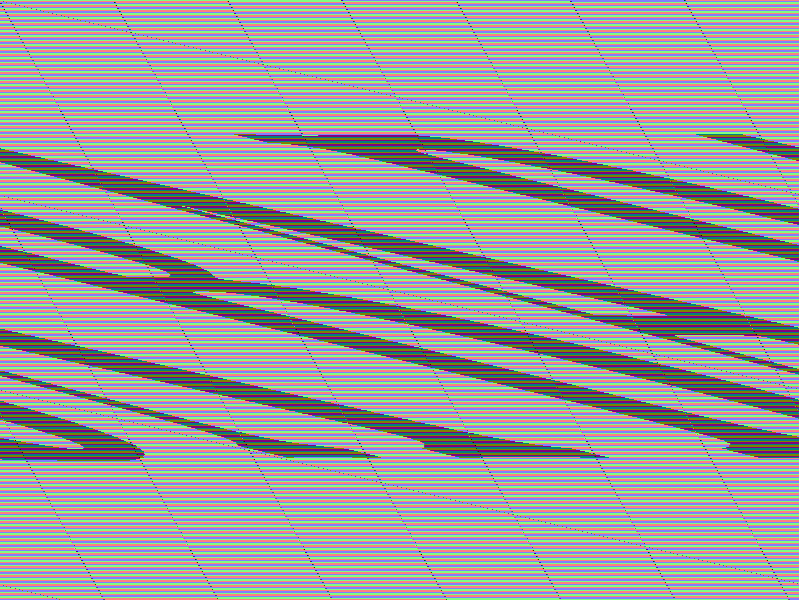
After some debugging in the hex editor, it turned out that every marker is repeated every 1028 bytes. It's a little embarrassing how much time I spent writing a filter. On the other hand, in the process one could enjoy some examples of contemporary art.

Then I realized that the slope and distortion of the image are caused by skipping and pixel wrap on each line (x = 799 is not equal to x = 800). And then, finally, I got an almost correct image, except for the color:

At first, I thought the calibration problem was due to data sampling when the VGA input was stuck in solid color. For correction, I made a new test image to identify such problems. In hindsight, I understand that you had to use something like a Philips PM5544 test card .

I uploaded the image to a laptop, and it produced such a VGA picture:
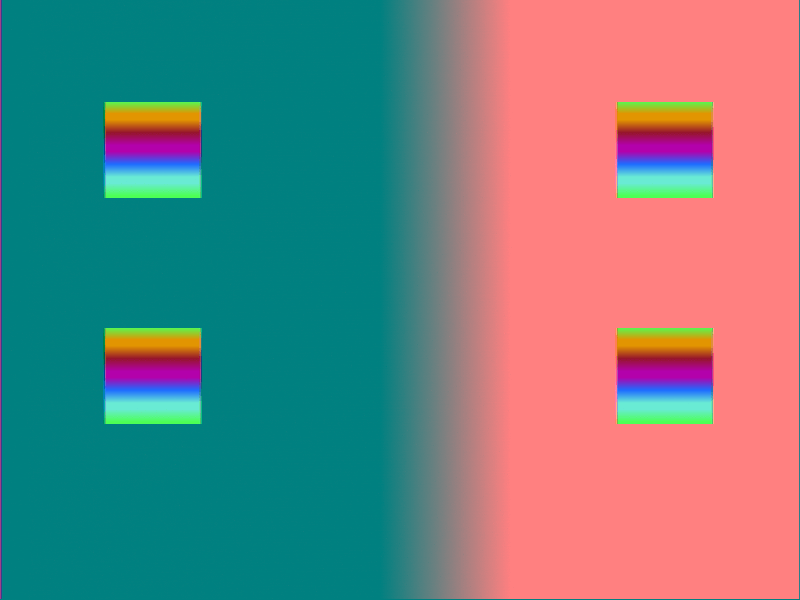
Then I got a memory of some old work on 3D rendering / shader. It was very similar to the YUV color scheme .
As a result, I plunged into reading YUV literature and remembered that during the reverse engineering of the official kernel driver, if I put a breakpoint on a function called
v2ucom_convertI420toBGR24
, then the system would crash without the possibility of renewal. So maybe the input was I420 encoding (from
-pix_fmt yuv420p
), and the output was RGB?
After using the built-in Go function YCbCrToRGB, the image suddenly became much closer to the original.

We did it! Even the raw driver produced 7 frames per second. Honestly, this is enough for me, since I use VGA only in case of an accident as a backup display.
So, now we know this device well enough to explain the algorithm for starting it from the very beginning:
- You need to initialize the USB controller . Judging by the amount of information, in fact, the driver passes code to it to download.
- When you finish loading the USB, the device will disconnect from the USB bus and after a moment will return with one USB endpoint.
- Now you can send the FPGA bitstream , one 64-byte USB packet for each control transfer.
- At the end of the transfer, the indicator on the device will blink green. At this point, you can send what seems like a sequence of parameters (overscan and other properties).
- Then run the control package to get the frame , the package specified permission. If you send a request for a 4: 3 frame to widescreen input, this will usually result in a damaged frame.
For maximum ease of use, I implemented a small web server in the driver. Through the browser-based MediaRecorder API, it easily records the stream from the screen to a video file.
Preventing the inevitable claims to the quality of the experimental code, I will say right away: I am not proud of it. Probably, he is in such a state, which is enough for me for acceptable use.
The code and ready-made builds for Linux and OSX are on GitHub .
Even if nobody ever starts the program, for me it was a hell of a fascinating journey through the wilds of the USB protocol, kernel debugging, reverse engineering of the module and video decoding format! If you like these things, you can check out other blog posts .