With the release of Veeam Backup & Replication 9.5 Update 4, users have at their disposal many new useful features, including for working with magnetic tape. She, in spite of skeptics, can be said to be “more alive than all living things” helps to organize reliable long-term data storage. And, of course, the tape is popular among our customers - we see this also on cases that come in technical support.
Therefore, today I will not only tell you in detail about the new features of Veeam Backup & Replication 9.5 Update 4b, but also give comments on a number of points that should be paid attention to when archiving and restoring. So let's get started.
Parallel use of libraries
Several versions have already passed since the media pools in Veeam Backup & Replication became “global.” What did this give the user?
Now we can talk about the concept of High Availability (high availability) and in relation to the tape. So, the user can specify the event upon which the archiving task should switch to the next tape device in the available list. These are the events " Library is offline " (library disabled) and " No media availabl e" (no media).
Here I would like to give a hint in case you need to remove the old device from the infrastructure. Some clients reported that they received an error message saying that the device was allegedly still used by the media pool X. In this case, I recommend that you launch the media pool setup wizard, go to the Tapes step and click Manage there - most likely, the device you need will be shown along with others in the Manage Libraries dialog that opens.
In Update 4, our engineers implemented the most parallel work for several libraries. Now, in this very Manage Libraries dialog, you can set the operation mode for each of the devices:
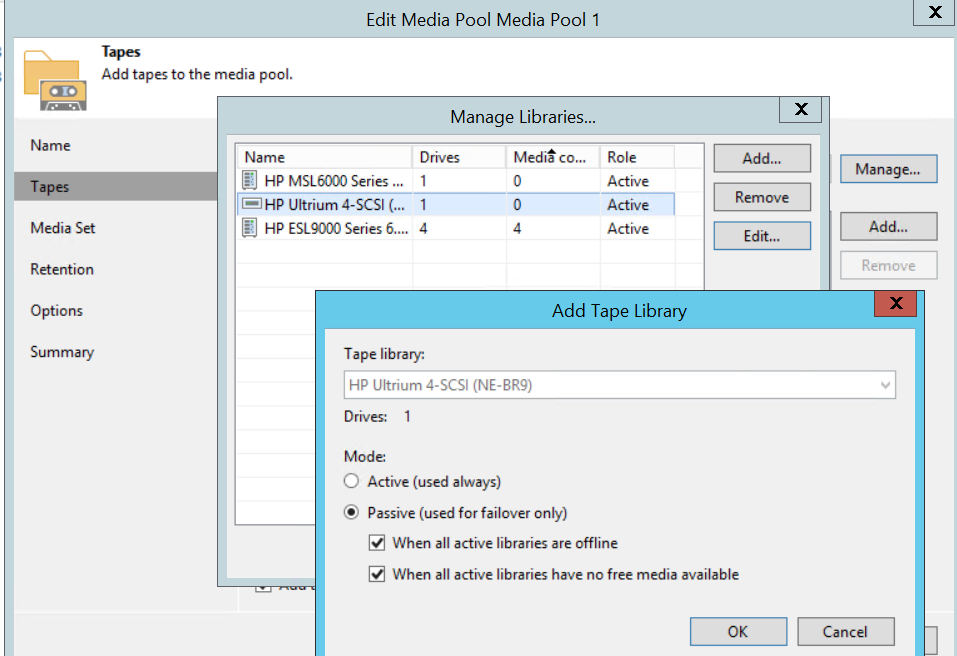
- To enable parallel processing, select the Active option.
- To activate the device if it is necessary to switch to it, select Passive .
Note: You can set either all devices to active mode, or one to active, and the rest to passive (and not vice versa).
General recommendations for using modes:
- If you have all the devices identical, then set them to active mode.
- If, for example, you have one device rather old, and the second one not, then the old library can be switched to passive mode - it will pick up job processing in case something happens to the newer library.
As you can see, no rocket science. However, there are a few important points that I would like to draw your attention to:
- Parallel processing can be used even within a single archiving job. To do this, the original backup must be created in per-VM mode, i.e. one virtual machine - one backup chain. Or, in the task you need to add several backups at once.
- Parallel processing is configured, as you saw, when configuring media pools. In the Options step, check Enable parallel processing for tape jobs using this media pool . You can immediately indicate how many writable drives can be used when working with this pool - in this example, 2.
Note: If you have several devices in active mode, then keep in mind that this number will indicate the total number of writers working with this media pool. If parallel processing is configured for one job, see the instructions above.
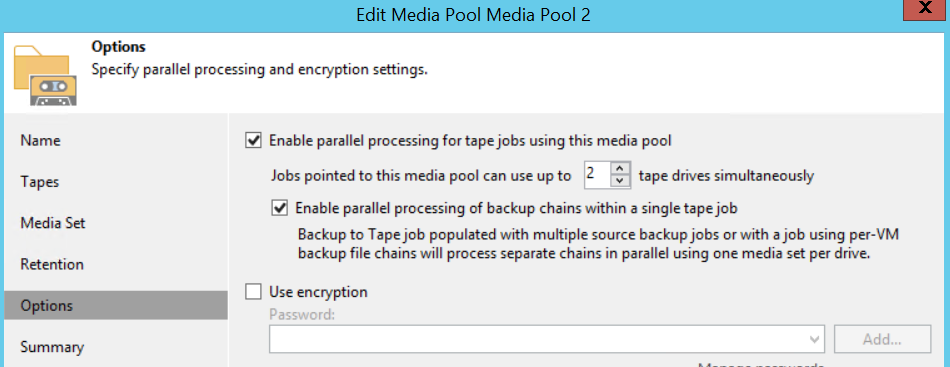
- What about media sets, you ask? Everything is simple here: each device (drive) works with its own media set.
However, in some infrastructures, special attention may be required during configuration.
Here is an example from our practice: a client contacted customer support complaining that Veeam Backup & Replication uses too many tapes, most of which are almost empty.
After analyzing the details, it turned out that the client had a media pool configured to create a new media set for each session of the task. At first, everything worked perfectly, because the amount of data for each session fit perfectly on the specified number of cassettes. Then a new device appeared, and the client decided to use parallel processing. Now the data was distributed across two sets of cassettes. Since the media set was finalized at the end of each session, Veeam Backup & Replication could not continue recording data on the same tapes during the next session. That is why the client observed an overrun of cartridges. As a result, he had to choose from two options: either configure the initial task so that the backups fit on two sets of cassettes (which is not too reliable), and make the media set continuous (continuous), or disable parallel processing.
It was also noted that parallel recording of two or more media sets can lead to confusion in the titles. It turned out for customers that several tapes were recorded at the same time and had the same serial number. (Actually, this is completely normal.) To avoid confusion, we recommend adding the % ID% variable to the name of the media set.
GFS Improvements
First, let's recall how support for the default GFS storage policy is organized.
- On the day on which the start of the task for archiving with the GFS-conversion (tape GFS) is scheduled, this task starts at midnight (00:00) and then waits for the arrival of a new restore point created by the original backup task.
- If the new point is an incremental backup, then the tape GFS task will create a virtual synthetic full backup on the tape.
If the new point is a full backup, then such a point will be copied as is. - The tape GFS job will wait for a new point to appear for 24 hours.
- If after this time a new point does not appear, the tape GFS job will switch to the previous available point.
Here a special situation arises with backup copy jobs (BCJ) - because of their continuous operation, the last point remains in a locked state for the entire duration of the backup interval. Depending on the settings for the BCJ job, the tape GFS job may be forced to wait all day before switching to the previous point.
If the tape GFS task needs to create points for several intervals on the same day (for example, a weekly point and a monthly point), then it will not copy 2 different points in this. Instead, one point will be used as the weekly and monthly.
Well, for each interval there is a media set. For example, if a cassette was used for weekly archives, then the monthly point cannot be recorded on it (unless the cassette is erased or marked as blank). This confuses some users - they see an expired cassette in the GFS media pool, however the tape GFS job seems to ignore it, requesting another, suitable cassette.
This is how the default process looks in general terms. I note that it was possible to change its settings only through contacting tech support, which used the registry key for these purposes.
What brought us update Update 4?
Firstly, two settings migrated from the registry to the interface (GUI):
- At the Schedule step of the tape GFS job setup wizard, you can now specify any time to start this task (by default, 00:00 remains).
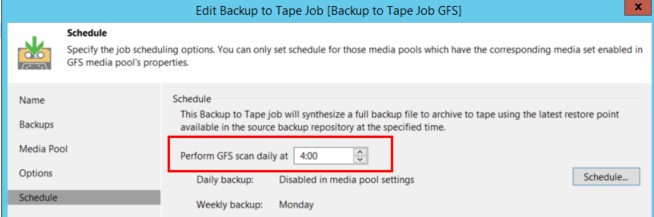
- In addition, you can configure the tape GFS task to immediately (without waiting) switch to the previous point if the point is unavailable today. This option is on the Options - Advanced - Advanced step:
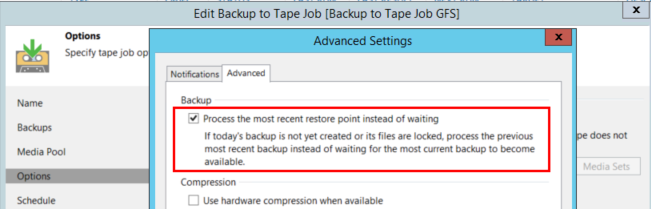
Also, a new value has been added to the registry, which allows the tape GFS job job to use tapes with expired data from any media set, and not just one that belongs to a specific interval. If you need to change this setting, please contact support.
Parallel processing of tape GFS jobs
If you look at the documentation describing the GFS media pool for the previous version, it will say that parallel tape processing is not supported for tape GFS jobs. And now in Update 4, it was finally added.
The stages of the process are the same as when working with regular media pools (see above). Be careful about the estimated number of cassettes when using GFS and parallel processing of tasks - this configuration requires the creation of many media sets. You can use this formula:
A (tuned media sets) x B (number of writers) = C (tapes used)
For example, for a configuration with 5 media sets and 2 drives turned on, at least 10 cassettes will be required.
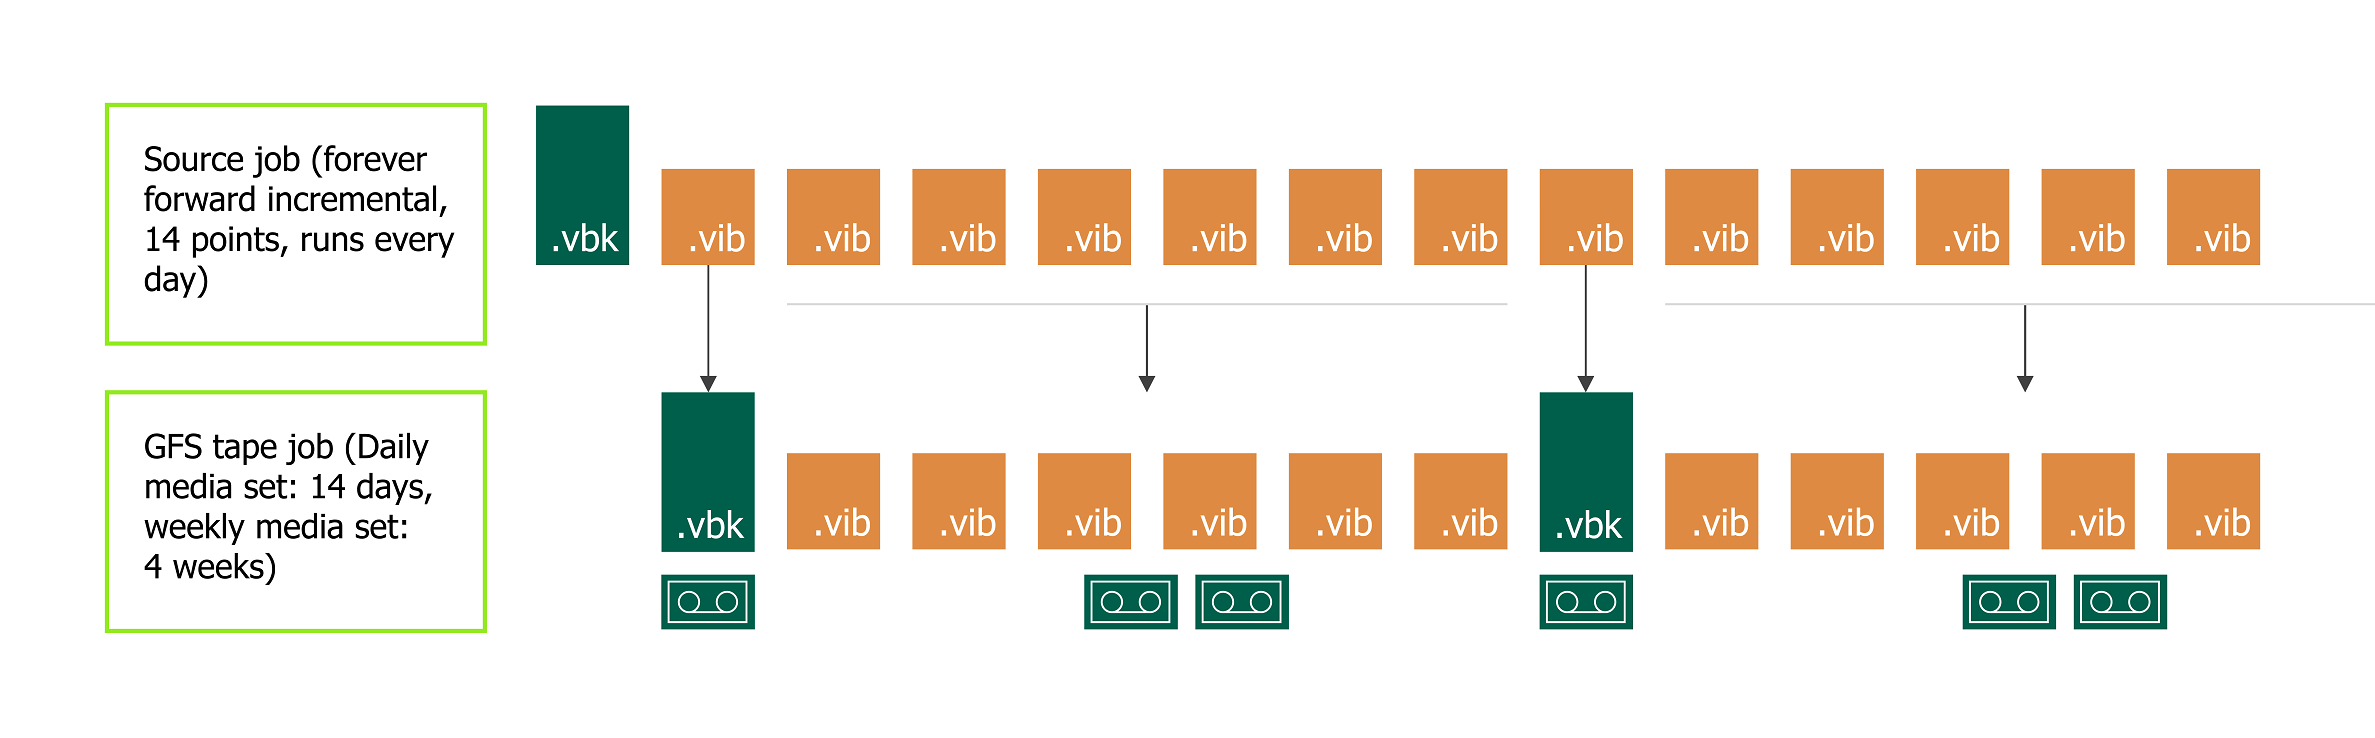
Daily Media Set
The main addition to the functionality of tape GFS jobs is the daily media set . It allows you to combine regular archiving jobs and jobs with GFS. So, if you use GFS media pools for long-term archiving, but at the same time use regular media pools to store short incremental chains on cassettes, you can use a daily media set instead of setting up a separate task to simplify the work.
Go to the settings of the GFS media pool and select the corresponding option there:

Note that to work with the daily media set, you need to configure and weekly.
With a daily media set, the tape GFS job will check every day if any points (full or incremental) created the original job and place them on the tape. If the original job creates several recovery points, then all of them will be placed on the tape. This allows you to fill the “gap” between the weekly GFS points and provide the ability to recover from the incremental point. During recovery, Veeam Backup & Replication will request tapes containing the nearest full backup (most likely, it will be a weekly GFS) and related incremental ones.
Keep in mind that (similar to backup archiving tasks on a tape), the daily media set does not copy “kickbacks” from backup tasks that create inverse-incremental chains. Only a full backup will be copied, which is always the latest in such a chain.
Example
Consider the following scenario:
There is a backup job that creates an infinite-incremental chain. It starts every day at 5 in the morning. The storage policy is configured to store 14 recovery points.
- For archiving to tape, you can configure the tape GFS job task with a daily media pool that stores data for 14 days, as well as with a weekly one that stores data for 4 weeks, and with the corresponding monthly, quarterly and annual.
- The daily media set can be configured to add cassettes (without export).
- The weekly GFS interval (and higher intervals) finalize the unrecorded tapes and export them after each session.
Thus, tapes containing incremental points are stored in the library and rotated in accordance with the storage policy. In the meantime, the tapes that store the full backups are taken offline, and they can be put in safe storage.
Such a scenario is depicted in the diagram below:
If recovery is required, Veeam Backup & Replication will request a cassette containing the weekly GFS point and will use the cassette from the daily media set to restore the corresponding incremental points.
Support for WORM cassettes
WORM stands for Write Once Read Many . This means that once recorded, such a tape cannot be erased or overwritten (this may be a virtue for a number of scenarios). However, there are some difficulties with this type of tape, and previous versions of Veeam Backup & Replication did not support this type. But now you can also work with him.
In principle, working with WORM cassettes is not very different from working with conventional cassettes.
- First you need to create the appropriate media pool - WORM media pool . As usual, there are two types: standard and GFS. There is only one feature - you cannot change the settings of the storage policy.
- Then add cassettes. There may sometimes be confusion - WORM cassettes are considered ordinary, and vice versa. To avoid this, remember that everything related to working with WORM cassettes has blue icons.
Veeam Backup & Replication identifies WORM cassettes by barcode or during inventory. Be sure to read the documentation for your tape device and use the correct barcodes! For example, IBM libraries believe that the letters V to Y in the barcode indicate a WORM cartridge (see this article on barcodes ). Inappropriate use of these letters can lead to confusion in Veeam Backup & Replication.
NDMP Backup
In Update 4, you can back up and restore NAS volumes if they support NDMP.
- First of all, you need to add the NDMP server in the Inventory view, as described in the documentation (see the user manual (in English)).
Note: Be sure to read the requirements and restrictions in this section (paragraphs Requirements and Limitations ), among them there are a number of very important points. For example, the current version does not support NDMP backup from NetApp Cluster Aware Backup (CAB) extensions. As a workaround, you can configure node-scoped NDMP, as described here . - After you have added the NDMP server to the infrastructure, it must be configured as the source file storage location for the standard file to tape file archiving task.
- Recovery — similar to restoring any other files stored on the tape — can be launched from the Files view.
Important! The current version of Veeam Backup & Replication does not support the recovery of individual volume files; only the entire volume can be restored.
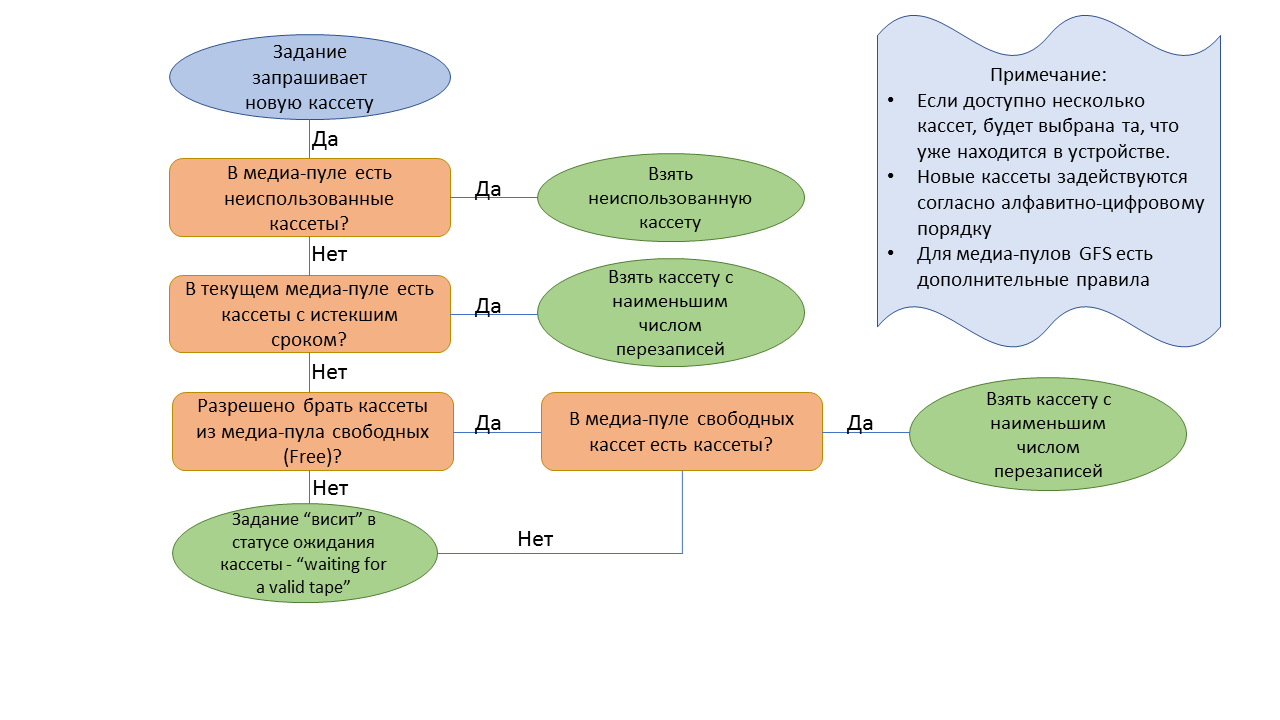
Cassette Selection Algorithm
To begin with, Update 4 introduced a new cassette usage indicator - the number of read / write sessions. This value is displayed in the cartridge properties in the Wear field:
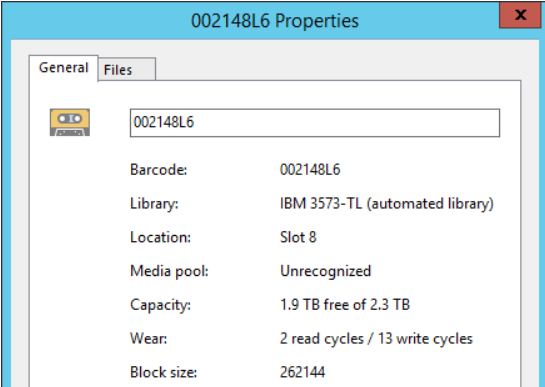
After using the cassette, the maximum allowable (in accordance with its specifications) number of times it will be moved to the Retired media pool media pool .
Those who are familiar with tape archiving using Veeam Backup & Replication are aware that it was possible to monitor warnings from tape devices about the inadmissibility of reusing tapes before.
But the use of the principle of balanced load is new - that is, when choosing a cassette, Veeam Backup & Replication Update 4 will take into account, along with other factors, the value of the Wear parameter (that is, how many sessions the cassette has already worked).
In general, the cartridge selection algorithm works like this:
New in file recovery
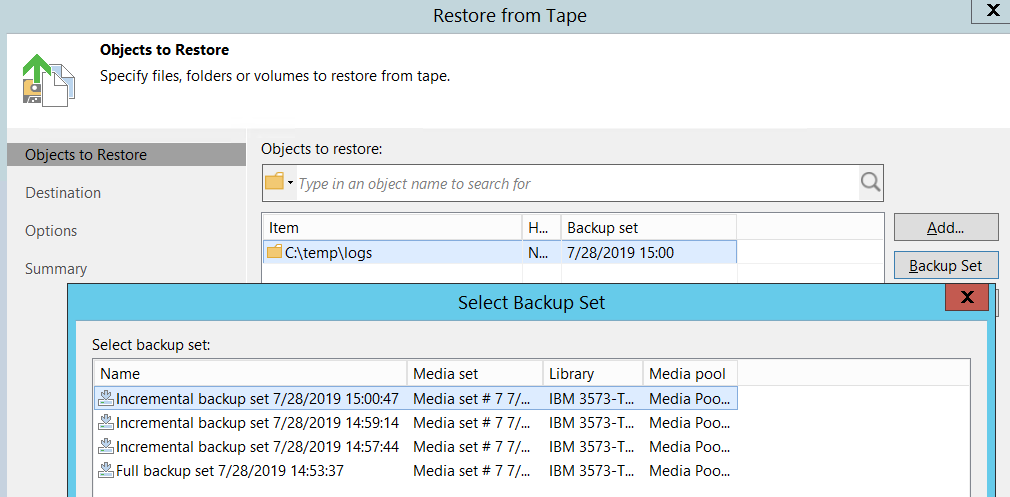
Now, after the user has selected the desired backup, only those files that were present in the source folder during the backup session will be restored from it. The menu itself has not changed, only the logic has been updated. As before, we start the recovery wizard and click Backup Set to select the set of backup files from which we will restore data.
Archiving client backups to tape
This feature allows service providers to implement a new type of service - recording backup copies of customer data on tape. All settings are performed on the provider side: if you have a Cloud Provider license (cloud service provider) installed for Veeam Backup & Replication, you can add a client as a job source by following the steps of the setup wizard for archiving jobs.
Note: Such jobs can only work with GFS pools.
Recovery is also performed by the provider. For recovery, there are such options:
- restore files to the original cloud repository (existing files will be overwritten and the task will be mapped to the restored set of backups)
- to the new cloud repository
- to local disk
In the end, if the client has its own tape infrastructure, then you can simply send the tape by mail and avoid any network traffic.
Other innovations
The role of the tape operator. Users with this role will be able to perform any actions with cassettes, but will not be able to start recovery.
The procedure for processing sources. Now you can change the order of processing sources (source) in the same way as it is done for virtual machines in backup jobs.
Include / exclude mask data for file archiving jobs. In previous versions, file archiving jobs could only use masks to include . Exclusion masks are now available ( exclud e).
Note: This only works for files and folders, but you remember that NDMP backups are performed at the volume level.
Automatically remove a cartridge from the drive when the tape is full. This is a small tweak to the logic when working with a standalone tape device. As soon as the tape is fully recorded during the backup session, it is automatically removed from the device so that the person next to the drive can insert another tape. This is applicable, in particular, for protection against ransomware viruses.
Finally
The many improvements in the work with magnetic tape implemented in Update 4 clearly show that this medium remains the focus of Veeam Backup & Replication product management. I hope that these new features will help make your backup even more efficient.