But unfortunately did not even get into the top 100. After the fight, they don’t wave their fists, but I was able to solve several more tasks to complete. I bring to your attention all the tasks I have solved.
Special thanks for the help in the solutions:
miraage toster.ru/user/miraage
profesor08 toster.ru/user/profesor08
SmthTo toster.ru/user/SmthTo
RAX7 toster.ru/user/RAX7
dimoff66 toster.ru/user/dimoff66
vk.com/vladilen.minin
Final round
A. Asynchronous API from a parallel universe. (15 points)
Condition.
Your fellow parallel universe developer has sent you his new spacecraft control library. Because a spaceship is a complicated thing, then the library’s API is rather “weighty”, the exact number of methods is unknown, of course, there is no documentation. But it is known that in a parallel universe, people walk on the ceiling, sleep during the day, work at night, and also use only asynchronous functions and always pass a callback as the first argument. Strange guys! Here on Earth for a long time everyone writes on promises. However, the library needs to be integrated into the project. Therefore, you received the task of writing a wrapper that will provide the same API, but at promises.
Input format
Example source API:
const api = { a: { b: { c: callback => setTimeout(() => callback(null, 'hello'), 100) } }, aa: { bb: (callback, x, y) => setTimeout(() => callback(null, x + y), 200) } };
Output format
Submit your solution as:
/** * @param {Object} api - API * @returns {Object} */ module.exports = function promisify(api) { // ... return promisedApi; };
Usage example:
const promisedApi = promisify(api); promisedApi.abc() .then(res => console.log(res)); // => 'hello'
Notes
the wrapper should return a rejected promise in case of an error when calling the source API, callback always accepts the error with the first argument:
callback(error, data)
in the original API, there may be constants (numbers, strings, and Booleans), they need to be returned as is:
api.foo.myConst = 1; promisedApi.foo.myConst === 1;
initialization of the wrapper should be "lazy": in the original API there can be a large number of namespaces, and you need to access them as you use them.
Decision
In the contest I did not solve this problem completely and got 12.86 points out of 15 possible for the solution. I used recursion to bypass all properties and promiscurate if it is a function.
And after the end of the test, I finalized the solution by using the Proxy object. Only this option passed all the tests. Below is a solution, taking into account improvements.
function promisify (obj) { const cache = {} return new Proxy(obj, { get (target, prop) { const value = target[prop] const type = Object.prototype.toString.call(value) if (type === '[object Object]') { cache[prop] = promisify(value) // , - return cache[prop] } else if (type === '[object Function]') { cache[prop] = function (...args) { // return new Promise((resolve, reject) => { const callback = (err, result) => { if (err) { reject(err) } else { resolve(result) } } value.call(this, callback, ...args) }) } return cache[prop] } return value } }) }
Note that node js already has such a utility nodejs.org/dist/latest-v8.x/docs/api/util.html#util_util_promisify_original , only it accepts a function whose callback is the last argument, and not the first.
All About Proxy:
learn.javascript.ru/proxy
www.youtube.com/watch?v=np08WdS9OXg
B. Weekdays intern (15 points)
Condition.
The Yandex team has a trainee Stepan. Timing is already running out, but he does not have time with page layout. Help Stepan make up one of them according to the layout of this task.
There should be no indentation at the layout from the left and top edges of the page. Also, images cannot be used. Here is the layout:

As you can see, the layout consists of two sizes of tiles: standard and double. Standard tile occupies 1/3 of the screen width, double - 2/3. Fixed tile height - 200px. The distance between the tiles is 20 pixels.
The background color of the standard tile is # 8a2be2, the color of double is # 000.
As a result, you should get an HTML page with layout for the layout. The page size should not exceed 10 KB.
Note:
only templates and styles can be written in templates - JavaScript and images cannot be used;
Initially, the following html file was offered:
github.com/vito2005/YandexCompetition/blob/master/final-2019/B/original.html
Decision
In principle, you could do without the source file. But I still took it as a basis.
Removed fonts and script from markup to reduce file weight.
Then he added 6 divs and wrapped them in a wrapper.
Make-up through display: grid
The result is the following:
<html> <head> <meta charset="utf-8"/> <meta http-equiv="X-UA-Compatible" content="IE=edge"/> <style> body { margin: 0; padding: 0; } .wrapper { display: grid; grid-template-columns: repeat(3, 1fr); grid-gap: 20px; } .banner1, .banner2, .banner3, .banner4, .banner7 { background: #8a2be2; height: 200px; } .banner5 { background: #000; grid-column: 2 / 4; } .banner6 { background: #000; grid-column: 1 / 3; } </style> </head> <body> <div class="wrapper"> <div class="banner1"></div> <div class="banner2"></div> <div class="banner3"></div> <div class="banner4"></div> <div class="banner5"></div> <div class="banner6"></div> <div class="banner7"></div> </div> </body> </html>
C. Perfect Rectangles (40 points)
Condition.
Bob is an expressionist artist. All his works are colored strictly vertical rectangles on a white background.
Recently, his work was published on the website of the famous magazine Top Art. Bob decided to take a closer look at his canvases, zoomed in on the page and was horrified by the blurry corners and fuzzy edges of his perfect rectangles.
Being a thorough man, he studied the problem and decided to convert his masterpieces to HTML so that the lines remained perfect at any angle and at any scale. To fulfill his plan, he chose you.
Write for him a service that can generate html from pictures.
Input format
The input is a string that contains a picture in base64
Output format
Return the traceImage function, which accepts a link to the picture as an input, and returns a promise that resolves to the string. The line should have a layout that repeats this picture.
Submit your solution as:
/** * * @param {String} imageSrc - base64 , 'data:image/png;base64,iVBORw0KGgoAAAANSUhEUgAA...' * @returns {Promise} */ function traceImage(imageSrc) { // }
Notes
Picture can be any size
The picture is not transparent
Blank Pixel Color - White (r, g, b): (255, 255, 255)
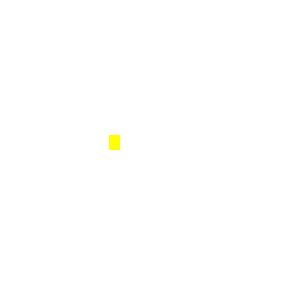
The image shows 1 colored opaque rectangle
All lines are horizontal or vertical.
The code runs in the browser
Example
The picture is given as a string in base64 (in the form in which it will be passed to the function):
gist.github.com/senaev/50460323558db543256cb7f196e7d81d
For such a picture, you can generate a line:
<div> <div style=" position: absolute; width: 11px; height: 15px; top: 135px; left: 109px; background-color: rgb(255, 255, 0); "></div> </div>
Decision
The essence of the solution is to create a canvas to fit the image, draw a picture there and start using getImageData to get information about the color of each pixel, then it remains to iterate over the pixels from the upper left edge until you get a white pixel. Next, continue to sort through the pixels along the horizontal and vertical axes until we again encounter a white pixel, so we get the width and height of the rectangle.
This article details working with canvas and using getImageData.
code.tutsplus.com/en/tutorials/canvas-from-scratch-pixel-manipulation--net-20573
Unfortunately, my code did not pass all the tests and scored 30 out of 40 points, and I still could not understand the errors, I will be grateful if you point out the shortcomings:
function traceImage (imgSrc) { function loadImg (src) { return new Promise((resolve, reject) => { if (typeof src !== 'string') reject('wrong data') const img = new Image() img.addEventListener('load', () => resolve(img)) img.addEventListener('error', err => reject(err)) img.src = src }) } function calcElementFromImage (img) { const TRANSPARENT_COLOR = [255, 255, 255, 1] const colorFromData = (data, i) => { return [data[i], data[i + 1], data[i + 2], data[i + 3] / 255] } const w = img.naturalWidth const h = img.naturalHeight const canvas = document.createElement('canvas') canvas.width = w canvas.height = h const ctx = canvas.getContext('2d') ctx.drawImage(img, 0, 0, w, h) const data = ctx.getImageData(0, 0, w, h).data let top, left, bgColor let lastIndex = 0 for (let i = lastIndex; i < data.length; i += 4) { const color = colorFromData(data, i) if (!color.every((c, i) => c === TRANSPARENT_COLOR[i])) { const px = i / 4 left = px % w top = px / w | 0 bgColor = color lastIndex = i break } } let width const maxLeftIndex = (w - left) * 4 + lastIndex for (let i = lastIndex; i < maxLeftIndex; i += 4) { const color = colorFromData(data, i) if (color.every((c, i) => c === TRANSPARENT_COLOR[i])) { const x = i / 4 % w width = x - left break } } let height const maxTopIndex = (h - top - 1) * w * 4 + lastIndex const hStep = w * 4 for (let i = lastIndex; i < maxTopIndex; i += hStep) { const color = colorFromData(data, i) if (color.every((c, i) => c === TRANSPARENT_COLOR[i])) { const y = i / 4 / w | 0 height = y - top break } } bgColor = Object.values(bgColor).join(',') return { parentWidth: w, parentHeight: h, top, left, width, height, bgColor } } return loadImg(imgSrc).then(img => { const data = calcElementFromImage(img) const { parentWidth, parentHeight, top, left, width, height, bgColor } = data const div = `<div style=" position: relative; width: ${parentWidth}px; height: ${parentHeight}px;"> <div style=" position: absolute; top: ${top}px; left: ${left}px; width: ${width}px; height: ${height}px; background-color: rgba(${bgColor})"></div> </div>` return Promise.resolve(div) }) }
D. Horseback Riding (40 points).
Condition.
Gennady is an intellectual. He likes to meet interesting people. But being a prudent and incredulous person, he does this only on the Internet. Recently, Gennady discovered that interlocutors comparable in IQ can be found at the chess forum, but the trouble is that Gennady is not able to play chess, and all the teachers are based on javascript, which Gennady carefully disables to avoid the possibility of picking up the virus.
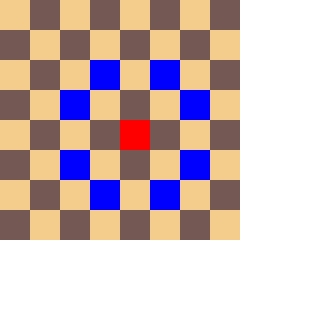
To help Gennady, we suggest making a tutorial for playing chess without javascript, which will show how the horse walks. The teacher should look like a chessboard. Click on the cage - they show you where the horse can go from this cage.
Input format
html-document when loading which a chessboard is drawn
Output format
The task will be tested in a real browser (Chrome 77).
Your html document will be loaded in the browser. The robot clicks into various cells of the chess field and takes screenshots after clicks.
Screenshots must correspond to the reference
Example
Notes
- CSS and HTML implementation. Javascript cannot be used.
- The whole layout should be square, without shadows, gradients, fillets, etc.
- Cell Width and Height - 30 pixels
- The chess field is on the page top left, without indentation
- Selected cell color # ff0000
- The color of the cell that figure # 0000ff can go to
- Light Cell Color # f4cd8d
- The color of the dark cell. # 745853
- Left upper cell light
- Initially no cell selected
Selection takes place by clicking on a specific cell and remains until the next click
Decision
Unfortunately, in the allotted 4 hours I was not able to fully provide a solution, I managed to make layout and click on a cell, and only after the end of the tournament, not without the help of colleagues from the forums, did I finish this task.
So, the first thing to do was to place the input type = radio for each cell, attach a label to them, setting the layout through display: grid and breaking it into 8 columns through grid-template-columns: repeat (8, 30px). I took a long time with layout for possible horse moves.
The difficulty was that in css you cannot style previous elements.
And it is not solvable in this case (when styling requires both previous and subsequent).
Therefore, in order not to pollute the markup, I decided to add pseudo-elements that are positioned by the absolute and through background painted by a linear gradient into squares. It took me a lot of time and it didn’t work out, but I was advised an excellent solution: set 8 shades of blue for the selected cell and arrange it as it should.
The result is the following:
<!DOCTYPE html> <html lang="en"> <head> <meta charset="UTF-8"> <title>Title</title> <style>.white { background: #f4cd8d; } .black { background: #746864; } body { margin: 0; display: flex } div { display: grid; grid-template-columns: repeat(8, 30px); overflow: hidden; } input { display: none; } label { width: 30px; height: 30px; background: #f4cd8d; display: block; position: relative; } input[type="radio"]:checked + label { background: #FF0000; box-shadow: -30px -60px 0 0 #0000FF, -60px -30px 0 0 #0000FF, 30px -60px 0 0 #0000FF, 60px -30px 0 0 #0000FF, -30px 60px 0 0 #0000FF, -60px 30px 0 0 #0000FF, 30px 60px 0 0 #0000FF, 60px 30px 0 0 #0000FF; z-index: 100; position: relative; } </style> </head> <body> <div> <input type="radio" name="tag" id="a1"> <label class="white a1" for="a1"></label> <input type="radio" name="tag" id="b1"> <label class="black b1" for="b1"></label> <input type="radio" name="tag" id="c1"> <label class="white c1" for="c1"></label> <input type="radio" name="tag" id="d1"> <label class="black d1" for="d1"></label> <input type="radio" name="tag" id="e1"> <label class="white e1" for="e1"></label> <input type="radio" name="tag" id="f1"> <label class="black f1" for="f1"></label> <input type="radio" name="tag" id="g1"> <label class="white g1" for="g1"></label> <input type="radio" name="tag" id="h1"> <label class="black h1" for="h1"></label> ........... ........... <input type="radio" name="tag" id="a8"> <label class="black a8" for="a8"></label> <input type="radio" name="tag" id="b8"> <label class="white b8" for="b8"></label> <input type="radio" name="tag" id="c8"> <label class="black c8" for="c8"></label> <input type="radio" name="tag" id="d8"> <label class="white d8" for="d8"></label> <input type="radio" name="tag" id="e8"> <label class="black e8" for="e8"></label> <input type="radio" name="tag" id="f8"> <label class="white f8" for="f8"></label> <input type="radio" name="tag" id="g8"> <label class="black g8" for="g8"></label> <input type="radio" name="tag" id="h8"> <label class="white h8" for="h8"></label> </div> </body> </html>
Link to the working version
To be continued…