Having decided to try the eight in the “wild”, I found that my hosting providers were in no hurry to create a virtual server image on CentOS 8. And the idea with a “native ISO” and “VNC console” did not inspire confidence due to the modest characteristics of VDS and gluttony modern anaconda (anaconda).
It remained to copy the deployed image of the new CentOS directly to the VDS hard drive, downloading the server “over the network”. The method does not sparkle with novelty, however, for example, I could not find detailed and complete instructions for its implementation. Therefore, I wanted to quickly fill this gap and talk about installing CentOS 8 on such a VDS:
KVM, 256MB RAM, 2GB HDD, without console and ISO

By the way, in this way you can install or reinstall not only CentOS and not necessarily in a virtual environment.
0. Characteristics of VDS
As it was said at the beginning of the article:

By the way, hosting providers now in their most budgetary tariffs offer VDS with more powerful features. Let CentOS 7 be the pre-installed operating system. I think that now it is possible for almost all virtualization providers.
1. Three treasured files
First of all, you will need a "donor" - an additional server with CentOS 8. installed. Although this is not important, but if the donor's technical specifications will correspond to those of VDS, then there will be much less trouble with tuning.
The amount of memory and the size of the donor disk are not important, the main thing is to install an operating system on it. I categorically advise marking the donor disk with one root partition.
Since in this case there is KVM VDS, the donor can be baked at home - on any Linux distribution with libvirt . I prefer the extra minimal initial setting, which in the context of the task will be a significant help. In this article, I talked about the standard way to make a tiny CentOS image. Under the spoiler, the corresponding kickstart file and how to use it:
CentOS 8 Tiny
You can place this file on any available Web resource and specify it at the beginning of the installation:

install text url --url="https://mirror.yandex.ru/centos/8/BaseOS/x86_64/os/" eula --agreed firstboot --disable keyboard --vckeymap=us --xlayouts='us' lang en_US.UTF-8 timezone Africa/Abidjan auth --enableshadow --passalgo=sha512 rootpw --plaintext very-strong-password-see-below #ignoredisk --only-use=vda zerombr bootloader --location=mbr clearpart --all --initlabel part / --fstype="ext4" --size=1 --grow network --bootproto=dhcp --hostname=localhost --onboot=on --activate #reboot poweroff %packages --nocore dnf NetworkManager openssh-server %end %addon com_redhat_kdump --disable %end
You can place this file on any available Web resource and specify it at the beginning of the installation:
I’m paying attention to the root password: I strongly recommend that you make it archisocial so that in the next steps you don’t have problems with hooligans scanning the Internet in search of entertainment.
After making a donor, you need to take all files from its disk into one archive, say centos8.tgz . You can do this in different ways: connect the donor disk to another virtual machine, mount it to the hypervisor, or pack all its files in the donor itself, excluding virtual directories (/ dev, / proc, etc.)
Further, two more files will be needed from the donor: the kernel ( vmlinuz ) and the modified ramdrive ( initrd ). The kernel can be taken in the / boot directory of the donor (vmlinuz-something-there), and the ramdrive needs to be made special by including the ability to boot over the network from the NFS server. To do this, in a working donor operating system you need to do:
# dnf install dracut-network nfs-utils # echo 'add_dracutmodules+="nfs"' >> /etc/dracut.conf # dracut -f /initrd
and pick up the necessary initrd from the root of the disk.
As a result, three files that will be needed in the future:
- centos8.tgz - archive with all files of installed CentOS 8
- initrd - a temporary file system with NFS support
- vmlinuz - OS kernel
# ls -l | awk '{print $9,$5}' centos8.tgz 320712609 initrd 21916741 vmlinuz 7876856
The donor is no longer needed, although it may come in handy (see below)
2. NFS server
To download VDS over a network without using a local disk, you will need a server with an NFS resource. Such a server can be anything, the main thing is its network availability from the IP address of VDS. You can try home equipment (with a possible “port forwarding on the router”) or any other VDS, taken, for example, for a test. Finally, use the “donor” if you can manage it with NFS (just kidding). After installing CentOS 8, the NFS server, like the donor, will no longer be needed.
The exported NFS resource must contain the centos8.tgz file and its unpacked contents in its root. Here is a quick production guide using CentOS 7 as an example:
# mkdir /nfsroot # cp .../centos8.tgz /nfsroot # tar xzf /nfsroot/centos8.tgz -C /nfsroot # yum install nfs-utils # systemctl enable rpcbind nfs-server # echo '/nfsroot 100.100.100.100/32(rw,sync,no_root_squash,no_all_squash)'>/etc/exports # systemctl restart rpcbind nfs-server
100.100.100.100 is, of course, the VDS IP address with future CentOS 8.
3. Download VDS "over the network" (NFSroot)
First of all, you need to copy the ramdrive ( initrd ) and kernel ( vmlinuz ) files obtained in the first step to the VDS root. Then, configure GRUB:
/etc/grub.d/40_custom
#!/bin/sh exec tail -n +3 $0 # This file provides an easy way to add custom menu entries. Simply type the # menu entries you want to add after this comment. Be careful not to change # the 'exec tail' line above. menuentry "NFSRoot" { linux /vmlinuz root=/dev/nfs rw nfsroot=200.200.200.200:/nfsroot \ ip=100.100.100.100::100.100.100.1:255.255.255.0:::off initrd /initrd }
200.200.200.200 - The IP address of the NFS server.
/ etc / default / grub
. . . GRUB_TIMEOUT=0 . . . GRUB_DEFAULT="NFSRoot" . . .
And restart VDS:
# grub2-mkconfig --output=/boot/grub2/grub.cfg # reboot
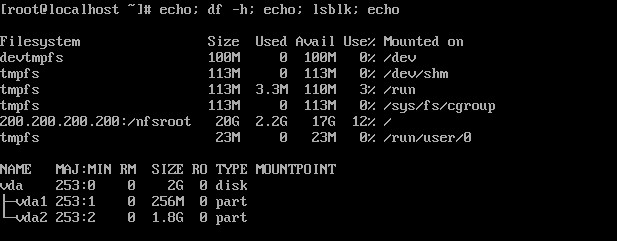
If everything goes smoothly, VDS will load the CentOS 8 donor, and the local drive will be completely unmounted:
4. "Installation" CentOS 8
Now you can re-format and format the local VDS disk, copy OS files to it, install the bootloader and configure the network. A brief description of the necessary actions:
# dnf install parted tar # parted /dev/vda unit s print free Model: Virtio Block Device (virtblk) Disk /dev/vda: 4194304s Sector size (logical/physical): 512B/512B Partition Table: msdos Disk Flags: Number Start End Size Type File system Flags 63s 2047s 1985s Free Space 1 2048s 526335s 524288s primary linux-swap(v1) 2 526336s 4194303s 3667968s primary xfs boot # dd if=/dev/zero of=/dev/vda count=3000
On tiny VDS, I prefer this disk configuration:
# parted /dev/vda unit s print free Model: Virtio Block Device (virtblk) Disk /dev/vda: 4194304s Sector size (logical/physical): 512B/512B Partition Table: msdos Disk Flags: Number Start End Size Type File system Flags 2s 2047s 2046s Free Space 1 2048s 4194303s 4192256s primary boot
Formatting, deleting a reservation and setting the UUID value to “donor”:
# mkfs.ext4 /dev/vda1 # cat /etc/fstab | grep UUID UUID=1f944e86-c590-4af7-b651-3c1783c15d79 / ext4 defaults 1 1 # tune2fs -m 0 -U 1f944e86-c590-4af7-b651-3c1783c15d79 /dev/vda1 tune2fs 1.44.3 (10-July-2018) Setting reserved blocks percentage to 0% (0 blocks) Setting UUID on a checksummed filesystem could take some time. Proceed anyway (or wait 5 seconds to proceed) ? (y,N) y
Copying operating system files and installing the bootloader:
# mount /dev/vda1 /mnt # tar xzf /centos8.tgz -C /mnt # grub2-install --boot-directory=/mnt/boot /dev/vda Installing for i386-pc platform. Installation finished. No error reported.
Since Network Manager understands legacy , you can create an appropriate ifcfg file to configure the network. The name of the interface can be found:
# ls /sys/class/net/ enp1s0 lo
# cat > /etc/sysconfig/network-scripts/ifcfg-enp1s0 << EOF > DEVICE=enp1s0 > NAME=enp1s0 > TYPE=Ethernet > ONBOOT=y > BOOTPROTO=none > IPADDR=100.100.100.100 > NETMASK=255.255.255.0 > GATEWAY=100.100.100.1 > EOF
That's all, you can reboot VDS from its local drive.
5. Conclusion
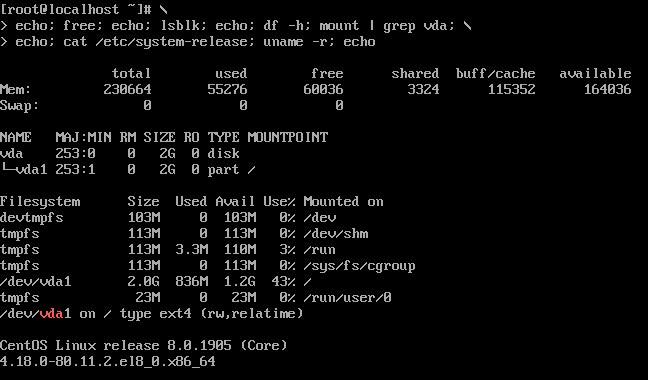
VDS with installed minimum CentOS 8:
Useful links:
www.kernel.org/doc/Documentation/filesystems/nfs/nfsroot.txt
access.redhat.com/documentation