Part 1. Creating a REST API: Web Server Basics
The web server is one of the most important components of the REST API. In this post, you will begin your REST API project by creating some initial directories and files. Then you create the web server module and plug it in so that the web server starts and shuts down correctly.
The code in this project will be organized using a common directory structure, which can be adjusted and built over time as necessary.
cd ~ mkdir hr_app cd hr_app/ touch index.js mkdir config touch config/web-server.js mkdir controllers mkdir db_apis mkdir services touch services/web-server.js
The index.js file can be considered as the "main" file in the application. It will be the entry point to the application. We will add code to this file and web-server.js files in the config and services directories.
Paste the following code in the file Home> hr_app> config> web-server.js
module.exports = { port: process.env.HTTP_PORT || 3000 };
In Node.js, a process object has an env property that contains a user environment. I use this to set the port value to the value of the HTTP_PORT environment variable. If this environment variable is not defined, the default value is 3000.
Paste the following code into the file Home> hr_app> services> web-server.js
const http = require('http'); const express = require('express'); const webServerConfig = require('../config/web-server.js'); let httpServer; function initialize() { return new Promise((resolve, reject) => { const app = express(); httpServer = http.createServer(app); app.get('/', (req, res) => { res.end('Hello World!'); }); httpServer.listen(webServerConfig.port) .on('listening', () => { console.log(`Web server listening on localhost:${webServerConfig.port}`); resolve(); }) .on('error', err => { reject(err); }); }); } module.exports.initialize = initialize;
Lines 1-3: Multiple modules required. The http module is included in Node.js, but the Express module will need to be installed via npm.
Lines 7-27: A function named initialize is declared. The function immediately returns a promise, which is allowed or rejected depending on whether the web server is successfully launched.
Lines 9-10: A new express application is created (which is actually just a function) and then used to create an http server through the http module.
Lines 12-14: The get method of the application is used to add a handler for GET requests that arrive at the root path (/). The reverse function will be called upon receipt of such a request, and it will use the “res” (res) parameter to send a “Hello World!” Response to the Client.
Lines 16-24: The server listening method is used to bind to the specified port and start listening to incoming requests.
Line 28: exporting the module so that it can be used externally
Paste the following code into the file Home> hr_app> index.js
const webServer = require('./services/web-server.js'); async function startup() { console.log('Starting application'); try { console.log('Initializing web server module'); await webServer.initialize(); } catch (err) { console.error(err); process.exit(1); // Non-zero failure code } } startup();
We connect the web server module, and then it determines and calls the asynchronous startup function. Since the initialize function of the web server returns a promise, you can use it with async / await and wrap it in a try-catch block. If the initialize function succeeds, the web server will work; otherwise, any exceptions will be caught and processed. All you have to do now is initialize npm and install Express - then you can start the application. Run the following commands in a terminal from the hr_app directory.
npm init -y npm install express -s node .
The npm init command is used to create the package.json file, which npm uses as a manifest file (the -y flag accepts default options). The npm install command is used to install express (the -s flag adds express to the dependency list in package.json). Npm stores the modules you install in the node_modules directory. He also creates a file called package.lock.json to provide an identical tree for the development team.
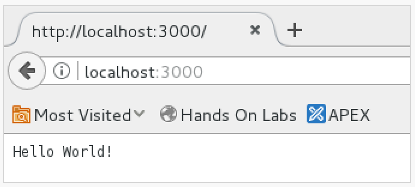
Do you see the message Web server listening on localhost: 3000? Congratulations, you have created an express server based on!
And here he is, another "Hello World". Although not particularly fun, this is an important first step for your API.
When you are ready, you can turn off the server by returning to the terminal and pressing ctrl + c.
Controlled shutdown
During shutdown by pressing Ctrl + C, you have no control over how this happened. To control the shutdown process, you need to explicitly close the web server and exit the Node.js.
Paste the following code into the file Home> hr_app> services> web-server.js
// *** previous code above this line *** function close() { return new Promise((resolve, reject) => { httpServer.close((err) => { if (err) { reject(err); return; } resolve(); }); }); } module.exports.close = close;
The close function returns a promise that is resolved when the web server is successfully closed. The httpServer.close method stops the establishment of new connections, but does not force to close already open connections. Depending on how many connections are open and what they are doing, you may need to wait a bit until the callback works. Although you will not do this in this module, you can use custom code or npm modules such as http-shutdown to force close open connections.
Paste the following code into the file Home> hr_app> index.js
// *** previous code above this line *** async function shutdown(e) { let err = e; console.log('Shutting down'); try { console.log('Closing web server module'); await webServer.close(); } catch (e) { console.log('Encountered error', e); err = err || e; } console.log('Exiting process'); if (err) { process.exit(1); // Non-zero failure code } else { process.exit(0); } } process.on('SIGTERM', () => { console.log('Received SIGTERM'); shutdown(); }); process.on('SIGINT', () => { console.log('Received SIGINT'); shutdown(); }); process.on('uncaughtException', err => { console.log('Uncaught exception'); console.error(err); shutdown(err); });
SIGINT and SIGTERM events relate to signals that can be sent to a process to shut it down, for example, when ctrl + c is pressed. The uncaughtException event will occur when a JavaScript error is thrown, but not caught, and handled using the try-catch statement. Try to start and close the application again. You will find out that everything works correctly when you see the “shutdown” messages in the terminal.
Registration on the server
There is one more thing that completes our web server module: HTTP logging. There are various modules that you can use for this type of login, but morgan is one of the simple ones. Let's install morgan using npm.
npm install morgan -s
Then add the following line to services / web-server.js under the line that requires express (line 2):
const morgan = require('morgan');
Now you can enable the morgan function as middleware through which all requests will be processed using app.use. Add this line before calling app.get, which displays the message “hello world”.
// Combines logging info from request and response app.use(morgan('combined')); // *** app.get call below this line ***
Note that app.use creates a pipeline of middleware functions that can interact with HTTP requests and responses. The middleware functions will be executed in the order in which they are enabled. Restart the application and install the terminal so that you can see it and the browser at the same time. Each time you reload the page, you should see a new log entry appear in the terminal. By default, morgan passes log information to STDOUT (which is displayed in the terminal).
The following article will cover the basics of working with databases, including connection pools, which will help you understand and build the REST API for Node.js.