First of all, using expo-cli, create a new expo project, for this we execute the command in the terminal:
expo init
And follow all the steps of the wizard to create an empty application.
After we have received the created application, it is necessary to add the dependencies that will be used in the future:
yarn add apollo / react-hooks apollo-cache-inmemory apollo-client apollo-link-http apollo-link-ws apollo-utilities graphql graphql-tag native-base react-router-native subscriptions-transport-ws
Done, the next step is to connect and configure apollo client to work with our backend. To do this, add the code below to App.js. I note that here we will configure apollo to connect to our backend via http and websocket protocols, as well as create an in-memory cache for apollo, as well as create 2 routes: one for the login form and the second for the chat page.
get link() { const BACKEND_URL = Platform.OS === 'ios' ? 'localhost:3000' : '10.0.2.2:3000'; const httpLink = new HttpLink({ uri: `http://${BACKEND_URL}/graphql` }); const wsLink = new WebSocketLink({ uri: `ws://${BACKEND_URL}/graphql`, options: { reconnect: true } }); return split( // split based on operation type ({ query }) => { const definition = getMainDefinition(query); return ( definition.kind === 'OperationDefinition' && definition.operation === 'subscription' ); }, wsLink, httpLink, ); } async componentDidMount() { const cache = new InMemoryCache(); this.client = new ApolloClient({ link: this.link, cache }); …. } render() { return ( ... <ApolloProvider client={this.client}> <NativeRouter> <Route exact path="/" component={UsernameForm}/> <Route path="/chat" component={Chat}/> </NativeRouter> </ApolloProvider> ) }
I will not describe the creation of the form in detail, I think you have already seen this several times, I will only say that the code of the login form can be found here , for simplicity I decided not to add authorization and a password field, however, if you wish, you can easily do it yourself .
I will dwell on an interesting point:
const [ findOrCreateUser ] = useMutation(FIND_OR_CREATE_USER, { update(cache, { data: { findOrCreateUser: { id, username } } }) { cache.writeQuery({ query: GET_CURRENT_USER, data: { id, username }, }); } });
Here, the mutation of adding / receiving a user by his username, as well as recording the result in the cache for further use in other parts of the application, is called.
After the login form is implemented, the next item is chat.
Again, we will not dwell on the layout, the entire code can be found here .
We use the subscription functionality to receive notifications about a new chat message and process only that thread when the message was not created by the current user, because otherwise, the message will already go to the apollo cache:
useSubscription(MESSAGE_CREATED, { onSubscriptionData: ({ client, subscriptionData: { data: { messageCreated } } }) => { const { getLast100Messages } = client.readQuery({ query: GET_LAST_100_MESSAGES }); if (messageCreated.user.id !== id) { client.writeQuery({ query: GET_LAST_100_MESSAGES, data: { getLast100Messages: [ ...getLast100Messages, messageCreated ] } }); } } });
Another interesting point, when downloading a chat with existing messages in it, the oldest message will be displayed at the top of the screen, this is unusual for users, we will make the application behavior more natural, for this we add the following lines of code:
const scrollEl = useRef(null); … <Content ref={scrollEl} onContentSizeChange={() => { scrollEl.current.wrappedInstance.scrollToEnd({ animated: true }); }} >
Now, when receiving the initial data or when adding a new message, the chat will smoothly scroll to the very last message.
The rest of the code does not make sense to consider, since it is similar to what has already been done, the application implementation is stored in the repository .
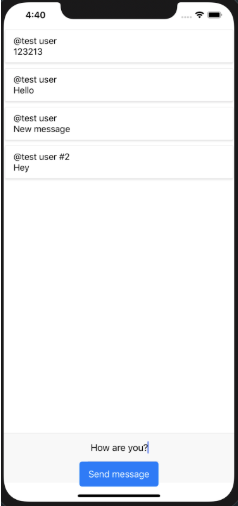
After all the functionality of the application has been implemented, it remains only to test the operability of the application along with the backend from the previous article. The application launched on the emulator looks like this: