One of the interesting and popular (especially for different anniversaries) tasks is to “colorize” old black-and-white photographs and even films. This topic is quite interesting, both from a mathematical and a historical point of view. We will consider the implementation of this process in Python, which anyone can run on their home PC, and convert photos and even videos to color.
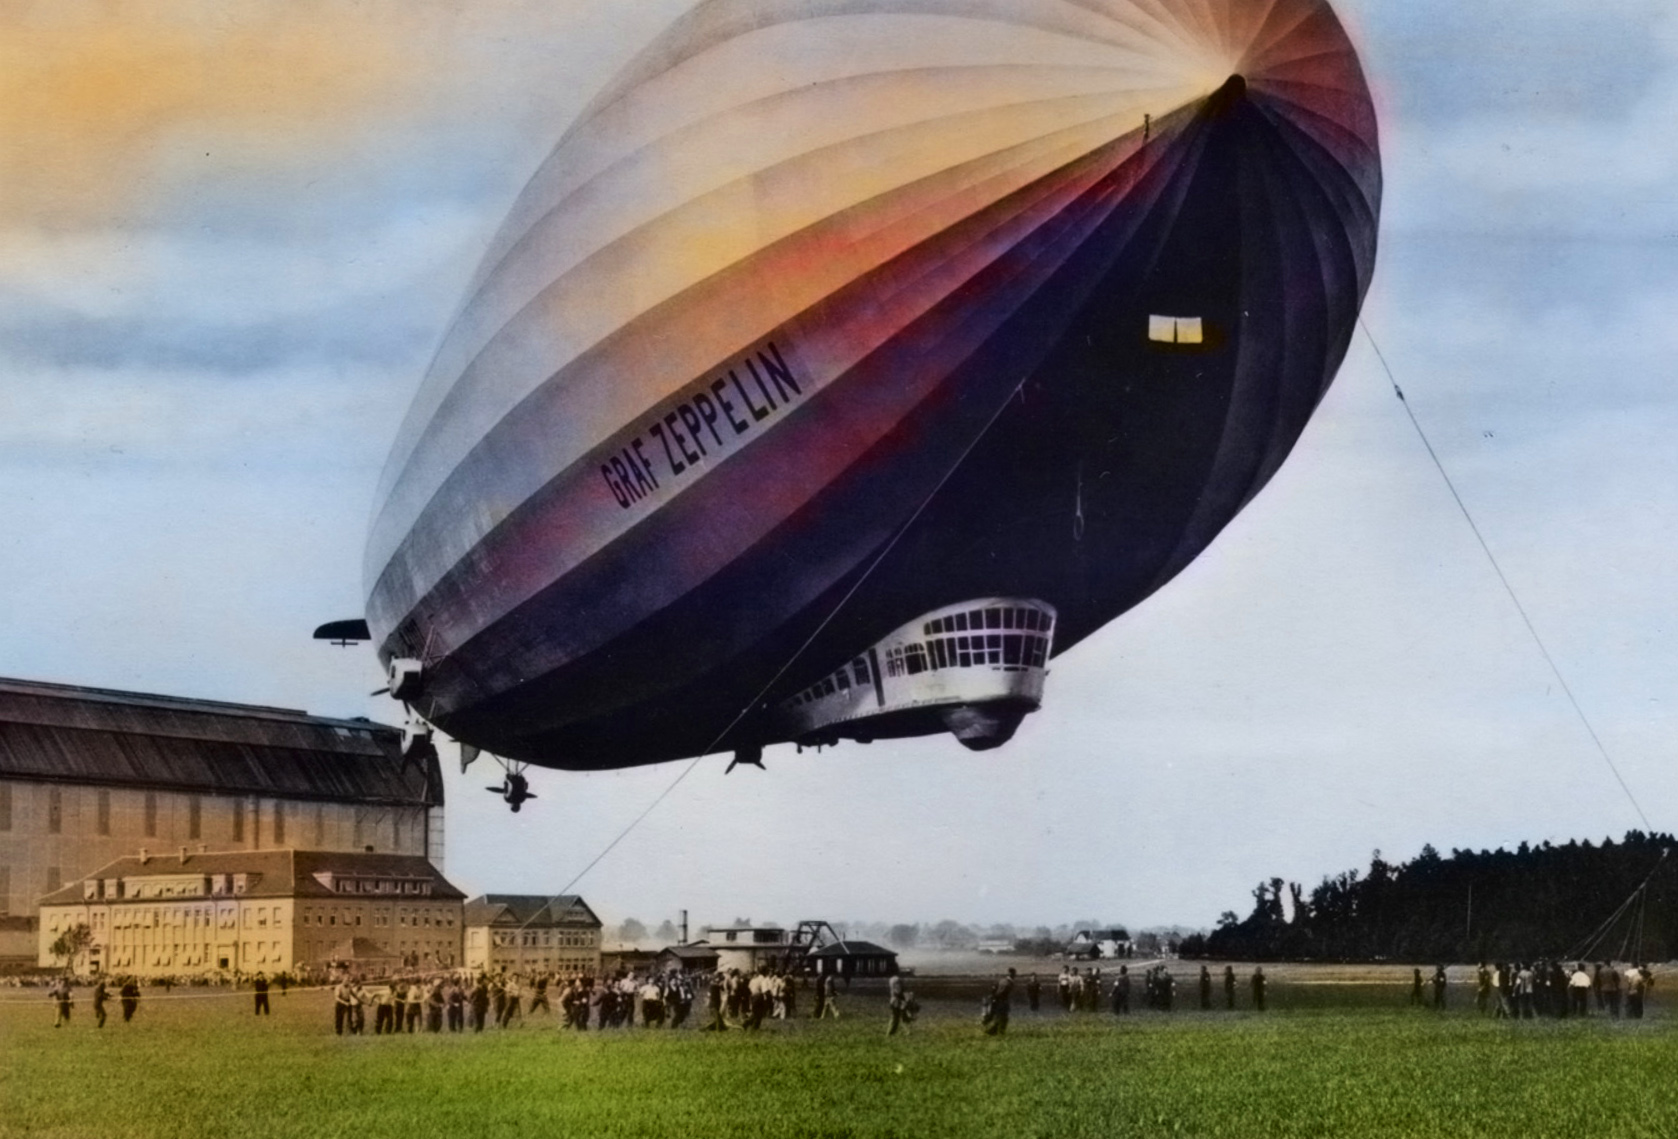
The result of the work in the photo.
For those who are interested, the principle of work, source codes and examples under the cut.
Principle of operation
So, we have black and white photos that were taken at a time when color printing was not there. What does this mean for us - that the color information in these photos is physically absent, we cannot take it from there. There are two options - either to paint manually (which some specially trained people do, which may include not only coloring, but also working with archives, museums, etc.), or call on the full power of machine learning, and let the computer do the rough work for us. .
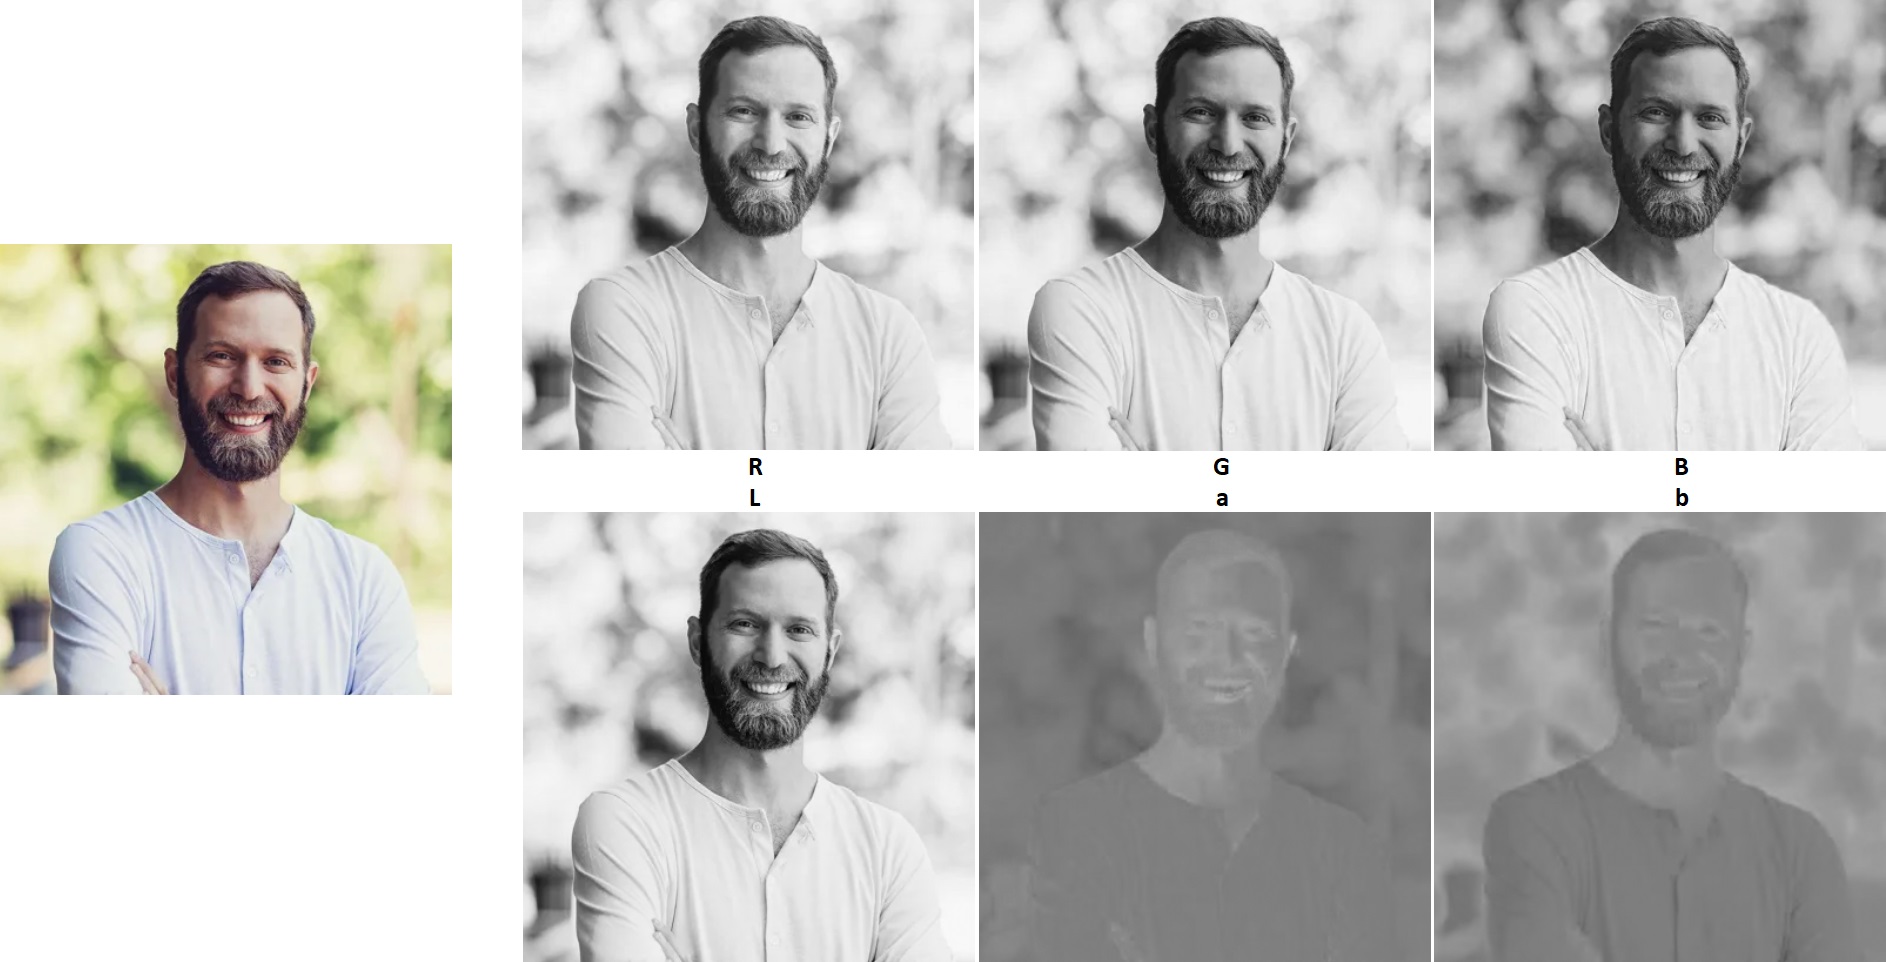
The basic approach is essentially simple. The first step is to convert the image to Lab format, which contains separately the brightness (L) and color (ab) components. L-channel is actually the desired black and white photo.
The second step is to teach a neural network that can “guess” the missing color channels for us through channel L. To do this, you need a lot of color images that will be used for training.
And finally, when everything is ready, we can use the trained neural network to colorize black and white photographs.
We will consider two approaches - the implementation of a neural network from scratch, and the use of a “professional” pre-trained neural network. The first method is more likely to be educational, and those who want to look at practical results can immediately proceed to the second.
Method 1. Implementing from scratch in Keras
Let's get down to the code. Let's look at an example implementation from Emil Wallner, its code on github can be viewed at the link.
Upload photos
Nothing unusual here. We load the array and bring the colors to the range 0..1. As you can see, the neural network works with 256x256 images. A little, but even this is at the limit of the capabilities of modern "home" video cards - when training the network, I periodically received an Out Of Memory message.
import numpy as np import cv2 IMG_SIZE = 256 def load_train_images(folder): x = [] for filename in os.listdir(folder): x.append(img_to_array(load_img(folder + os.sep + filename))) x = np.array([cv2.resize(i, (IMG_SIZE, IMG_SIZE)) for i in x], dtype=float)/255.0 return x
Data preparation
Here we use the ImageDataGenerator class, which allows you to get several from one image. As you can see, zoom_range = 0.2, rotation_range = 20, horizontal_flip = True, i.e. several images with different rotation, magnification and horizontal reflection will be created from one image.
from skimage.color import rgb2lab, lab2rgb, rgb2gray, xyz2lab from keras.preprocessing.image import ImageDataGenerator, array_to_img, img_to_array, load_img from keras.layers import Conv2D, UpSampling2D, InputLayer, Conv2DTranspose from keras.layers import Activation, Dense, Dropout, Flatten datagen = ImageDataGenerator(shear_range=0.2, zoom_range=0.2, rotation_range=20, horizontal_flip=True) # Generate training data def image_a_b_gen(batch_size): for batch in datagen.flow(train_images, batch_size=batch_size): lab_batch = rgb2lab(batch) x_batch = lab_batch[:, :, :, 0] y_batch = lab_batch[:, :, :, 1:] / 128 yield (x_batch.reshape(x_batch.shape + (1,)), y_batch)
Inside the generator itself, the rgb2lab function is called, and the corresponding channels are taken.
Neural network training
As you can see, a fairly multi-layer convolutional network is used here, which is configured so that the resulting image is the same size as the input.
model = Sequential() model.add(InputLayer(input_shape=(IMG_SIZE, IMG_SIZE, 1))) model.add(Conv2D(64, (3, 3), activation='relu', padding='same')) model.add(Conv2D(64, (3, 3), activation='relu', padding='same', strides=2)) model.add(Conv2D(128, (3, 3), activation='relu', padding='same')) model.add(Conv2D(128, (3, 3), activation='relu', padding='same', strides=2)) model.add(Conv2D(256, (3, 3), activation='relu', padding='same')) model.add(Conv2D(256, (3, 3), activation='relu', padding='same', strides=2)) model.add(Conv2D(512, (3, 3), activation='relu', padding='same')) model.add(Conv2D(256, (3, 3), activation='relu', padding='same')) model.add(Conv2D(128, (3, 3), activation='relu', padding='same')) model.add(UpSampling2D((2, 2))) model.add(Conv2D(64, (3, 3), activation='relu', padding='same')) model.add(UpSampling2D((2, 2))) model.add(Conv2D(32, (3, 3), activation='relu', padding='same')) model.add(Conv2D(2, (3, 3), activation='tanh', padding='same')) model.add(UpSampling2D((2, 2))) model.compile(optimizer='rmsprop', loss='mse') model.fit_generator(image_a_b_gen(batch_size=50), steps_per_epoch=steps_per_epoch, epochs=epochs)
The actual coloring consists in preparing the L-channel (b / w photo), calling the predict function of the neural network and combining the channels together.
output = model.predict(data_in) for i in range(len(output)): cur = np.zeros((256, 256, 3)) cur[:,:,0] = color_me[i][:,:,0] cur[:,:,1:] = output[i] * 128 img_rgb = lab2rgb(cur)*brightness_corr imsave(folder_dst + os.sep + "img_%d.png" % i, img_rgb.astype(np.uint8))
In general, and all the "magic."
Alas, it was not possible to achieve stable operation from this program, sometimes it shows good results, sometimes nothing at all, so this example can only be considered as an educational one. Those interested can see the results on github , the source can be taken there . For those who are too lazy to go to github, the whole code is given under the spoiler.
colorize1.py
import os # os.environ["CUDA_VISIBLE_DEVICES"] = "-1" # Force CPU os.environ['TF_CPP_MIN_LOG_LEVEL'] = '3' # 0 = all messages are logged, 3 - INFO, WARNING, and ERROR messages are not printed from keras.layers import Conv2D, Conv2DTranspose, UpSampling2D from keras.layers import Activation, Dense, Dropout, Flatten, InputLayer from keras.layers.normalization import BatchNormalization from keras.callbacks import TensorBoard from keras.models import Sequential from keras.preprocessing.image import ImageDataGenerator, array_to_img, img_to_array, load_img from skimage.color import rgb2lab, lab2rgb, rgb2gray from skimage.io import imsave import numpy as np import random import tensorflow as tf import cv2 folder_train = "Faces" folder_src = "Input" folder_dst = "Output" model_file = "faces1.h5" brightness_corr = 250 do_train = True # Get train images X = [] for filename in os.listdir(folder_train): X.append(img_to_array(load_img(folder_train + os.sep + filename))) X = np.array([cv2.resize(i, (256, 256)) for i in X], dtype=float)/255.0 # X = np.array(X, dtype=float) Xtrain = X # Model model = Sequential() model.add(InputLayer(input_shape=(256, 256, 1))) model.add(Conv2D(64, (3, 3), activation='relu', padding='same')) model.add(Conv2D(64, (3, 3), activation='relu', padding='same', strides=2)) model.add(Conv2D(128, (3, 3), activation='relu', padding='same')) model.add(Conv2D(128, (3, 3), activation='relu', padding='same', strides=2)) model.add(Conv2D(256, (3, 3), activation='relu', padding='same')) model.add(Conv2D(256, (3, 3), activation='relu', padding='same', strides=2)) model.add(Conv2D(512, (3, 3), activation='relu', padding='same')) model.add(Conv2D(256, (3, 3), activation='relu', padding='same')) model.add(Conv2D(128, (3, 3), activation='relu', padding='same')) model.add(UpSampling2D((2, 2))) model.add(Conv2D(64, (3, 3), activation='relu', padding='same')) model.add(UpSampling2D((2, 2))) model.add(Conv2D(32, (3, 3), activation='relu', padding='same')) model.add(Conv2D(2, (3, 3), activation='tanh', padding='same')) model.add(UpSampling2D((2, 2))) model.compile(optimizer='rmsprop', loss='mse') # Image transformer datagen = ImageDataGenerator(shear_range=0.2, zoom_range=0.2, rotation_range=20, horizontal_flip=True) # Generate training data batch_size = 10 def image_a_b_gen(batch_size): for batch in datagen.flow(Xtrain, batch_size=batch_size): lab_batch = rgb2lab(batch) X_batch = lab_batch[:,:,:,0] Y_batch = lab_batch[:,:,:,1:] / 128 yield (X_batch.reshape(X_batch.shape+(1,)), Y_batch) if do_train: # Train model model.fit_generator(image_a_b_gen(batch_size), epochs=1, steps_per_epoch=400) # Save model model.save_weights(model_file) # Load model model.load_weights(model_file) # Process images color_me = [] for filename in os.listdir(folder_src): color_me.append(img_to_array(load_img(folder_src + os.sep + filename))) color_me = np.array([cv2.resize(i, (256, 256)) for i in color_me], dtype=float) # color_me = np.array(color_me, dtype=float) color_me = rgb2lab(1.0/255*color_me)[:,:,:,0] color_me = color_me.reshape(color_me.shape+(1,)) # Test model output = model.predict(color_me) # Output colorizations for i in range(len(output)): cur = np.zeros((256, 256, 3)) cur[:,:,0] = color_me[i][:,:,0] cur[:,:,1:] = output[i] * 128 img_rgb = lab2rgb(cur)*brightness_corr imsave(folder_dst + os.sep + "img_%d.png" % i, img_rgb.astype(np.uint8)) print("img_%d.png saved" % i)
Method 2. Pre-trained network
As a second method, consider a ready-made neural network from Rich Zhang . This is a much more serious project, the neural network was trained for 1.3 million images, and only the files of the saved model for this network occupy about 300 MB.
Step 1 Download model files:
Download the files colorization_deploy_v2.prototxt , colorization_release_v2.caffemodel and pts_in_hull.npy , put them in the models folder.
Step 2 Download the neural network model
def load_model() -> Any: # Load serialized black and white colorizer model and cluster # The L channel encodes lightness intensity only # The a channel encodes green-red. # And the b channel encodes blue-yellow print("Loading model...") prototxt = "models/colorization_deploy_v2.prototxt" model = "models/colorization_release_v2.caffemodel" points = "models/pts_in_hull.npy" net = cv2.dnn.readNetFromCaffe(prototxt, model) pts = np.load(points) # Add the cluster centers as 1x1 convolutions to the model: class8 = net.getLayerId("class8_ab") conv8 = net.getLayerId("conv8_313_rh") pts = pts.transpose().reshape(2, 313, 1, 1) net.getLayer(class8).blobs = [pts.astype("float32")] net.getLayer(conv8).blobs = [np.full([1, 313], 2.606, dtype="float32")] return net
Step 3 Colorize the image. The principle is the same as in our "educational" example: we get the channels in Lab, convert them to RGB and write to a file.
def colorize_image(net: Any, image_in: str, image_out: str): # Load the input image, scale it and convert it to Lab: image = cv2.imread(image_in) height, width, channels = image.shape # image = cv2.cvtColor(image, cv2.COLOR_BGR2GRAY) # image = cv2.cvtColor(image, cv2.COLOR_GRAY2RGB) # Extracting "L" scaled = image.astype("float32") / 255.0 lab = cv2.cvtColor(scaled, cv2.COLOR_RGB2LAB) # Resize to network size resized = cv2.resize(lab, (224, 224)) L = cv2.split(resized)[0] L -= 50 # Predicting "a" and "b" net.setInput(cv2.dnn.blobFromImage(L)) ab = net.forward()[0, :, :, :].transpose((1, 2, 0)) # Creating a colorized Lab photo (L + a + b) L = cv2.split(lab)[0] ab = cv2.resize(ab, (width, height)) colorized = np.concatenate((L[:, :, np.newaxis], ab), axis=2) # Convert to RGB colorized = cv2.cvtColor(colorized, cv2.COLOR_LAB2RGB) colorized = np.clip(colorized, 0, 1) colorized = (255 * colorized).astype("uint8") cv2.imwrite(image_out, cv2.cvtColor(colorized, cv2.COLOR_RGB2BGR)) print("Image %s saved" % image_out)
results
As the source files, I took the following photos:

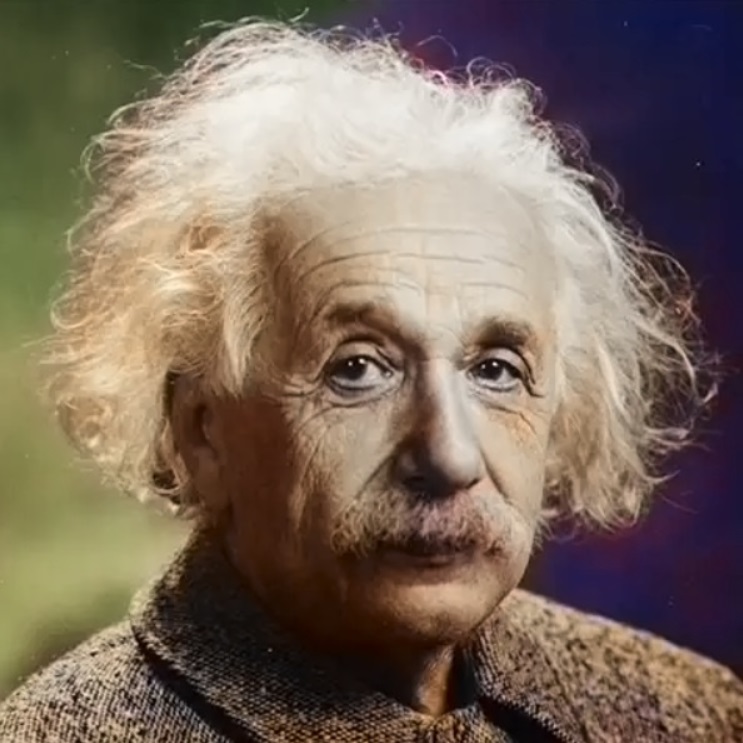
The result is imperfect, but basically not so bad:

It is important to keep in mind that the neural network works with 224x224 images, so alas, it will not be possible to get High-Res - the output image will have the original resolution (L channel), but the color channel will be scaled from 224x224. Although if you do not know this, it is not so easy to notice color artifacts, the color resolution of the eye is several times lower than the brightness:
At KDPV the principle is the same.
For those who want to experiment independently with different pictures, the source is under the spoiler.
colorize2.py
import numpy as np from typing import * import cv2 import os # Sources: # https://www.learnopencv.com/convolutional-neural-network-based-image-colorization-using-opencv/ # https://www.pyimagesearch.com/2019/02/25/black-and-white-image-colorization-with-opencv-and-deep-learning/ # http://richzhang.github.io/colorization/ # Models: # http://eecs.berkeley.edu/~rich.zhang/projects/2016_colorization/files/demo_v2/colorization_release_v2.caffemodel # http://eecs.berkeley.edu/~rich.zhang/projects/2016_colorization/files/demo_v2/colorization_release_v2_norebal.caffemodel # http://eecs.berkeley.edu/~rich.zhang/projects/2016_colorization/files/demo_v1/colorization_release_v1.caffemodel prototxt = "models/colorization_deploy_v2.prototxt" model = "models/colorization_release_v2.caffemodel" points = "models/pts_in_hull.npy" folder_in = "Input" folder_out = "Output" def load_model() -> Any: # Load serialized black and white colorizer model and cluster # The L channel encodes lightness intensity only # The a channel encodes green-red. # And the b channel encodes blue-yellow print("Loading model...") net = cv2.dnn.readNetFromCaffe(prototxt, model) pts = np.load(points) # Add the cluster centers as 1x1 convolutions to the model: class8 = net.getLayerId("class8_ab") conv8 = net.getLayerId("conv8_313_rh") pts = pts.transpose().reshape(2, 313, 1, 1) net.getLayer(class8).blobs = [pts.astype("float32")] net.getLayer(conv8).blobs = [np.full([1, 313], 2.606, dtype="float32")] return net def colorize_image(net: Any, image_in: str, image_out: str): # Load the input image, scale it and convert it to Lab: image = cv2.imread(image_in) height, width, channels = image.shape # image = cv2.cvtColor(image, cv2.COLOR_BGR2GRAY) # image = cv2.cvtColor(image, cv2.COLOR_GRAY2RGB) # Extracting "L" scaled = image.astype("float32") / 255.0 lab = cv2.cvtColor(scaled, cv2.COLOR_RGB2LAB) # Resize to network size resized = cv2.resize(lab, (224, 224)) L = cv2.split(resized)[0] L -= 50 # Predicting "a" and "b" net.setInput(cv2.dnn.blobFromImage(L)) ab = net.forward()[0, :, :, :].transpose((1, 2, 0)) # Creating a colorized Lab photo (L + a + b) L = cv2.split(lab)[0] ab = cv2.resize(ab, (width, height)) colorized = np.concatenate((L[:, :, np.newaxis], ab), axis=2) # Convert to RGB colorized = cv2.cvtColor(colorized, cv2.COLOR_LAB2RGB) colorized = np.clip(colorized, 0, 1) colorized = (255 * colorized).astype("uint8") cv2.imwrite(image_out, cv2.cvtColor(colorized, cv2.COLOR_RGB2BGR)) print("Image %s saved" % image_out) if __name__ == '__main__': net = load_model() for filename in os.listdir(folder_in): colorize_image(net, folder_in + os.sep + filename, folder_out + os.sep + filename.replace(".", "-out."))
To run the program, programming skills are not required, it is enough to be able to run the program from the console and put the source files in the Input folder, color photos will be generated in the Output folder (you also need to download the model files from the above links to the models folder).
Conclusion
As you can see, the task of coloring a photo is very difficult from a computational point of view. Even training a neural network processing files 224x224pks may require a powerful video card and several hours or even days of training. Whether there are affordable neural networks capable of at least FullHD-quality, I do not know.
Those who wish can study the project from Rich Chang in more detail, there are instructions for training the network on different datasets, well, and the ready code above with an already trained network can simply be started, it works quickly and almost does not require PC resources.
A good article from mail.ru about coloring photos of wartime can be read on their blog , but of course, like in any corporate blog, there are no source codes
And a bonus for those who have read up to here. Using a similar approach, you can colorize the video, the principle is exactly the same. The source code that receives and stores MP4 is listed under the spoiler.
video.py
def colorize_video(net: Any, video_in: str, video_out: str): vid_in = cv2.VideoCapture(video_in) frames, fps = int(vid_in.get(cv2.CAP_PROP_FRAME_COUNT)), int(round(vid_in.get(cv2.CAP_PROP_FPS))) width, height = int(vid_in.get(cv2.CAP_PROP_FRAME_WIDTH)), int(vid_in.get(cv2.CAP_PROP_FRAME_HEIGHT)) print("Video {}: {}x{}, {} frames, {} fps".format(video_in, width, height, frames, fps)) size_out = (width, height) vid_out = cv2.VideoWriter(video_out, cv2.VideoWriter_fourcc(*"mp4v"), fps, size_out) # .mp4 # vid_out = cv2.VideoWriter(video_out, cv2.VideoWriter_fourcc(*'DIVX'), fps, size_out) # .avi count = 0 while True: success, frame = vid_in.read() if frame is None or success is False: break if (count % 10) == 0: print("Frame {} of {}".format(count, frames)) frame = cv2.cvtColor(frame, cv2.COLOR_BGR2GRAY) frame = cv2.cvtColor(frame, cv2.COLOR_GRAY2RGB) scaled = frame.astype("float32") / 255.0 lab = cv2.cvtColor(scaled, cv2.COLOR_RGB2LAB) resized = cv2.resize(lab, (224, 224)) L = cv2.split(resized)[0] L -= 50 net.setInput(cv2.dnn.blobFromImage(L)) ab = net.forward()[0, :, :, :].transpose((1, 2, 0)) ab = cv2.resize(ab, (frame.shape[1], frame.shape[0])) L = cv2.split(lab)[0] colorized = np.concatenate((L[:, :, np.newaxis], ab), axis=2) colorized = cv2.cvtColor(colorized, cv2.COLOR_LAB2BGR) colorized = np.clip(colorized, 0, 1) colorized = (255 * colorized).astype("uint8") frame_out = colorized # cv2.cvtColor(colorized, cv2.COLOR_RGB2BGR) vid_out.write(frame_out) count += 1 vid_in.release() vid_out.release() print("File %s saved" % video_out)
It is enough to insert it into the above program. The video processing process is not fast, the speed is about 1-2 frames / s.
As usual, all successful experiments.
You can declare in the comments a contest for the best color retro photo;)