Ruby on Rails installation issue at the end of 2019
Hello to all lovers of programming and improving the world for the better.
In this post, I’ll tell you how I was tormented with installing Ruby on Rails, I’ll say right away, before that I had never come across this solution and the task was given to me by a potential employer to write a specific solution on this framework.
It took me almost four days to do this, and honestly, I had no idea where to dig in which direction and what to do, due to not knowing anything about this decision at all. Searches on the Internet for reinstalling program components and language yielded nothing, as well as searches on various forums and on video platforms. And the biggest problem was that these videos and solutions were either last year’s or with outdated versions, and repeating the previous steps did not produce results.
Having spent a lot of time on this, I hope that these steps will enable those in need of an answer and solving their problems in installation, some help and reduce that precious time which we always lack.
And so, let's get started.
Installation was carried out on the Windows 10 Home OS.
1. Download from the site: rubyinstaller.org in the downloads section the Ruby version - Ruby + Devkit 2.6.5-1 (x64) - maybe you will have a newer one, and also monitor the bit depth of the OS that has x32 vs x86, choose the appropriate
2. Download from the site: www.sqlite.org in the downloads section two files from the Precompiled Binaries for Windows subsection, one: sqlite-dll-win32-x86-3300000.zip, the second: sqlite-dll-win64-x64-3300000.zip
with the download finished, proceed to the step-by-step installation
3. First, unpack the files from the archives downloaded from the site www.sqlite.org into one folder and copy this folder to the installation address of your operating system. I have this C: \ sqlite folder called 'sqlite'. Only files from two archives should be in this folder, if there are folders in the archives, then you need to get the files from them and transfer them to the specified folder C: \ sqlite
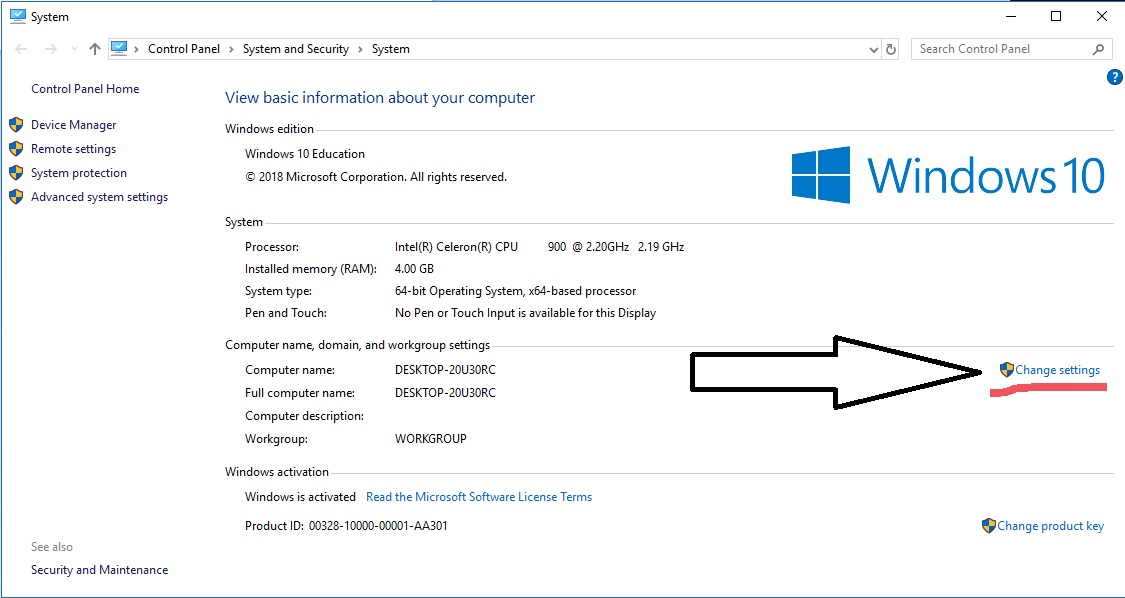
4. You need to give access to sqlite from any directories of your computer, for this: right-click on “My Computer” and select “Properties” in the drop-down menu, a window with the data of your system will open, click on:
Further in the window that appears, click
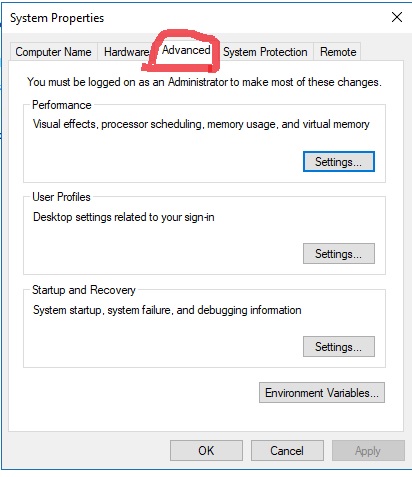
Further

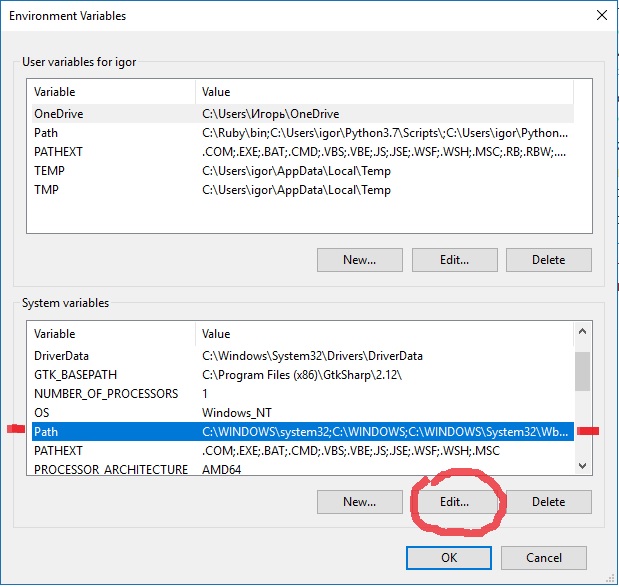
then in the lower part of the window select Path and click "Edit" or "Edit"
then in the window that appears, click "New" or "New" and in a new line, write to the sqlite files I have this C: \ sqlite and click everywhere "OK" thereby accepting the changes
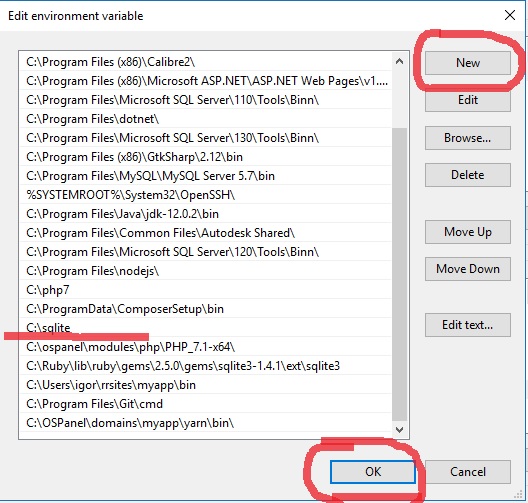
everything, with paragraph number 4 we finished
sqlite installation can be checked by entering the sqlite3 command in cmd and pressing the Enter key, if the program version is displayed, everything is fine, the installation is successful and you can continue to move on
important note: the library 'rails' at the time of installation was the latest version 6.0.0 and it was installed on command only the last, when I tried to put the version of 'ruby' earlier, there was an error in some libraries with 'rails' and there were problems, stay tuned so that the rails and ruby versions are at most the same release time
5. You need to install Ruby on your computer, just run the installation file we downloaded earlier and put it on the dist with the OS, I called the folder “Ruby” easier, wait for the installation, at the end in the last step, you need to check the box installation of an additional library, if it costs nothing, then click "OK".
A window similar to the cmd windows will open and in this window you will need to enter the number “1” according to the instructions and press “Enter”, wait for installation and continue.
You can verify the installation by entering the ruby -v command in cmd, also if the ruby version is displayed, then everything went well.
6. Next, we need to install the “Rails” framework for this; enter the following command “gem install rails” in cmd, wait for the installation to complete, you can also check the command “rails -v” in cmd, if it issues a version, everything is fine and you can move on.
The fun begins.
7. Next, we need to create a project, which will be the majority of the problems. We create a folder on the computer anywhere, I also created on the same disk with Windows, and go to cmd in this folder. When you’ve switched, we type the command to create the project 'rails new app' where 'app' is the name of the application, you can choose any reasonable one and press 'Enter' the installation will start and most likely there will be an error somewhere
error 1: cannot find or determine sqlite3 version 1.4.1 or 1.4.0
open the folder with the application already installed through the Sublime Text program and open the file 'Gemfile' it will be visible at the first level at the bottom
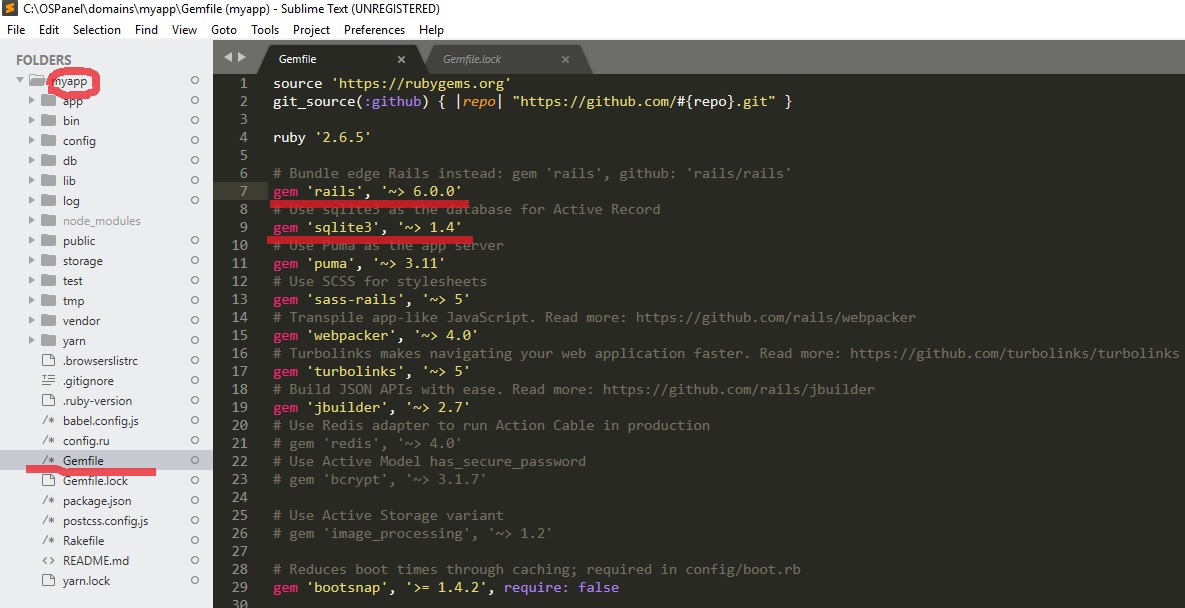
change data values:
to lower versions, or those versions that are registered in cmd errors when creating a project
eg:
and try to reinstall sqlite with the command, entering it in cmd 'gem install sqlite' if this command does not work, try rails install sqlite or gem sqlite install, in any case there will be no error in the application, only in the cmd program window - this is not scary
8. Next, we will need to restart the installer called 'bundle', it was launched during the creation of the application and is responsible for all rails components. It is launched by the command 'bundle install' and an error will occur, approximately in the middle of the process, where it will be said that the file 'webpack' is not found and to install it you must first download the file 'yarn from the resource yarnpkg.com/lang/en/docs/install 'and install it on the computer.
So we do.
9. Download the file 'yarn' from yarnpkg.com/lang/en/docs/install under windows and double-click on the file, install it in the folder with your project along the path 'Name of your project (folder) \ yarn (folder)'
10. Next, as was previously said in cmd, we run the command 'rails webpack: install' and wait for the installation, it will not be fast.
11. At the end of the installation, enter the command 'rails s' thereby starting the server, we find in the cmd line '* Listening on tcp: // localhost: 3000' from which we copy 'localhost: 3000', paste it into the browser and enjoy high technology .
In the beginning, three days ago, I only went to the step of creating an application where the problematic sqlite database did not want to work and start.
If after the steps you have taken, the server still does not start and there are problems, look carefully at the 'Gemfile' project file for instructions on what version to install, change the version number and run the installer again 'bundle install' or 'bundle update' .
It's all.
All interesting projects, extraordinary ideas and good mood.
In this post, I’ll tell you how I was tormented with installing Ruby on Rails, I’ll say right away, before that I had never come across this solution and the task was given to me by a potential employer to write a specific solution on this framework.
It took me almost four days to do this, and honestly, I had no idea where to dig in which direction and what to do, due to not knowing anything about this decision at all. Searches on the Internet for reinstalling program components and language yielded nothing, as well as searches on various forums and on video platforms. And the biggest problem was that these videos and solutions were either last year’s or with outdated versions, and repeating the previous steps did not produce results.
Having spent a lot of time on this, I hope that these steps will enable those in need of an answer and solving their problems in installation, some help and reduce that precious time which we always lack.
And so, let's get started.
Installation was carried out on the Windows 10 Home OS.
1. Download from the site: rubyinstaller.org in the downloads section the Ruby version - Ruby + Devkit 2.6.5-1 (x64) - maybe you will have a newer one, and also monitor the bit depth of the OS that has x32 vs x86, choose the appropriate
2. Download from the site: www.sqlite.org in the downloads section two files from the Precompiled Binaries for Windows subsection, one: sqlite-dll-win32-x86-3300000.zip, the second: sqlite-dll-win64-x64-3300000.zip
with the download finished, proceed to the step-by-step installation
3. First, unpack the files from the archives downloaded from the site www.sqlite.org into one folder and copy this folder to the installation address of your operating system. I have this C: \ sqlite folder called 'sqlite'. Only files from two archives should be in this folder, if there are folders in the archives, then you need to get the files from them and transfer them to the specified folder C: \ sqlite
4. You need to give access to sqlite from any directories of your computer, for this: right-click on “My Computer” and select “Properties” in the drop-down menu, a window with the data of your system will open, click on:
Further in the window that appears, click
Further
then in the lower part of the window select Path and click "Edit" or "Edit"
then in the window that appears, click "New" or "New" and in a new line, write to the sqlite files I have this C: \ sqlite and click everywhere "OK" thereby accepting the changes
everything, with paragraph number 4 we finished
sqlite installation can be checked by entering the sqlite3 command in cmd and pressing the Enter key, if the program version is displayed, everything is fine, the installation is successful and you can continue to move on
important note: the library 'rails' at the time of installation was the latest version 6.0.0 and it was installed on command only the last, when I tried to put the version of 'ruby' earlier, there was an error in some libraries with 'rails' and there were problems, stay tuned so that the rails and ruby versions are at most the same release time
5. You need to install Ruby on your computer, just run the installation file we downloaded earlier and put it on the dist with the OS, I called the folder “Ruby” easier, wait for the installation, at the end in the last step, you need to check the box installation of an additional library, if it costs nothing, then click "OK".
A window similar to the cmd windows will open and in this window you will need to enter the number “1” according to the instructions and press “Enter”, wait for installation and continue.
You can verify the installation by entering the ruby -v command in cmd, also if the ruby version is displayed, then everything went well.
6. Next, we need to install the “Rails” framework for this; enter the following command “gem install rails” in cmd, wait for the installation to complete, you can also check the command “rails -v” in cmd, if it issues a version, everything is fine and you can move on.
The fun begins.
7. Next, we need to create a project, which will be the majority of the problems. We create a folder on the computer anywhere, I also created on the same disk with Windows, and go to cmd in this folder. When you’ve switched, we type the command to create the project 'rails new app' where 'app' is the name of the application, you can choose any reasonable one and press 'Enter' the installation will start and most likely there will be an error somewhere
error 1: cannot find or determine sqlite3 version 1.4.1 or 1.4.0
open the folder with the application already installed through the Sublime Text program and open the file 'Gemfile' it will be visible at the first level at the bottom
change data values:
gem 'sqlite3', '~> 2.5' gem 'rails', '~> 6.0.0'
to lower versions, or those versions that are registered in cmd errors when creating a project
eg:
gem 'sqlite3', '~> 1.4' gem 'rails', '~> 1.4.0'
and try to reinstall sqlite with the command, entering it in cmd 'gem install sqlite' if this command does not work, try rails install sqlite or gem sqlite install, in any case there will be no error in the application, only in the cmd program window - this is not scary
8. Next, we will need to restart the installer called 'bundle', it was launched during the creation of the application and is responsible for all rails components. It is launched by the command 'bundle install' and an error will occur, approximately in the middle of the process, where it will be said that the file 'webpack' is not found and to install it you must first download the file 'yarn from the resource yarnpkg.com/lang/en/docs/install 'and install it on the computer.
So we do.
9. Download the file 'yarn' from yarnpkg.com/lang/en/docs/install under windows and double-click on the file, install it in the folder with your project along the path 'Name of your project (folder) \ yarn (folder)'
10. Next, as was previously said in cmd, we run the command 'rails webpack: install' and wait for the installation, it will not be fast.
11. At the end of the installation, enter the command 'rails s' thereby starting the server, we find in the cmd line '* Listening on tcp: // localhost: 3000' from which we copy 'localhost: 3000', paste it into the browser and enjoy high technology .
In the beginning, three days ago, I only went to the step of creating an application where the problematic sqlite database did not want to work and start.
If after the steps you have taken, the server still does not start and there are problems, look carefully at the 'Gemfile' project file for instructions on what version to install, change the version number and run the installer again 'bundle install' or 'bundle update' .
It's all.
All interesting projects, extraordinary ideas and good mood.
All Articles