How we put infrastructure management on Terraform - and started living
We had 4 Amazon accounts, 9 VPCs and 30 most powerful development environments, stages, regressions - in total more than 1000 EC2 instance of all colors and shades. Since I started collecting cloud solutions for business, I must go in my hobby to the end and think about how to automate all this.
Hello! My name is Kirill Kazarin, I work as an engineer at DINS. We are developing cloud-based business communications solutions. In our work, we actively use Terraform, with which we flexibly manage our infrastructure. I will share my experience with this solution.
The article is long, so stock up on
And one more nuance - the article was written on the basis of version 0.11, in fresh 0.12 a lot has changed but the main practices and tips are still relevant. The issue of migration from 0.11 to 0.12 deserves a separate article!
What is Terraform
Terraform is a popular Hashicorp tool that appeared in 2014.
This utility allows you to manage your cloud infrastructure in the Infrastructure as a Code paradigm in a very friendly, easy-to-read declarative language. Its application provides you with a single type of resources and application of code practices for infrastructure management, which have already been developed by the community of developers for a long time. Terraform supports all modern cloud platforms, allows you to safely and predictably change the infrastructure.
When launched, Terraform reads the code and, using the plug-ins provided by the cloud service providers, brings your infrastructure to the described state by making the necessary API calls.
Our project is located entirely in Amazon, deployed on the basis of AWS services, and therefore I write about the use of Terraform in this vein. Separately, I note that it can be used not only for Amazon. It allows you to manage everything that has an API.
In addition, we manage VPC settings, IAM policies, and roles. We manage routing tables, certificates, network ACLs. We manage the settings of our web application firewall, S3-bucket, SQS-queues - everything that our service can use in Amazon. I have not yet met features with Amazon that Terraform could not describe in terms of infrastructure.
It turns out a rather big infrastructure, with your hands it’s easy to support. But with Terraform it is convenient and simple.
What Terraform is made of
Providers are plugins for working with the API of a service. I counted them more than 100 . Among them are providers for Amazon, Google, DigitalOcean, VMware Vsphere, Docker. I even found a provider on this official list that allows you to manage the rules for the Cisco ASA !
Among other things, you can control:
- Dashboards, datasource and alerts in Grafana .
- Projects on GitHub and GitLab .
- RabbitMQ .
- Databases, users and permissions in MySQL .
And these are only official providers, there are even more unofficial providers. During the experiments, I came across on GitHub a third-party, not included in the official list provider, which allowed working with DNS from GoDaddy , as well as with Proxmox resources .
Within one Terraform project you can use different providers and, accordingly, the resources of different service providers or technologies. For example, you can manage your infrastructure in AWS, with external DNS from GoDaddy. And tomorrow, your company bought a startup that hosted in DO or Azure. And while you decide to migrate it to AWS or not, you can also support this with the same tool!
Resources. These are cloud entities that you can create using Terraform. Their list, syntax and properties depend on the provider used, in fact - on the cloud used. Or not just clouds.
Modules These are the entities with which Terraform allows you to template your configuration. Thus, templates allow you to make your code smaller, allow you to reuse it. Well, they help to work comfortably with him.
Why we chose Terraform
For ourselves, we identified 5 main reasons. Perhaps from your point of view, not all of them will seem significant:
- Terraform is a
Cloud Agnosticmultiple cloud support utility (thanks for the valuable comment in the comments) . When we selected this tool, we thought: “What will happen if management comes to us tomorrow or in a week and says:“ Guys, we thought - let's not just deploy to Amazon. We have some kind of project, where we’ll need to get the infrastructure in Google Cloud. Or in Azure - well, you never know . " We decided that we would like to have a tool that will not be rigidly attached to any cloud service. - Open source . Terraform is an open source solution . The project repository has a rating of more than 16 thousand stars, this is a good confirmation of the reputation of the project.
We have more than once or twice encountered the fact that in some versions there are bugs or not quite understandable behavior. Having an open repository allows you to make sure that this is really a bug, and we can solve the problem by simply updating the engine or version of the plugin. Or that this is a bug, but "Guys, wait, literally two days later a new version will be released and we will fix it." Or: "Yes, this is something incomprehensible, strange, they sort it out, but there is work-around." It is very convenient. - Control . Terraform as a utility is completely under your control. It can be installed on a laptop, on a server, it can be easily integrated into your pipeline, which can be done on the basis of any tool. For example, we use it in GitLab CI.
- Checking the status of the infrastructure . Terraform can and does a good check on the state of your infrastructure.
Suppose you started using Terraform in your team. You create a description of some resource in Amazon, for example, Security Group, apply it - it is created for you, everything is fine. And here - bam! Your colleague who returned from vacation yesterday and is not yet aware that you have arranged everything so beautifully here, or even a colleague from another department comes in and changes the settings for this Security Group by hand.
And without meeting with him, without talking, or without having come up against a certain problem, you will never know about this in a normal situation. But, if you use Terraform, even running a plan idle on this resource will show you that there are changes in the working environment.
When Terraform looks at your code, it simultaneously calls on the cloud provider’s API, receives the state of the objects from it and compares: “And now there is the same thing that I did before, what do I remember?” Then it compares it with the code, looks what else needs to be changed. And, for example, if everything is the same in his story, in his memory, and in your code, but there are changes there, he will show you and offer to roll it back. In my opinion, also a very good property. Thus, this is another step, for us personally, to ensure that we have an immutable infrastructure. - Another very important feature is the modules I mentioned, and counts. I’ll talk about this a bit later. When I will compare with the tools.
And also a cherry on the cake: Terraform has a rather large list of built-in functions . These functions, despite the declarative language, allow us to implement some, not to say programmatic, but logic.
For example, some auto-calculations, split lines, casting to the lower and upper case, removing characters from this line. We use it quite actively. They make life much easier, especially when you write a module that will be reused later in different environments.
Terraform vs CloudFormation
On the net, Terraform is often compared to CloudFormation. We also asked this question when choosing it. And here is the result of our comparison.
| Comparison | Terraform | Cloudformation |
|---|---|---|
| Multiple cloud support | Through the use of various providers, plug-ins can work with any large cloud provider.
| Firmly attached to Amazon. |
| Change tracking | If you have a change
not in the TF code, but on the resource that he created, TF will be able to detect this and allow you to correct the situation | Similar function appeared
only in November 2018 . |
| Conditions | No support for conditions (only
in the form of ternary operators). | Conditions are supported. |
| Storage
states | Allows you to select several types of backend, for example, locally
on your machine (this is the default behavior), on a file share, in S3 and elsewhere. This is sometimes useful because tfstate Terraform is presented as a large text file with a JSON-like structure. And sometimes it’s sometimes useful to get into it, read it - and at least be able to backup it, because you never know what. Personally, for example, I’m calmer from the fact that this is in some place controlled by me. | Storing state only somewhere inside AWS |
| Resource Import | Terraform makes it easy to import resources. You can take all resources under your control. You just need to write the code that will characterize this object, or use Terraforming .
She goes to the same Amazon, takes information about the environment environment from there, and then dumps it in the form of code. It is machine-generated, not optimized, but this is a good first step to start the migration. And then you just give the import command. Terraform compares, brings this environment into its state - and now it controls it. | CloudFormation doesn’t. If
you have done something before this with your hands, you either bang it and recreate it with CloudFormation, or live on. Unfortunately, no options. |
How to get started with Terraform
Generally speaking, getting started is pretty simple. Here are the first steps briefly:
- First of all, create a Git repository and immediately begin to store there all your changes, experiments, in general everything.
- Read the Getting-started guide . It is small, unpretentious, fairly detailed, describes well how you can start working with this utility.
- Write some demo, working code. You can even copy some kind of example to play with it later.
Our practice with Terraform
Source code
You started your first project and save everything in one big main.tf file. Here is a typical example (I honestly took the first one I got from GitHub).
Nothing wrong, but the size of the code base tends to grow over time. Dependencies between resources are also growing. After some time, the file becomes huge, complex, unreadable, poorly maintained - and a careless change in one place can cause troubles.
The first thing I recommend is to highlight the so-called core repository, or core state of your project, your environment. As soon as you start creating an infrastructure using Terraform, or importing it, you will immediately come across the fact that you have some entities that, once deployed, configured, rarely change. For example, these are VPC settings, or VPC itself. These are networks, basic, general Security-groups such as SSH-access - you can compile a fairly large list.
It makes no sense to keep this in the same repository as the services you change frequently. Select them in a separate repository and dock them through a Terraform feature such as remote state.
- You reduce the code base of that part of the project with which you often work directly.
- Instead of one large tfstate file that contains a description of the state of your infrastructure, two smaller files, and at a particular point in time you are working with one of them.
What is the trick? When Terraform makes a plan, that is, calculates, calculates what it should change, apply - it completely recounts this state, checks against the code, checks against the status in AWS. The larger your state, the longer the plan will take.
We came to this practice when it took us 20 minutes to build a plan for the whole environment in production. Due to the fact that we pulled into a separate core everything that we are not subject to frequent changes, we reduced the time to build a plan by half. We have an idea how it can be reduced further, breaking down not only into core and non-core, but also by subsystems, because we have them connected and usually change together. Thus, we, say, turn 10 minutes into 3. But we are still in the process of implementing such a solution.
Less code - easier to read
Small code is easier to understand and more convenient to work with. If you have a large team and people with different levels of experience in it, take out what you rarely change, but globally, in a separate turnip, and give it narrower access.
Let's say you have juniors in your team, and you do not give them access to the global repository that describes the VPC settings - this way you insure yourself against errors. If an engineer makes a mistake in writing the instance, and something is created wrong - it is not scary. And if he makes a mistake in the options that are installed on all machines, breaks, or does something with the settings of the subnets, with routing - this is much more painful.
The selection of the core repository takes place in several steps.
Stage 1 . Create a separate repository. Store all the code in it, separately - and describe those entities that should be reused in a third-party repository using this output. Let's say we create an AWS subnet resource in which we describe where it is located, which availability zone, address space.
resource "aws_subnet" "lab_pub1a" { vpc_id = "${aws_vpc.lab.id}" cidr_block = "10.10.10.0/24" Availability_zone = "us-east-1a" ... } output "sn_lab_pub1a-id" { value = "${aws_subnet.lab_pub1a.id}" }
And then we say that we send the id of this object to output. You can do output for each parameter that you need.
What is the trick here? When you describe a value, Terraform separately saves it in tfstate core. And when you turn to him, he will not need to synchronize, recount - he will be able to immediately give this matter to you from this state. Further, in the repository, which is non-core, you describe such a connection with the remote state: you have a remote state such and such, it lies in the S3-bucket such and such, such and such a key and region.
Stage 2 . In a non-core project, we create a link to the state of the core project, so that we can refer to the parameters exported through output.
data "terraform_remote_state" "lab_core" { backend = "s3" config { bucket = "lab-core-terraform-state" key = "terraform.tfstate" region = "us-east-1" } }
Stage 3 . Getting started! When I need to deploy a new network interface for an instance in a specific subnet, I say: here is the data remote state, find the name of this state in it, find this parameter in it, which, in fact, matches this name.
resource "aws_network_interface" "fwl01" { ... subnet_id = "${data.terraform_remote_state.lab_core.sn_lab_pub1a-id}" }
And when I build a plan of changes in my non-core repository, this value for Terraform will become a constant for it. If you want to change it, you have to do it in the repository of this, of course, core. But since this rarely changes, it doesn’t bother you much.
Modules
Let me remind you that a module is a self-contained configuration consisting of one or more related resources. It is managed as a group:
A module is an extremely convenient thing due to the fact that you rarely create one resource just like that, in a vacuum, usually it is logically connected with something.
module "AAA" { source = "..." count = "3" count_offset = "0" host_name_prefix = "XXX-YYY-AAA" ami_id = "${data.terraform_remote_state.lab_core.ami-base-ami_XXXX-id}" subnet_ids = ["${data.terraform_remote_state.lab_core.sn_lab_pub1a-id}", "${data.terraform_remote_state.lab_core.sn_lab_pub1b-id}"] instance_type = "t2.large" sgs_ids = [ "${data.terraform_remote_state.lab_core.sg_ssh_lab-id}", "${aws_security_group.XXX_lab.id}" ] boot_device = {volume_size = "50" volume_type = "gp2"} root_device = {device_name = "/dev/sdb" volume_size = "50" volume_type = "gp2" encrypted = "true"} tags = "${var.gas_tags}" }
For example: when we deploy a new EC2 instance, we make a network interface and attachment for it, we often make an Elastic IP address for it, we make route-53 record, and something else. That is, we get at least 4 entities.
Each time, describing them in four pieces of code is inconvenient. Moreover, they are pretty typical. It begs - make a template, and then just refer to this template, passing parameters to it: some name, into which grid to shove, which security group to hang on it. It is very convenient.
Terraform has a Count feature, which allows you to further reduce your state. You can describe a large bundle of instances with one piece of code. Let's say I need to deploy 20 machines of the same type. I will not write 20 pieces of code even from a template, I will write 1 piece of code, I will indicate Count and the number in it - how much I need to do.
For example, there are some modules that reference a template. I pass only specific parameters: ID subnet; AMI to deploy with; type of instance; security group settings; anything else, and indicate how many of these things to do to me. Great, took them and turned them around!
Tomorrow, developers come to me and say: “Listen, we want to experiment with the load, give us, please, two more.” What I need to do: I change one digit to 5. The amount of code remains exactly the same.
Conventionally, modules can be divided into two types - resource and infrastructure. From the point of view of the code, there is no difference, but rather the higher-level concepts introduced by the operator himself.
Resource modules provide a standardized and parameterized, logically related collection of resources. The example above is a typical resource module. How to work with them:
- We indicate the path to the module - the source of its configuration, through the Source directive.
- We indicate the version - yes, and operation on the principle of “latest and greatest” is not the best option here. You do not include the latest version of the library each time in your project? But more on that later.
- We pass arguments to it.
We are attached to the module version, and we just take the last one - the infrastructure must be versioned (resources cannot be versioned, but code can). A resource can be created deleted or recreated. All! We also need to clearly know which version we have created each piece of infrastructure.
Infrastructure modules are quite simple. They consist of resources, and include company standards (for example, tags, lists of standard values, accepted defaults, and so on).
As for our project and our experience, we have long and firmly switched to the use of resource modules for everything that is possible with a very strict versioning and review process. And now we are actively introducing the practice of infrastructure modules at the level of lab and staging.
Recommendations for using modules
- If you can not write, but use ready-made ones, do not write. Especially if you are new to this. Trust the ready-made modules, or at least see how they did it to you. However, if you still need to write your own, do not use the call to providers internally and be careful with service providers.
- Verify that the Terraform Registry does not contain a ready-made resource module.
- If you are writing your module, hide the specifics under the hood. The end user does not have to worry about what and how you implement internally.
- Do input parameters and output values from your module. And it’s better if they are separate files. So convenient.
- If you write your modules, store them in the repository and version. Better a separate repository for the module.
- Do not use local modules - they are not versioned or reused.
- Avoid using provider descriptions in the module, because connection credentials can be configured and applied differently for different people. Someone uses environment variables for this, and someone involves storing their keys and secrets in files with paths for them. This must be indicated at a higher level.
- Use the local provisioner carefully. It is executed locally, on the machine on which Terraform is running, but the execution environment for different users may be different. Until you embed it in CI, you can come across various artifacts: for example local exec and running ansible. And someone has a different distribution, another shell, another version of ansible, or even Windows.
Signs of a good module (here is a little more details ):
- Good modules have documentation and examples. If each is designed as a separate repository, this is easier to do.
- Do not have hardcoded settings (for example, AWS region).
- Use reasonable defaults, designed as defaults. For example, the module for the EC2 instance by default will not create a virtual machine of type m5d.24xlarge for you, it uses one of the minimum t2 or t3 types for this.
- The code is “clean” - structured, provided with comments, not unnecessarily confused, designed in the same style.
- It is highly desirable that it be equipped with tests, although this is difficult. Unfortunately, we have not yet come to this.
Tagging
Tags are important.
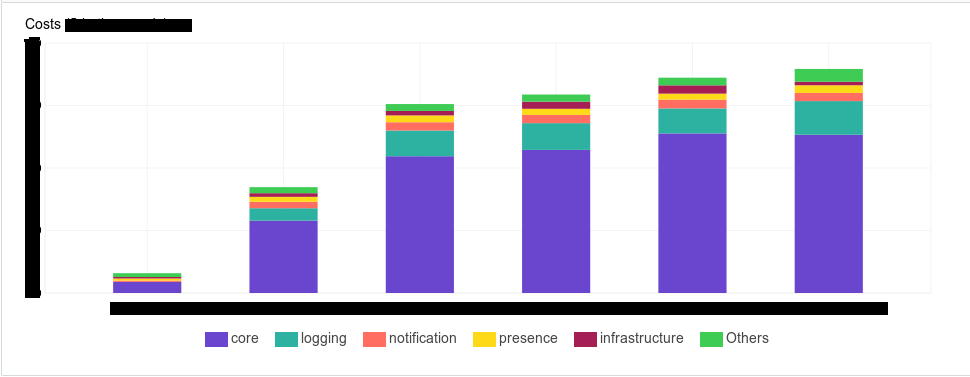
Tagging is billing. AWS has tools that let you see how much money you spend on your infrastructure. And our management really wanted to have a tool in which they could see it deterministically. For example, how much money such and such components consume, or such and such a subsystem, such and such a team, such and such an environment
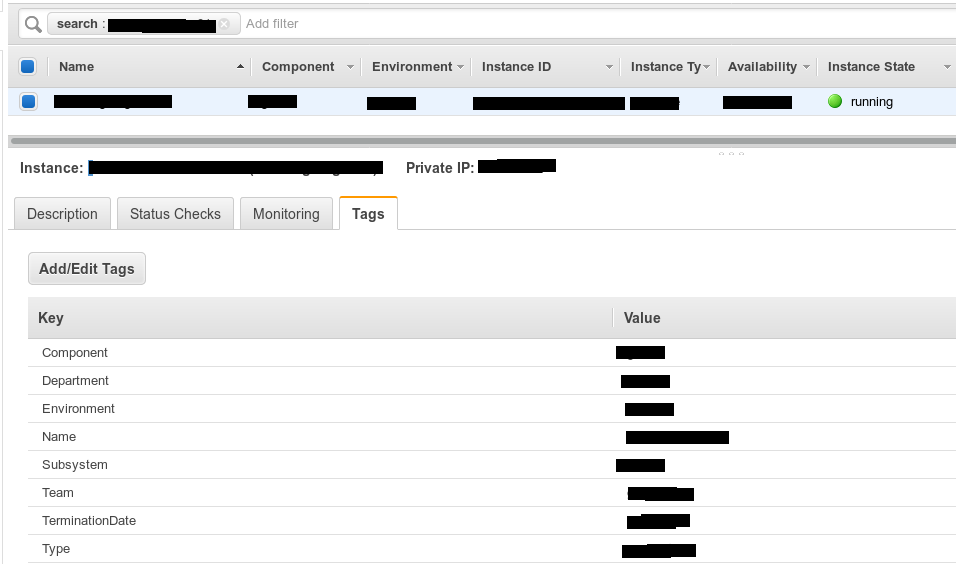
Tagging is the documentation of your system. With it, you simplify your search. Even just in the AWS console, where these tags are neatly displayed on your screen, it becomes easier for you to understand what this or that type of instance refers to. If new colleagues come, it’s easier for you to explain this by showing: “Look, this is it - here.” We began to create tags as follows - we created an array of tags for each type of resource.
Example:
variable "XXX_tags" { description = "The set of XXX tags." type = "map" default = { "TerminationDate" = "03.23.2018", "Environment" = "env_name_here", "Department" = "dev", "Subsystem" = "subsystem_name", "Component" = "XXX", "Type" = "application", "Team" = "team_name" } }
It so happened that in our company more than one of our teams uses AWS, and there is some list of required tags.
- Team - which team uses how many resources.
- Department - similar to a department.
- Environment - resources beat in “environments”, but you, for example, can replace it with a project or something like that.
- Subsystem - the subsystem to which the component belongs. Components can belong to one subsystem. For example, we want to see how much we have this subsystem and its entities began to consume. Suddenly, for example, for the previous month, it has grown significantly. We need to go to the developers and say: “Guys, it's expensive. The budget is already close to each other, let's optimize the logic somehow. ”
- Type - component type: balancer, storage, application or database.
- Component - the component itself, its name in internal notation.
- Termination date - time when it should be deleted, in date format. If its removal is not expected, set to “Permanent”. We introduced it because in development environments, and even in some stage environments, we have a stress testing stage that rises in stress sessions, that is, we do not keep these machines regularly. We indicate the date when the resource should be destroyed. Further to this, you can fasten the automation based on lambda, some external scripts that work through the AWS Command Line Interface, which will destroy these resources automatically.
Now - how to tag.
We decided that we would do our own tag map for each component, in which we would list all the specified tags: when to terminate it, what it refers to. They quickly realized that it was inconvenient. Because the code base is growing, because we have more than 30 components, and 30 such pieces of code are inconvenient. If you need to change something, then you run and change.
To tag well, we use the Locals entity.
locals { common_tags = {"TerminationDate" = "XX.XX.XXXX", "Environment" = "env_name", "Department" = "dev", "Team" = "team_name"} subsystem_1_tags = "${merge(local.common_tags, map("Subsystem", "subsystem_1_name"))}" subsystem_2_tags = "${merge(local.common_tags, map("Subsystem", "subsystem_2_name"))}" }
In it you can list a subset, and then use them with each other.
For example, we removed some common tags into such a structure, and then specific ones by subsystems. We say: “Take this block and add, for example, subsystem 1. And for subsystem 2, add subsystem 2”. We say: "Tags, please take the general ones and add type, application, name, component and who it is to them." It turns out very briefly, clearly and centralized change, if suddenly it is required.
module "ZZZ02" { count = 1 count_offset = 1 name = "XXX-YYY-ZZZ" ... tags = "${merge(local.core_tags, map("Type", "application", "Component", "XXX"))}" }
Version control
Your template modules, if you use them, must be stored somewhere. The easiest way that most likely everyone starts is local storage. Just in the same directory, just some subdirectory in which you describe, for example, a template for some kind of service. This is not a good way. This is convenient, it can be quickly fixed and tested quickly, but it is difficult to reuse it later and difficult to control
module "ZZZ02" { source = "./modules/srvroles/ZZZ" name = "XXX-YYY-ZZZ" }
Suppose the developers came to you and said: “So, we need such and such an entity in such and such a configuration, in our infrastructure.” You wrote it, made it in the form of a local module in the repository of their project. Deployed - excellent. They tested, said: “It will! In production. " We come to stage, stress testing, production. Each time Ctrl-C, Ctrl-V; Ctrl-C, Ctrl-V. While we got to the sale, our colleague took it, copied the code from the laboratory environment, transferred it to another place and changed it there. And we get an already inconsistent state. With horizontal scaling, when you have as many laboratory environments as we have, it's just an adish.
Therefore, a good way is to create a separate Git repository for each of your modules, and then just refer to it. We change everything in one place - good, convenient, controlled.
module "ZZZ" { source = "git::ssh://git@GIT_SERVER_FQDN/terraform/modules/general-vm/2-disks.git" host_name_prefix = "XXX-YYY-ZZZ"
Anticipating the question, how does your code reach production. For this, a separate project is created that reuses prepared and tested modules.
Great, we have one source of code that changes centrally. I took, wrote, prepared and set myself that tomorrow morning I’m going to deploy in production. I built a plan, tested it - great, let's go. At this moment, my colleague, guided exclusively by good intentions, went and optimized something, added to this module. And it so happened that these changes break backward compatibility.
For example, he added the necessary parameters, which he must pass, otherwise the module will not assemble. Or he changed the names of these parameters. I come in in the morning, I have strictly limited time for changes, start building a plan, and Terraform pulls up state modules from Git, starts building a plan and says: “Oops I can’t. Not enough for you, you renamed. " I am surprised: “But I didn’t do this, how to deal with this?” And if this is a resource that was created long ago, then after such changes you will have to run through all the environments, somehow change it and bring it to one look. It is not comfortable.
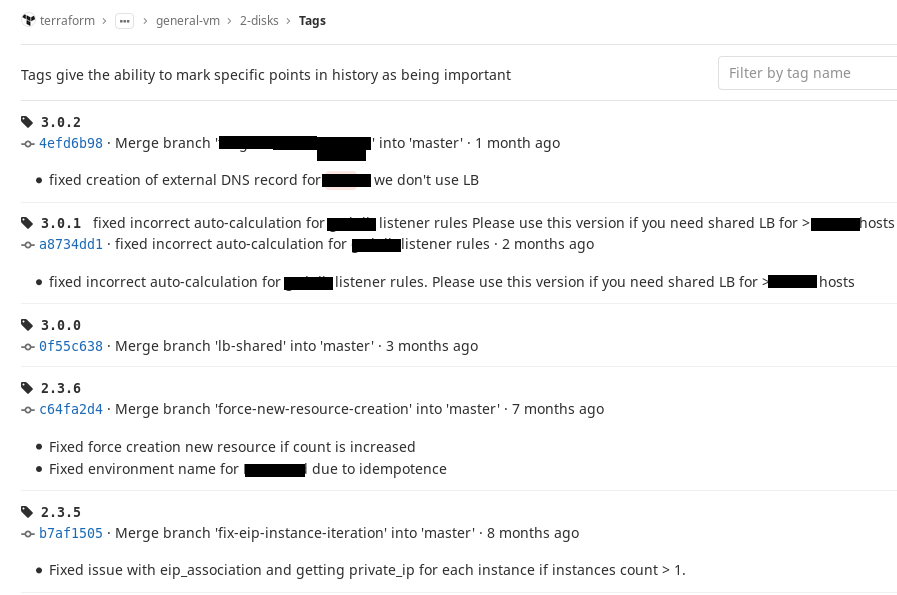
This can be fixed using Git tags. We decided for ourselves that we would use SemVer notation and worked out a simple rule: as soon as the configuration of our module reaches a certain stable state, that is, we can use it, we put a tag on this commit. If we make changes and they do not break backward compatibility, we change the minor number at the tag, if they break, we change the major number.
So, in the source address, attach to a specific tag and if at least provide something that you had before, it will always be collected. Let the module version go ahead, but at the right time we will come, and when we really need it, we will change it. And what was working before that, at least it won’t break. It's comfortable. This is what it looks like in our GitLab.
Branching
Using branching is another important practice. We have developed a rule for ourselves that you should make changes only from the master. But for any change that you want to make and test - please make a separate branch, play with it, experiment, make plans, see how it is going. And then do a merge-request, and let a colleague look at the code and help.

Where to store tfstate
You should not store your state locally. You should not store your state in Git.
We got burned on this when someone, when rolling out the branches of a non-master, gets his tfstate, in which the state is saved - then he turns it on through merge, someone adds his own, it turns out merge conflicts. Or it turns out without them, but an inconsistent state, because "he already has it, I don’t have it yet," and then to fix it all is an unpleasant practice. Therefore, we decided that we would store it in a safe place, versioned, but it would be outside of Git.
S3 fits this perfectly: it is available, it has HA, as far as I remember four nines, maybe five . It gives versioning out of the box, even if you break your tfstate, you can always roll back. And it also gives a very important thing in combination with DynamoDB, which, in my opinion, has learned this Terraform since version 0.8. In DynamoDB, you have a nameplate in which Terraform records that it is blocking the state.
That is, suppose I want to make some changes. I’m starting to build a plan or starting to apply it, Terraform goes to DynamoDB and says that it makes information in this plate that this state is blocked; user, computer, time. At this moment, my colleague, who works remotely or maybe a couple of tables from me, but focused on work and does not see what I'm doing, also decided that something needs to be changed. He makes a plan, but launches it a bit later.
Terraform goes into the dynamics, sees - Lock, breaks off, tells the user: "Sorry, tfstate is blocked by something." A colleague sees that I am working now, can come up to me and say: “Listen, I have a more important changer, please give me.” I say: “Good”, I cancel the plan, remove the block, rather, even it is automatically removed if you do it correctly, without interrupting Ctrl-C. A colleague goes and does. Thus, we insure ourselves against a situation when you two are changing something.
Merge-request
We use branching in Git. We assign our merge requests to colleagues. Moreover, in Gitlab, we use almost all the tools we have for collaboration, for merge-requests or even just some pools: discussion of your code, its review, setting in-progress or issue, something else like that. It is very useful, it helps in the work.
Plus, in this case, rollback is also easier, you can return to the previous commit or, if you, say, decided that you would not only apply the changes from the wizard, you can simply switch to a stable branch. For example, you made a feature branch and decided that you would make changes first from the feature branch. And then the changes, after everything worked well, make to the master. You applied the changes in your branch, realized that something was wrong, switched to the master - there are no changes, they said apply - he returned.
Pipelines
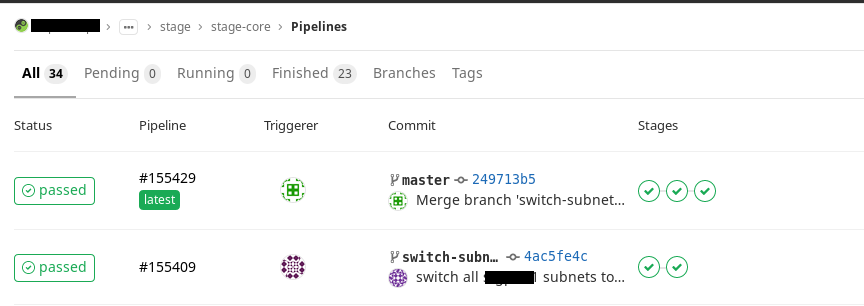
We decided that we need to use the CI process to apply our changes. To do this, based on Gitlab CI, we write a pipeline that automates the application of changes. So far, we have two types of them:
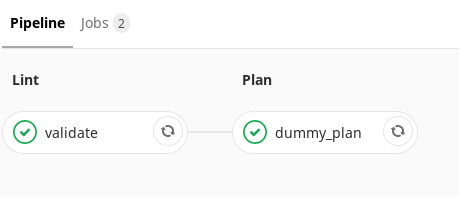
- Pipeline for the master branch (master pipeline)
- Pipeline for all other branches (branch pipeline)
What does a pipeline brunch do?It starts automatic code verification (stupidly checking for typos, for example). And then it starts building a plan. And the colleague who will watch your merge-request can immediately open the plan that has been built and see not only the code - but also what you add. He will also see how it will fall on your infrastructure. It is clear and useful.
In the wizard, one more step is added here. The difference is that your plan is not just generated, it is also saved as an artifact. Another very useful feature of Terraform is that the plan can be saved as a file, and then apply it. Say you made a merge-request and set it aside. A month later they remembered him and decided to return. Your code has already gone far ahead. Due to the fact that you keep the artifact of the plan, you can apply it to what you wanted at that moment.
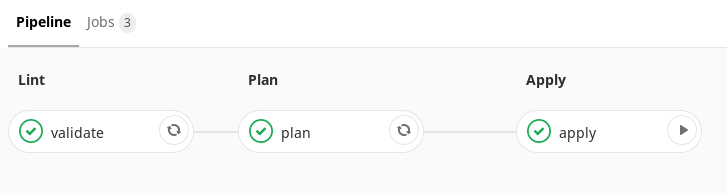
In our case, this artifact is then transferred to the next step, which is performed by hand. That is, we get a single point of application of our changes.
Disadvantages of Terraform
FunctionsDespite the fact that Terraform has a fairly large number of built-in functions, not all of them are as good as we would like to think.
It has uncomfortable functions in it, for example, the “Element” - in some situations, with a lack of experience, its behavior may not be exactly what you expected.
For example, you use a module, count is passed to the module — how many instances to deploy, and, say, a list of subnets broken down by availability zones is transmitted. Transferred, applied, increased the count, still applied. And now you decided to transfer to it the increased list of subnets. You got a grid, you decided to use one more AZ. You have the second part of the list changing, and count is mapped to this list through an element.
Let's say you had 4 AZ before this and 5 instances, and then you added another AZ - it will leave the first 4, which were already in order. And about the fifth he will say: “And now I’ll recreate it.” And you didn’t want to! You want only new ones to come. Such bugs come from the nature of Terraform's work with lists.
Ternary operator. A condition is only a ternary operator . We really lack conditions. Still, I would like some more familiar If and Else. It’s a pity that they aren’t - maybe they’ll give a ride.
The challenges of teamwork . If you have a large team, or a large project, for a large number of environments, or both, Terraform will become difficult for you to use without using some CI.
Without CI, you will make changes from your local environment from your computer. In our experience, this leads to the fact that you made a branch for yourself, started it, experimented with it - and forgot to make a merge, forgot to push the changes. It hurts.
For example, you and your colleague had the same version on the machines. Then my colleague updated the version on one. The next day you come, start making changes, Terraform goes to check, sees that in tfstate the required version of Terraform is higher and says: "No, I can’t, update me." When you have a small window for making changes, it is not easy to see that you first need to update the utility.
When you have a CI, there is some single entity, for example, in your pipeline container - you insure yourself that you will not have such versions traveling around the utility.
And finally, a broken or unused code may accumulate in the wizard. Each time you will be too lazy from your place to wait until a plan for the whole environment is built. You will come to the point of trying to build through the target option the application only on what you changed. For example, you added some instance and say: “Terraform apply target instance”, or security group. But in this case, if something broke down (for example, some configuration is outdated), you would see it when building the full plan.
You will have to spend a lot of effort and time to bring this up to date. No need to bring this up. If there is a CI - in it we just forcibly say that Terraform will build the plan completely, you push the changes. And let him build his plan, you go and do something else. He built it, you saw it, you have it in the form of an artifact, and you went to apply it. It disciplines.
Terraform is not a silver bullet
What he will not allow you to do:
- Terraform , . , , . , , , . , , , .
, — Tfstate, , . . « , » — .
, -, , - — . , . , — . - Terraform , . Terraform . Why? , . . , , AZ - -. , North Virginia, 6 . . , , : «, ». — . — , , Terraform .
- Terraform . , — 200 , 198 , 5. . , API . .
- Also, he cannot take into account that some names must be unique. For example, you want to make an S3 bucket. This is a global service for the region, and even if you did not create a service with this name in your account, it is not a fact that someone else did not create it. And when you create it using Terraform, it will perfectly build a plan, start creating it, and Amazon will say: "Sorry, someone already has this." This cannot be foreseen in advance. Only if you try to do it with your hands in advance, although this is contrary to practice.
In any case, Terraform is the best there is now. And we continue to use it, it helps us a lot.
All Articles