We process orders from the online store using RabbitMQ and TypeScript

Hello! The popularity of Internet commerce is constantly growing, as is the share of informatization of all types of activities related to trade. Along with this, the complexity of information processing is growing. Each order made by a customer of an online store generates a large number of integrations with various services. Such services may include payment processing, delivery, accounting and loyalty services. Each order must be paid, recorded, assembled and delivered, and also available for further analysis. This, and so not a simple situation, is complicated by the fact that the user of an online store does not want to wait long and painfully for something when placing an order. The response from the online store should be quick, because every millisecond of delay increases the chance of losing a customer, and subsequently profit. In this article I want to talk about the RabbitMQ message broker and how to use it to organize the order processing using Node.js and TypeScript. Welcome to cat.
The necessary theory
I think many have heard about RabbitMQ, because the first open source version of this message broker, based on the AMQP protocol, was released already in 2007. A message broker is needed to connect different components of the system into a single whole, as glue is needed to resuscitate a broken vase. Using the message broker, you can implement asynchronous processing of events entering the system. It is just such asynchronous order processing that the online store needs. But first you need to understand the basic components of RabbitMQ. This broker has three main components with which we will build the processing process:
- Message This is the smallest unit of information within the message broker and our processing service that can be processed. RabbitMQ itself stores messages in binary form, but for our system and for the article this is not important. We will receive and process messages in the form of JSON. It's also worth mentioning that messages in RabbitMQ have headers. They are similar to http request headers. This is an associative array in which you can write the necessary information.
- Message queue . This is the queue in which RabbitMQ stores messages. A message queue can be subscribed to by one or more consumers. Each message in the rabbit queue is distributed to consumers using the round-robin algorithm.
- Exchange This, as the name implies, is an exchange point. Queues or other exchangers can be attached to this point. An exchange point does not store messages; its main function is to route messages to one or several queues, or the same exchange points. Each queue or exchanger is associated with a routing key. There are several different types of exchangers in RabbitMQ that affect how exactly exchange will route the message it receives.
In order to describe how different types of exchangers work, you need to understand what routing keys are. The routing key is both in the binding of the queue to the exchanger and in the message itself. The routing key is just a string divided into blocks. Each block is separated by a dot. For example, “notify.sendEmail.sendSms”. At the same time, patterns can be set for the message routing key using special characters # and *. * - says that any one block can go after the point, but after # any number of blocks can go. For example, “notify.sendSms. *” Or “notify. #”. Now you can move on to the types of exchange points.
There are four types of exchangers:
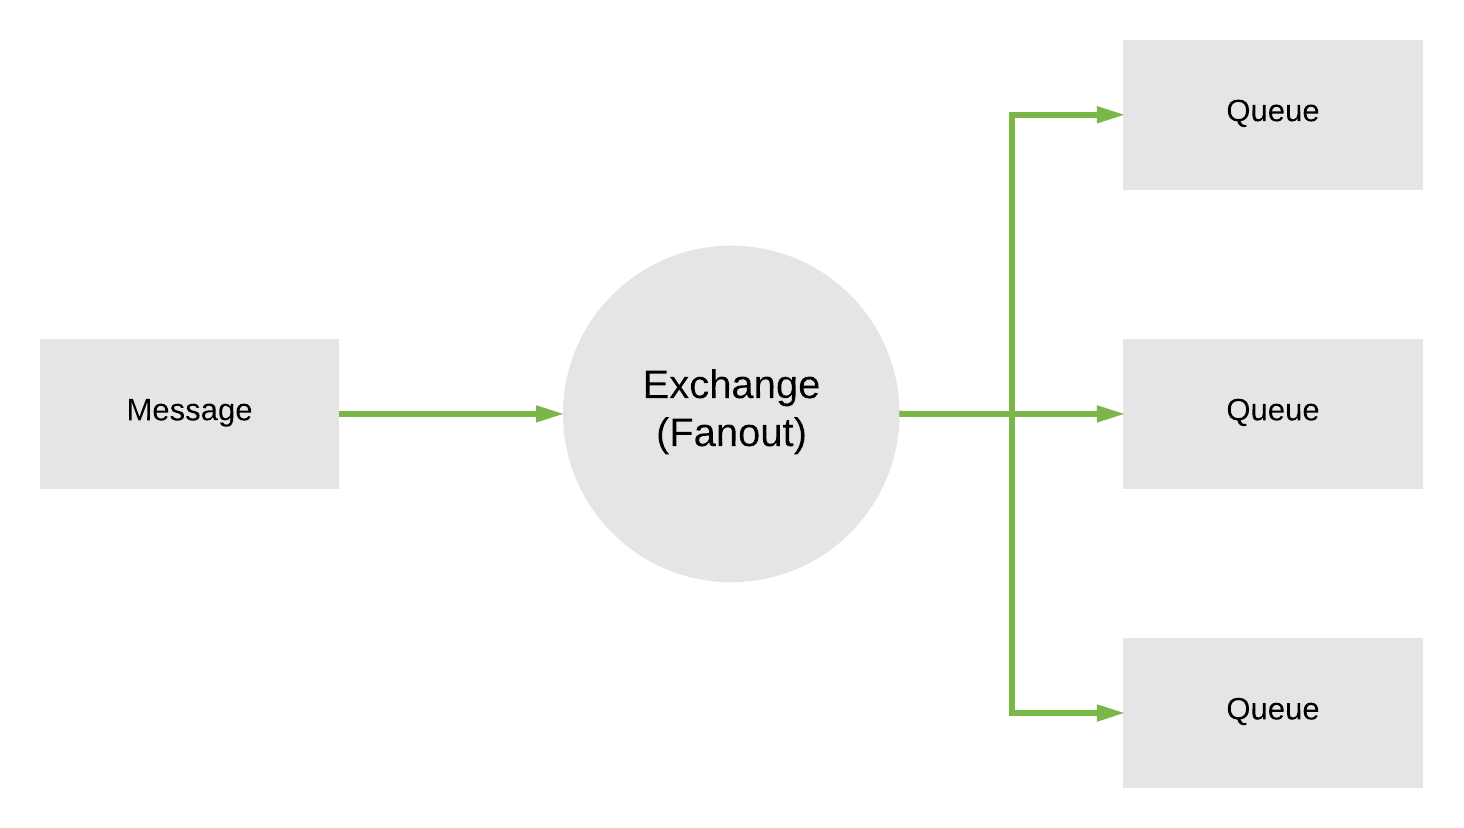
- Fanout The routing logic of this exchange is simple, it redirects the incoming message to all queues or exchangers that are attached to it.
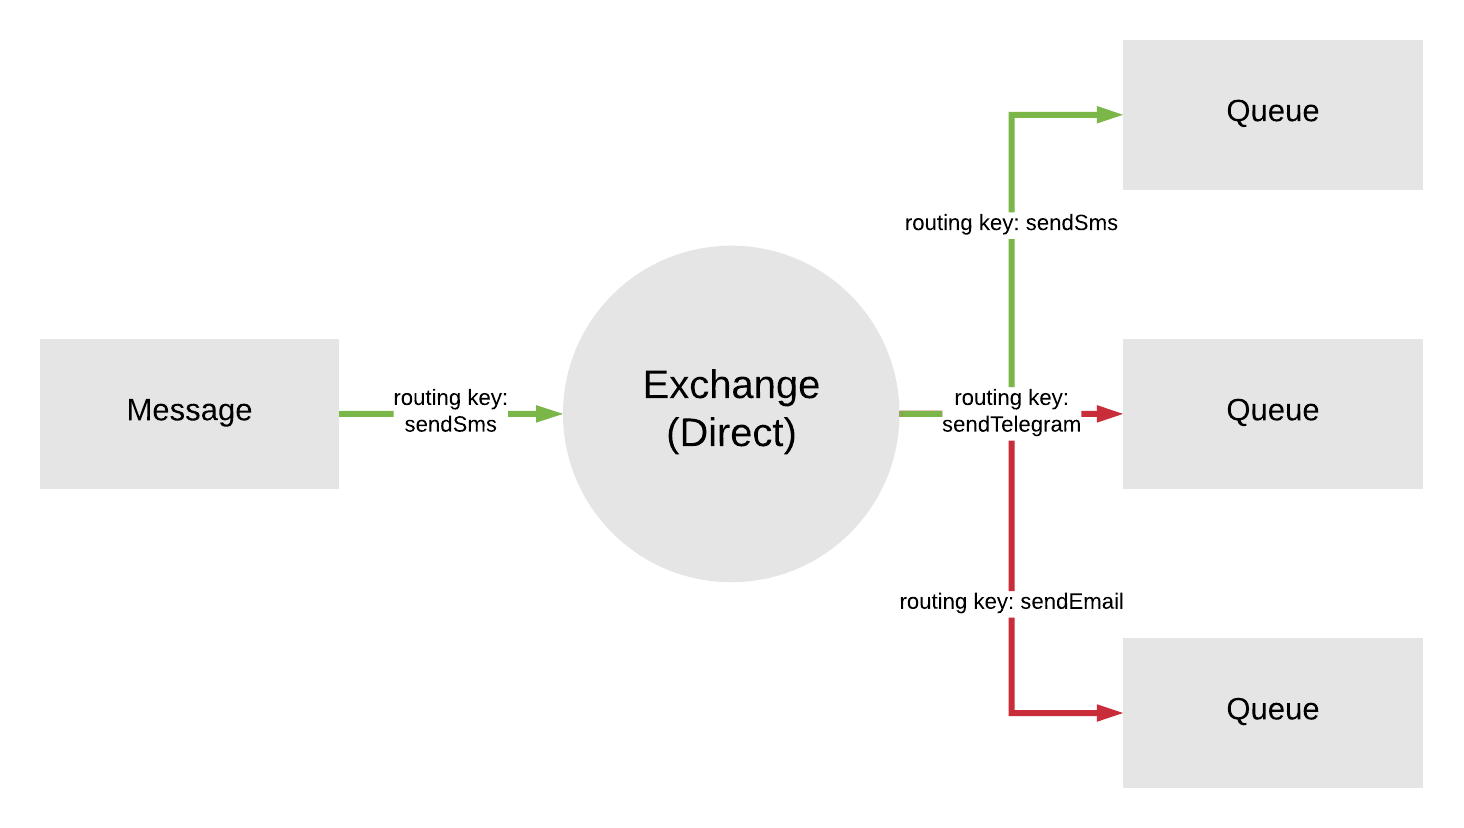
- Direct This exchange redirects the message depending on whether the routing key of the message matches the routing key of the binding.
- Topic Exchange of this type as well as Direct routes the message depending on the routing key. But the pattern can act as a routing key.

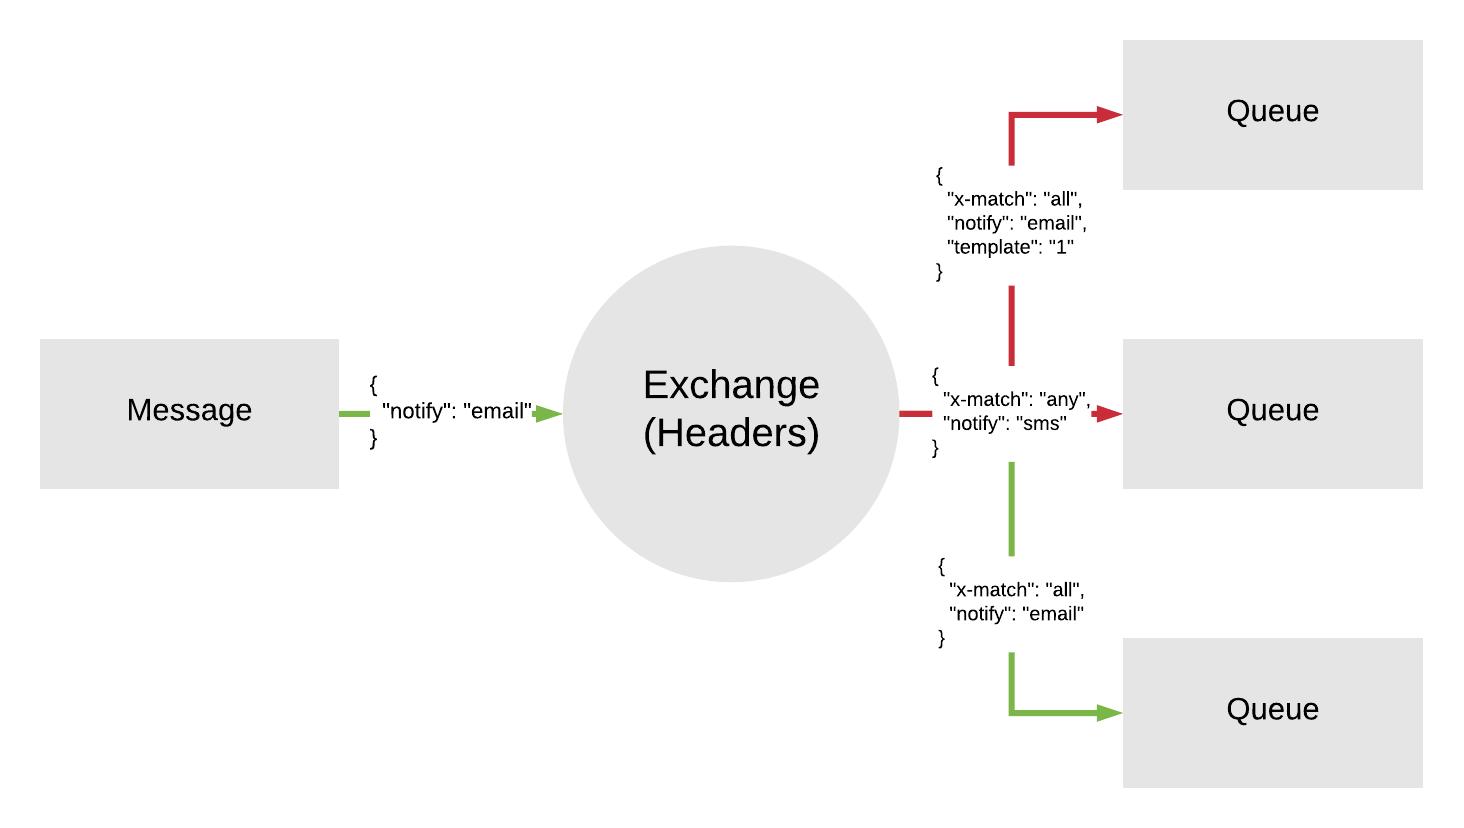
- Headers . This exchange, unlike the others, uses message headers for routing. At the same time, queues to the exchanger are also bound using an associative array. The logic by which the exchanger will route messages can be changed using the special “x-match“ key, which is set in the associative binding array. The key can be set to two values all or any. If the value is all, then the message headers must completely match the associative binding array; if the value is any, then the value must match at least one key.
These are the core components of RabbitMQ. You can read more about these components in the AMQP protocol specification . Next, we will design and implement an order processing system using the TypeScript example, simultaneously understanding the settings of each component.
Design
To simplify the example, we assume that for the successful processing of an online order, we must have the following functionality:
- Save incoming orders
- Send SMS to the client with the order number, as well as the order status
- Send a message to the courier delivery service about a new order from our online store, if the client has chosen this delivery method
But it’s not enough to implement this functionality, because our online store plans to expand the functionality and provide more different opportunities to its customers in the future (and this always happens). For example, notify the customer by email or provide a choice of several delivery methods for the order. It follows from this that we need to design the system in such a way that adding functionality was simple.
It is also worth mentioning that I will use the template for deferred messages so that it is possible, if the external service is unavailable, to repeat the logic several times. You can read about this template here.
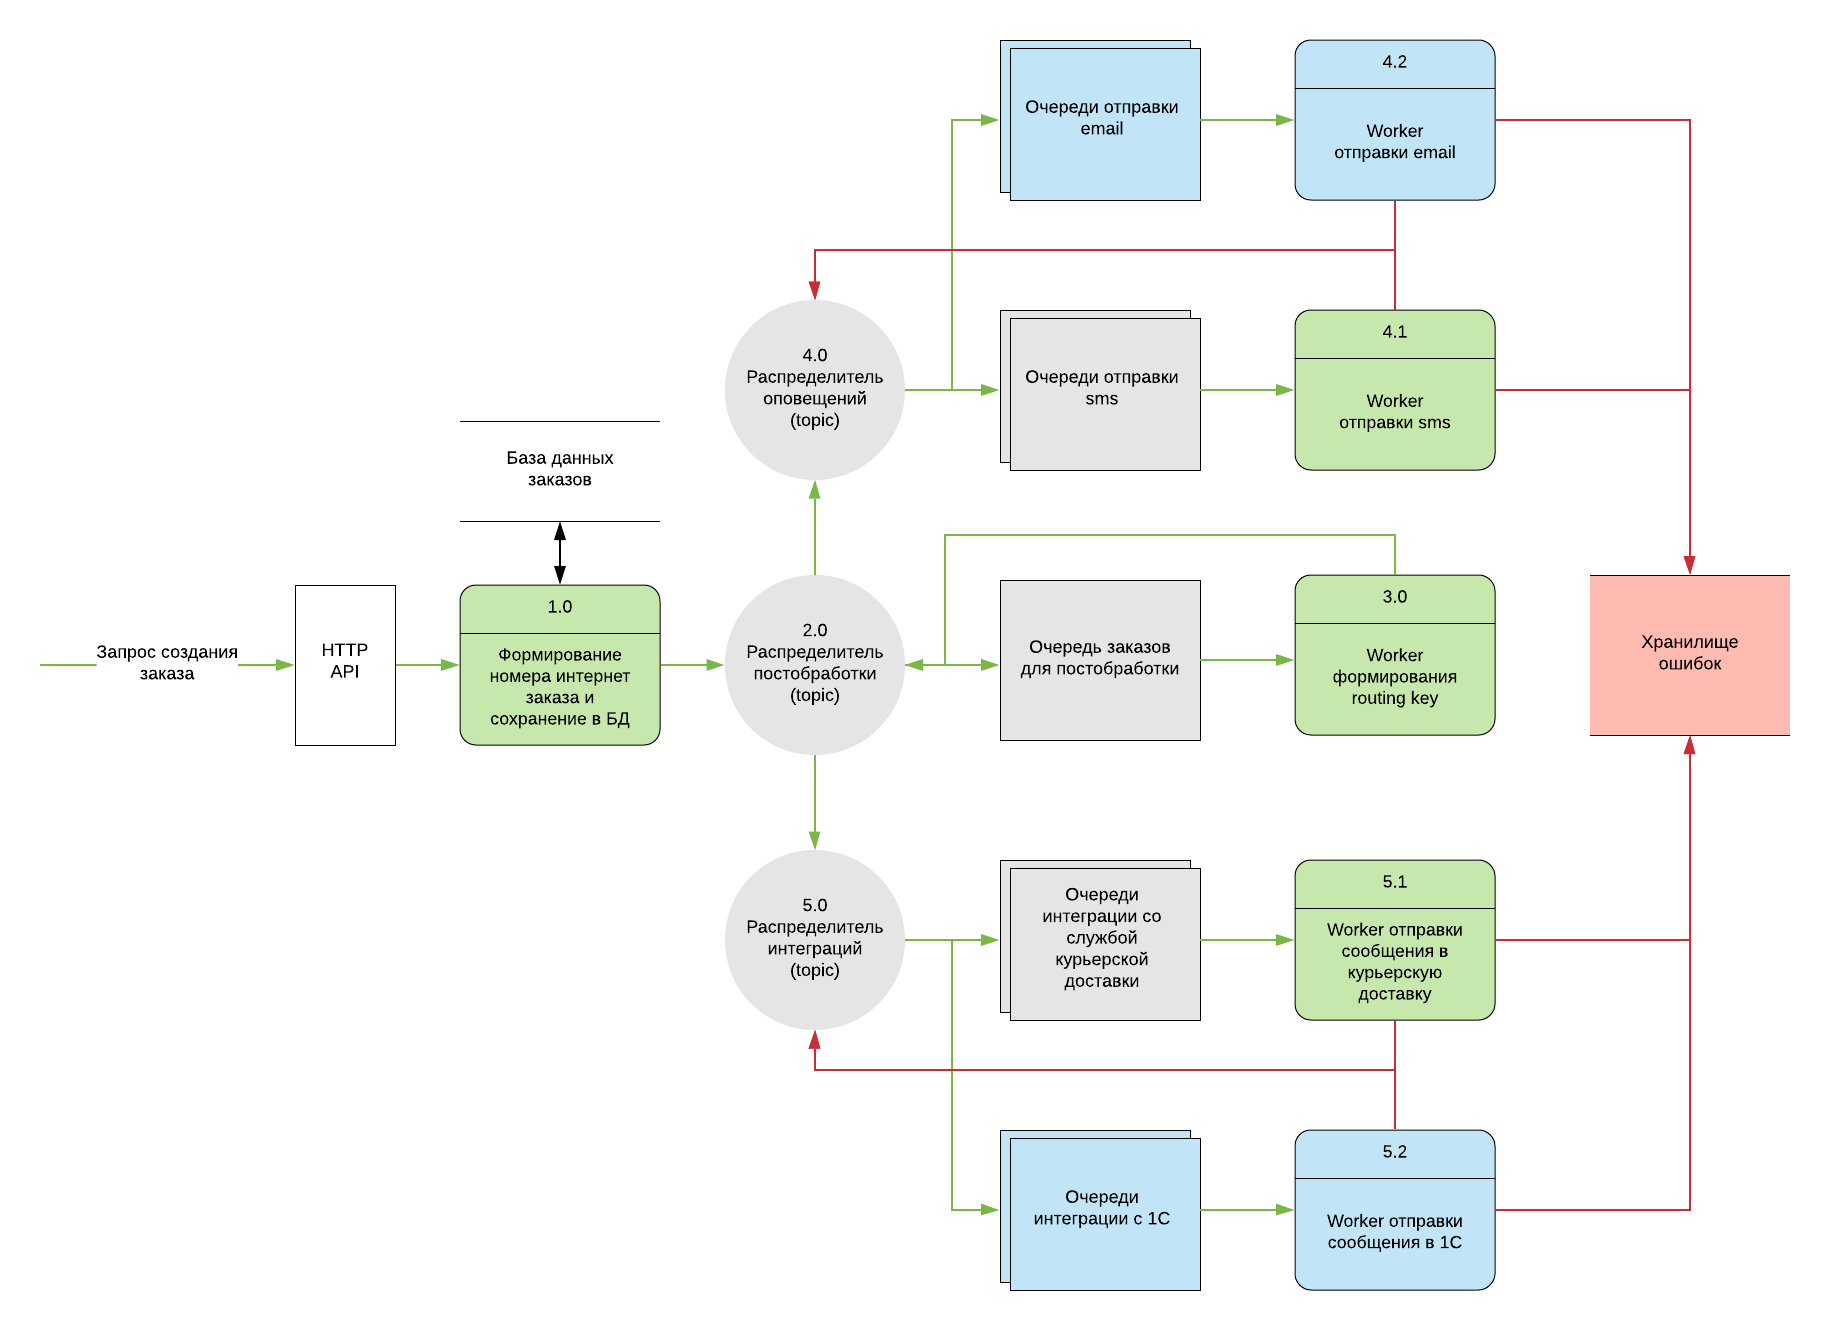
To more clearly represent the ultimate goal, I will draw a diagram.
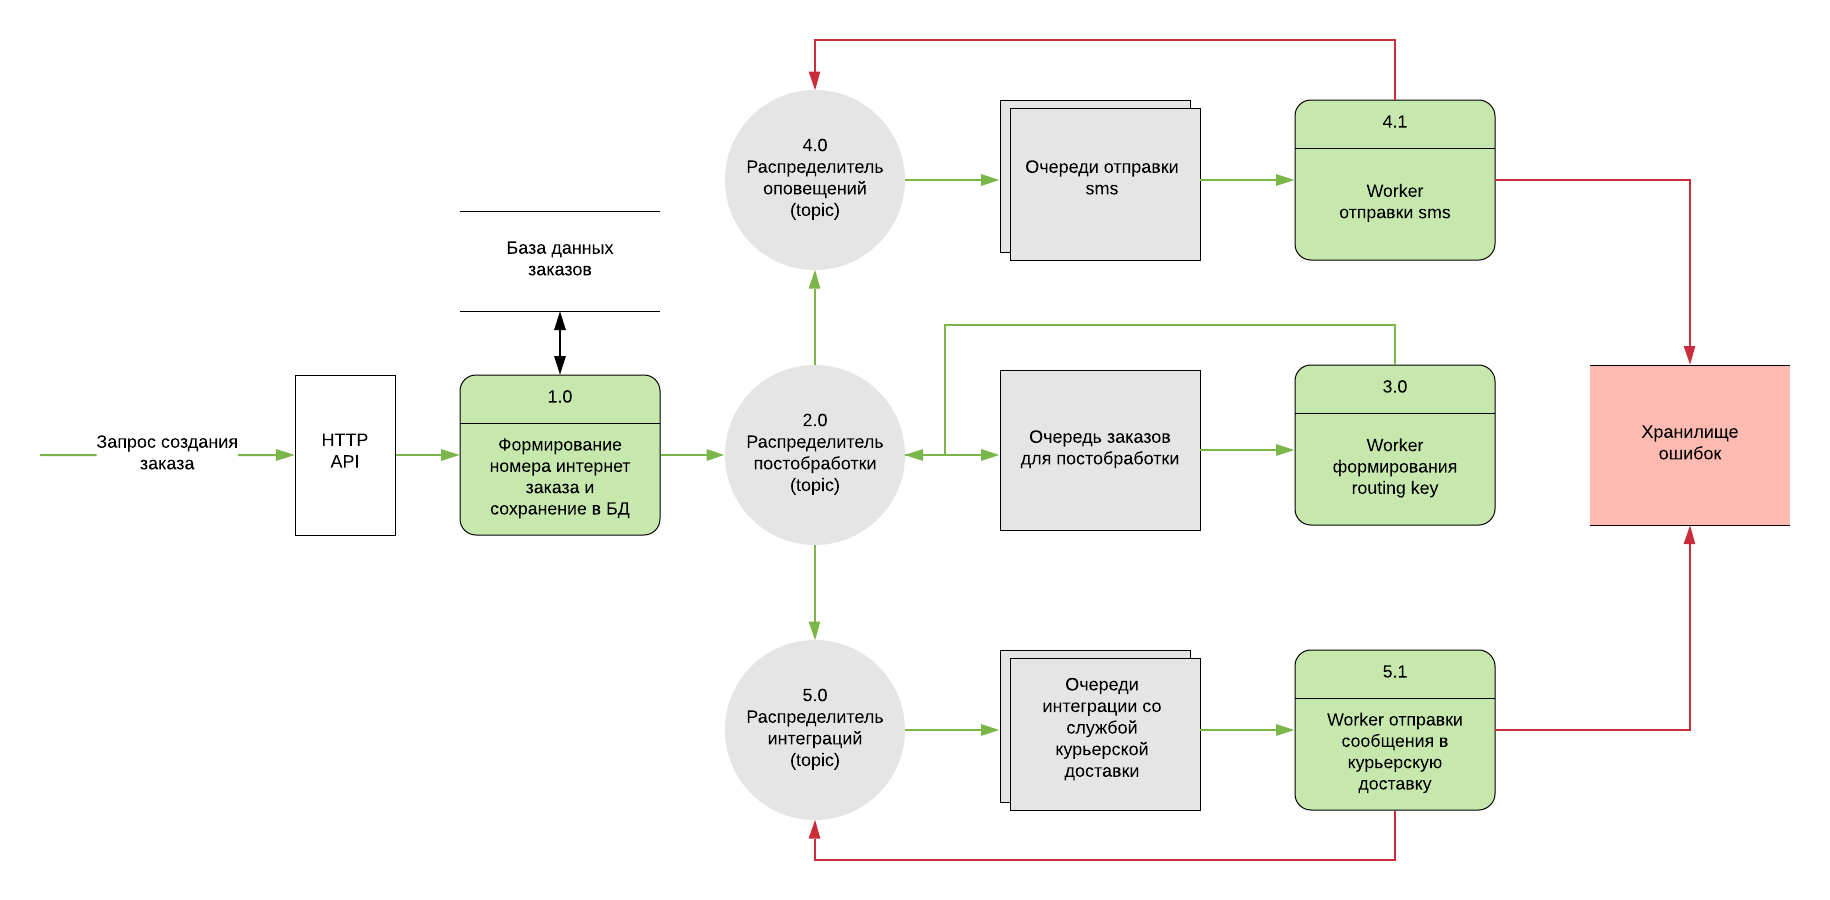
Let's take a look at the order of the order processing process on this diagram. The scheme is divided into blocks and different colors. White blocks indicate external services that we will not consider. Gray blocks indicate RabbitMQ elements. Queues and exchangers. The green color reflects the blocks of business logic that need to be implemented. Also, each block related to our logic is numbered. The numbers indicate the process and subprocess in order.
First of all, the HTTP API message gets into our service. After that, we must assign a number to the order, save the order in the database with the status “new” and send a response about the successful creation of the order, with its number, back. The client, having received a message about the successful creation of the order, goes about his own business. By sending a positive response, we send the order object to the post-processing exchange, from which it falls into the worker of the routing key formation. This worker, having received the order object from the queue, on the basis of it (whether there is an email or a customer’s phone in the order, which delivery method was chosen) must form the order routing key. Having formed a routing key, the worker sends a message back to the post-processing exchange, but now the routing key of the order has changed and the exchanger can send it already on the desired route. Depending on the key, the order can be sent to exchange, which is responsible for notifications, exchange integrations, or both at once. And further on the same logic in a queue and workers.
SMS sending workers and delivery services will try to process the message several times. The number of such attempts can be passed in an environment variable. But you shouldn’t process the message endlessly, because the error may lie in the message itself or the worker's logic. Therefore, after exceeding the number of allowed attempts, the message will be deleted from the queues and sent to the error storage, from which it can be re-sent back to the desired processing level.
Implementation
To verify the implementation, you will need rabbit itself. I recommend using docker and an official broker image for this purpose. Install and run the container with the following command.
docker run -d --name rabbit -p 5672:5672 -e rabbitmq:3.7.15-management-alpine
This is an image with a web interface available on port 15672 for convenient debugging.
We will implement our plans with TypeScript and the amqplib library (RabbitMQ client implementation for Node.js), so for a start it is necessary to describe several interfaces. We describe the interfaces of the order and the messages that we will send to rabbit.
// export interface Product { id: string; name: string; price: number; } // export interface Order { clientName: string; city: string; email?: string; phone?: string; products: Product[]; totalSum: number; deliveryAddress?: string; } // export interface OrderWithPhone extends Order { phone: string; } // export interface OrderWithDeliveryAddress extends Order { deliveryAddress: string; } // Types Guard' export const isOrderWithPhone = (order: Order): order is OrderWithPhone => Boolean(order.phone); export const isOrderWithDeliveryAddress = (order: Order): order is OrderWithDeliveryAddress => Boolean(order.deliveryAddress); // . export interface Message<O extends Order> { errors: string[]; retry: number; order: O; // export interface FailOrder extends Message<Order> { exchange: string; routingKey: string; }
Now we need to describe the configuration interface of queues and exchangers, on the basis of which we will build the processing structure in rabbit.
import { Types, ExchangeTypes } from '../constants'; import { Options } from 'amqplib'; // RabbitMQ export enum Types { QUEUE = 'queue', EXCHANGE = 'exchange', } // export enum ExchangeTypes { TOPIC = 'topic', } // export interface Queue { name: string; options: Options.AssertQueue; } // export interface Exchange { name: string; type: ExchangeTypes; } // export interface Binding { type: Types; destination: string; source: string; routingKey: string; } // RabbitMQ export interface PipelineConfig { queues: Queue[]; exchanges: Exchange[]; bindings: Binding[]; }
Having described the main components of the system, we describe the configuration that was drawn on the diagram using the object.
Queues
export default [ // routingKey { name: 'generateRoutingKey', options: { durable: true, }, }, // sms { name: 'sendSms', options: { durable: true, }, }, // { name: 'delivery', options: { durable: true, }, }, // sms { name: 'sendSmsHold', options: { durable: true, deadLetterExchange: 'notify', deadLetterRoutingKey: 'sendSms', messageTtl: 60000, }, }, // { name: 'deliveryHold', options: { durable: true, deadLetterExchange: 'integrates', deadLetterRoutingKey: 'delivery', messageTtl: 60000, }, }, ];
When describing queues, the following options are used for the queue.
- durable . By default, all queue messages are stored in memory. Therefore, when the broker reboots, messages will disappear. To avoid this, you can use this option. With this setting, rabbit will flush messages to disk. But there is one caveat. In order for messages to be saved after the broker restart, this setting is not enough; messages must be sent to the queue with the persistent option.
- messageTtl . The message lifetime. Given in milliseconds
- deadLetterExchange . The name of the exchanger where the message will be sent from the queue when it expires
- deadLetterRoutingKey . RoutingKey with which the message will be sent to the exchanger from the previous option
Exchanges
import { ExchangeTypes } from '../constants'; export default [ { name: 'postprocessing', type: ExchangeTypes.TOPIC, }, { name: 'notify', type: ExchangeTypes.TOPIC, }, { name: 'integrates', type: ExchangeTypes.TOPIC, }, ];
Bindings
import { Types } from '../constants'; export default [ { type: Types.EXCHANGE, destination: 'notify', source: 'postprocessing', routingKey: '#.notify.#', }, { type: Types.EXCHANGE, destination: 'integrates', source: 'postprocessing', routingKey: '#.integrates.#', }, { type: Types.QUEUE, destination: 'generateRoutingKey', source: 'postprocessing', routingKey: 'generateRoutingKey', }, { type: Types.QUEUE, destination: 'sendSms', source: 'notify', routingKey: '#.sendSms.#', }, { type: Types.QUEUE, destination: 'delivery', source: 'integrates', routingKey: '#.delivery.#', }, { type: Types.QUEUE, destination: 'sendSmsHold', source: 'notify', routingKey: 'sendSmsHold', }, { type: Types.QUEUE, destination: 'deliveryHold', source: 'integrates', routingKey: 'deliveryHold', }, ];
Full configuration
import { PipelineConfig } from '../interfaces'; import exchanges from './exchanges'; import queues from './queues'; import bindings from './bindigs'; export const pipelineConfig: PipelineConfig = { exchanges, queues, bindings, };
To connect to rabbit, write a class.
import { connect, Connection, Channel } from 'amqplib'; export class RabbitConnect { private _uri: string; private _connection: Connection; private _chanel: Channel; constructor() { // rabbit this._uri = process.env.RABBIT_URI || 'amqp://localhost'; } protected async connect() { this._connection = await connect(this._uri); this._chanel = await this._connection.createChannel(); } protected async disconnect() { await this._chanel.close(); return this._connection.close(); } protected get chanel() { return this._chanel; } }
Let's write the Pipeline class, which at startup will create all the necessary infrastructure in rabbit according to the configuration described earlier.
import { RabbitConnect } from './RabbitConnect'; import { PipelineConfig } from './interfaces'; import { Types } from './constants'; export class Pipeline extends RabbitConnect { private _pipeline: PipelineConfig; constructor(pipelineConfig: PipelineConfig) { super(); this._pipeline = pipelineConfig; } public async create() { try { await this.connect(); // const createQueues = this._pipeline.queues.map(queue => this.chanel.assertQueue(queue.name, queue.options), ) as PromiseLike<any>[]; // const createExchanges = this._pipeline.exchanges.map(exchange => this.chanel.assertExchange(exchange.name, exchange.type), ) as PromiseLike<any>[]; await Promise.all([...createQueues, ...createExchanges]); // const createBindings = this._pipeline.bindings.map(binding => { if (binding.type === Types.QUEUE) { return this.chanel.bindQueue(binding.destination, binding.source, binding.routingKey); } return this.chanel.bindExchange(binding.destination, binding.source, binding.routingKey); }); await Promise.all(createBindings); return this.disconnect(); } catch (error) { console.error(error); throw new Error(error); } } }
Now we will write an abstract class of a worker with a common functionality for all workers that can be inherited from.
import { RabbitConnect } from './RabbitConnect'; import { Message, Order, FailOrder } from './interfaces'; import { ConsumeMessage } from 'amqplib'; export interface WorkerParams { maxRetry?: number; // active: string; // exchange: string; // holdKey?: string; // } export abstract class Worker<M extends Order> extends RabbitConnect { private _maxRetry: number; private _active: string; private _holdKey: string | undefined; protected exchange: string; private _currentMessage: Message<M>; private _currentConsumeMessage: ConsumeMessage; constructor({ active, holdKey, exchange, maxRetry }: WorkerParams) { super(); this._maxRetry = maxRetry || 0; this._active = active; this._holdKey = holdKey; this.exchange = exchange; } public async subscribe() { await this.connect(); this.chanel.consume(this._active, this.checkMessage.bind(this)); } // private async checkMessage(message: ConsumeMessage) { this._currentConsumeMessage = message; const orderMessage: Message<M> = JSON.parse(message.content.toString()); if (orderMessage.retry >= this._maxRetry) { await this.sendToErrorStorage(' '); } this._currentMessage = orderMessage; // await this.handler(orderMessage.order || orderMessage); } // protected async sendToErrorStorage(error: string) { const message: FailOrder = { order: this._currentMessage.order, errors: [...this._currentMessage.errors, error], retry: this._currentMessage.retry + 1, exchange: this.exchange, routingKey: this._active }; console.log(' ', message); this.ack(); } // protected async hold(error: string) { if (!this._holdKey) { return; } const orderMessage = { order: this._currentMessage.order, errors: [...this._currentMessage.errors, error], retry: this._currentMessage.retry + 1, }; const orderData = Buffer.from(JSON.stringify(orderMessage)); return this.chanel.publish(this.exchange, this._holdKey, orderData); } // protected async ack() { return this.chanel.ack(this._currentConsumeMessage); } protected abstract handler(message: M): void; }
By default, rabbit requires confirmation of a successful message processing from the worker. For this, the connection channel has an ack method. If the worker was unable to process the message, then there is a nack method that tells rabbit to send the message to another worker.
Now we can write some simple workers from the diagram.
Worker generating a routing key.
import { Worker } from '../Worker'; import { isOrderWithPhone, isOrderWithDeliveryAddress, Order, Message, } from '../interfaces'; import { Keys } from '../constants'; export class GenerateRoutingKey extends Worker<Order> { constructor() { super({ active: 'generateRoutingKey', exchange: 'postprocessing', }); } protected async handler(order: Order) { try { const routingKey: string[] = []; if (isOrderWithPhone(order)) { routingKey.push(Keys.SEND_SMS); } if (isOrderWithDeliveryAddress(order)) { routingKey.push(Keys.SEND_TO_DELIVERY); } const message: Message<Order> = { retry: 0, errors: [], order, }; await this.chanel.publish( this.exchange, routingKey.join('.'), Buffer.from(JSON.stringify(message)), ); await this.ack(); } catch (error) { console.error(error); await this.sendToErrorStorage(error); } } }
Workers sending sms.
import { Worker } from '../Worker'; import { OrderWithPhone } from '../interfaces'; export class SendSms extends Worker<OrderWithPhone> { constructor() { super({ active: 'sendSms', exchange: 'notify', holdKey: 'sendSmsHold', maxRetry: process.env.MAX_RETRY ? parseInt(process.env.MAX_RETRY) : 5, }); } protected async handler(message: OrderWithPhone) { try { console.log(' sms : ', message.phone); this.ack(); } catch (error) { console.error(error); await this.hold(error); } } }
Worker integration with delivery service.
import { Worker } from '../Worker'; import { OrderWithDeliveryAddress } from '../interfaces'; export class Delivery extends Worker<OrderWithDeliveryAddress> { constructor() { super({ active: 'delivery', exchange: 'interates', holdKey: 'deliveryHold', maxRetry: process.env.MAX_RETRY ? parseInt(process.env.MAX_RETRY) : 5, }); } protected async handler(message: OrderWithDeliveryAddress) { try { console.log(' : ', message.deliveryAddress); this.ack(); } catch (error) { console.error(error); await this.hold(error); } } }
The entry point to the application.
import { Pipeline } from './Pipeline'; import { pipelineConfig } from './pipeline'; import { GenerateRoutingKey } from './workers/GenerateRoutingKey'; import { SendSms } from './workers/SendSms'; import { Delivery } from './workers/Delivery'; (async () => { try { const pipeline = new Pipeline(pipelineConfig); const generateRoutingKey = new GenerateRoutingKey(); const sendSms = new SendSms(); const delivery = new Delivery(); await pipeline.create(); await Promise.all([generateRoutingKey.subscribe(), sendSms.subscribe(), delivery.subscribe()]); } catch (error) { console.error(error); process.exit(1); } })();
I will not give an example of a class code for writing an order to the database and generating an Internet order number. This is beyond the scope of this article. To verify the code, you can use the rabbit web interface by sending the order json to the posrprocessing exchanger.
Conclusion
This design scheme for processing online ordering makes it easy to scale the system. It will not be difficult for us to add several queues and workers to this scheme in order to add the necessary functionality. For example, you can add sending notifications by email or sending an order for accounting in 1C. The converted circuit will look like this:
I hope you enjoyed the article. I will be glad to any comments and criticism. All submitted code can be found on github
All Articles