Android Camera2 API from the kettle

Not so long ago, I was busy with my robotic machine, trying to put an ANDROID smartphone on it. My, that is, his task, was to make the cart evolutionarily advanced. So that she, so to speak, could feel the world with his sensors, look at him with her eye (camera), hear with a microphone and swear over the speakerphone. AVR resources, of course, were not enough for this and therefore the microcontroller that was on the cart moved to a lower level, somewhere in the spinal cord region to control motors and various unconditioned reflexes.
But a strange thing, when I started writing an application for a smartphone, a bad IDE ANDROID STUDIO began to constantly cross out my code and call it obsolete.
camera =
Especially, as you can see, in those parts where I tried to work with the camera. It was very disappointing because I read on the Internet and learned many lessons about working with android and camera here , here , here and even here . Nothing was crossed out there. And it was called the Camera API. Everything there was simple and logical. But Google stubbornly pushed me towards some kind of Camera2 API .
I looked there and simply opupil from the number of different callbacks, builders, handlers and loopers for each line of the demo code. It was completely incomprehensible which way to approach this if you are an ordinary amateur, not an android developer. Moreover, there are a few articles on the Camera2 API on the network even today, although this update appeared to be like four years ago. But all I found was an article in Hacker in 2016, a post in three parts from Ukrainian brothers of the same year, a double post on Habré in 2017, and an Understanding Camera2 article from the Japanese megaphone Tomoaki Imai. And this I also mean some structured and formalized information, and not snippets of code like “see how I can” and sheets in the style “look at the code pliz, nothing works for me” scattered on the Internet.
And now, if you are still wondering why I needed to cut my post on this topic
already in 2019, then welcome to cat.
Actually, I liked the article from the Hacker because it gave me at least a panoramic understanding of why the hell the new paradigm of working with the camera was introduced. It also became clear why some new methods were needed that were not in the previous API. But to write a working program for this article was completely impossible, because the authors, apparently, like real hackers, cited only the names of the methods, well, maybe there are still a couple of lines of additional code. But this categorically was not enough for me.
The post on Habré was good, I don’t argue, and I even understood the first few paragraphs, but that was the point, because the author of the post defeated the camera using RxJava2, which automatically excluded me from the number of further readers. I would normally deal with OOP, but here is some kind of reactive programming.
The Japanese article was even better, even if he did not write in his native language. But I don’t know Kotlin either, although I, of course, was glad for the domestic developers and appreciated the brevity of its syntax, in contrast to the JAVA vermicelli that was on the Google developers page (by the way, with this page, it was also clear to me that there not much is clear).
The last article that brought me practical benefit was a three-part post from fraternal Ukraine. I even launched something there and saw something there. But unfortunately, in the third part, the author of the article was very tired and also began to issue code in fragments that did not add up to my working whole. Moreover, in the end, the author was completely upset, because he got the image of the wrong color palette for which he was counting.

Say, this is because the version of Lollipop is 5.0, and there is a bug. You need to upgrade to Lollipop 5.1 and then everything will be fine. But somehow not yet. And also harmful Ukrainians fastened to the JAVA SCRIPT article, and when copying the code a wild amount of garbage was poured into the program text. Guys, well, you can’t do that ... I had to install a special plug-in in Firefox.
Therefore, I had to pick up the fallen banner and finish the job to the end, which of course, required a titanic mental effort. And since it was somehow a pity to be satisfied with just the realization that the working result was obtained, I wanted to share it with amateur teapots. Moreover, this is far from the end of the story. I still need to learn how to transfer live video from an android camera to a computer (a robotic trolley should develop, this is the law of evolution) and not in pieces, like I blinded, but smoothly. And there are such Mont Blanc obstacles in the form of media codecs and other things, that it’s just tinplate.
But on the other hand, the whole thing may end in complete disappointment. And not because they will not be able to climb Mont Blanc.
And because now manufacturers of smartphones are developing completely new approaches to camera manufacturing.
A month ago, a rumor leaked about Nokia smartphones with five main cameras. How to relate to this? An interesting and promising rumor or another strange thing? No matter how unique such a design may look, Nokia certainly will not be able to become a pioneer in introducing an unusual number of lenses and sensors into compact devices. The Light L16 camera was already equipped with 16 lenses in 2015, and the company, obviously, has a new prototype in operation. Above you can see how this could potentially look.
After the triple camera appeared in the Huawei P20 Pro, the transition to a smartphone with five cameras no longer sounds as comical as it could have been a couple of years ago. However, the main question remains - what’s the point?
What to do with so many lenses?
The first thing that comes to mind is the variety of types of camera sensors available on the modern smartphone market, and the ability to add more. Why choose between wide-angle, telephoto, portrait with bokeh or monochrome, if you can get all this in one device?
Being theoretically possible, such a design would be quite awkward to use. The software will have to switch between modes automatically or offer a complex set of options to the user. Moreover, the development of such a design would be very expensive for all the dubious advantages of such a solution. Each camera would function for the most part independently, and buyers were unlikely to use some large number of modes. And it is not clear how much they would be willing to pay for such functionality. So cameras with multiple modules should be able to do more to attract the user.
Huawei P20 Pro already offers its version of how several camera modules can work together to give an interesting result. We are talking about technologies from Huawei, such as Monochrome and Hybrid Zoom. The first improves the dynamic range of standard frames by combining regular RGB data with a photosensitive black and white sensor. And Hybrid Zoom promises even more: it combines data from multiple cameras to increase the resolution of the image for a better zoom. As a result, in the P20 Pro 8 MP, the telephoto lens sensor allows you to shoot in 10 MP resolution at 3x and 5x zoom.
Higher Resolution - More Flexibility
The first Light L16 camera worked similarly, using periscope mirrors to fit the camera modules into a compact body. The camera took data from several modules at 28, 70 and 150 mm, depending on the zoom level. The result was a large 52 MP shot taken with 10 slightly different angles available at magnification levels up to 5x. The concept of the new model developed for smartphones works with 5-9 lenses. Such a camera module is capable of taking large 64-megapixel pictures.
This idea of multiple shots also adds benefits when shooting in low light and in HDR with multiple apertures. The high-quality effect of the depth of the frame is also available due to the simultaneous software emulation and the use of several focal lengths.
Light L16 brought disappointment, but the idea itself was promising. And the next generation with success may prove to be something worthwhile. The company claims that a smartphone will be announced at the end of the year, where their latest solution with multiple lenses will be installed.
The same idea can be traced back to Nokia’s experience with multi-camera implementation, given the old history of investing in Pelican Imaging in 2013. Unlike Light, the sensor here is much smaller. And even so, the technology promises very similar advantages, including software focus change, depth measurement and increasing the size of the final image. Unfortunately, Tessera bought the company in 2016, but the idea itself might not have left the minds of Nokia engineers.
Zeiss, Nokia’s current partner in photo parts, has a patent for switchable zoom, but we haven’t heard from them about the design with multiple lenses. Perhaps Nokia’s other partner, FIH Mobile, looks more promising. This company is owned by Foxconn, launches Nokia phones and also invested in Light in 2015, giving it a license to use the technology.
And if you think that the Nokia leak and the Light prototype have something in common, this is no coincidence. Connects the two Foxconn companies. So will the Nokia smartphone be the first to use technology from Light?
So is this the future?
Ultra-high resolution is not a new concept. In 2014, Oppo Find 7 used a similar principle, and Huawei's Hybrid Zoom allowed the technology to work with multiple cameras. Historically, the main problem of the technology has been high performance requirements, algorithm quality and power consumption. But on the side of modern smartphones, more powerful signal processing processors, energy-efficient DSP chips, and even improved capabilities of neural networks, which gradually reduces the problem.
High detail, optical zoom capabilities and a custom bokeh effect top the list of camera requirements for a modern smartphone, and multi-camera technology can help achieve success. Instead of performing different functions with separate cameras, the future of mobile photography is to combine several cameras to provide more advanced and flexible capabilities.
There are still questions about the Light technology, especially about gluing images with different focal lengths. We can only wait - we will see what will change for the better in the second generation of technology.

It will not be easy to configure such an assembly from cameras with handles in the program. Perhaps the circle will be closed and in order to take a picture, we will again have to write an explicit intent, with the content, such as, “camera, please take the picture yourself as you can, but beautifully, and return it to me in my activity”.
But for now, though a little more remains for us. Therefore, we proceed immediately.
Why did all this google need?
It seems like the whole thing is safe and proper multithreading (and it’s also become possible to do all sorts of effects and filters directly). Now, if in vanilla JAVA, if necessary, you need to push mutexes, synchronizations and semaphores competently everywhere, then here Google takes over almost everything. You only need to write down the callbacks in the program text, which will be called if necessary. That is, for example, you submit a request to turn on the camera:
mCameraManager.openCamera()
But this is not a team, this is a request. You cannot immediately start working with the camera. Firstly, she needs time to turn on, and secondly, the android has so many important things to do, and your wish is put in a rather big queue. But then we don’t have to wait for the camera to open in a loop in the main thread, hanging the entire application (we still remember what can be done in the UI thread and what not). Therefore, we send our wish and while we go about our business, open the views, write “hello world”, configure button handlers and the like.
Meanwhile, after some tens and hundreds of milliseconds, the operating system finally reaches the hands of the camera and it initializes it. And as soon as the camera is ready, the same callback is triggered (unless of course you registered it in advance)
private CameraDevice.StateCallback mCameraCallback = new CameraDevice.StateCallback() { @Override public void onOpened(CameraDevice camera) { mCameraDevice = camera; createCameraPreviewSession(); ….. }
That is, the camera is now open and can do something there: display the image from the camera on the view, forward it further for saving, and so on.
As a result, all work with the camera, in fact, comes down to prescribing all kinds of callbacks. But in their noble endeavor, Google's developers slightly went too far and, as the Japanese comrade correctly noted:
One of the reasons why Camera2 is perplexed is how many callbacks you need to use to take one shot.
But this is not enough. The full scheme of the camera has such an awesome look
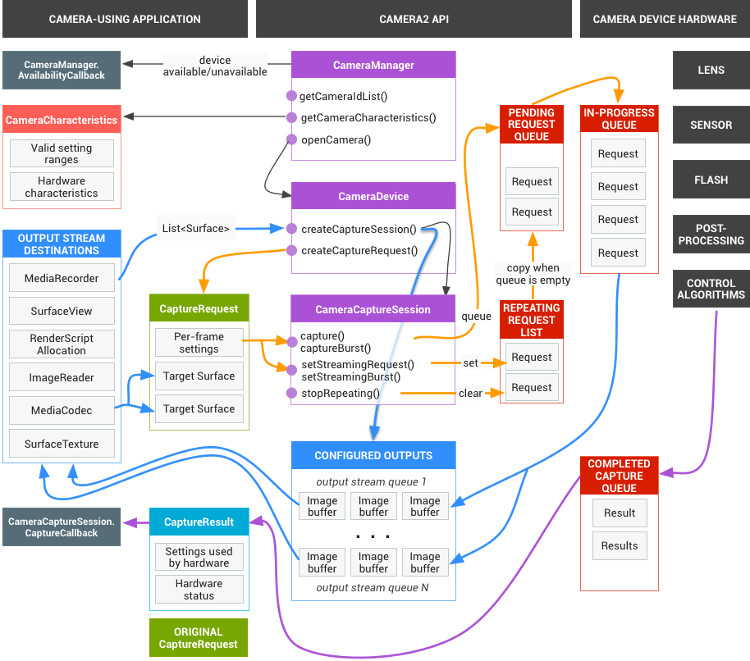
But fortunately, for starters, it can be reduced to a much more attractive picture.
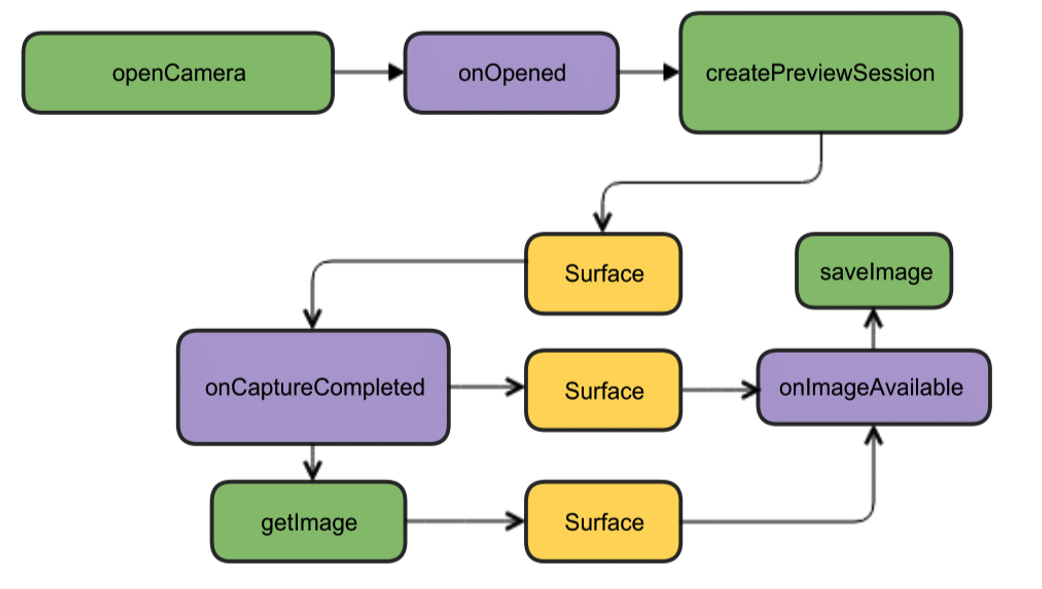
Although everything is in English there, but as they say, it is clear without words. For starters, we have enough of this design. Open the camera, display the image on the smartphone screen, take a picture and as soon as it is ready (callbacks again), the listener of this event will work and write the picture to a file.
Getting started creating code
We will create a new project in the Android Studio IDE, select the minimum version of SDK 22 to avoid green pictures and order empty Activity (or even better, take version 23, otherwise troubles may occur with permissions). Enough for a start. Even the permissions in the manifest do not need to be done yet.
We begin by creating an instance of the CameraManager class. This is a system service manager that allows you to find available cameras, get their characteristics you need for work and set shooting settings for cameras.
And we will see the following characteristics:
camera identifier (0, 1, 2 ....)
direction where the camera is directed (forward, backward)
camera resolution
First, we get the list of cameras in the form of a string array, and then print the required characteristics in a loop and write them to the log.
package com.example.camera; import android.content.Context; import androidx.annotation.RequiresApi; import androidx.appcompat.app.AppCompatActivity; import android.graphics.ImageFormat; import android.hardware.camera2.CameraAccessException; import android.hardware.camera2.CameraCharacteristics; import android.hardware.camera2.CameraManager; import android.hardware.camera2.params.StreamConfigurationMap; import android.os.Build; import android.os.Bundle; import android.util.Log; import android.util.Size; public class MainActivity extends AppCompatActivity { public static final String LOG_TAG = "myLogs"; String[] myCameras = null; private CameraManager mCameraManager = null; @RequiresApi(api = Build.VERSION_CODES.M) @Override protected void onCreate(Bundle savedInstanceState) { super.onCreate(savedInstanceState); setContentView(R.layout.activity_main); mCameraManager = (CameraManager) getSystemService(Context.CAMERA_SERVICE); try{ // myCameras = new String[mCameraManager.getCameraIdList().length]; // for (String cameraID : mCameraManager.getCameraIdList()) { Log.i(LOG_TAG, "cameraID: "+cameraID); int id = Integer.parseInt(cameraID); // e CameraCharacteristics cc = mCameraManager.getCameraCharacteristics(cameraID); // , StreamConfigurationMap configurationMap = cc.get(CameraCharacteristics.SCALER_STREAM_CONFIGURATION_MAP); // int Faceing = cc.get(CameraCharacteristics.LENS_FACING); if (Faceing == CameraCharacteristics.LENS_FACING_FRONT) { Log.i(LOG_TAG,"Camera with ID: "+cameraID + " is FRONT CAMERA "); } if (Faceing == CameraCharacteristics.LENS_FACING_BACK) { Log.i(LOG_TAG,"Camera with: ID "+cameraID + " is BACK CAMERA "); } // jpeg Size[] sizesJPEG = configurationMap.getOutputSizes(ImageFormat.JPEG); if (sizesJPEG != null) { for (Size item:sizesJPEG) { Log.i(LOG_TAG, "w:"+item.getWidth()+" h:"+item.getHeight()); } } else { Log.i(LOG_TAG, "camera don`t support JPEG"); } } } catch(CameraAccessException e){ Log.e(LOG_TAG, e.getMessage()); e.printStackTrace(); } } }
The log will get something like this:
2019-09-13 10:56:31.489 11130-11130/? I/myLogs: cameraID: 0 2019-09-13 10:56:31.504 11130-11130/? I/myLogs: Camera with: ID 0 is BACK CAMERA 2019-09-13 10:56:31.506 11130-11130/? I/myLogs: w:4000 h:3000 2019-09-13 10:56:31.506 11130-11130/? I/myLogs: w:4000 h:2250 2019-09-13 10:56:31.506 11130-11130/? I/myLogs: w:3840 h:2160 2019-09-13 10:56:31.506 11130-11130/? I/myLogs: w:2592 h:1944 2019-09-13 10:56:31.506 11130-11130/? I/myLogs: w:2592 h:1940 2019-09-13 10:56:31.506 11130-11130/? I/myLogs: w:2048 h:1536 2019-09-13 10:56:31.506 11130-11130/? I/myLogs: w:1920 h:1080 2019-09-13 10:56:31.506 11130-11130/? I/myLogs: w:1600 h:1200 2019-09-13 10:56:31.506 11130-11130/? I/myLogs: w:1440 h:1080 2019-09-13 10:56:31.506 11130-11130/? I/myLogs: w:1440 h:720 2019-09-13 10:56:31.506 11130-11130/? I/myLogs: w:1280 h:960 2019-09-13 10:56:31.506 11130-11130/? I/myLogs: w:1280 h:768 2019-09-13 10:56:31.506 11130-11130/? I/myLogs: w:1280 h:720 2019-09-13 10:56:31.506 11130-11130/? I/myLogs: w:1280 h:480 2019-09-13 10:56:31.506 11130-11130/? I/myLogs: w:1280 h:400 2019-09-13 10:56:31.506 11130-11130/? I/myLogs: w:800 h:480 2019-09-13 10:56:31.506 11130-11130/? I/myLogs: w:720 h:480 2019-09-13 10:56:31.506 11130-11130/? I/myLogs: w:640 h:480 2019-09-13 10:56:31.506 11130-11130/? I/myLogs: w:480 h:640 2019-09-13 10:56:31.506 11130-11130/? I/myLogs: w:480 h:360 2019-09-13 10:56:31.506 11130-11130/? I/myLogs: w:480 h:320 2019-09-13 10:56:31.506 11130-11130/? I/myLogs: w:352 h:288 2019-09-13 10:56:31.506 11130-11130/? I/myLogs: w:320 h:240 2019-09-13 10:56:31.506 11130-11130/? I/myLogs: w:240 h:320 2019-09-13 10:56:31.507 11130-11130/? I/myLogs: w:176 h:144 2019-09-13 10:56:31.507 11130-11130/? I/myLogs: w:144 h:176 2019-09-13 10:56:31.507 11130-11130/? I/myLogs: cameraID: 1 2019-09-13 10:56:31.514 11130-11130/? I/myLogs: Camera with ID: 1 is FRONT CAMERA 2019-09-13 10:56:31.515 11130-11130/? I/myLogs: w:4224 h:3136 2019-09-13 10:56:31.515 11130-11130/? I/myLogs: w:4224 h:2376 2019-09-13 10:56:31.516 11130-11130/? I/myLogs: w:4160 h:3120 2019-09-13 10:56:31.516 11130-11130/? I/myLogs: w:4160 h:2340 2019-09-13 10:56:31.516 11130-11130/? I/myLogs: w:4000 h:3000 2019-09-13 10:56:31.516 11130-11130/? I/myLogs: w:4000 h:2250 2019-09-13 10:56:31.516 11130-11130/? I/myLogs: w:3840 h:2160 2019-09-13 10:56:31.516 11130-11130/? I/myLogs: w:2592 h:1944 2019-09-13 10:56:31.516 11130-11130/? I/myLogs: w:2592 h:1940 2019-09-13 10:56:31.516 11130-11130/? I/myLogs: w:2048 h:1536 2019-09-13 10:56:31.516 11130-11130/? I/myLogs: w:1920 h:1080 2019-09-13 10:56:31.516 11130-11130/? I/myLogs: w:1600 h:1200 2019-09-13 10:56:31.516 11130-11130/? I/myLogs: w:1440 h:1080 2019-09-13 10:56:31.516 11130-11130/? I/myLogs: w:1440 h:720 2019-09-13 10:56:31.516 11130-11130/? I/myLogs: w:1280 h:960 2019-09-13 10:56:31.516 11130-11130/? I/myLogs: w:1280 h:768 2019-09-13 10:56:31.516 11130-11130/? I/myLogs: w:1280 h:720 2019-09-13 10:56:31.516 11130-11130/? I/myLogs: w:1280 h:480 2019-09-13 10:56:31.516 11130-11130/? I/myLogs: w:1280 h:400 2019-09-13 10:56:31.516 11130-11130/? I/myLogs: w:800 h:480 2019-09-13 10:56:31.516 11130-11130/? I/myLogs: w:720 h:480 2019-09-13 10:56:31.516 11130-11130/? I/myLogs: w:640 h:480 2019-09-13 10:56:31.516 11130-11130/? I/myLogs: w:480 h:640 2019-09-13 10:56:31.516 11130-11130/? I/myLogs: w:480 h:360 2019-09-13 10:56:31.516 11130-11130/? I/myLogs: w:480 h:320 2019-09-13 10:56:31.516 11130-11130/? I/myLogs: w:352 h:288 2019-09-13 10:56:31.516 11130-11130/? I/myLogs: w:320 h:240 2019-09-13 10:56:31.516 11130-11130/? I/myLogs: w:240 h:320 2019-09-13 10:56:31.516 11130-11130/? I/myLogs: w:176 h:144 2019-09-13 10:56:31.516 11130-11130/? I/myLogs: w:144 h:176
We, in principle, do not really need this information, any teapot even by the previous API already knows that cameras have identifiers from zero and beyond, that you will not surprise anyone with a resolution of 1920 by 1080, and even more so with the JPEG format. In fact, this data is already needed by an “adult” application ready for production and which, on its basis, will make menus of choice for the user and so on. In our simplest case, in general, everything is clear. But since all articles begin with this, then we will begin.
After making sure that the front camera has the identifier number “1” and the rear “0” (for some reason they are specified in the String format), and also that the resolution of 1920 x 1080 and saving the JPG file are available to us, we will continue the attack.
We get the necessary permissions
Initially, we need to worry about a number of permissions. To do this, the manifest will have to write the following:
<uses-permission android:name="android.permission.CAMERA" /> <uses-permission android:name="android.permission.WRITE_EXTERNAL_STORAGE" />
The first is understandable for the camera, the second is for writing pictures to a file (and this is not an external memory card, as it might seem from the meaning of the word EXTERNAL, but quite a native smartphone memory)
But Android also cares about us, therefore, starting with the Lollipop version, the permissions specified in the manifest will no longer be enough. Now it is required that the user pens approve his consent to open the camera and write data to memory.
For this, in the simplest case, you need to add this:
protected void onCreate(Bundle savedInstanceState) { super.onCreate(savedInstanceState); setContentView(R.layout.activity_main); ……... if (checkSelfPermission(Manifest.permission.CAMERA) != PackageManager.PERMISSION_GRANTED || (ContextCompat.checkSelfPermission(MainActivity.this, Manifest.permission.WRITE_EXTERNAL_STORAGE) != PackageManager.PERMISSION_GRANTED) ) { requestPermissions(new String[]{Manifest.permission.CAMERA,Manifest.permission.WRITE_EXTERNAL_STORAGE}, 1); } …..
Why in the simplest? Because it’s not necessary to do such things in a UI stream. Firstly, a thread is hung up while the user pokes the screen with his clumsy fingers, and secondly, if you have camera initialization further, the application may generally crash. In this demo case, everything is fine, but it’s generally prescribed for this case to use the desired callback type:
@Override public void onRequestPermissionsResult(int requestCode, String[] permissions, int[] grantResults) { if (requestCode == MY_REQUEST_CODE_FOR_CAMERA) { if (grantResults[0] == PackageManager.PERMISSION_GRANTED) { startCameraActivity(); // ( ) } } }
Although I previously did not know all this, I launched the desired Activity through AsyncTask, and even earlier I just sculpted a new Thread as in Java.
Cooking the camera
For convenience, we will take out everything related to cameras in a separate class on the advice of smart people and create the CameraService class. There we will place the initialization of the cameras and then write down all the callbacks that are required.
….. CameraService[] myCameras = null; private CameraManager mCameraManager = null; private final int CAMERA1 = 0; private final int CAMERA2 = 1; protected void onCreate(Bundle savedInstanceState) { super.onCreate(savedInstanceState); setContentView(R.layout.activity_main); ….. } public class CameraService { private String mCameraID; private CameraDevice mCameraDevice = null; private CameraCaptureSession mCaptureSession; public CameraService(CameraManager cameraManager, String cameraID) { mCameraManager = cameraManager; mCameraID = cameraID; } public boolean isOpen() { if (mCameraDevice == null) { return false; } else { return true; } } public void openCamera() { try { if (checkSelfPermission(Manifest.permission.CAMERA) == PackageManager.PERMISSION_GRANTED) { mCameraManager.openCamera(mCameraID,mCameraCallback,null); } } catch (CameraAccessException e) { Log.i(LOG_TAG,e.getMessage()); } } public void closeCamera() { if (mCameraDevice != null) { mCameraDevice.close(); mCameraDevice = null; } } }
In the main thread, create an instance of mCameraManager and use it to populate the array of myCameras objects. In this case, there are only two of them - the front and selfie cameras.
mCameraManager = (CameraManager) getSystemService(Context.CAMERA_SERVICE); try{ // myCameras = new CameraService[mCameraManager.getCameraIdList().length]; for (String cameraID : mCameraManager.getCameraIdList()) { Log.i(LOG_TAG, "cameraID: "+cameraID); int id = Integer.parseInt(cameraID); // myCameras[id] = new CameraService(mCameraManager,cameraID); } } catch(CameraAccessException e){ Log.e(LOG_TAG, e.getMessage()); e.printStackTrace(); }
In the public void openCamera () method, you can see the line:
mCameraManager.openCamera(mCameraID,mCameraCallback,null);
it is from here that the path leads to the first callback of the CameraDevice camera status. StateCallback. He will tell us if the camera is open, closed or maybe there is nothing at all there and will give an error. We will write it in the methods of the CameraService class.
private CameraDevice.StateCallback mCameraCallback = new CameraDevice.StateCallback() { @Override public void onOpened(CameraDevice camera) { mCameraDevice = camera; Log.i(LOG_TAG, "Open camera with id:"+mCameraDevice.getId()); createCameraPreviewSession(); } @Override public void onDisconnected(CameraDevice camera) { mCameraDevice.close(); Log.i(LOG_TAG, "disconnect camera with id:"+mCameraDevice.getId()); mCameraDevice = null; } @Override public void onError(CameraDevice camera, int error) { Log.i(LOG_TAG, "error! camera id:"+camera.getId()+" error:"+error); } };
Accordingly, if the camera is available for operation (the public void onOpened (CameraDevice camera) {} method has worked), then we write our further actions there, for example, calling the createCameraPreviewSession () method. It will help to bring us the image from the camera to the view and work with it further.
CreateCameraPreviewSession
Here we are trying to display an image (data stream) on the mImageView texture, which is already defined in the layout. You can even determine with which resolution in the pixels.
private void createCameraPreviewSession() { SurfaceTexture texture = mImageView.getSurfaceTexture(); // texture.setDefaultBufferSize(1920,1080); Surface surface = new Surface(texture); try { final CaptureRequest.Builder builder = mCameraDevice.createCaptureRequest(CameraDevice.TEMPLATE_PREVIEW); builder.addTarget(surface); mCameraDevice.createCaptureSession(Arrays.asList(surface), new CameraCaptureSession.StateCallback() { @Override public void onConfigured(CameraCaptureSession session) { mCaptureSession = session; try { mCaptureSession.setRepeatingRequest(builder.build(),null,null); } catch (CameraAccessException e) { e.printStackTrace(); } } @Override public void onConfigureFailed(CameraCaptureSession session) { }}, null ); } catch (CameraAccessException e) { e.printStackTrace(); } }
And when this same session is ready, the aforementioned callback is called up and we begin by the expression of googlodels: “displaying the camera preview”. Here, those who wish can adjust the autofocus and flash settings, but for now we will get by with the default settings.
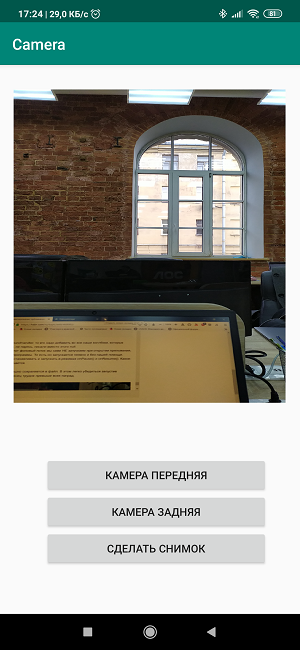
Create a layout
Now we need, so to speak, to sketch the colors on the canvas and create a brilliant picture in the style of
"Three screen buttons and one view."
<?xml version="1.0" encoding="utf-8"?> <androidx.constraintlayout.widget.ConstraintLayout xmlns:android="http://schemas.android.com/apk/res/android" xmlns:app="http://schemas.android.com/apk/res-auto" xmlns:tools="http://schemas.android.com/tools" android:layout_width="match_parent" android:layout_height="match_parent" tools:context=".MainActivity"> <TextureView android:id="@+id/textureView" android:layout_width="356dp" android:layout_height="410dp" android:layout_marginTop="32dp" app:layout_constraintEnd_toEndOf="parent" app:layout_constraintHorizontal_bias="0.49" app:layout_constraintStart_toStartOf="parent" app:layout_constraintTop_toTopOf="parent" /> <LinearLayout android:layout_width="292dp" android:layout_height="145dp" android:layout_marginStart="16dp" android:orientation="vertical" app:layout_constraintBottom_toBottomOf="parent" app:layout_constraintEnd_toEndOf="parent" app:layout_constraintStart_toStartOf="parent" app:layout_constraintTop_toBottomOf="@+id/textureView" app:layout_constraintVertical_bias="0.537"> <Button android:id="@+id/button4" android:layout_width="match_parent" android:layout_height="wrap_content" android:text=" " /> <Button android:id="@+id/button5" android:layout_width="match_parent" android:layout_height="wrap_content" android:text=" " /> <Button android:id="@+id/button6" android:layout_width="match_parent" android:layout_height="wrap_content" android:text=" " /> </LinearLayout> </androidx.constr
The process is quite trivial and anyone can turn around here as he wants. But to write the names of the buttons directly in the layout is also bad manners and so in working versions it is not necessary to do so.
Accordingly, in the Activity itself, we create listeners, that is, listeners for buttons and views.
private Button mButtonOpenCamera1 = null; private Button mButtonOpenCamera2 = null; private Button mButtonToMakeShot = null; private TextureView mImageView = null; @RequiresApi(api = Build.VERSION_CODES.M) @Override protected void onCreate(Bundle savedInstanceState) { super.onCreate(savedInstanceState); setContentView(R.layout.activity_main); ……... mButtonOpenCamera1 = findViewById(R.id.button1); mButtonOpenCamera2 = findViewById(R.id.button2); mButtonToMakeShot =findViewById(R.id.button3); mImageView = findViewById(R.id.textureView); mButtonOpenCamera1.setOnClickListener(new View.OnClickListener() { @Override public void onClick(View v) { if (myCameras[CAMERA2].isOpen()) myCameras[CAMERA2].closeCamera(); if (myCameras[CAMERA1] != null) { if (!myCameras[CAMERA1].isOpen()) myCameras[CAMERA1].openCamera(); } } }); mButtonOpenCamera2.setOnClickListener(new View.OnClickListener() { @Override public void onClick(View v) { if (myCameras[CAMERA1].isOpen()) myCameras[CAMERA1].closeCamera(); if (myCameras[CAMERA2] != null) { if (!myCameras[CAMERA2].isOpen()) myCameras[CAMERA2].openCamera(); } } }); mButtonToMakeShot.setOnClickListener(new View.OnClickListener() { @Override public void onClick(View v) { // } }); ……..
The button assignments are clear from the names, we will leave the third button for the future picture.
And if you now bring all the pieces of code together then
get the following:
package com.example.camera; import androidx.annotation.RequiresApi; import androidx.appcompat.app.AppCompatActivity; import androidx.core.content.ContextCompat; import android.Manifest; import android.content.Context; import android.content.pm.PackageManager; import android.graphics.SurfaceTexture; import android.hardware.camera2.CameraAccessException; import android.hardware.camera2.CameraCaptureSession; import android.hardware.camera2.CameraDevice; import android.hardware.camera2.CameraManager; import android.hardware.camera2.CaptureRequest; import android.os.Build; import android.os.Bundle; import android.util.Log; import android.view.Surface; import android.view.TextureView; import android.view.View; import android.widget.Button; import java.util.Arrays; public class MainActivity extends AppCompatActivity { public static final String LOG_TAG = "myLogs"; CameraService[] myCameras = null; private CameraManager mCameraManager = null; private final int CAMERA1 = 0; private final int CAMERA2 = 1; private Button mButtonOpenCamera1 = null; private Button mButtonOpenCamera2 = null; private Button mButtonToMakeShot = null; private TextureView mImageView = null; @RequiresApi(api = Build.VERSION_CODES.M) @Override protected void onCreate(Bundle savedInstanceState) { super.onCreate(savedInstanceState); setContentView(R.layout.activity_main); Log.d(LOG_TAG, " "); if (checkSelfPermission(Manifest.permission.CAMERA) != PackageManager.PERMISSION_GRANTED || (ContextCompat.checkSelfPermission(MainActivity.this, Manifest.permission.WRITE_EXTERNAL_STORAGE) != PackageManager.PERMISSION_GRANTED) ) { requestPermissions(new String[]{Manifest.permission.CAMERA,Manifest.permission.WRITE_EXTERNAL_STORAGE},1); } mButtonOpenCamera1 = findViewById(R.id.button1); mButtonOpenCamera2 = findViewById(R.id.button2); mButtonToMakeShot =findViewById(R.id.button3); mImageView = findViewById(R.id.textureView); mButtonOpenCamera1.setOnClickListener(new View.OnClickListener() { @Override public void onClick(View v) { if (myCameras[CAMERA2].isOpen()) {myCameras[CAMERA2].closeCamera();} if (myCameras[CAMERA1] != null) { if (!myCameras[CAMERA1].isOpen()) myCameras[CAMERA1].openCamera(); } } }); mButtonOpenCamera2.setOnClickListener(new View.OnClickListener() { @Override public void onClick(View v) { if (myCameras[CAMERA1].isOpen()) {myCameras[CAMERA1].closeCamera();} if (myCameras[CAMERA2] != null) { if (!myCameras[CAMERA2].isOpen()) myCameras[CAMERA2].openCamera(); } } }); mButtonToMakeShot.setOnClickListener(new View.OnClickListener() { @Override public void onClick(View v) { // if (myCameras[CAMERA1].isOpen()) myCameras[CAMERA1].makePhoto(); // if (myCameras[CAMERA2].isOpen()) myCameras[CAMERA2].makePhoto(); } }); mCameraManager = (CameraManager) getSystemService(Context.CAMERA_SERVICE); try{ // myCameras = new CameraService[mCameraManager.getCameraIdList().length]; for (String cameraID : mCameraManager.getCameraIdList()) { Log.i(LOG_TAG, "cameraID: "+cameraID); int id = Integer.parseInt(cameraID); // myCameras[id] = new CameraService(mCameraManager,cameraID); } } catch(CameraAccessException e){ Log.e(LOG_TAG, e.getMessage()); e.printStackTrace(); } } public class CameraService { private String mCameraID; private CameraDevice mCameraDevice = null; private CameraCaptureSession mCaptureSession; public CameraService(CameraManager cameraManager, String cameraID) { mCameraManager = cameraManager; mCameraID = cameraID; } private CameraDevice.StateCallback mCameraCallback = new CameraDevice.StateCallback() { @Override public void onOpened(CameraDevice camera) { mCameraDevice = camera; Log.i(LOG_TAG, "Open camera with id:"+mCameraDevice.getId()); createCameraPreviewSession(); } @Override public void onDisconnected(CameraDevice camera) { mCameraDevice.close(); Log.i(LOG_TAG, "disconnect camera with id:"+mCameraDevice.getId()); mCameraDevice = null; } @Override public void onError(CameraDevice camera, int error) { Log.i(LOG_TAG, "error! camera id:"+camera.getId()+" error:"+error); } }; private void createCameraPreviewSession() { SurfaceTexture texture = mImageView.getSurfaceTexture(); texture.setDefaultBufferSize(1920,1080); Surface surface = new Surface(texture); try { final CaptureRequest.Builder builder = mCameraDevice.createCaptureRequest(CameraDevice.TEMPLATE_PREVIEW); builder.addTarget(surface); mCameraDevice.createCaptureSession(Arrays.asList(surface), new CameraCaptureSession.StateCallback() { @Override public void onConfigured(CameraCaptureSession session) { mCaptureSession = session; try { mCaptureSession.setRepeatingRequest(builder.build(),null,null); } catch (CameraAccessException e) { e.printStackTrace(); } } @Override public void onConfigureFailed(CameraCaptureSession session) { }}, null ); } catch (CameraAccessException e) { e.printStackTrace(); } } public boolean isOpen() { if (mCameraDevice == null) { return false; } else { return true; } } public void openCamera() { try { if (checkSelfPermission(Manifest.permission.CAMERA) == PackageManager.PERMISSION_GRANTED) { mCameraManager.openCamera(mCameraID,mCameraCallback,null); } } catch (CameraAccessException e) { Log.i(LOG_TAG,e.getMessage()); } } public void closeCamera() { if (mCameraDevice != null) { mCameraDevice.close(); mCameraDevice = null; } } } @Override public void onPause() { if(myCameras[CAMERA1].isOpen()){myCameras[CAMERA1].closeCamera();} if(myCameras[CAMERA2].isOpen()){myCameras[CAMERA2].closeCamera();} super.onPause(); } }
We load, start, work!
In general, if this is not enough for you, the shooting process itself can be greatly varied. Our Japanese Tomoaki shows and explains how, giving a beautiful diagram.
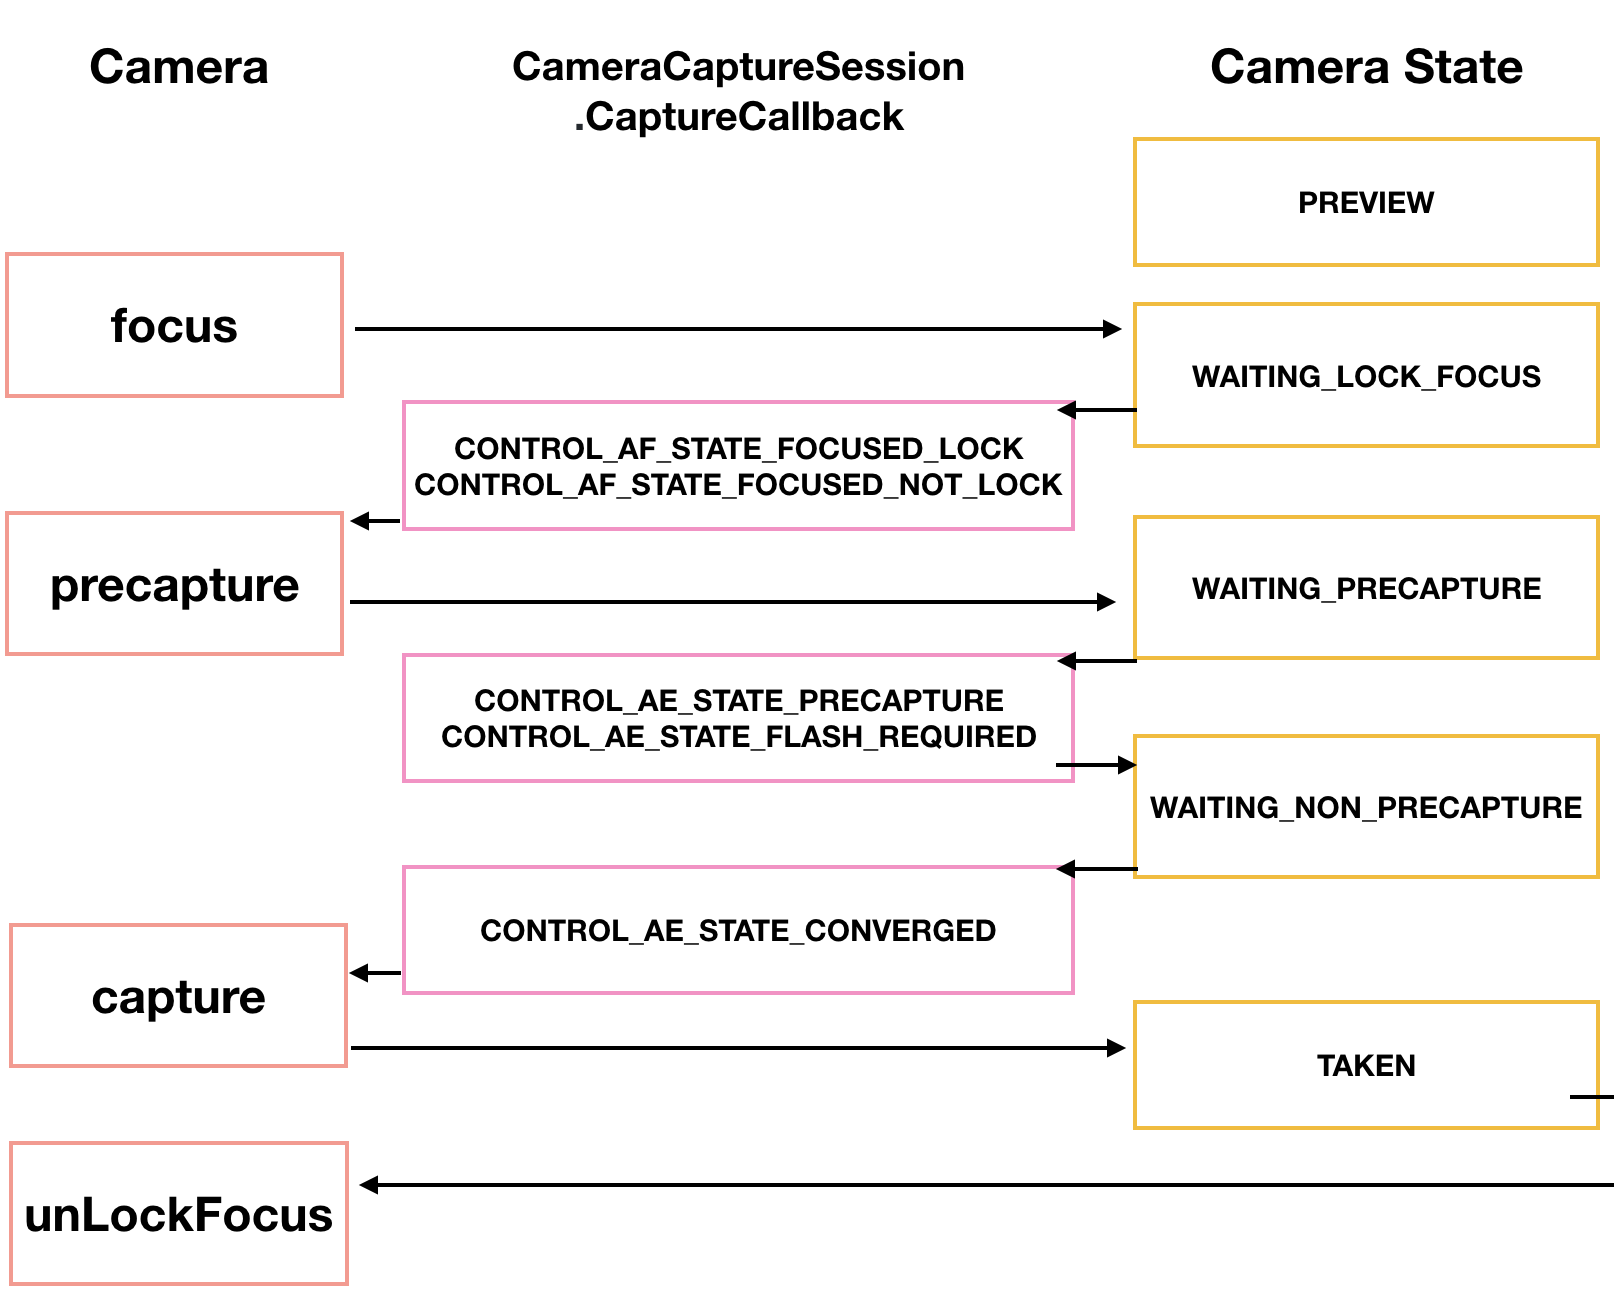
First, the camera needs to focus. This usually does not cause problems, but sometimes it requires several attempts, which are also implemented through a callback.
CameraCaptureSession.StateCallback().
Then the camera enters the PRECAPTURE preview mode. At this stage, the camera calculates the exposure, white balance and aperture (I used to know what it was in childhood, but now this knowledge has been lost). Sometimes a callback may return a CONTROL_AE_STATE_FLASH_REQUIRED request, which means “it would be nice to turn on the flash.” It can be turned on automatically by the way - setAutoFlash (mPreviewRequestBuilder).
When all the necessary parameters for shooting are defined, then the callback returns the state CONTROL_AE_STATE_CONVERGED signaling to us that the camera is ready to take a picture.
On the googloids page, all of this is already in the examples, and if you have the patience to break through these minefields and wire fences, then honor is then to you.
Take a picture and save the picture to a file
This is where the problems started.No, judging by the block diagram of the above (not Japanese, but the previous one), everything seems to be not very complicated. We are waiting for the camera to capture the image. After processing with the CamerCaptureSession class, it will be available as a Surface object, which in turn can be processed using the ImageReader class.
The truth is, to create an ImageReader object again, it takes time. We are waiting for this time in the next listener called OnImageAvailableListener. And finally, with the help of the instance of the last ImageSaver class, we save the image to a file and of course we do it asynchronously too, because ImageSaver is Runnable here.
The problem was that I couldn’t attach this ImageReader anywhere, because the callback CameraCaptureSession.StateCallback () was already busy broadcasting the video to the smartphone’s view. And if I did a new session, then Android predictably cursed and crashed the application. As a result (don’t ask me how) I managed to cross the horse and the quivering doe in one createCameraPreviewSession () method, which used to display the camera image only on the view.
Here is this piece of code before:
private void createCameraPreviewSession() { SurfaceTexture texture = mImageView.getSurfaceTexture(); Surface surface = new Surface(texture); try { final CaptureRequest.Builder builder = mCameraDevice.createCaptureRequest(CameraDevice.TEMPLATE_PREVIEW); builder.addTarget(surface); mCameraDevice.createCaptureSession(Arrays.asList(surface), new CameraCaptureSession.StateCallback() …….
And here he is after:
private ImageReader mImageReader; private void createCameraPreviewSession() { mImageReader = ImageReader.newInstance(1920,1080,ImageFormat.JPEG,1); mImageReader.setOnImageAvailableListener(mOnImageAvailableListener, null); SurfaceTexture texture = mImageView.getSurfaceTexture(); Surface surface = new Surface(texture); try { final CaptureRequest.Builder builder = mCameraDevice.createCaptureRequest(CameraDevice.TEMPLATE_PREVIEW); builder.addTarget(surface); mCameraDevice.createCaptureSession(Arrays.asList(surface, mImageReader.getSurface()), new CameraCaptureSession.StateCallback() ……
The difference, apart from the ImageReader instance definition at the top, is almost elusive. Just added to the surface, comma separated mImageReader.getSurface () and that's it. But until you get to it ...
From that moment things went more fun and you could use the third screen button "Take a Picture". When it is pressed, the makePhoto () method is called (well, who would have thought):
mButtonToMakeShot.setOnClickListener(new View.OnClickListener() { @Override public void onClick(View v) { if (myCameras[CAMERA1].isOpen()) myCameras[CAMERA1].makePhoto(); if (myCameras[CAMERA2].isOpen()) myCameras[CAMERA2].makePhoto(); } }); …… public class CameraService { public void makePhoto (){ try { // This is the CaptureRequest.Builder that we use to take a picture. final CaptureRequest.Builder captureBuilder = mCameraDevice.createCaptureRequest(CameraDevice.TEMPLATE_STILL_CAPTURE); captureBuilder.addTarget(mImageReader.getSurface()); CameraCaptureSession.CaptureCallback CaptureCallback = new CameraCaptureSession.CaptureCallback() { @Override public void onCaptureCompleted(@NonNull CameraCaptureSession session, @NonNull CaptureRequest request, @NonNull TotalCaptureResult result) { } }; mCaptureSession.stopRepeating(); mCaptureSession.abortCaptures(); mCaptureSession.capture(captureBuilder.build(), CaptureCallback, null); } catch (CameraAccessException e) { e.printStackTrace(); } }
And immediately after it we register the OnImageAvailableListener listener:
private final ImageReader.OnImageAvailableListener mOnImageAvailableListener = new ImageReader.OnImageAvailableListener() { @Override public void onImageAvailable(ImageReader reader) { { Toast.makeText(MainActivity.this," ", Toast.LENGTH_SHORT).show();} } };
While he is doing nothing, he simply signals with a toast that they say that everything is in order, you can save the picture to a file.
And for this we need the file itself:
public class CameraService { private File mFile = new File(Environment.getExternalStoragePublicDirectory(Environment.DIRECTORY_DCIM), "test1.jpg");;
And also a special object of the ImageSaver class, which quickly transfers data from an image to a byte buffer, and from there to a binary file.
This class is static and Runnable. Therefore, we place it in MainActivity itself:
private static class ImageSaver implements Runnable { private final File mFile; ImageSaver(Image image, File file) { mImage = image; mFile = file; } @Override public void run() { ByteBuffer buffer = mImage.getPlanes()[0].getBuffer(); byte[] bytes = new byte[buffer.remaining()]; buffer.get(bytes); FileOutputStream output = null; try { output = new FileOutputStream(mFile); output.write(bytes); } catch (IOException e) { e.printStackTrace(); } finally { mImage.close(); if (null != output) { try { output.close(); } catch (IOException e) { e.printStackTrace(); } } } } }
And so that it works, we additionally write in the OnImageAvailableListener listener:
mBackgroundHandler.post(new ImageSaver(reader.acquireNextImage(), mFile));
WAIT! OH SHIT !!
What else is mBackgroundHandler ??? Still, it worked perfectly without him.
But in fact, the right question is - how did it even work without it? Because, as stated in Google’s examples, BackgroundHandler provides BackgroundThread, which in turn is a thread working in the background and actually responsible for the camera’s activity. And in fact, we should register at the very beginning of our Activity:
private HandlerThread mBackgroundThread; private Handler mBackgroundHandler = null; private void startBackgroundThread() { mBackgroundThread = new HandlerThread("CameraBackground"); mBackgroundThread.start(); mBackgroundHandler = new Handler(mBackgroundThread.getLooper()); } private void stopBackgroundThread() { mBackgroundThread.quitSafely(); try { mBackgroundThread.join(); mBackgroundThread = null; mBackgroundHandler = null; } catch (InterruptedException e) { e.printStackTrace(); } }
Not only that, you still need to add the start and stop of BackgroundThread here as well:
public void onPause() { super.onPause(); stopBackgroundThread(); } @Override public void onResume() { super.onResume(); startBackgroundThread(); }
As for mBackgroundHandler, it must be added to all our callbacks that require a handler and where we, without worrying, wrote null instead.
The most intriguing thing is that we DO NOT start this background thread when we open the application, as it is easy to see from the program text. That is, it starts implicitly and without our help. But we have to stop it and run it in onPause () and onResume () modes. Some kind of contradiction is obtained here.
But now the picture is successfully saved to a file. This is easy to verify by running the application. As the saying goes, the crown of labor is above all awards.
True, the picture somehow lies on its side, but to solve this problem is the task of future generations.
Full listing of the program
package com.example.camera; import androidx.annotation.NonNull; import androidx.annotation.RequiresApi; import androidx.appcompat.app.AppCompatActivity; import androidx.core.content.ContextCompat; import android.Manifest; import android.content.Context; import android.content.pm.PackageManager; import android.graphics.ImageFormat; import android.graphics.SurfaceTexture; import android.hardware.camera2.CameraAccessException; import android.hardware.camera2.CameraCaptureSession; import android.hardware.camera2.CameraDevice; import android.hardware.camera2.CameraManager; import android.hardware.camera2.CaptureRequest; import android.hardware.camera2.TotalCaptureResult; import android.media.Image; import android.media.ImageReader; import android.os.Build; import android.os.Bundle; import android.os.Environment; import android.os.Handler; import android.os.HandlerThread; import android.util.Log; import android.view.Surface; import android.view.TextureView; import android.view.View; import android.widget.Button; import android.widget.Toast; import java.io.File; import java.io.FileOutputStream; import java.io.IOException; import java.nio.ByteBuffer; import java.util.Arrays; public class MainActivity extends AppCompatActivity { public static final String LOG_TAG = "myLogs"; CameraService[] myCameras = null; private CameraManager mCameraManager = null; private final int CAMERA1 = 0; private final int CAMERA2 = 1; private Button mButtonOpenCamera1 = null; private Button mButtonOpenCamera2 = null; private Button mButtonToMakeShot = null; private TextureView mImageView = null; private HandlerThread mBackgroundThread; private Handler mBackgroundHandler = null; private void startBackgroundThread() { mBackgroundThread = new HandlerThread("CameraBackground"); mBackgroundThread.start(); mBackgroundHandler = new Handler(mBackgroundThread.getLooper()); } private void stopBackgroundThread() { mBackgroundThread.quitSafely(); try { mBackgroundThread.join(); mBackgroundThread = null; mBackgroundHandler = null; } catch (InterruptedException e) { e.printStackTrace(); } } @RequiresApi(api = Build.VERSION_CODES.M) @Override protected void onCreate(Bundle savedInstanceState) { super.onCreate(savedInstanceState); setContentView(R.layout.activity_main); Log.d(LOG_TAG, " "); if (checkSelfPermission(Manifest.permission.CAMERA) != PackageManager.PERMISSION_GRANTED || (ContextCompat.checkSelfPermission(MainActivity.this, Manifest.permission.WRITE_EXTERNAL_STORAGE) != PackageManager.PERMISSION_GRANTED) ) { requestPermissions(new String[]{Manifest.permission.CAMERA,Manifest.permission.WRITE_EXTERNAL_STORAGE},1); } mButtonOpenCamera1 = findViewById(R.id.button1); mButtonOpenCamera2 = findViewById(R.id.button2); mButtonToMakeShot =findViewById(R.id.button3); mImageView = findViewById(R.id.textureView); mButtonOpenCamera1.setOnClickListener(new View.OnClickListener() { @Override public void onClick(View v) { if (myCameras[CAMERA2].isOpen()) {myCameras[CAMERA2].closeCamera();} if (myCameras[CAMERA1] != null) { if (!myCameras[CAMERA1].isOpen()) myCameras[CAMERA1].openCamera(); } } }); mButtonOpenCamera2.setOnClickListener(new View.OnClickListener() { @Override public void onClick(View v) { if (myCameras[CAMERA1].isOpen()) {myCameras[CAMERA1].closeCamera();} if (myCameras[CAMERA2] != null) { if (!myCameras[CAMERA2].isOpen()) myCameras[CAMERA2].openCamera(); } } }); mButtonToMakeShot.setOnClickListener(new View.OnClickListener() { @Override public void onClick(View v) { if (myCameras[CAMERA1].isOpen()) myCameras[CAMERA1].makePhoto(); if (myCameras[CAMERA2].isOpen()) myCameras[CAMERA2].makePhoto(); } }); mCameraManager = (CameraManager) getSystemService(Context.CAMERA_SERVICE); try{ // myCameras = new CameraService[mCameraManager.getCameraIdList().length]; for (String cameraID : mCameraManager.getCameraIdList()) { Log.i(LOG_TAG, "cameraID: "+cameraID); int id = Integer.parseInt(cameraID); // myCameras[id] = new CameraService(mCameraManager,cameraID); } } catch(CameraAccessException e){ Log.e(LOG_TAG, e.getMessage()); e.printStackTrace(); } } public class CameraService { private File mFile = new File(Environment.getExternalStoragePublicDirectory(Environment.DIRECTORY_DCIM), "test1.jpg");; private String mCameraID; private CameraDevice mCameraDevice = null; private CameraCaptureSession mCaptureSession; private ImageReader mImageReader; public CameraService(CameraManager cameraManager, String cameraID) { mCameraManager = cameraManager; mCameraID = cameraID; } public void makePhoto (){ try { // This is the CaptureRequest.Builder that we use to take a picture. final CaptureRequest.Builder captureBuilder = mCameraDevice.createCaptureRequest(CameraDevice.TEMPLATE_STILL_CAPTURE); captureBuilder.addTarget(mImageReader.getSurface()); CameraCaptureSession.CaptureCallback CaptureCallback = new CameraCaptureSession.CaptureCallback() { @Override public void onCaptureCompleted(@NonNull CameraCaptureSession session, @NonNull CaptureRequest request, @NonNull TotalCaptureResult result) { } }; mCaptureSession.stopRepeating(); mCaptureSession.abortCaptures(); mCaptureSession.capture(captureBuilder.build(), CaptureCallback, mBackgroundHandler); } catch (CameraAccessException e) { e.printStackTrace(); } } private final ImageReader.OnImageAvailableListener mOnImageAvailableListener = new ImageReader.OnImageAvailableListener() { @Override public void onImageAvailable(ImageReader reader) { mBackgroundHandler.post(new ImageSaver(reader.acquireNextImage(), mFile)); } }; private CameraDevice.StateCallback mCameraCallback = new CameraDevice.StateCallback() { @Override public void onOpened(CameraDevice camera) { mCameraDevice = camera; Log.i(LOG_TAG, "Open camera with id:"+mCameraDevice.getId()); createCameraPreviewSession(); } @Override public void onDisconnected(CameraDevice camera) { mCameraDevice.close(); Log.i(LOG_TAG, "disconnect camera with id:"+mCameraDevice.getId()); mCameraDevice = null; } @Override public void onError(CameraDevice camera, int error) { Log.i(LOG_TAG, "error! camera id:"+camera.getId()+" error:"+error); } }; private void createCameraPreviewSession() { mImageReader = ImageReader.newInstance(1920,1080, ImageFormat.JPEG,1); mImageReader.setOnImageAvailableListener(mOnImageAvailableListener, null); SurfaceTexture texture = mImageView.getSurfaceTexture(); texture.setDefaultBufferSize(1920,1080); Surface surface = new Surface(texture); try { final CaptureRequest.Builder builder = mCameraDevice.createCaptureRequest(CameraDevice.TEMPLATE_PREVIEW); builder.addTarget(surface); mCameraDevice.createCaptureSession(Arrays.asList(surface,mImageReader.getSurface()), new CameraCaptureSession.StateCallback() { @Override public void onConfigured(CameraCaptureSession session) { mCaptureSession = session; try { mCaptureSession.setRepeatingRequest(builder.build(),null,mBackgroundHandler); } catch (CameraAccessException e) { e.printStackTrace(); } } @Override public void onConfigureFailed(CameraCaptureSession session) { }}, mBackgroundHandler); } catch (CameraAccessException e) { e.printStackTrace(); } } public boolean isOpen() { if (mCameraDevice == null) { return false; } else { return true; } } public void openCamera() { try { if (checkSelfPermission(Manifest.permission.CAMERA) == PackageManager.PERMISSION_GRANTED) { mCameraManager.openCamera(mCameraID,mCameraCallback,mBackgroundHandler); } } catch (CameraAccessException e) { Log.i(LOG_TAG,e.getMessage()); } } public void closeCamera() { if (mCameraDevice != null) { mCameraDevice.close(); mCameraDevice = null; } } } @Override public void onPause() { if(myCameras[CAMERA1].isOpen()){myCameras[CAMERA1].closeCamera();} if(myCameras[CAMERA2].isOpen()){myCameras[CAMERA2].closeCamera();} stopBackgroundThread(); super.onPause(); } @Override public void onResume() { super.onResume(); startBackgroundThread(); } private static class ImageSaver implements Runnable { /** * The JPEG image */ private final Image mImage; /** * The file we save the image into. */ private final File mFile; ImageSaver(Image image, File file) { mImage = image; mFile = file; } @Override public void run() { ByteBuffer buffer = mImage.getPlanes()[0].getBuffer(); byte[] bytes = new byte[buffer.remaining()]; buffer.get(bytes); FileOutputStream output = null; try { output = new FileOutputStream(mFile); output.write(bytes); } catch (IOException e) { e.printStackTrace(); } finally { mImage.close(); if (null != output) { try { output.close(); } catch (IOException e) { e.printStackTrace(); } } } } } }
All Articles