Custom dimensions in Google Analytics that saved us more than once
When setting up analytics through Google Analytics (GA), User Parameters or CD ( Custom Dimensions ) are often ignored. This is due to the difficulty in understanding their scope: it is unclear exactly how the CDs can help in collecting and analyzing data and how they are configured. In this article, we talk about the main CDs that we use in Adventum on many projects, and the setup process.
To build a report in Google Analytics, more than 200 different parameters and metrics are available, such as “source”, “city”, “browser”, “operating system” and many others. But standard parameters are not always enough for analysis, so Google has given users the ability to create their own. The value of CD can be transferred with any hit of the user. For example, using custom parameters, you can analyze the site’s performance in the context of adaptive data.
There are 4 CD action areas in total:
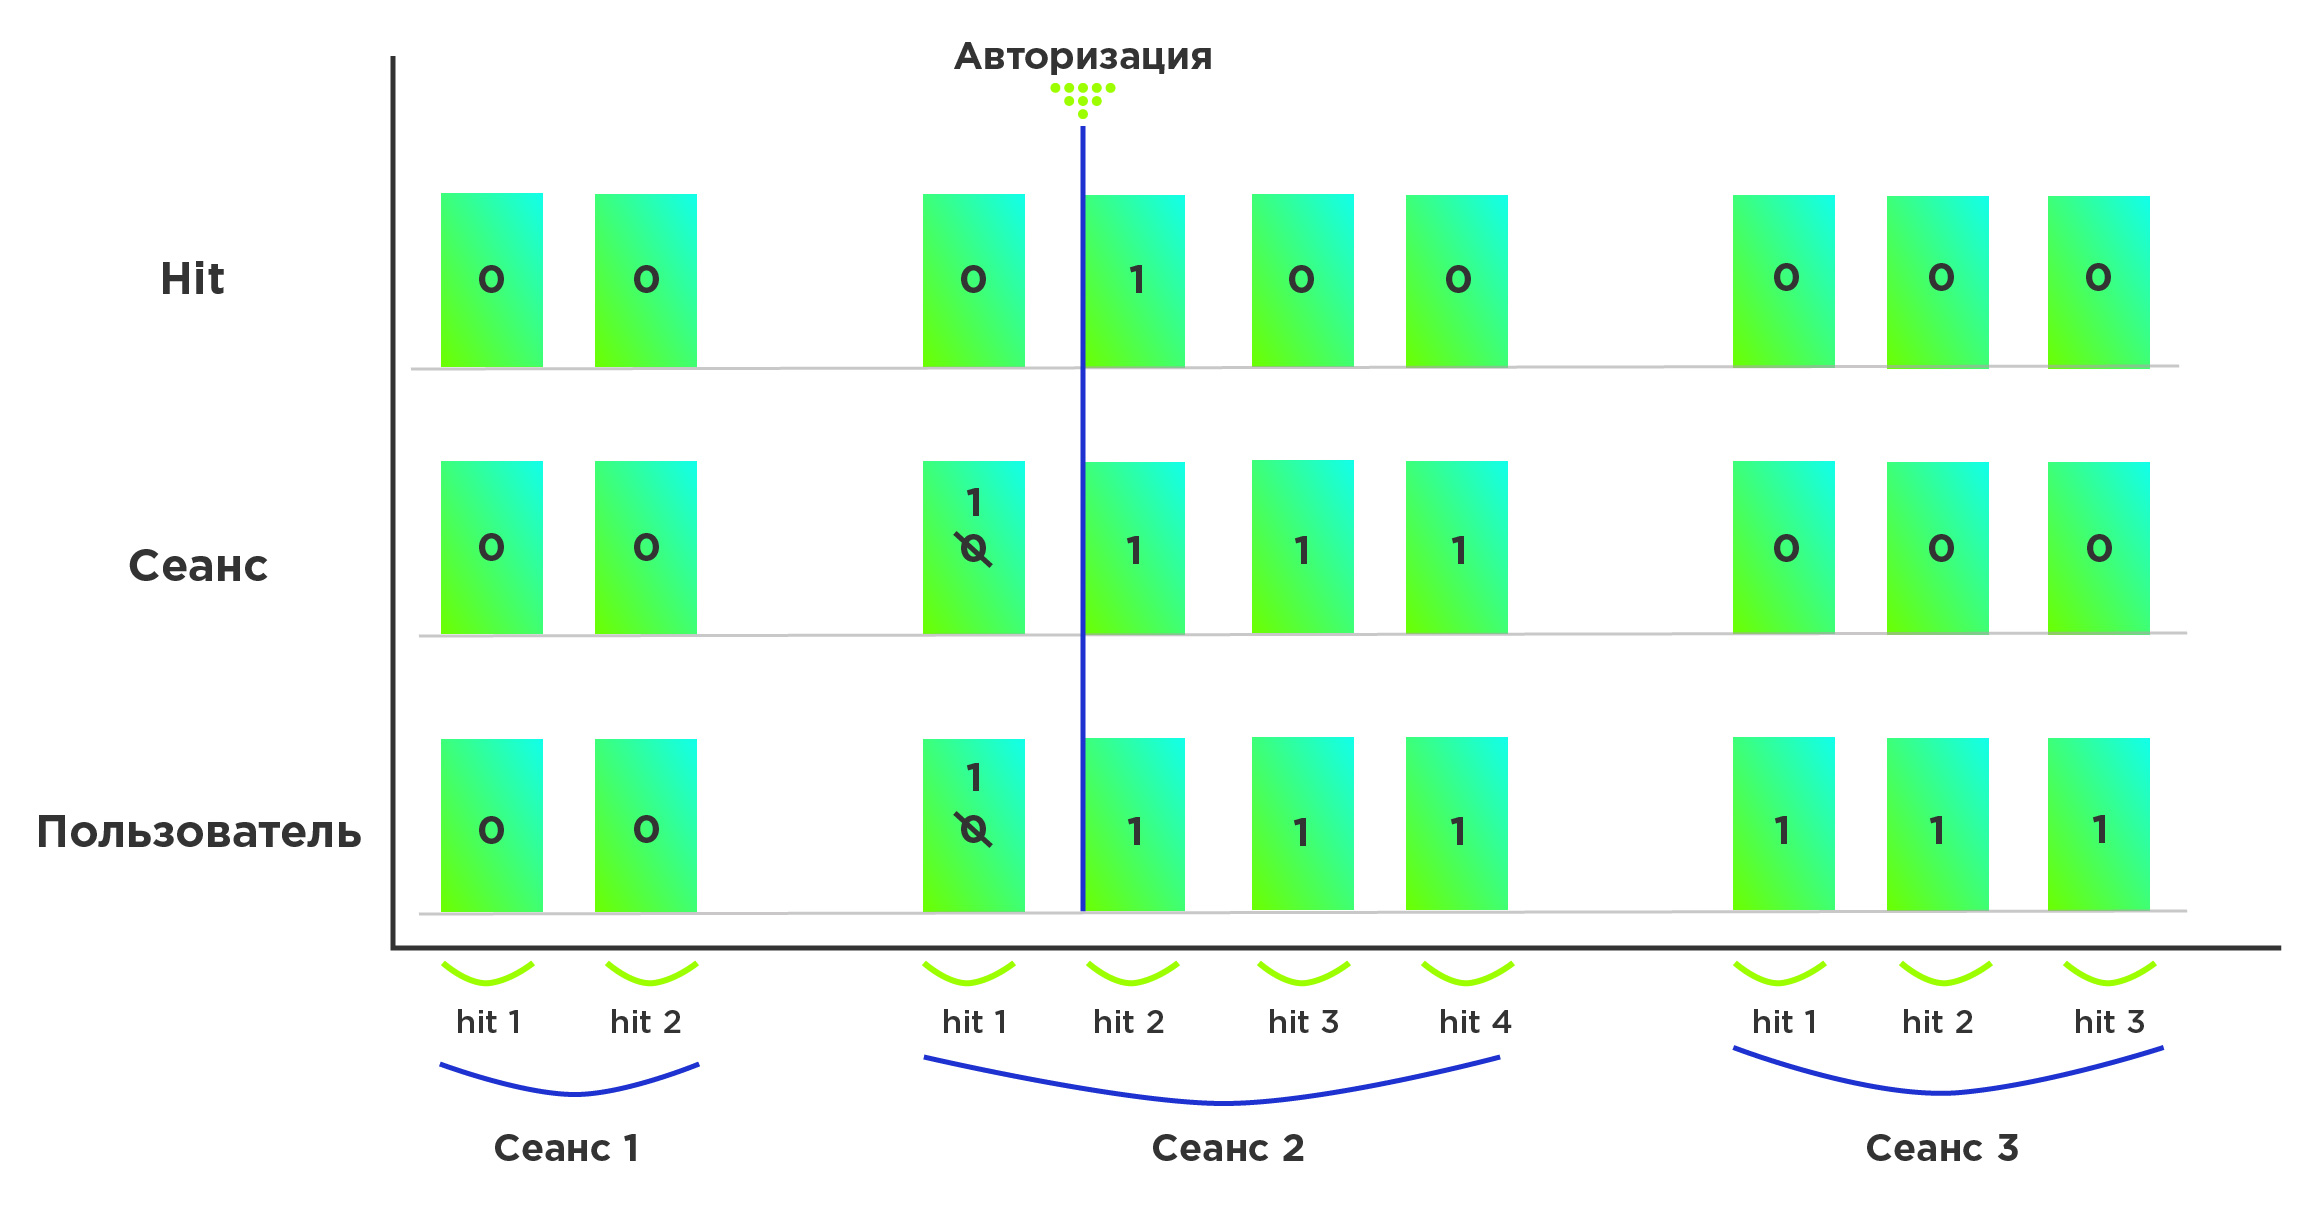
For example, we have a CD in which the user authorization parameter is stored (0 - not authorized, 1 - authorized). At the beginning of the session, all users are not authorized. Let's see what happens when this parameter changes after entry, depending on the scope of the CD.
Sometimes you need to analyze the characteristics of a product whose support is not laid down in the basic parameters of Google Analytics: for example, weight. Since information about several products can be transmitted in one hit, we will need an additional scope with deeper detail. It is for this granularity that the “Product” scope is used:

Setting up a user parameter consists of two steps: creating a parameter in GA and sending data from the site. Next, we describe the steps for setting up a CD.
There are two ways to configure sending parameters from the site:
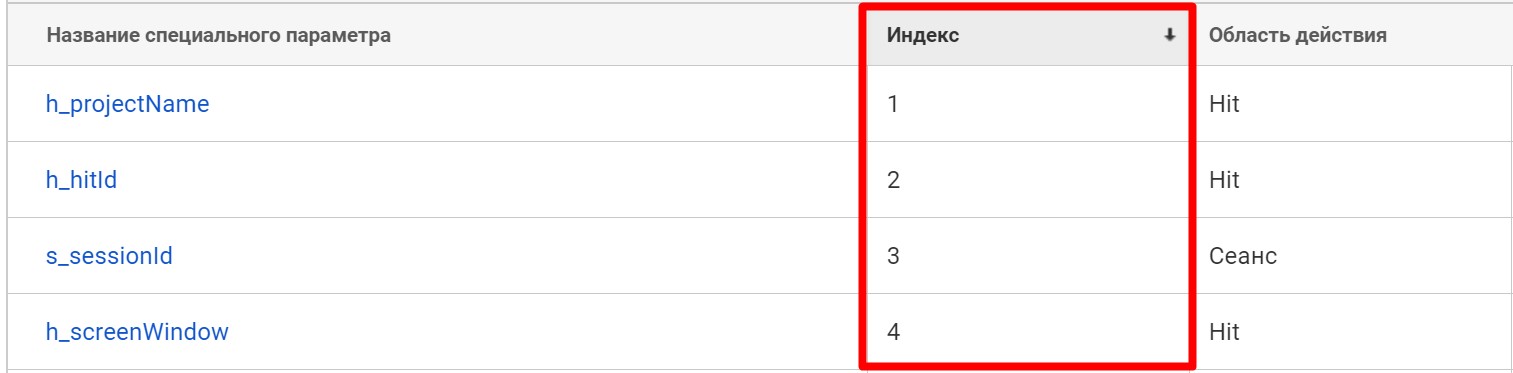
For both methods, we need the CD index in Google Analytics. You can see it in the "Special Settings" section:
Sending via HTML on the site
Update the config of the resource in the Google Analytics tracking code by adding custom_map there (you need to add what is highlighted on both sides by comments):
where GA_MEASUREMENT_ID is your Analytics counter identifier. Replace <Index> with the index of the parameter in GA, and instead of dimension_name specify its name.
If you have several User parameters, then 'dimension <Index>' : 'dimension_name' must be specified with a comma for each of them.
For example:
In order to send a CD along with a page view, you need to assign these parameters to the desired value before the code indicated above :
where dimension_name should match the ones you specified in 'custom_map' , and dimension_value should be the value you want to transfer to the CD.
For example:
When sending a CD value along with an event, you must send the code:
where instead of:
action_value - event action
category_value - event category
label_value - event label
event_value - event value (non-negative integer)
dimension_name - the name of the parameter that we specified in the previous code
dimension_value - value of CD
Example:
On our projects, we use the second option - tuning through GTM. Let's consider it in more detail.
Submitting CDs with Hits to GA via GTM
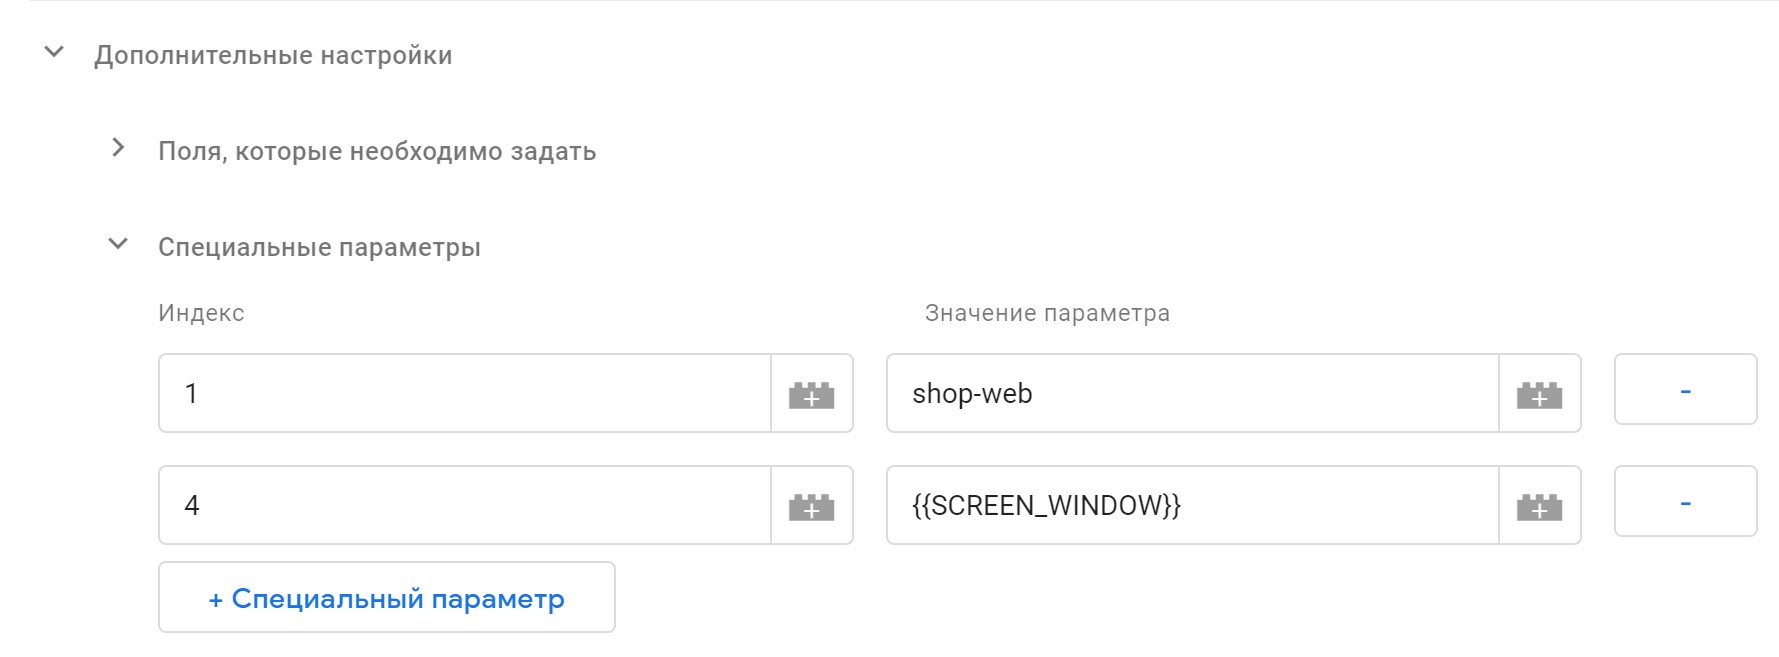
The setting of sending CD along with hits (page views, events) in GA is done in a variable of the type “Google Analytics Settings”. If you have already configured this variable, then open it. If not, then you need to create it. Go to the "Advanced Settings" section, the "Special Settings" subsection. Here you must add all the user parameters that you created earlier in GA:

The tracking ID must include the GA counter number. In the "Index" field, write the identifier of the CD from GA to which you want to transfer data.
In the "Parameter Value" field, you must specify the value that will be transferred to the CD with the specified index. This value can be specified in two ways:
With this setting of user parameters, it is important to consider:
You can avoid these difficulties with customTask.
customTask is the function with the highest priority, the code and logic of which you define yourself. Not so long ago, Google gave the opportunity to use this feature in GTM.
customTask uses data from the model object (which includes all fields of the tracking counter), cookie, etc. The priority of this function is higher than that of all the others, and it works out to the tag. Thanks to this, you can configure the sending of the user ID from the first viewing of the page.
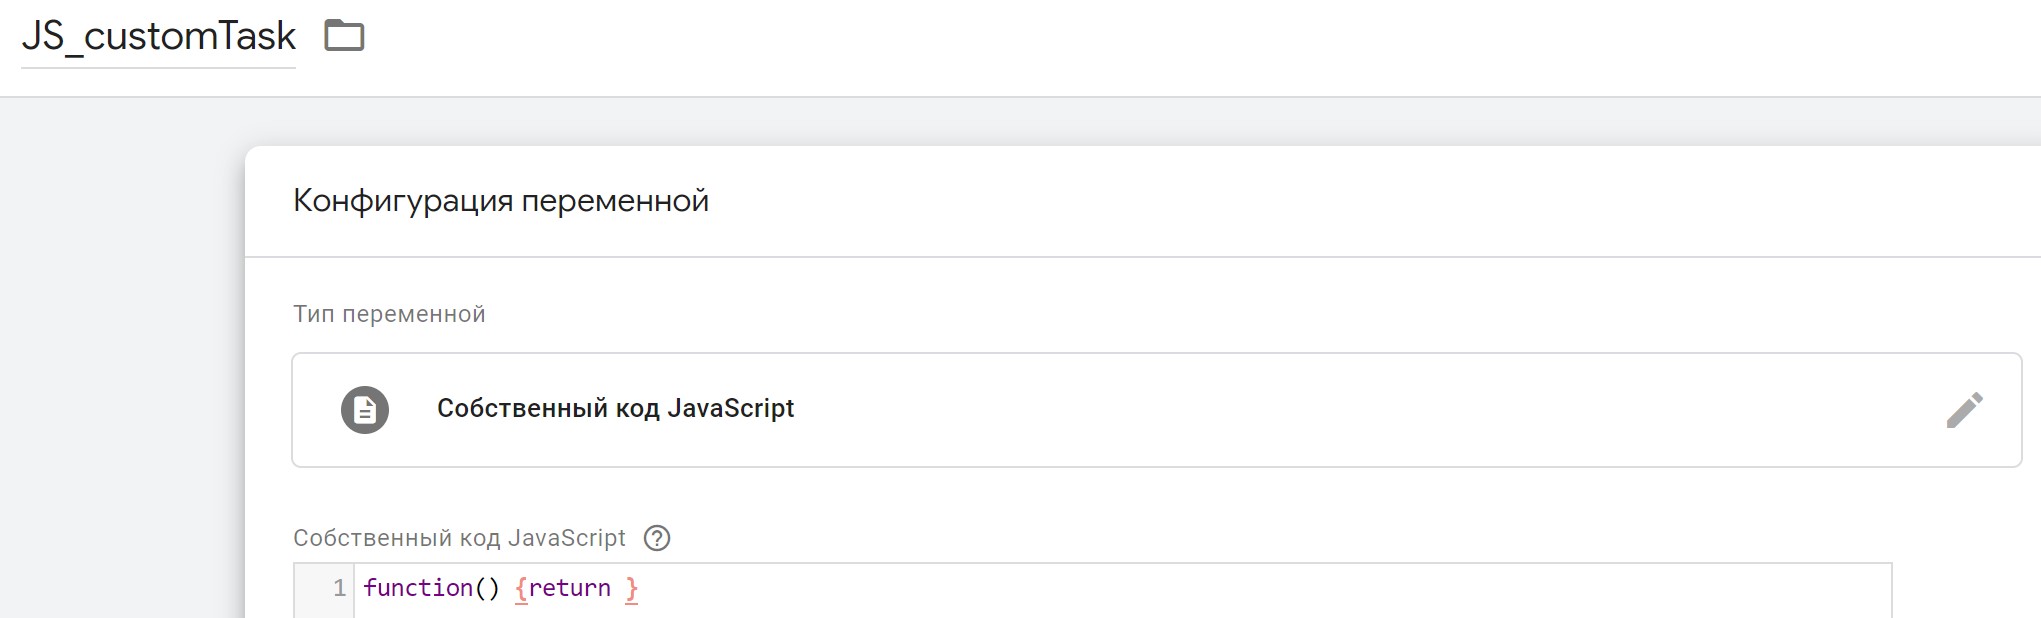
To configure the CD via customTask, create a GTM variable with the name JS_customTask and the type “Native JavaScript code”:
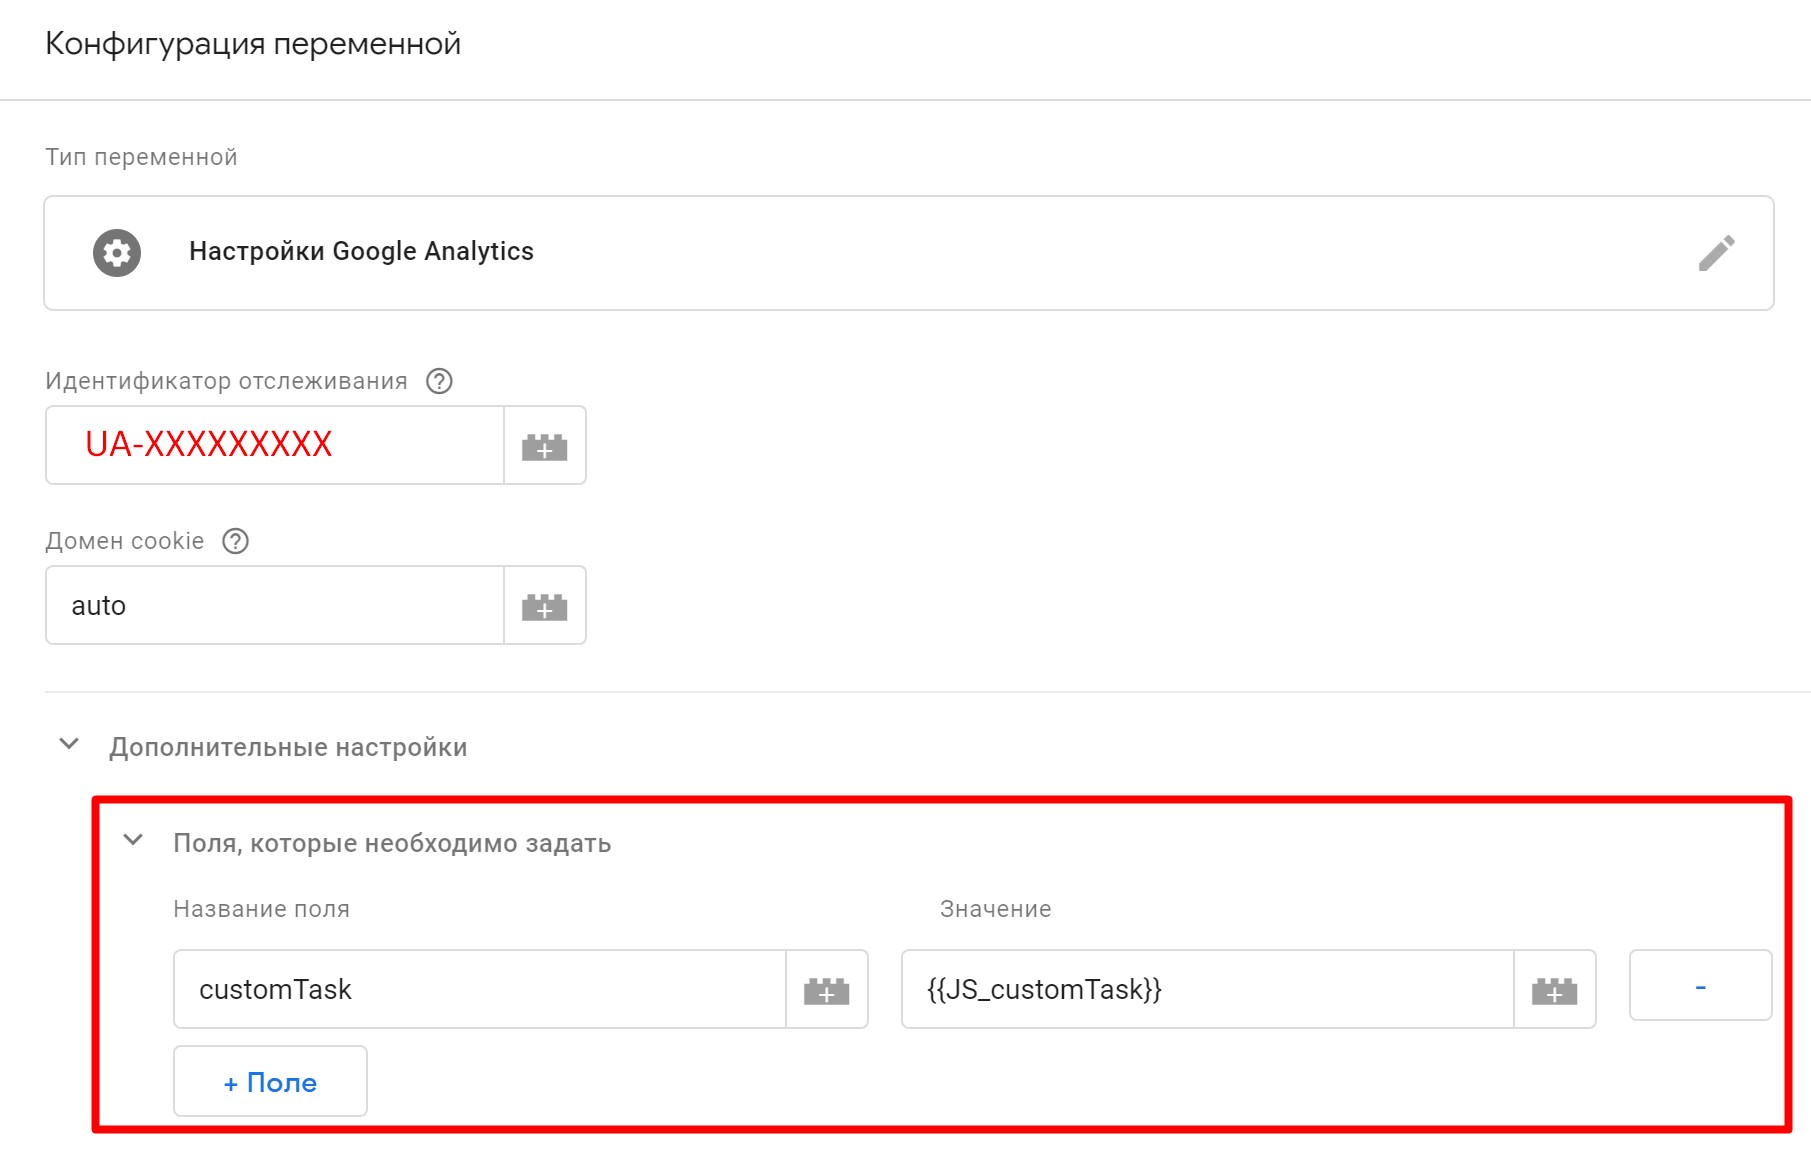
Now add the JS_customTask we created to the Google Analytics Settings variable, in the “Fields to Set” section:
Only one customTask can be defined in a GTM tag. Therefore, all CDs that can be determined by this method will be written in the JS_customTask variable created earlier.
A task. The counter has recorded a large jump in the number of sessions. At the same time, the number of users has grown slightly. There was a hypothesis about bot traffic that comes from some users. By default, it is not possible to view the characteristics of individual users in GA in a convenient format.
Decision. Google Analytics assigns a unique identifier to each visitor to the site - Client ID. You can see it in the Google Analytics interface only in one report - “User statistics” (User Explorer). It is inconvenient to use it, because on one screen you can see the sequence of actions of only one user and you cannot add additional parameters to the report.
An ideal solution would be the ability to display clientID as a separate parameter in a standard or user report. And this can be done using GTM.
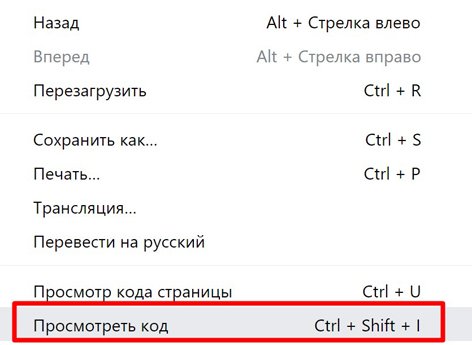
Technique settings. As the ClientId, we use the sequence of digits from the user ID in GA (it is stored in a cookie with the name _ga. For example, _ga = GA1.2.1111111111.111111111, where ClientId = 111111111.111111111). To see this value, right-click on the site page and select “View Code”:
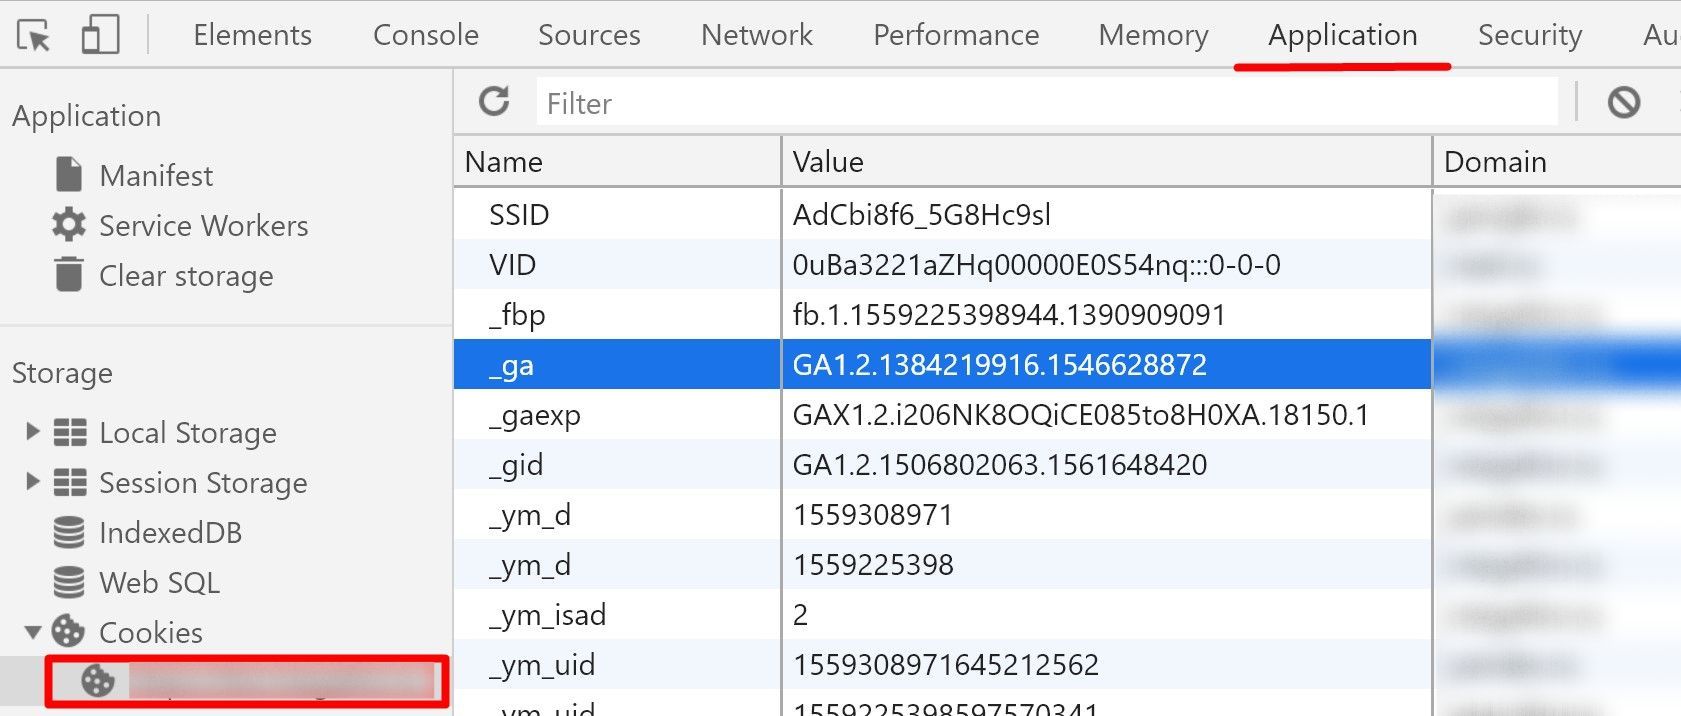
Then, in the Application tab, in the left side menu, select Cookies and the name of the site and look for the _ga variable in the table:
In addition to the cookie, the GA user ID is stored in the model object and can be retrieved using the .get ('clientId') method. We use customTask to retrieve this value and pass it to GA. Add the following code to the variable named JS_customTask:
After the equal sign for the variable customDimensionIndex_client, you need to specify the CD index corresponding to the ClientId in GA. In this way, we got the client ID from the counter and sent it to the user parameter.
Result. We built a report on individual users and found that some of them actually had a thousand sessions. All sessions were with a bounce rate of 100% and clearly did not carry any value to us. We set up a segment to exclude these users and were able to analyze traffic dynamics without unnecessary visits.
A task. It is necessary to see how the user behaves on the site, what actions he performs and in what sequence. Based on these data, hypotheses for developing a business could be put forward.
Decision. Create your own CD with the hit number of the user in each session. Sorting in increasing order of hits, we will be able to look at the ways of users.
Technique settings. For convenience, as HitId, we pass ClientId + hit time in timestamp format. So for each event, page view, transaction there will be a value. This parameter can be configured through customTask (similar to ClientId).
Only one customTask can be defined in a single GTM tag. Therefore, we add to the previously created variable “Custom JavaScript” the code highlighted on both sides by comments, where the CD index named h_HitId from GA will be stored in the variable customDimensionIndex_hit:
The parameter type is hit. Due to the fact that it also contains time in the timestamp format, all user / session hits can be sorted by the order of their execution, without using additional parameters.
If you make exactly the same settings, only in GA choose the scope of the parameter - session, then we get a CD that will store the user's session identifier.
Result. Built two reports:
Then they unloaded this data from GA, combined them into Excel (or a database). If we sort the lines by ClientId, and then by HitId, we get the path of each user on the site. Now we can create pivot tables and visualize them.
A task. The company decided to conduct an AB test. Settings were made by developers, without using Google Optimize. The question arose: how to transfer test options to Google Analytics in order to analyze the effectiveness of the experiment.
Decision. In this case, the CDs will help us compare the test results in GA. It is enough to configure a user parameter that will take values with the identifier of the test and the option that the user is in. So we can divide the audience into groups according to test options and compare the results.
Technique settings. Create a custom parameter in GA, similar to what we configured earlier. We select as a “Scope” - a hit, so that it is possible to divide events into user-committed events before and after getting into the test. Call it, for example, h_AB-Test. It is possible to transfer data to a CD in several tests at once. You can separate them with a symbol that is not found in the name and version of the test, for example, “|”.
If you do the test yourself and store the data about it in a cookie, you will need a variable like “Native JavaScript code” to extract them:
where instead of {{test_variant}} you must specify the name of the cookie in which the name and variant of the test are stored. Do not forget to add it to the GA settings variable.
Having added the h_AB-Test parameter to the report, we will see in Google Analytics which test variant the session belongs to. Depending on the value of this parameter, you can segment users.
Result. We create as many segments as there were test cases with the condition h_AB-Test. It must match the value “name + test case”. We look at the events of interest to us in the reports.
A task. The contextual advertising manager has launched an advertising campaign in Yandex.Direct. A few days later, he went into the GA sources report and found that the number of user sessions that came from the advertising campaign he created was much less than clicks on ads in Yandex.Direct.
Decision. Google Analytics has a required parameter for tracking ads - utm_source. If it is, then its value will be added to the standard parameter "Campaign Source". Similarly, Google does with other UTM tags for writing to the corresponding parameters.
All UTM tags are automatically deleted from the report on the pages of the site and you cannot analyze them there. In this case, if the utm_source label was not set, then Google will simply delete all the found UTM tags from the page report and will not record their contents in the corresponding built-in parameters.
We’ll configure the parameter with the full page address to see all the tags, even if the advertisement is configured incorrectly. Let's call it h_fullPage.
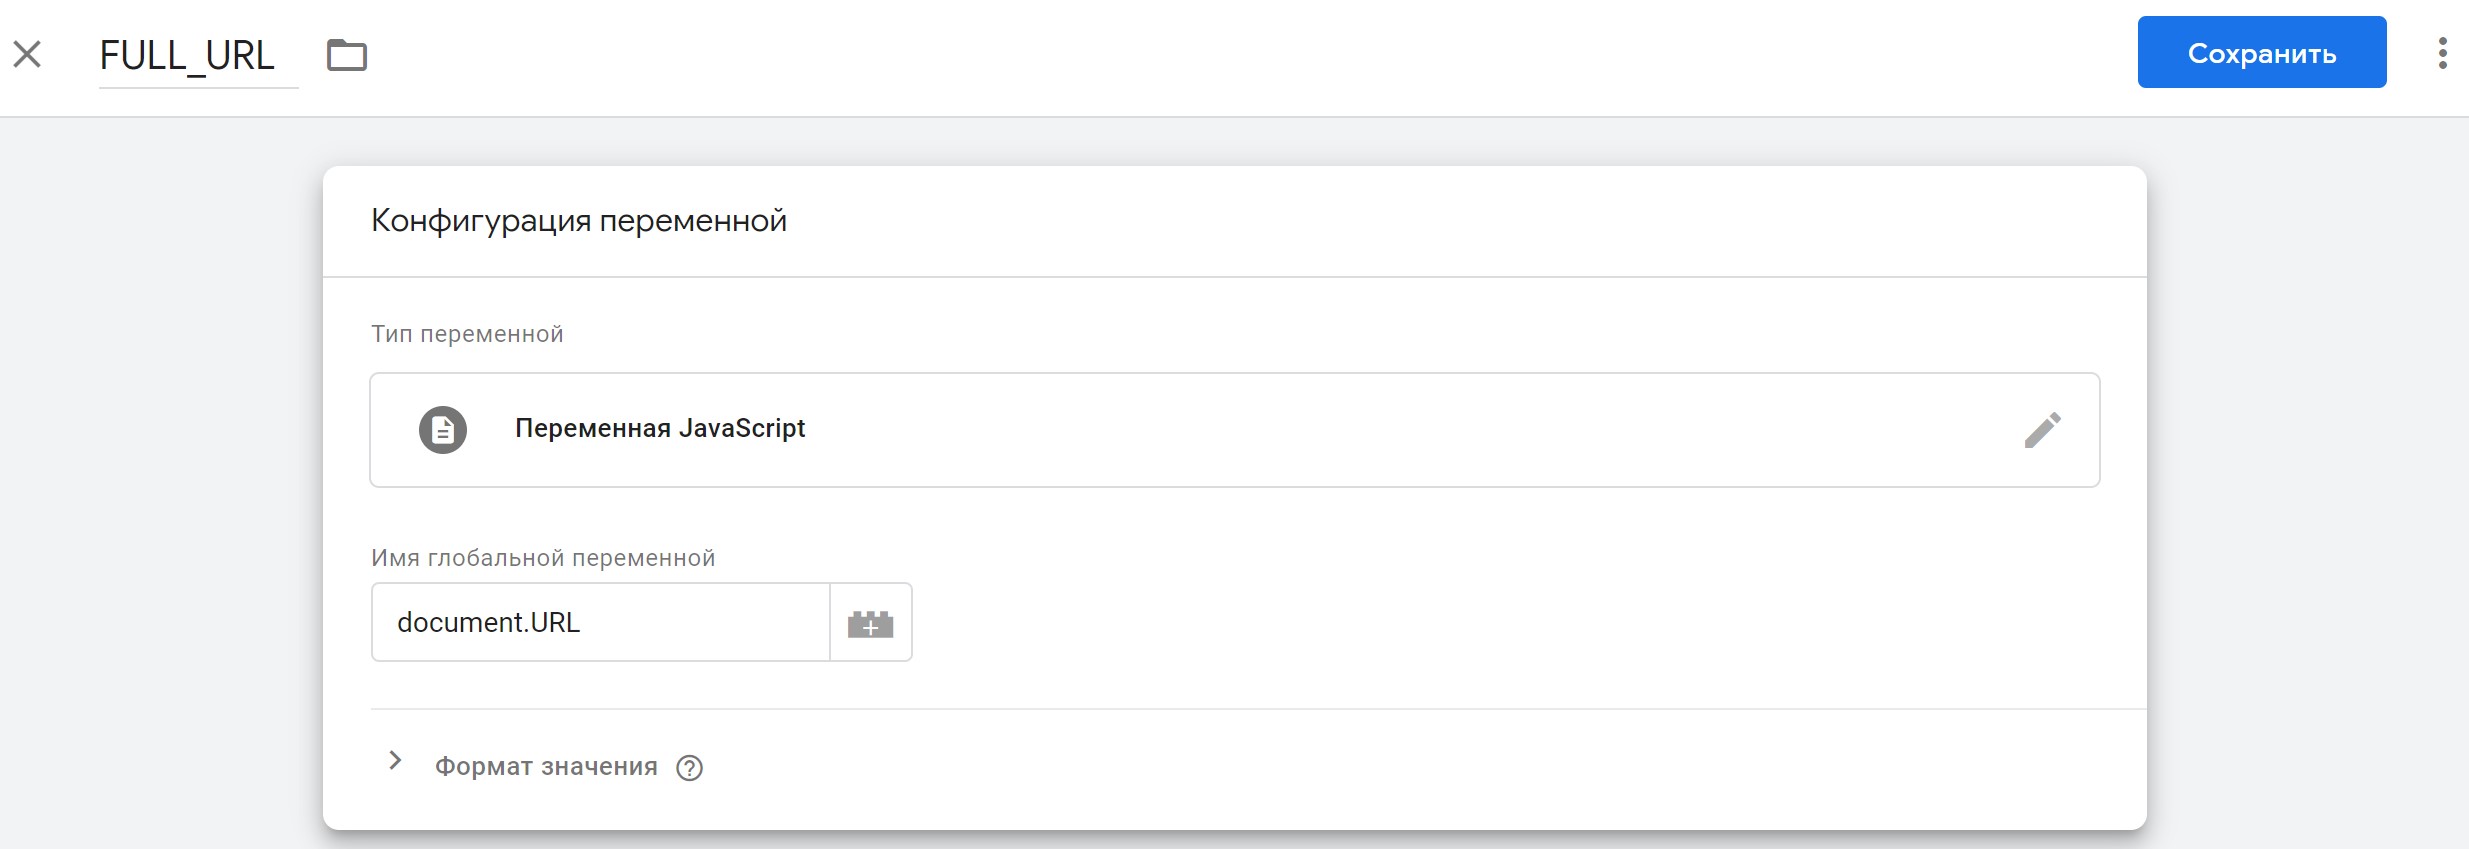
Technique settings. Let's create a variable with the type “JavaScript variable” in the “Global variable name” section and specify document.URL:
As the scope of the variable set - hit.
Result. The following sequence of UTM tags was used throughout the advertising campaign: utm_medium, utm_source, utm_campaign. Looking at the full address of the pages, we noticed that an ampersand was skipped between utm_medium and utm_source regarding ads. Since utm_source is a mandatory utm tag for any advertising campaign, and Google Analytics did not find it after special characters (?, &), The click on this advertisement was recorded in direct traffic. Thanks to the h_fullPage parameter, it was possible to detect the problem and fix it in the settings of the advertising panel.
Two more useful parameters (without a description of their settings):
The functionality of Custom Dimensions is wide and not limited to the described setup and application methods. For each type of business, analysis, and hypothesis, you can find your own application of Custom Settings, and the described customization methods will help make this process easier.
What are user options
To build a report in Google Analytics, more than 200 different parameters and metrics are available, such as “source”, “city”, “browser”, “operating system” and many others. But standard parameters are not always enough for analysis, so Google has given users the ability to create their own. The value of CD can be transferred with any hit of the user. For example, using custom parameters, you can analyze the site’s performance in the context of adaptive data.
There are 4 CD action areas in total:
- Hit
- Session
- User
- Product
For example, we have a CD in which the user authorization parameter is stored (0 - not authorized, 1 - authorized). At the beginning of the session, all users are not authorized. Let's see what happens when this parameter changes after entry, depending on the scope of the CD.
- for a CD with the Hit scope, the unit is assigned to the authorization parameter in the hit in which the authorization occurred;
- for a CD with the scope of the Session, the authorization parameter will become equal to 1 for all hits of the session in which the event occurred (overwriting the old values of the CD in this session);
- for a CD with a scope of User, the authorization parameter will become equal to 1 for all user sessions, starting from the one in which the login was made.
Sometimes you need to analyze the characteristics of a product whose support is not laid down in the basic parameters of Google Analytics: for example, weight. Since information about several products can be transmitted in one hit, we will need an additional scope with deeper detail. It is for this granularity that the “Product” scope is used:
CD setup
Setting up a user parameter consists of two steps: creating a parameter in GA and sending data from the site. Next, we describe the steps for setting up a CD.
Create a CD in Google Analytics
- Go to the “Administrator” section
- In the Resource settings in the “User Parameters” section, select the “Special Parameters” subsection:
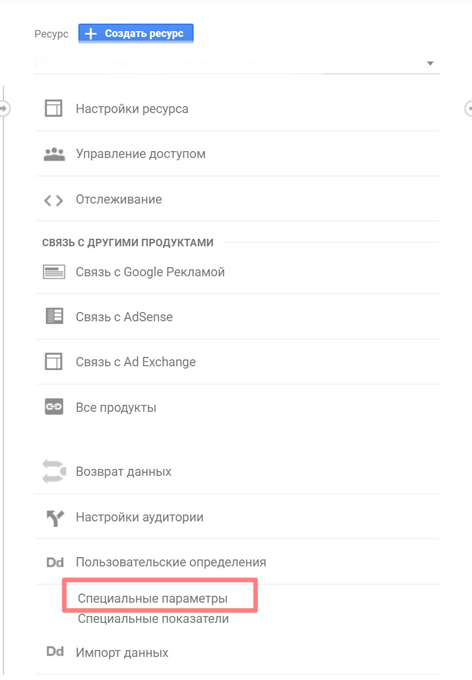
- Click on the button “+ Special parameter”

- The form opens:

Select the parameter scope:
- Hit
- Session
- User
- Product
And leave the check mark opposite “Active” so that data begins to be collected and the CD is reflected in the reports.
CD title recommendations
We have developed our own system for naming user parameters.
At the beginning of each CD, we add a symbol for the scope. For hit it is h_ (for example, h_hitId), for session - s_ (for example, s_sessionId). This helps us to navigate in user parameters and always know their scope, without checking the counter settings. Sometimes it becomes necessary to create two parameters with the same name, but with a different scope. For example, we conduct an A / B test and want to check if it is configured correctly, does the test variant change during the session. To do this, create two parameters with the same value: name + test version, in which the user got into, but one of them is hit, the second session. In this case, the proposed naming will be very convenient.
Setting up Google Tag Manager
There are two ways to configure sending parameters from the site:
- directly through the HTML code on the site.
- via Google Tag Manager (GTM).
For both methods, we need the CD index in Google Analytics. You can see it in the "Special Settings" section:
Sending via HTML on the site
Update the config of the resource in the Google Analytics tracking code by adding custom_map there (you need to add what is highlighted on both sides by comments):
gtag('config', 'GA_MEASUREMENT_ID' , // { 'custom_map': {'dimension<Index>': 'dimension_name'} } // );
where GA_MEASUREMENT_ID is your Analytics counter identifier. Replace <Index> with the index of the parameter in GA, and instead of dimension_name specify its name.
If you have several User parameters, then 'dimension <Index>' : 'dimension_name' must be specified with a comma for each of them.
For example:
gtag('config', 'UA-XXXXXXXXX', { 'custom_map': {'dimension1': 'projectName', 'dimension2': 'hitId', 'dimension3': 'sessionId', 'dimension4': 'screenWindow'} });
In order to send a CD along with a page view, you need to assign these parameters to the desired value before the code indicated above :
gtag('set', { 'dimension_name': 'dimension_value'});
where dimension_name should match the ones you specified in 'custom_map' , and dimension_value should be the value you want to transfer to the CD.
For example:
gtag('set', {'projectName': 'shop', 'hitId': '1121243'});
When sending a CD value along with an event, you must send the code:
gtag('event', 'action_value', {'event_category': 'category_value', 'event_label': 'label_value', 'value': 'event_value', 'dimension_name': 'dimension_value'});
where instead of:
action_value - event action
category_value - event category
label_value - event label
event_value - event value (non-negative integer)
dimension_name - the name of the parameter that we specified in the previous code
dimension_value - value of CD
Example:
gtag('event', 'clickButton', {'event_category': 'conversion', 'event_label': 'registration', 'projectName': 'shop', 'hitId': '1121243'});
On our projects, we use the second option - tuning through GTM. Let's consider it in more detail.
Submitting CDs with Hits to GA via GTM
The setting of sending CD along with hits (page views, events) in GA is done in a variable of the type “Google Analytics Settings”. If you have already configured this variable, then open it. If not, then you need to create it. Go to the "Advanced Settings" section, the "Special Settings" subsection. Here you must add all the user parameters that you created earlier in GA:
The tracking ID must include the GA counter number. In the "Index" field, write the identifier of the CD from GA to which you want to transfer data.
In the "Parameter Value" field, you must specify the value that will be transferred to the CD with the specified index. This value can be specified in two ways:
- manually, if it will be the same for all events;
- using the variable in which the value of this parameter is stored (its name is written in double curly brackets). For example, {{SCREEN_WINDOW}} - “Browser window size”.
With this setting of user parameters, it is important to consider:
- When the tag is first processed, a cookie with the Google user ID (clientID) will not be created yet. If we want to configure the transfer of this parameter to CD, we will not be able to do this for the first viewing of pages.
- If we want to use the same variable when sending data to different user parameters, then this variable will be calculated again for each user parameter. For example, when sending a tag processing time tag to two different user parameters, you may notice a difference in values of a few milliseconds.
You can avoid these difficulties with customTask.
Using customTask
customTask is the function with the highest priority, the code and logic of which you define yourself. Not so long ago, Google gave the opportunity to use this feature in GTM.
customTask uses data from the model object (which includes all fields of the tracking counter), cookie, etc. The priority of this function is higher than that of all the others, and it works out to the tag. Thanks to this, you can configure the sending of the user ID from the first viewing of the page.
To configure the CD via customTask, create a GTM variable with the name JS_customTask and the type “Native JavaScript code”:
Now add the JS_customTask we created to the Google Analytics Settings variable, in the “Fields to Set” section:
- In the “Field Name” write customTask ;
- In the “Value” write the name of the variable that we created above. All variables must be written in double braces.
Only one customTask can be defined in a GTM tag. Therefore, all CDs that can be determined by this method will be written in the JS_customTask variable created earlier.
Frequently Used CDs
User ID
A task. The counter has recorded a large jump in the number of sessions. At the same time, the number of users has grown slightly. There was a hypothesis about bot traffic that comes from some users. By default, it is not possible to view the characteristics of individual users in GA in a convenient format.
Decision. Google Analytics assigns a unique identifier to each visitor to the site - Client ID. You can see it in the Google Analytics interface only in one report - “User statistics” (User Explorer). It is inconvenient to use it, because on one screen you can see the sequence of actions of only one user and you cannot add additional parameters to the report.
An ideal solution would be the ability to display clientID as a separate parameter in a standard or user report. And this can be done using GTM.
Technique settings. As the ClientId, we use the sequence of digits from the user ID in GA (it is stored in a cookie with the name _ga. For example, _ga = GA1.2.1111111111.111111111, where ClientId = 111111111.111111111). To see this value, right-click on the site page and select “View Code”:
Then, in the Application tab, in the left side menu, select Cookies and the name of the site and look for the _ga variable in the table:
In addition to the cookie, the GA user ID is stored in the model object and can be retrieved using the .get ('clientId') method. We use customTask to retrieve this value and pass it to GA. Add the following code to the variable named JS_customTask:
function() { var customDimensionIndex_client = 5; return function(model) { model.set('dimension' + customDimensionIndex_client, model.get('clientId')); } }
After the equal sign for the variable customDimensionIndex_client, you need to specify the CD index corresponding to the ClientId in GA. In this way, we got the client ID from the counter and sent it to the user parameter.
Result. We built a report on individual users and found that some of them actually had a thousand sessions. All sessions were with a bounce rate of 100% and clearly did not carry any value to us. We set up a segment to exclude these users and were able to analyze traffic dynamics without unnecessary visits.
Hit id
A task. It is necessary to see how the user behaves on the site, what actions he performs and in what sequence. Based on these data, hypotheses for developing a business could be put forward.
Decision. Create your own CD with the hit number of the user in each session. Sorting in increasing order of hits, we will be able to look at the ways of users.
Technique settings. For convenience, as HitId, we pass ClientId + hit time in timestamp format. So for each event, page view, transaction there will be a value. This parameter can be configured through customTask (similar to ClientId).
Only one customTask can be defined in a single GTM tag. Therefore, we add to the previously created variable “Custom JavaScript” the code highlighted on both sides by comments, where the CD index named h_HitId from GA will be stored in the variable customDimensionIndex_hit:
function() { var customDimensionIndex_client = 5; // var customDimensionIndex_hit = 2; var now = new Date(); // return function(model) { model.set('dimension' + customDimensionIndex_client, model.get('clientId')); // model.set('dimension' + customDimensionIndex_hit, model.get('clientId').concat('_', now.getTime())); // } }
The parameter type is hit. Due to the fact that it also contains time in the timestamp format, all user / session hits can be sorted by the order of their execution, without using additional parameters.
If you make exactly the same settings, only in GA choose the scope of the parameter - session, then we get a CD that will store the user's session identifier.
Result. Built two reports:
- User identifier, hit identifier, event category, event action, event label, add. options.
- User ID, hit ID, add. options.
Then they unloaded this data from GA, combined them into Excel (or a database). If we sort the lines by ClientId, and then by HitId, we get the path of each user on the site. Now we can create pivot tables and visualize them.
A / B tests
A task. The company decided to conduct an AB test. Settings were made by developers, without using Google Optimize. The question arose: how to transfer test options to Google Analytics in order to analyze the effectiveness of the experiment.
Decision. In this case, the CDs will help us compare the test results in GA. It is enough to configure a user parameter that will take values with the identifier of the test and the option that the user is in. So we can divide the audience into groups according to test options and compare the results.
Technique settings. Create a custom parameter in GA, similar to what we configured earlier. We select as a “Scope” - a hit, so that it is possible to divide events into user-committed events before and after getting into the test. Call it, for example, h_AB-Test. It is possible to transfer data to a CD in several tests at once. You can separate them with a symbol that is not found in the name and version of the test, for example, “|”.
If you do the test yourself and store the data about it in a cookie, you will need a variable like “Native JavaScript code” to extract them:
function(){ var cookie_name ='{{test_variant}}'; var matches = document.cookie.match(new RegExp( "(?:^|; )" + cookie_name.replace(/([\.$?*|{}\(\)\[\]\\\/\+^])/g, '\\$1') + "=([^;]*)" )); return matches ? decodeURIComponent(matches[1]) : '(not set)'; }
where instead of {{test_variant}} you must specify the name of the cookie in which the name and variant of the test are stored. Do not forget to add it to the GA settings variable.
Having added the h_AB-Test parameter to the report, we will see in Google Analytics which test variant the session belongs to. Depending on the value of this parameter, you can segment users.
Result. We create as many segments as there were test cases with the condition h_AB-Test. It must match the value “name + test case”. We look at the events of interest to us in the reports.
Full page address
A task. The contextual advertising manager has launched an advertising campaign in Yandex.Direct. A few days later, he went into the GA sources report and found that the number of user sessions that came from the advertising campaign he created was much less than clicks on ads in Yandex.Direct.
Decision. Google Analytics has a required parameter for tracking ads - utm_source. If it is, then its value will be added to the standard parameter "Campaign Source". Similarly, Google does with other UTM tags for writing to the corresponding parameters.
All UTM tags are automatically deleted from the report on the pages of the site and you cannot analyze them there. In this case, if the utm_source label was not set, then Google will simply delete all the found UTM tags from the page report and will not record their contents in the corresponding built-in parameters.
We’ll configure the parameter with the full page address to see all the tags, even if the advertisement is configured incorrectly. Let's call it h_fullPage.
Technique settings. Let's create a variable with the type “JavaScript variable” in the “Global variable name” section and specify document.URL:
As the scope of the variable set - hit.
Result. The following sequence of UTM tags was used throughout the advertising campaign: utm_medium, utm_source, utm_campaign. Looking at the full address of the pages, we noticed that an ampersand was skipped between utm_medium and utm_source regarding ads. Since utm_source is a mandatory utm tag for any advertising campaign, and Google Analytics did not find it after special characters (?, &), The click on this advertisement was recorded in direct traffic. Thanks to the h_fullPage parameter, it was possible to detect the problem and fix it in the settings of the advertising panel.
Event Options
Two more useful parameters (without a description of their settings):
- A task. We mark the site on our own through GTM. Found an error, quickly fixed it, but events with the error continue to arrive in GA.
Decision. To quickly find the root of the problem, you can transfer a CD with each event:
The name of the container (if there are several of them on the site) - the built-in variable GTM;
The container version is the GTM built-in variable;
Tag name - you need to configure it yourself.
You can pass these three parameters through any separator in a variable of type “Constant”:

The scope of the parameter is hit.
Result. Using the configured variable, we found out that some users still have the old version of the container, so events continue to be sent. Most likely, users simply did not refresh the page or it was cached, so you need to wait a bit. - A task. We mark the site through the developers. They introduced a new instruction written by us. After checking, it turned out that some events were sent with an error.
Important:
Decision. We will divide events into new / incorrectly working and correctly marked. The first can be marked as test, the second - prod.
- Do not send test events to the GA working view when we check events on the test site;
- if after rolling out to the battle we noticed that we checked incorrectly marked events / something broke after updating the site, it is important to quickly stop sending events to the working view.
To do this, let the developers add data to the dataLayer, and we will get it and send it to GA. Any push will look like this:
<script> dataLayer.push({ 'event': '{{ }}', 'event_id': '{{id }}', 'eventCategory': '{{ }}', 'eventAction': '{{ }}', 'eventLabel': '{{ }}', }); </script>
where in double curly brackets are the names of the variables in which the data is stored on the side of the developers.
We will need to create the “Lookup Table” variable to separate events:
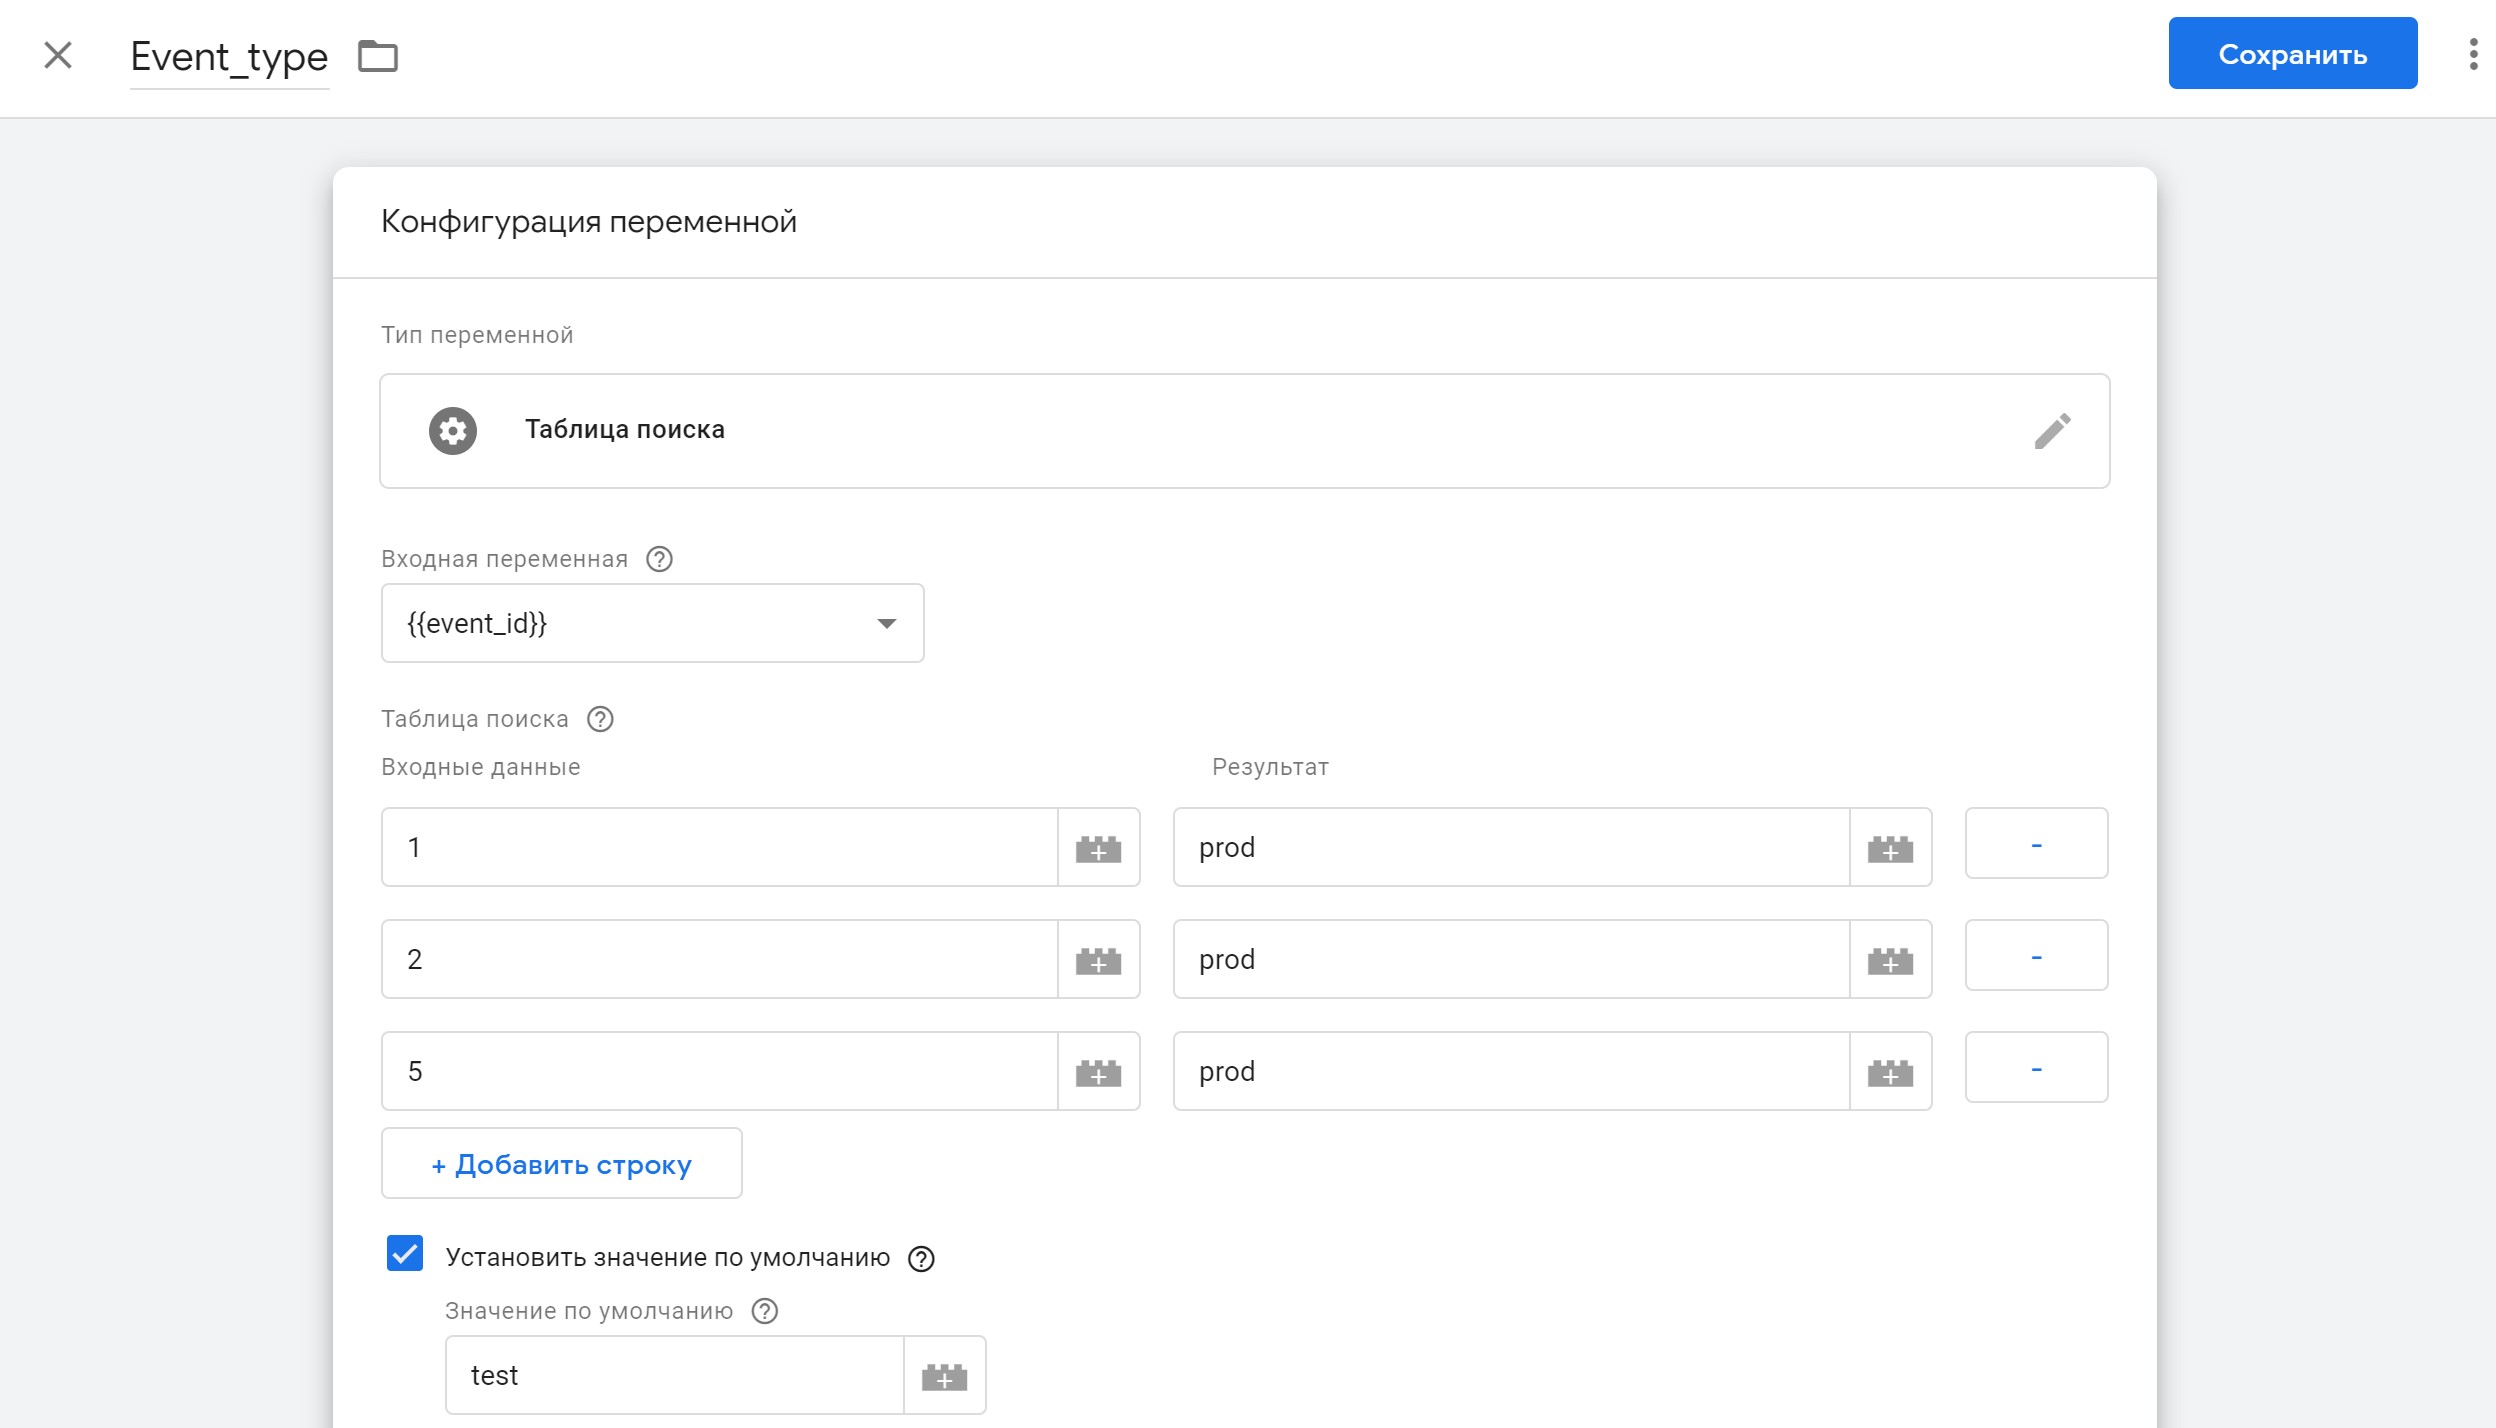
{{event_id}} is a variable that retrieves the event identifier from the DataLayer.
We put a tick in front of “Set default value” and in the column “Default value” write test. Thus, initially for all events, this variable will be equal to test. After making sure that the event is marked correctly, add its event_id to the “Input” cell. In the field “Result” we send prod.
So we divided all events into correctly marked and new / incorrectly marked. We advise you to create a separate view in Google Analytics, where there will be events only with the prod label (this can be done using the Views filter). There you will only see correctly marked events.
Result. As the errors in the markup of events from the instructions were eliminated, we changed the parameter value for these events in GTM from test to prod. Thanks to this parameter, we include in reports only correctly marked events with the label prod.
The functionality of Custom Dimensions is wide and not limited to the described setup and application methods. For each type of business, analysis, and hypothesis, you can find your own application of Custom Settings, and the described customization methods will help make this process easier.
All Articles