A telephone for a horse and an orchestra without a pianist. How to come up with sports tasks on the front end
Hello! My name is Dmitry Andriyanov, I work as an interface developer in Yandex. Last year, I participated in the preparation of our online front-end competition.

A couple of days ago I received a letter from the organizers asking if I would like to participate again - to come up with frontend tasks for the second programming championship . I agreed - and thought it was an interesting topic for the article. Pour coffee, sit back. I will tell you how we prepared the tasks a year ago.
There were about ten of us, almost all of them were front-end developers from various Yandex services. We had to make a selection of tasks that would be checked by autotests.
For programming competitions, there is a special service - Yandex.Contest . There you can publish tasks, and participants register and solve them. Testing of tasks takes place automatically, the results of the participants are published in a special table. Thus, the infrastructure was already ready. All that was needed was to come up with tasks. But it turned out that there is one caveat. Previously, Yandex held competitions in algorithms, machine learning, and other topics, but never in front-end competitions. No one had an understanding of what the competition should consist of and how to automate the verification.

We decided that for front-end developers, tasks that require layout, JavaScript and knowledge of the browser API are suitable. Layout can be checked by comparing screenshots. Algorithmic tasks can be run in Node.js and verified by comparing the result with the correct answer. Programs that work with the browser API can be launched through Puppeteer and the script can check the status of the page after execution.
Competitions consist of two rounds - qualification and final, with 6 tasks in each round. Qualification tasks must be varied so that different participants get different options. We selected the number and type of tasks for each round, divided into teams of two people and distributed tasks between teams. Each group had to come up with two variative problems for qualification and two non-variational tasks for the finals.
Let's click on the DOM elements ...
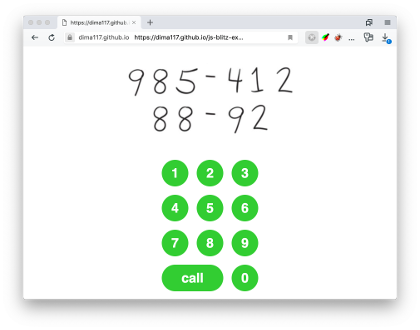
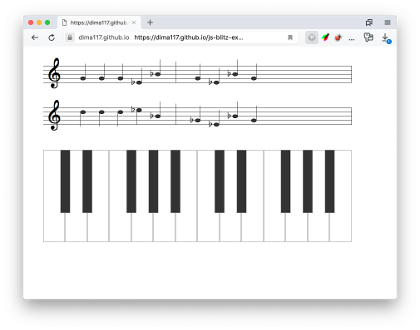
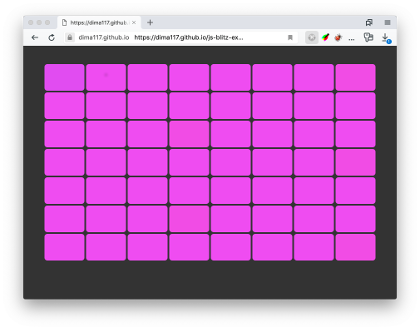
There was an idea - as one of the varied tasks to give a browser game in which you need to click on the DOM elements. The participant’s task was to write a program that plays this game and wins. Invented 4 options:
- Dial a handwritten phone number
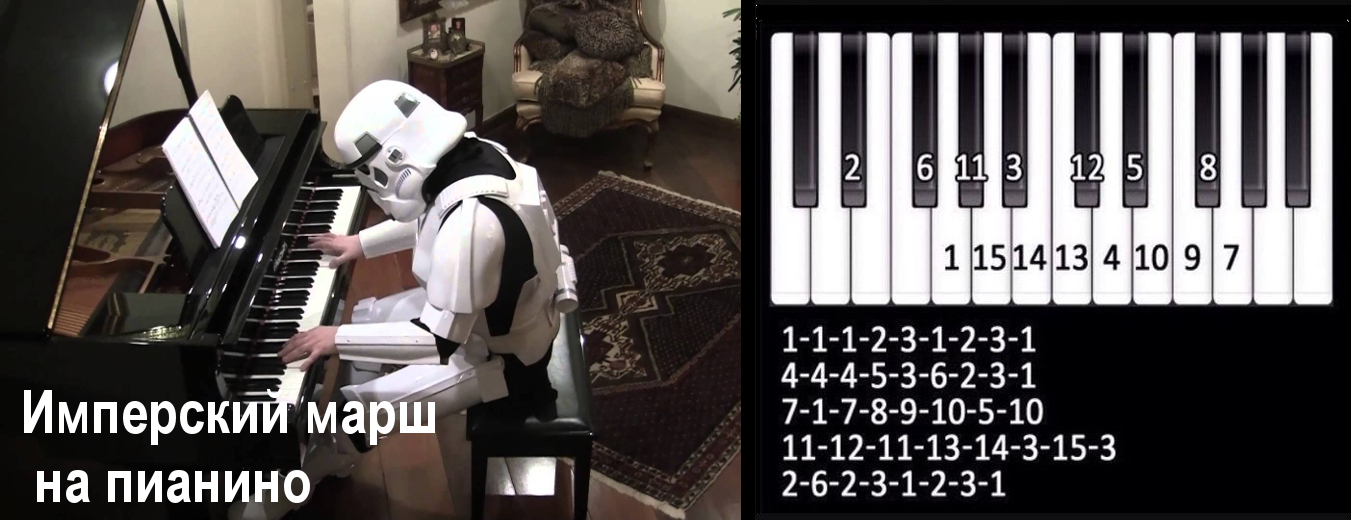
- play the melody on the piano
- Click on duplicate pictures
- Click on a color that is different .
If you want, you can follow the links and play. If you play “phone” or “piano”, do not forget to turn on the sound.
Wrote a common part for all options. It contained the logic for displaying clickable elements, as well as elements with information about where to click (notes, handwritten numbers, cards with pictures and colors). Sets of information and clickable elements are set through parameters.
// — div // targetClasses — // keyClasses — , function initGame(targetClasses, keyClasses) { // for(let i = 0; i < targetClasses.length; i++) { document.body.insertAdjacentHTML('afterbegin', `<div class="${targetClasses[i]}" />`); } // for(let i = 0; i < keyClasses.length; i++) { document.body.insertAdjacentHTML('beforeend', // data-index `<div class="key ${keyClasses[i]}" data-index="${i}" />`); } // , }
Appearance was controlled through CSS. It turned out very similar to csszengarden.com - one layout with different styles looks different.

The result of the participant’s program is a log of clicks on elements. Added a handler that writes information about clicked items to a global variable. So that the participant, instead of honest clicks, could not immediately write the result to this variable, we pass its name on the outside.
function initGame(targetClasses, keyClasses, resultName) { // ... const log = []; document.body.addEventListener('click', (e) => { if (e.target.classList.contains('key')) { // , // log.push(e.target.data.index); // , // , if (log.length === targetClasses.length) { window[resultName] = log; } } }); }
The script to run the participant program was something like this:
// , , // Node.js. // Chrome headless-, // . const puppeteer = require('puppeteer'); const { writeFileSync } = require('fs'); const htmlFilePath = require.resolve('./game.html'); // const solutionJsPath = resolve(process.argv[2]); // const data = require('input.json'); // const resName = `RESULT${Date.now()}`; // (async () => { const browser = await puppeteer.launch(); // const page = await browser.newPage(); // await page.goto(`file://${htmlFilePath}`); // await page.evaluate(resName => initGame( // data.target, data.keys, resName), resName); await page.addScriptTag({ path: solutionJsPath }); // await page.waitForFunction(`!!window[${resName}]`) // , resName const result = await page.evaluate(`window[${resName}]`); // writeFileSync('output.json', JSON.stringify(result)); // await browser.close(); })();
Add sound
We decided that we need to revive the game with the phone a bit and add the sound of keystrokes. Such sounds are called DTMF tones . Found an article on how to generate them. In short, it is necessary to simultaneously play two sounds with different frequencies. Sounds of a given frequency can be played using the Web Audio API . The result is something like this code:
function playSound(num) { // audioContext const context = this.audioContext; const g = context.createGain() // const o = context.createOscillator(); o.connect(g); o.type='sine'; o.frequency.value = [697, 697, 697, 770, 770, 770, 852, 852, 852, 941, 941][num]; g.connect(context.destination); // const o2 = context.createOscillator(); o2.connect(g); o2.type='sine'; o2.frequency.value = [1209, 1336, 1477, 1209, 1336, 1477, 1209, 1336, 1477, 1209, 1336][num]; g.connect(context.destination); // — // . // o.start(0); o2.start(0); // 240 g.gain.value = 1; setTimeout(() => g.gain.value = 0, 240); }
Sounds have also been added for playing the piano. If any of the participants tried to play the notes written on the page, he would have heard the imperial march from Star Wars.
Let's complicate the task
We rejoiced at what a cool task with sounds we did, but the joy did not last long. During testing the game, it turned out that the program clicks on the buttons very quickly and all our cool sounds merge into a common mess. We decided to add a delay of 50 ms between keystrokes, so that sounds are played in turn. At the same time, this complicated the task a little.
function initGame(targetClasses, keyClasses, resultName) { // // let lastClick = 0; // ... document.body.addEventListener('click', (e) => { const now = Date.now(); // // 50 , if (lastClick + 50 < now) { // ... // lastClick = now; } }); }
But that is not all. We thought that participants could easily see the source code and immediately see the delay. To complicate their task, we minified all the JS code on the page using UglifyJS . But this library does not change the public API of classes. Therefore, the parts that UglifyJS left the same (namely, the names of methods and class fields), we replaced through replace
.
The script for the obfuscation of the game looked something like this:
const minified = uglifyjs.minify(lines.join('\n')); const replaced = minified.code .replaceAll('this.window', 'this.') .replaceAll('this.document', 'this.') .replaceAll('this.log', 'this.') .replaceAll('this.lastClick', 'this.') .replaceAll('this.target', 'this.') .replaceAll('this.resName', 'this.') .replaceAll('this.audioContext', 'this.') .replaceAll('this.keyCount', 'this.') .replaceAll('this.classMap', 'this.') .replaceAll('_createDiv', '_') .replaceAll('_renderTarget', '_') .replaceAll('_renderKeys', '_') .replaceAll('_updateLog', '_') .replaceAll('_generateAnswer', '') .replaceAll('_createKeyElement', '') .replaceAll('_getMessage', '') .replaceAll('_next', '_____') .replaceAll('_pos', '__') .replaceAll('PhoneGame', '') .replaceAll('MusicGame', '') .replaceAll('BaseGame', 'xyz');
Let's write a creative condition
We prepared the technical part of the game, but we needed a creative text of the condition - not only with the requirements that need to be fulfilled, but with some kind of story.
My favorite kind of humor is absurdity. This is when with a serious look you say some ridiculous nonsense. Nonsense usually sounds unexpected and causes laughter. I wanted to make the conditions of the tasks absurd in order to please the participants. So there was a story about Adolf's horse, who cannot call a friend, because he does not get his big hooves on the keys of the phone.

Then there was a story about a girl who is engaged in the piano and wants to automate it, so that instead of classes she goes for a walk. There was the phrase "If a girl stops playing, mom comes out of the room and gives a slap in the face." We were told that this is propaganda of child abuse and we need to write another text. Then we came up with a story about an orchestra in which a pianist fell ill before a concert, and one of the musicians wrote a program on JS that would play his part.
In general, we managed to achieve the desired effect of the texts. If you want, you can read them here .
Setting tasks in Contest
So, we had ready task conditions, scripts for checking solutions and reference solutions. Further it was necessary to configure all this in the Contest. For any task, there are several tests, each of which contains a set of input data and the correct answer. The diagram below shows the stages of the Contest. The first stage is the execution of the program, the second is the verification of the result:
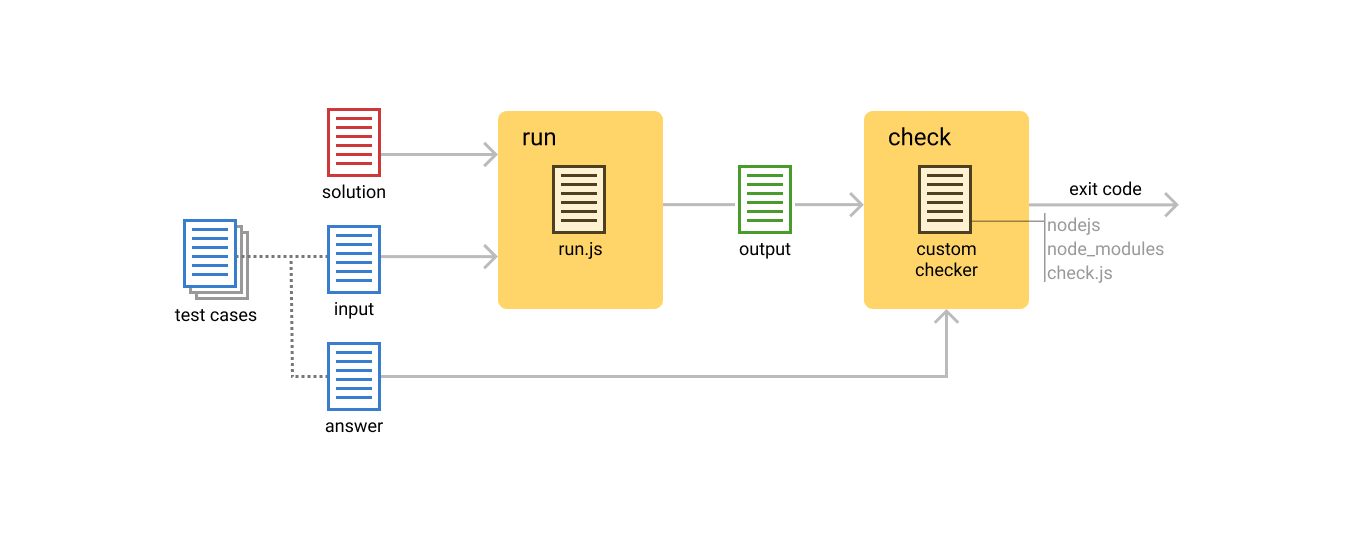
At the input of the first stage, a set of test data and a participant program are received. Inside the run.js script works, the code of which we wrote above. He is responsible for running the participant’s program, receiving and writing the result of its work to a file. The program runs in a separate virtual machine, which rises from the Docker image before running. This virtual machine is limited in resources, it does not have access to the network.
The second stage (checking the result) is performed in another virtual machine. Thus, the participant’s program does not physically have access to the environment where the verification takes place. The input of the second stage is the result of the participant’s program (obtained in the first stage) and the file with the correct answer. The output is the exit code of the verification script, according to which the Contest understands how the verification ended:
- OK
= 0,
- PE
(presentation error - incorrect result format) = 4
- WA
(wrong answer) = 5
- CF
(error during verification) = 6
The contest was poorly adapted to frontend tasks, including Node.js. We solved the problem by packing the verification scripts into a binary file using pkg along with Node.js and node_modules. Now we have secret knowledge about the Contest and experience much less difficulties in preparing the current championship.
So, we have prepared the tasks. After that, there was much more: public tests to calibrate complexity, task publishing, technical support duty during the competition and awarding winners in the Yandex office. But these are completely different stories.
Now, instead of competing in certain areas, we are holding unified programming championships, where there are simply parallel tracks, including the frontend.
I do not regret a bit about the time spent on preparing tasks. It was interesting and fun, unconventional. In one of comments on Habré wrote that conditions were thought up by enthusiasts of the business. During the competition, it was cool to realize that the participants are solving the tasks that you came up with.
References:
- Analysis of last year’s frontend assignment, which we prepared
- Analysis of the track on the frontend in the first championship of this year
All Articles