 Reactでのいくつかのプロジェクトの後、Angular 2でアプリケーションに取り組む機会がありました。率直に言って、私は感銘を受けませんでした。 しかし、1つ覚えられていました-依存性注入を使用してアプリケーションのロジックと状態を管理します。 そして、DDD、階層化アーキテクチャ、および依存性注入を使用して、Reactで状態を管理するのが便利かどうか疑問に思いました。
これを行う方法に興味があり、最も重要なのはなぜか-カットへようこそ!
正直なところ、バックエンドであっても、DIが最大限に使用されることはめったにありません。 本当に大きなアプリケーションでない限り。 また、中小規模では、DIを使用する場合でも、各インターフェイスには通常1つの実装しかありません。 しかし、依存性注入にはまだ利点があります。
- コードはより構造化されており、インターフェイスは明示的なコントラクトとして機能します。
- 単体テストでのスタブの作成は簡素化されています。
しかし、 JestなどのJS用の最新のテストライブラリを使用すると、モジュラーES6システムに基づいてmokiを簡単に作成できます。 したがって、ここではDIから多くの利益を得ることはできません。
2番目のポイント-オブジェクトのスコープとライフタイムの管理。 サーバーでは、ライフタイムは通常、アプリケーション全体(シングルトン)またはリクエストにバインドされます。 クライアントでは、コードの主要なユニットはコンポーネントです。 私たちはそれに添付されます。
アプリケーションレベルで状態を使用する必要がある場合、最も簡単な方法は、ES6モジュールレベルで変数を作成し、必要に応じてインポートすることです。 また、状態がコンポーネント内でのみ必要な場合は、 this.state
入れます。 他のすべてについては、 Context
ます。 しかし、 Context
は低すぎます。
- Reactコンポーネントツリーの外部でコンテキストを使用することはできません。 たとえば、ビジネスロジックレイヤー。
-
Class.contextType
で複数のコンテキストを使用することはできません。 いくつかの異なるサービスへの依存を判断するには、新しい方法で「ホラーピラミッド」を構築する必要があります。
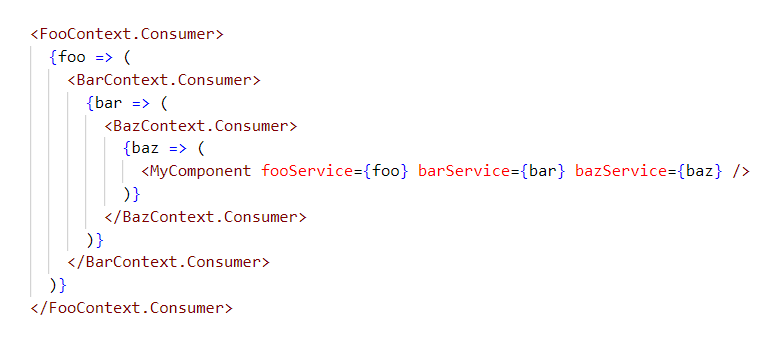
新しいフックuseContext()
は、機能コンポーネントの状況をわずかに修正します。 しかし、多くの<Context.Provider>
を取り除くことはできません。 コンテキストをService Locatorに、その親コンポーネントをComposition Rootに変えるまで。 しかし、ここではDIからそれほど遠くないので、始めましょう!
この部分をスキップして、アーキテクチャの説明に直接進むことができます。
DIメカニズムの実装
まず、React Contextが必要です。
export const InjectorContext= React.createContext(null);
Reactは必要に応じてコンポーネントコンストラクターを使用するため、プロパティインジェクションを使用します。 これを行うには、 @inject
デコレータを定義します。
-
Class.contextType
プロパティを設定します。 - 依存関係のタイプを取得します
-
Injector
オブジェクトを見つけて、依存関係を解決します。
import "reflect-metadata"; export function inject(target, key) { // static cotextType target.constructor.contextType = InjectorContext; // const type = Reflect.getMetadata("design:type", target, key); // property Object.defineProperty(target, key, { configurable: true, enumerable: true, get() { // Injector const instance = getInstance(getInjector(this), type); Object.defineProperty(this, key, { enumerable: true, writable: true, value: instance }); return instance; }, // settet Dependency Injection set(instance) { Object.defineProperty(this, key, { enumerable: true, writable: true, value: instance }); } }); }
これで、任意のクラス間の依存関係を定義できます。
import { inject } from "react-ioc"; class FooService {} class BarService { @inject foo: FooService; } class MyComponent extends React.Component { @inject foo: FooService; @inject bar: BarService; }
デコレータを受け入れない人のために、このシグネチャを使用してinject()
関数を定義します。
type Constructor<T> = new (...args: any[]) => T; function inject<T>(target: Object, type: Constructor<T> | Function): T;
export function inject(target, keyOrType) { if (isFunction(keyOrType)) { return getInstance(getInjector(target), keyOrType); } // ... }
これにより、依存関係を明示的に定義できます。
class FooService {} class BarService { foo = inject(this, FooService); } class MyComponent extends React.Component { foo = inject(this, FooService); bar = inject(this, BarService); // static contextType = InjectorContext; }
機能コンポーネントはどうですか? それらに対して、フックuseInstance()
実装できます
import { useRef, useContext } from "react"; export function useInstance(type) { const ref = useRef(null); const injector = useContext(InjectorContext); return ref.current || (ref.current = getInstance(injector, type)); }
import { useInstance } from "react-ioc"; const MyComponent = props => { const foo = useInstance(FooService); const bar = useInstance(BarService); return <div />; }
次に、 Injector
がどのように見えるか、それを見つける方法、および依存関係を解決する方法を決定します。 インジェクターには、親への参照、既に解決された依存関係のオブジェクトキャッシュ、およびまだ解決されていない依存関係のルールディクショナリが含まれている必要があります。
type Binding = (injector: Injector) => Object; export abstract class Injector extends React.Component { // Injector _parent?: Injector; // _bindingMap: Map<Function, Binding>; // _instanceMap: Map<Function, Object>; }
Reactコンポーネントの場合、 this.context
フィールドからInjector
を使用できます。依存関係クラスの場合、 Injector
を一時的にグローバル変数に入れることができます。 各クラスのインジェクターの検索を高速化するために、非表示フィールドにInjector
へのリンクをキャッシュします。
export const INJECTOR = typeof Symbol === "function" ? Symbol() : "__injector__"; let currentInjector = null; export function getInjector(target) { let injector = target[INJECTOR]; if (injector) { return injector; } injector = currentInjector || target.context; if (injector instanceof Injector) { target[INJECTOR] = injector; return injector; } return null; }
特定のバインディングルールを見つけるには、 getInstance()
関数を使用してインジェクターツリーを上に移動する必要があります。
export function getInstance(injector, type) { while (injector) { let instance = injector._instanceMap.get(type); if (instance !== undefined) { return instance; } const binding = injector._bindingMap.get(type); if (binding) { const prevInjector = currentInjector; currentInjector = injector; try { instance = binding(injector); } finally { currentInjector = prevInjector; } injector._instanceMap.set(type, instance); return instance; } injector = injector._parent; } return undefined; }
最後に、依存関係の登録に移りましょう。 これを行うには、HOC provider()
が必要provider()
。これは、依存関係バインディングの配列を実装に取り込み、 Injector
を介して新しいInjector
を登録します
export const provider = (...definitions) => Wrapped => { const bindingMap = new Map(); addBindings(bindingMap, definitions); return class Provider extends Injector { _parent = this.context; _bindingMap = bindingMap; _instanceMap = new Map(); render() { return ( <InjectorContext.Provider value={this}> <Wrapped {...this.props} /> </InjectorContext.Provider> ); } static contextType = InjectorContext; static register(...definitions) { addBindings(bindingMap, definitions); } }; };
また、依存関係インスタンスを作成するためのさまざまな戦略を実装する一連のバインディング関数。
export const toClass = constructor => asBinding(injector => { const instance = new constructor(); if (!instance[INJECTOR]) { instance[INJECTOR] = injector; } return instance; }); export const toFactory = (depsOrFactory, factory) => asBinding( factory ? injector => factory(...depsOrFactory.map(type => getInstance(injector, type))) : depsOrFactory ); export const toExisting = type => asBinding(injector => getInstance(injector, type)); export const toValue = value => asBinding(() => value); const IS_BINDING = typeof Symbol === "function" ? Symbol() : "__binding__"; function asBinding(binding) { binding[IS_BINDING] = true; return binding; } export function addBindings(bindingMap, definitions) { definitions.forEach(definition => { let token, binding; if (Array.isArray(definition)) { [token, binding = token] = definition; } else { token = binding = definition; } bindingMap.set(token, binding[IS_BINDING] ? binding : toClass(binding)); }); }
一連のペア[<>, <>]
の形式で、任意のコンポーネントのレベルで依存関係バインディングを登録できるようになりました。
import { provider, toClass, toValue, toFactory, toExisting } from "react-ioc"; @provider( // [FirstService, toClass(FirstServiceImpl)], // [SecondService, toValue(new SecondServiceImpl())], // [ThirdService, toFactory( [FirstService, SecondService], (first, second) => ThirdServiceFactory.create(first, second) )], // [FourthService, toExisting(FirstService)] ) class MyComponent extends React.Component { // ... }
または、クラスの省略形:
@provider( // [FirstService, toClass(FirstService)] FirstService, // [SecondService, toClass(SecondServiceImpl)] [SecondService, SecondServiceImpl] ) class MyComponent extends React.Component { // ... }
サービスの存続期間は、サービスが登録されているプロバイダーコンポーネントによって決定されるため、サービスごとに.dispose()
のクリーニング方法を決定できます。 その中で、いくつかのイベントの登録を解除したり、ソケットを閉じたりすることができます。 DOMからプロバイダーを削除すると、作成するすべてのサービスで.dispose()
が呼び出されます。
export const provider = (...definitions) => Wrapped => { // ... return class Provider extends Injector { // ... componentWillUnmount() { this._instanceMap.forEach(instance => { if (isObject(instance) && isFunction(instance.dispose)) { instance.dispose(); } }); } // ... }; };
コードと遅延読み込みを分離するには、サービスをプロバイダーに登録する方法を逆にする必要があります。 デコレータ@registerIn()
がこれに役立ちます。
export const registrationQueue = []; export const registerIn = (getProvider, binding) => constructor => { registrationQueue.push(() => { getProvider().register(binding ? [constructor, binding] : constructor); }); return constructor; };
export function getInstance(injector, type) { if (registrationQueue.length > 0) { registrationQueue.forEach(registration => { registration(); }); registrationQueue.length = 0; } while (injector) { // ... }
import { registerIn } from "react-ioc"; import { HomePage } from "../components/HomePage"; @registerIn(() => HomePage) class MyLazyLoadedService {}

したがって、150行と1 KBのコードに対して、ほぼ完全な階層型DIコンテナーを実装できます。
アプリケーションアーキテクチャ
最後に、主なことに移りましょう-アプリケーションのアーキテクチャを整理する方法。 アプリケーションのサイズ、サブジェクト領域の複雑さ、および怠に応じて、3つの可能なオプションがあります。
1. Uい
Virtual DOMがあるため、高速である必要があります。 少なくともこのソースで、Reactはキャリアの夜明けに役立った。 したがって、ルートコンポーネントへのリンクを覚えておいてください(たとえば、 @observer
デコレータを使用し@observer
)。 そして、共有サービスに影響を与える各アクションの後に.forceUpdate()
を呼び出します(たとえば、 @action
デコレーターを使用)
export function observer(Wrapped) { return class Observer extends React.Component { componentDidMount() { observerRef = this; } componentWillUnmount() { observerRef = null; } render() { return <Wrapped {...this.props} />; } } } let observerRef = null;
export function action(_target, _key, descriptor) { const method = descriptor.value; descriptor.value = function() { let result; runningCount++; try { result = method.apply(this, arguments); } finally { runningCount--; } if (runningCount === 0 && observerRef) { observerRef.forceUpdate(); } return result; }; } let runningCount = 0;
class UserService { @action doSomething() {} } class MyComponent extends React.Component { @inject userService: UserService; } @provider(UserService) @observer class App extends React.Component {}
それも動作します。 しかし... ...あなた自身が理解しています:-)
2.悪い
くしゃみごとにすべてをレンダリングすることに満足していません。 しかし、まだ使用したい ほぼ 状態を保存するための通常のオブジェクトと配列。 MobXを取りましょう!
標準アクションでいくつかのデータストレージを開始します。
import { observable, action } from "mobx"; export class UserStore { byId = observable.map<number, User>(); @action add(user: User) { this.byId.set(user.id, user); } // ... } export class PostStore { // ... }
サービスレイヤーにビジネスロジック、I / Oなどを取り出します。
import { action } from "mobx"; import { inject } from "react-ioc"; export class AccountService { @inject userStore userStore; @action updateUserInfo(userInfo: Partial<User>) { const user = this.userStore.byId.get(userInfo.id); Object.assign(user, userInfo); } }
そして、それらをコンポーネントに配布します。
import { observer } from "mobx-react"; import { provider, inject } from "react-ioc"; @provider(UserStore, PostStore) class App extends React.Component {} @provider(AccountService) @observer class AccountPage extends React.Component{} @observer class UserForm extends React.Component { @inject accountService: AccountService; }
import { action } from "mobx"; import { inject } from "react-ioc"; export class AccountService { userStore = inject(this, UserStore); updateUserInfo = action((userInfo: Partial<User>) => { const user = this.userStore.byId.get(userInfo.id); Object.assign(user, userInfo); }); }
import { observer } from "mobx-react-lite"; import { provider, useInstance } from "react-ioc"; const App = provider(UserStore, PostStore)(props => { // ... }); const AccountPage = provider(AccountService)(observer(props => { // ... })); const UserFrom = observer(props => { const accountService = useInstance(AccountService); // ... });
その結果、古典的な3層アーキテクチャが実現します。
3.グッド
サブジェクト領域が非常に複雑になり、単純なオブジェクト(またはDDDの観点から貧血モデル)を使用して作業することが既に不便になる場合があります。 これは、データが多くの関係を持つ関係構造を持つ場合に特に顕著です。 そのような場合、 MobX State Treeライブラリが私たちの助けとなり、フロントエンドアプリケーションのアーキテクチャにドメイン駆動設計の原則を適用することができます。
モデルの設計は、タイプの説明から始まります。
// models/Post.ts import { types as t, Instance } from "mobx-state-tree"; export const Post = t .model("Post", { id: t.identifier, title: t.string, body: t.string, date: t.Date, rating: t.number, author: t.reference(User), comments: t.array(t.reference(Comment)) }) .actions(self => ({ voteUp() { self.rating++; }, voteDown() { self.rating--; }, addComment(comment: Comment) { self.comments.push(comment); } })); export type Post = Instance<typeof Post>;
import { types as t, Instance } from "mobx-state-tree"; export const User = t.model("User", { id: t.identifier, name: t.string }); export type User = Instance<typeof User>;
import { types as t, Instance } from "mobx-state-tree"; import { User } from "./User"; export const Comment = t .model("Comment", { id: t.identifier, text: t.string, date: t.Date, rating: t.number, author: t.reference(User) }) .actions(self => ({ voteUp() { self.rating++; }, voteDown() { self.rating--; } })); export type Comment = Instance<typeof Comment>;
データストアのタイプ:
// models/index.ts import { types as t } from "mobx-state-tree"; export { User, Post, Comment }; export default t.model({ users: t.map(User), posts: t.map(Post), comments: t.map(Comment) });
エンティティタイプには、ドメインモデルの状態とそれを使用した基本操作が含まれます。 I / Oを含むより複雑なシナリオは、サービス層に実装されます。
import { Instance, unprotect } from "mobx-state-tree"; import Models from "../models"; export class DataContext { static create() { const models = Models.create(); unprotect(models); return models; } } export interface DataContext extends Instance<typeof Models> {}
import { observable } from "mobx"; import { User } from "../models"; export class AuthService { @observable currentUser: User; }
import { inject } from "react-ioc"; import { action } from "mobx"; import { Post } from "../models"; export class PostService { @inject dataContext: DataContext; @inject authService: AuthService; async publishPost(postInfo: Partial<Post>) { const response = await fetch("/posts", { method: "POST", body: JSON.stringify(postInfo) }); const { id } = await response.json(); this.savePost(id, postInfo); } @action savePost(id: string, postInfo: Partial<Post>) { const post = Post.create({ id, rating: 0, date: new Date(), author: this.authService.currentUser.id, comments: [], ...postInfo }); this.dataContext.posts.put(post); } }
MobX状態ツリーの主な機能は、データスナップショットの効率的な作業です。 いつでも、 getSnapshot()
関数を使用して、エンティティ、コレクション、またはアプリケーションの状態全体のシリアル化された状態を取得できます。 同様に、 applySnapshot()
を使用して、モデルの任意の部分にスナップショットを適用できます。 これにより、数行のコードでサーバーから状態を初期化したり、LocalStorageからロードしたり、Redux DevToolsを介してサーバーとやり取りしたりできます。
正規化されたリレーショナルモデルを使用するため、データを読み込むためにnormalizrライブラリが必要です。 ツリーJSONを、データスキームに従ってid
グループ化されたオブジェクトのフラットテーブルに変換できます。 MobX状態ツリーがスナップショットとして必要な形式でのみ。
これを行うには、サーバーからダウンロードしたオブジェクトのスキームを定義します。
import { schema } from "normalizr"; const UserSchema = new schema.Entity("users"); const CommentSchema = new schema.Entity("comments", { author: UserSchema }); const PostSchema = new schema.Entity("posts", { // - // author: UserSchema, comments: [CommentSchema] }); export { UserSchema, PostSchema, CommentSchema };
そして、データをストレージにロードします。
import { inject } from "react-ioc"; import { normalize } from "normalizr"; import { applySnapshot } from "mobx-state-tree"; export class PostService { @inject dataContext: DataContext; // ... async loadPosts() { const response = await fetch("/posts.json"); const posts = await response.json(); const { entities } = normalize(posts, [PostSchema]); applySnapshot(this.dataContext, entities); } // ... }
[ { "id": 123, "title": " React", "body": " - React...", "date": "2018-12-10T18:18:58.512Z", "rating": 0, "author": { "id": 12, "name": "John Doe" }, "comments": [{ "id": 1234, "text": "Hmmm...", "date": "2018-12-10T18:18:58.512Z", "rating": 0, "author": { "id": 12, "name": "John Doe" } }] }, { "id": 234, "title": "Lorem ipsum", "body": "Lorem ipsum dolor sit amet...", "date": "2018-12-10T18:18:58.512Z", "rating": 0, "author": { "id": 23, "name": "Marcus Tullius Cicero" }, "comments": [] } ]
最後に、適切なコンポーネントにサービスを登録します。
import { observer } from "mobx-react"; import { provider, inject } from "react-ioc"; @provider(AuthService, PostService, [ DataContext, toFactory(DataContext.create) ]) class App extends React.Component { @inject postService: PostService; componentDidMount() { this.postService.loadPosts(); } }
すべて同じ3層アーキテクチャですが、データ型の状態と実行時検証を維持する機能を備えています(DEVモード)。 後者を使用すると、例外が発生しない場合に、データウェアハウスの状態が仕様に対応していることを確認できます。

興味のある方は、 githubへのリンクとデモをご覧ください。