
これは、 初心者のAndroid開発者向けのDagger 2シリーズの6番目の記事です。 前のものを読んでいない場合、 ここにいます。
一連の記事
- 初心者のAndroid開発者向けの短剣2。 はじめに
- 初心者のAndroid開発者向けの短剣2。 依存性注入 パート1
- 初心者のAndroid開発者向けの短剣2。 依存性注入 パート2
- 初心者のAndroid開発者向けの短剣2。 ダガー2。パート1 。
- 初心者のAndroid開発者向けの短剣2。 ダガー2。パート2 。
- 初心者のAndroid開発者向けの短剣2。 ダガー2.アドバンス。
パート1(ここにいます) 。 - 初心者のAndroid開発者向けの短剣2。 ダガー2.アドバンス。
パート2
一連の記事の前半
生成されたDagger 2クラスを分析し、Dagger 2がBuilderパターンを使用して必要な依存関係を提供する方法を調べました。
その後、
@Module
および
@Provides
アノテーションを使用する簡単な例
@Provides
。
まえがき
この記事はあなたにとって少し大きいように思えるかもしれません。 通常、私の記事は800文字を超えません。 私はそれをより小さな部分に分解したかったのですが、記事が非常に大きい理由は、途中で長時間ハード接続(ハード依存関係)の問題を解決すると、迷子になる可能性があるからです。
しかし、記事にはチェックポイント(チェックポイント)を含めました。 これらの場所では、少し休憩して気を散らすことができます。 これはDagger 2と依存性注入(DI)の初心者にとって便利だと思います。
Androidホーム

これまで、例で通常のJavaプロジェクトを見てきました。 皆さんのほとんどがDIについて、そしてDagger 2を使用してDIを実装する方法を理解していることを願っています。 ここで、Androidアプリケーションの実際の例に飛び込み、このプロジェクトでDagger 2を使用してみてください。
Googleコードラボのようにすべてを1か所に集めるために、キックスタートブランチを作成しました 。 私たちの目標は、このプロジェクトの強いつながりをなくすことです。 ソリューションの一部は、このプロジェクトの別々のブランチに配置されます。
プロジェクトの説明
これは非常に単純なプロジェクトです。 その中で、 Random Users APIを使用してランダムユーザーを受け取り、
RecyclerView
表示します。 プロジェクトの説明にあまり時間をかけず、抽象的に説明します。 ただし、プロジェクトでのDagger 2の実装が可能な限り明確でシンプルになるように、コードを慎重に逆アセンブルしてください。
#クラスとパッケージ
-
MainActivity.java
-APIにリクエストを行い、受け取ったアイテムをRecyclerView
表示します。 -
Model
パッケージ-POJOへのJSONスキーマを使用して作成された、APIからの応答用のPOJO -
RandomUsersAdapter.java
-RecyclerView
Adapter
依存関係
プロジェクト機能を実装するには、次のライブラリを使用します。
-
Retrofit
呼び出し用 -
GsonBuilder
およびGson
-JSONを操作するための -
HttpLoggingInterceptor
ネットワーク操作のロギング用 -
OkHttpClient
Retrofit
用のクライアント -
Picasso
Adapter
で画像を操作する
前の例で見たように、
MainActivity
には依存関係が
MainActivity
ます。
MainActivity
を作成する
MainActivity
、依存関係インスタンスが
MainActivity
度も作成されます。
public class MainActivity extends AppCompatActivity { Retrofit retrofit; RecyclerView recyclerView; RandomUserAdapter mAdapter; @Override protected void onCreate(Bundle savedInstanceState) { super.onCreate(savedInstanceState); setContentView(R.layout.activity_main); initViews(); GsonBuilder gsonBuilder = new GsonBuilder(); Gson gson = gsonBuilder.create(); Timber.plant(new Timber.DebugTree()); HttpLoggingInterceptor httpLoggingInterceptor = new HttpLoggingInterceptor(new HttpLoggingInterceptor.Logger() { @Override public void log(@NonNull String message) { Timber.i(message); } }); httpLoggingInterceptor.setLevel(HttpLoggingInterceptor.Level.BODY); OkHttpClient okHttpClient = new OkHttpClient() .newBuilder() .addInterceptor(httpLoggingInterceptor) .build(); retrofit = new Retrofit.Builder() .client(okHttpClient) .baseUrl("https://randomuser.me/") .addConverterFactory(GsonConverterFactory.create(gson)) .build(); populateUsers(); } private void initViews() { recyclerView = findViewById(R.id.recyclerView); recyclerView.setLayoutManager(new LinearLayoutManager(this)); } private void populateUsers() { Call<RandomUsers> randomUsersCall = getRandomUserService().getRandomUsers(10); randomUsersCall.enqueue(new Callback<RandomUsers>() { @Override public void onResponse(Call<RandomUsers> call, @NonNull Response<RandomUsers> response) { if(response.isSuccessful()) { mAdapter = new RandomUserAdapter(); mAdapter.setItems(response.body().getResults()); recyclerView.setAdapter(mAdapter); } } @Override public void onFailure(Call<RandomUsers> call, Throwable t) { Timber.i(t.getMessage()); } }); } public RandomUsersApi getRandomUserService(){ return retrofit.create(RandomUsersApi.class); } }
(チェックポイント)
...
既存の問題
MainActivity
を見ると、次の問題に気づくでしょう。
#オブジェクトの厄介な初期化
onCreate()
メソッドを見ると、その中に厄介な初期化が見つかることがあります。 もちろん、この方法でこのメソッドのオブジェクトを引き続き初期化することはできますが、問題を解決する正しい方法を見つけた方がよいでしょう。
#テスト容易性
また、コードをテストする方法を見つける必要があります。 また、
Adapter
内の
Picasso
もテスト機能を妨害します。 この依存関係をコンストラクターに渡すと便利です。
public class RandomUserAdapter extends RecyclerView.Adapter<RandomUserAdapter.RandomUserViewHolder> { private List<Result> resultList = new ArrayList<>(); public RandomUserAdapter() { } @Override public RandomUserViewHolder onCreateViewHolder(ViewGroup parent, int viewType) { View view = LayoutInflater.from(parent.getContext()).inflate(R.layout.list_item_random_user, parent, false); return new RandomUserViewHolder(view); } @Override public void onBindViewHolder(RandomUserViewHolder holder, int position) { Result result = resultList.get(position); holder.textView.setText(String.format("%s %s", result.getName().getFirst(), result.getName().getLast())); Picasso.with(holder.imageView.getContext()) .load(result.getPicture().getLarge()) .into(holder.imageView); } ......
例を少し複雑にしましょう
MainActivity
クラスの上記の依存関係は、プロジェクトを掘り下げて快適に感じるためにのみ必要でした。 さらに深く進むと、実際のプロジェクトと同様に、依存関係が増えます。 さらにいくつか追加しましょう。
以前に考慮された依存関係に加えて、次を追加します。
-
File
-キャッシュを保存しFile
-
Cache
-ネットワークキャッシュ用 -
OkHttp3Downloader
-OkHttpClient
を使用して画像を読み込むOkHttpClient
-
Picasso
ネットワークからの画像処理用
コードは次のようになります( 別のブランチで完全な例を表示できます)。
public class MainActivity extends AppCompatActivity { Retrofit retrofit; RecyclerView recyclerView; RandomUserAdapter mAdapter; Picasso picasso; @Override protected void onCreate(Bundle savedInstanceState) { super.onCreate(savedInstanceState); setContentView(R.layout.activity_main); initViews(); GsonBuilder gsonBuilder = new GsonBuilder(); Gson gson = gsonBuilder.create(); Timber.plant(new Timber.DebugTree()); File cacheFile = new File(this.getCacheDir(), "HttpCache"); cacheFile.mkdirs(); Cache cache = new Cache(cacheFile, 10 * 1000 * 1000); //10 MB HttpLoggingInterceptor httpLoggingInterceptor = new HttpLoggingInterceptor(new HttpLoggingInterceptor.Logger() { @Override public void log(@NonNull String message) { Timber.i(message); } }); httpLoggingInterceptor.setLevel(HttpLoggingInterceptor.Level.BODY); OkHttpClient okHttpClient = new OkHttpClient() .newBuilder() .cache(cache) .addInterceptor(httpLoggingInterceptor) .build(); OkHttp3Downloader okHttpDownloader = new OkHttp3Downloader(okHttpClient); picasso = new Picasso.Builder(this).downloader(okHttpDownloader).build(); retrofit = new Retrofit.Builder() .client(okHttpClient) .baseUrl("https://randomuser.me/") .addConverterFactory(GsonConverterFactory.create(gson)) .build(); populateUsers(); } private void initViews() { recyclerView = findViewById(R.id.recyclerView); recyclerView.setLayoutManager(new LinearLayoutManager(this)); } private void populateUsers() { Call<RandomUsers> randomUsersCall = getRandomUserService().getRandomUsers(10); randomUsersCall.enqueue(new Callback<RandomUsers>() { @Override public void onResponse(Call<RandomUsers> call, @NonNull Response<RandomUsers> response) { if(response.isSuccessful()) { mAdapter = new RandomUserAdapter(picasso); mAdapter.setItems(response.body().getResults()); recyclerView.setAdapter(mAdapter); } } @Override public void onFailure(Call<RandomUsers> call, Throwable t) { Timber.i(t.getMessage()); } }); } public RandomUsersApi getRandomUserService(){ return retrofit.create(RandomUsersApi.class); } }
(チェックポイント)
...
依存グラフ
依存関係グラフは、クラス間の依存関係を説明する図にすぎません。 このようなグラフの形成により、実装がより理解しやすくなります(これは終わり近くでわかります)。 プロジェクトの依存関係グラフを見てください。
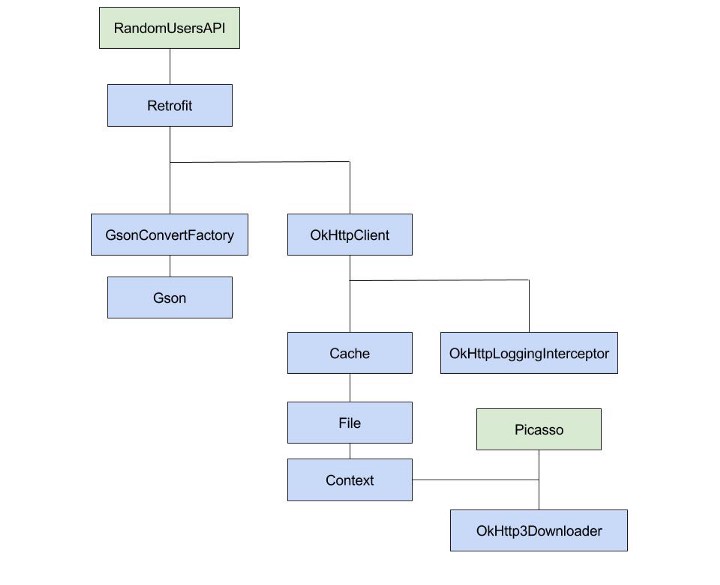
最上位の依存関係は緑色でマークされています。つまり、他の依存関係では必要ありませんが、いくつかの依存関係が必要です。
このチャートの読み方 たとえば、
Picasso
OkHttp3Downloader
と
Context
2つの依存関係があります。
APIを使用してカジュアルユーザーを獲得するには、
Retrofit
が必要です。 彼は、
GsonConvertFactory
と
OkHttpClient
などの2つの依存関係を必要とします。
MainActivity
のコードを見て、理解を深めるためにチャートと比較してください。
(チェックポイント)
...
Dagger 2を使用した依存関係の展開
完全なコードは、別のプロジェクトブランチにあります。
注:
-
RandomUsersAPI
とRandomUsersApi
は同じものです。 チャートのタイプミス。 -
RandomUsersComponent
は、上記のブランチと以下の例で異なります。 以下の例を完全に遵守するために新しいブランチを使用することをお勧めします。前述のブランチは参照用に残してください。 - GitHub (スター)でプロジェクトをブックマークすることを忘れないでください。トレーニングで本当に助けになった場合。
ステップ1. Dagger 2のインストール
build.gradle
ファイルに数行を追加するだけです。
dependencies { implementation 'com.google.dagger:dagger:2.13' annotationProcessor 'com.google.dagger:dagger-compiler:2.13' }
ステップ2.コンポーネントの作成
コンポーネントは、依存関係グラフ全体のインターフェイスになります。 コンポーネントを使用するためのベストプラクティスは、その最上位の依存関係のみを宣言し、残りの依存関係を非表示にすることです。
これは、依存関係グラフで緑色でマークされている依存関係のみがコンポーネント、つまり
RandomUsersAPI
と
Picasso
存在することを
RandomUsersAPI
します。
@Component public interface RandomUserComponent { RandomUsersApi getRandomUserService(); Picasso getPicasso(); }
Component自身は、
RandomUsersAPI
と
Picasso
依存関係を取得する場所をどのように理解しますか? モジュールを使用します。
ステップ3.モジュールの作成
ここで、コードを
MainActivity
からさまざまなモジュールに移動する必要があります。 依存関係グラフを見ると、必要なモジュールを決定できます。
1つ目は
RandomUsersModule
、
RandomUsersApi
、
GsonConverterFactory
、
Gson
、および
GsonConverterFactory
依存関係を提供します。
@Module public class RandomUsersModule { @Provides public RandomUsersApi randomUsersApi(Retrofit retrofit){ return retrofit.create(RandomUsersApi.class); } @Provides public Retrofit retrofit(OkHttpClient okHttpClient, GsonConverterFactory gsonConverterFactory, Gson gson){ return new Retrofit.Builder() .client(okHttpClient) .baseUrl("https://randomuser.me/") .addConverterFactory(gsonConverterFactory) .build(); } @Provides public Gson gson(){ GsonBuilder gsonBuilder = new GsonBuilder(); return gsonBuilder.create(); } @Provides public GsonConverterFactory gsonConverterFactory(Gson gson){ return GsonConverterFactory.create(gson); } }
2つ目は
PicassoModule
、
Picasso
および
OkHttp3Downloader
を提供します。
@Module public class PicassoModule { @Provides public Picasso picasso(Context context, OkHttp3Downloader okHttp3Downloader){ return new Picasso.Builder(context). downloader(okHttp3Downloader). build(); } @Provides public OkHttp3Downloader okHttp3Downloader(OkHttpClient okHttpClient){ return new OkHttp3Downloader(okHttpClient); } }
RandomUsersModule
モジュールでは、
RandomUsersModule
Retrofit
必要
OkHttpClient
。 順番に、他の依存関係が必要です。 このために別のモジュールを作成しませんか?
OkHttpClient
、
Cache
、
HttpLoggingInterceptor
および
File
を提供する
OkHttpClientModule
を作成し
File
。
@Module public class OkHttpClientModule { @Provides public OkHttpClient okHttpClient(Cache cache, HttpLoggingInterceptor httpLoggingInterceptor){ return new OkHttpClient() .newBuilder() .cache(cache) .addInterceptor(httpLoggingInterceptor) .build(); } @Provides public Cache cache(File cacheFile){ return new Cache(cacheFile, 10 * 1000 * 1000); //10 MB } @Provides public File file(Context context){ File file = new File(context.getCacheDir(), "HttpCache"); file.mkdirs(); return file; } @Provides public HttpLoggingInterceptor httpLoggingInterceptor(){ HttpLoggingInterceptor httpLoggingInterceptor = new HttpLoggingInterceptor(new HttpLoggingInterceptor.Logger() { @Override public void log(String message) { Timber.d(message); } }); httpLoggingInterceptor.setLevel(HttpLoggingInterceptor.Level.BODY); return httpLoggingInterceptor; } }
モジュールの準備はほぼ完了していますが、
PicassoModule
と
OkHttpClientModule
は
Context
必要
Context
あり、他の場所で役立つかもしれません。 これらの目的のためにモジュールを作成します。
@Module public class ContextModule { Context context; public ContextModule(Context context){ this.context = context; } @Provides public Context context(){ return context.getApplicationContext(); } }
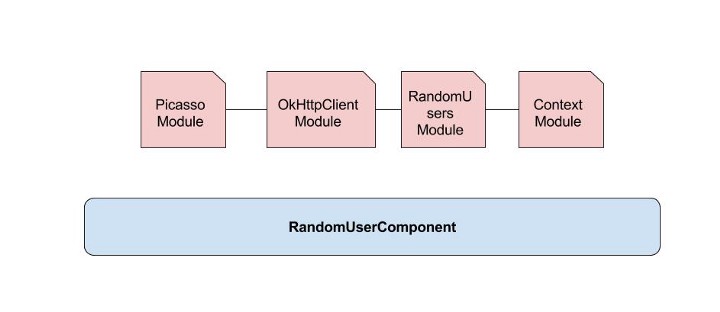
ステップ4.モジュールを接続する
これで、下の図のように、すべてのモジュールとコンポーネントができました。 しかし、
Context
を他のモジュールに渡す方法は? 互いに依存するモジュールをバインドする必要があります。

モジュール間の通信を実装するには、
includes
属性が必要です。 この属性には、参照されるモジュールの現在のモジュール依存関係が含まれます。
どのモジュールを接続する必要がありますか?
-
RandomUsersModule
はRandomUsersModule
が必要OkHttpClientModule
-
OkHttpClientModule
はContextModule
が必要です -
PicassoModule
はOkHttpClientModule
とContextModule
が必要OkHttpClientModule
。OkHttpClientModule
すでにContextModule
に関連付けられているため、OkHttpClientModule
のみをOkHttpClientModule
ことができますOkHttpClientModule
// RandomUsersModule.java @Module(includes = OkHttpClientModule.class) public class RandomUsersModule { ... } // OkHttpClientModule.java @Module(includes = ContextModule.class) public class OkHttpClientModule { ... } // PicassoModule.java @Module(includes = OkHttpClientModule.class) public class PicassoModule { ... }
そこで、すべてのモジュールを接続しました。
ステップ5.コンポーネントとモジュールのリンク
現時点では、すべてのモジュールが接続されており、互いに通信しています。 今こそ、必要な依存関係を提供するモジュールを使用するようにComponentに伝えるか、トレーニングするときです。
includes
属性を使用してモジュールを相互にリンクしたため、同様に、
modules
属性を使用してコンポーネントとモジュールをリンクできます。
作成されたコンポーネント(
getRandomUserService()
および
getPicasso()
メソッド)のニーズを考慮して、
modules
属性を使用してコンポーネントに
RandomUsersModule
および
PicassoModule
モジュールへのリンクを含めます。
@Component(modules = {RandomUsersModule.class, PicassoModule.class}) public interface RandomUserComponent { RandomUsersApi getRandomUserService(); Picasso getPicasso(); }

ステップ6.プロジェクトの組み立て
すべてを正しく行った場合、Dagger 2は、必要な依存関係を提供する、作成したコンポーネントに基づいてクラスを生成します。
MainActivity
では、
MainActivity
を使用して
Picasso
および
RandomUsersApi
依存関係を簡単に取得できます。
public class MainActivity extends AppCompatActivity { RandomUsersApi randomUsersApi; Picasso picasso; .... @Override protected void onCreate(Bundle savedInstanceState) { super.onCreate(savedInstanceState); setContentView(R.layout.activity_main); ... RandomUserComponent daggerRandomUserComponent = DaggerRandomUserComponent.builder() .contextModule(new ContextModule(this)) .build(); picasso = daggerRandomUserComponent.getPicasso(); randomUsersApi = daggerRandomUserComponent.getRandomUserService(); populateUsers(); ... } ... }
ステップ7.おめでとうございます!
やった! AndroidアプリでDagger 2を使用しました。 祝福して休憩
(チェックポイント)
...
GIF 
しかし、問題があります
なに? 問題は何ですか?
DaggerComponent.build()
を呼び出す
DaggerComponent.build()
、構成したすべてのオブジェクトまたは依存関係の新しいインスタンスが作成されます。 この場合、Dagger 2が
Picasso
インスタンスを1つだけ必要とすることを知らないのはなぜですか? 言い換えると、シングルトンとして依存関係を提供するようにDagger 2に指示するにはどうすればよいですか?
@Scope
@Scope
は、
DaggerComponent.build()
が複数回呼び出された場合でも、Dagger 2に単一のインスタンスのみを作成するように指示します。 これにより、依存関係がシングルトンとして機能します。 目的の領域(スコープ)を構成するには、独自の注釈を作成する必要があります。
@Scope @Retention(RetentionPolicy.CLASS) public @interface RandomUserApplicationScope { }
@Retention
は、注釈の使用の拒否点を示す注釈です。 彼女は、いつ注釈を使用できるかについて話します。 たとえば、マークSOURCEを使用すると、注釈はソースコードでのみ使用でき、コンパイル中に破棄されます。マークCLASSを使用すると、注釈はコンパイル時に使用できますが、プログラム操作中は使用できません。マークRUNTIMEでは、注釈は実行時に使用できます。
スコープを使用する
作成された領域を使用するには、コンポーネントから開始し、作成された注釈にマークを付けてから、必要な各メソッドをシングルトンとしてマークする必要があります。
@RandomUserApplicationScope @Component(modules = {RandomUsersModule.class, PicassoModule.class}) public interface RandomUserComponent { ...} @Module(includes = OkHttpClientModule.class) public class PicassoModule { ... @RandomUserApplicationScope @Provides public Picasso picasso(Context context, OkHttp3Downloader okHttp3Downloader){ return new Picasso.Builder(context). downloader(okHttp3Downloader). build(); } ... } @Module(includes = OkHttpClientModule.class) public class RandomUsersModule { ... @RandomUserApplicationScope @Provides public Retrofit retrofit(OkHttpClient okHttpClient, GsonConverterFactory gsonConverterFactory, Gson gson){ return new Retrofit.Builder() .client(okHttpClient) .baseUrl("https://randomuser.me/") .addConverterFactory(gsonConverterFactory) .build(); } ... }
これは、単一のインスタンスを作成する方法です。
別の問題!
GIF 
原則として、各アプリケーションでは、
ApplicationContext
と
Activity
コンテキストの2種類のコンテキストを使用します。 それらを提供するには?
ContextModule
を使用して
ApplicationContext
を提供できます。 別のモジュールを作成しましょう。
@Module public class ActivityModule { private final Context context; ActivityModule(Activity context){ this.context = context; } @RandomUserApplicationScope @Provides public Context context(){ return context; } }
しかし、作成されたクラスは問題を解決しません。 ここで、
Context
型の2つの依存関係を提供します。Dagger2はどちらを使用するかを判断できず、エラーが発生します。
@Named
この注釈は、コンテキストを区別するのに役立ちます。 属性を忘れずに、この注釈をメソッドに追加するだけです。
@Module public class ActivityModule { .... @Named("activity_context") @RandomUserApplicationScope @Provides public Context context(){ return context; } } @Module public class ContextModule { .... @Named("application_context") @RandomUserApplicationScope @Provides public Context context(){ return context.getApplicationContext(); } }
次に、適切な場所で適切なコンテキストを使用するようにDagger 2に指示します。
@Module(includes = ContextModule.class) public class OkHttpClientModule { .... @Provides @RandomUserApplicationScope public File file(@Named("application_context") Context context){ File file = new File(context.getCacheDir(), "HttpCache"); file.mkdirs(); return file; } .... } @Module(includes = OkHttpClientModule.class) public class PicassoModule { ... @RandomUserApplicationScope @Provides public Picasso picasso(@Named("application_context")Context context, OkHttp3Downloader okHttp3Downloader){ return new Picasso.Builder(context). downloader(okHttp3Downloader). build(); ... }
@Named
注釈の@Named
- @Qualifier
@Named
注釈を
@Qualifier
置き換えるには、別個の注釈を作成し、必要に応じて使用する必要があります。
@Qualifier public @interface ApplicationContext {}
次に、対応する依存関係を提供するメソッドに注釈を付けます。
@Module public class ContextModule { .... @ApplicationContext @RandomUserApplicationScope @Provides public Context context(){ return context.getApplicationContext(); } }
次に、注釈によって作成された
ApplicationContext
が必要なすべてのメソッドのパラメーターに注目します。
@Module(includes = ContextModule.class) public class OkHttpClientModule { ... @Provides @RandomUserApplicationScope public File file(@ApplicationContext Context context){ File file = new File(context.getCacheDir(), "HttpCache"); file.mkdirs(); return file; } .... } @Module(includes = OkHttpClientModule.class) public class PicassoModule { @RandomUserApplicationScope @Provides public Picasso picasso(@ApplicationContext Context context, OkHttp3Downloader okHttp3Downloader){ return new Picasso.Builder(context). downloader(okHttp3Downloader). build(); } .... }
対応するコミットを見て、
@Named
アノテーションを
@Qualifier
置き換える方法を確認してください。
まとめ
現時点では、単純なプロジェクトを作成し、Dagger 2と注釈を使用して依存関係を実装しました。
また、3つの新しい注釈についても調査しました。 1つは、単一インスタンスで依存関係を取得するための
@Scope
です。 2つ目は
@Named
で、同じタイプの依存関係を提供するメソッドを分離します。 3つ目は
@Qualifier
の代替としての
@Named
です。
次は?
現時点では、アプリケーションレベルの依存関係のみを考慮しています。 次の記事では、
Activity
レベルの依存関係を調べ、いくつかのコンポーネントを作成し、それらを操作する方法を学習します。 次の記事は1週間で公開されます。