Googleアプリ
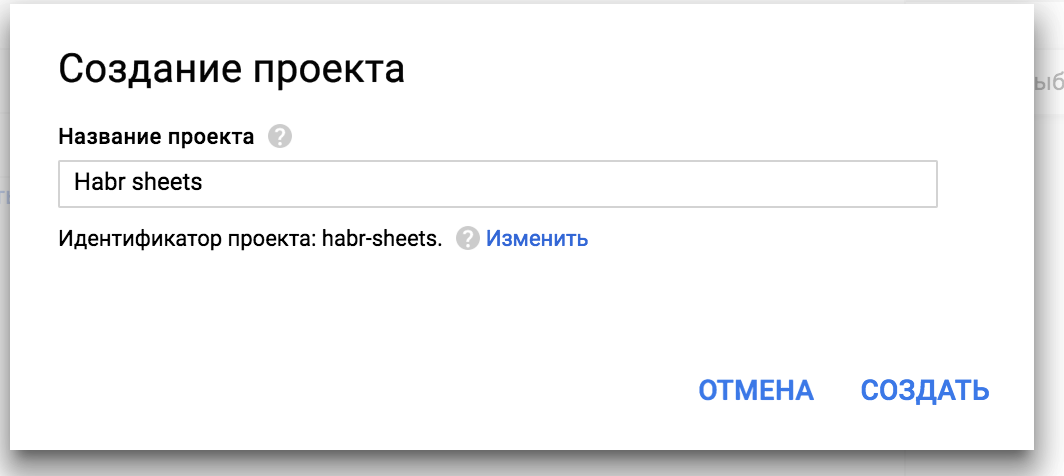
Googleコンソールから新しいプロジェクトを作成します。
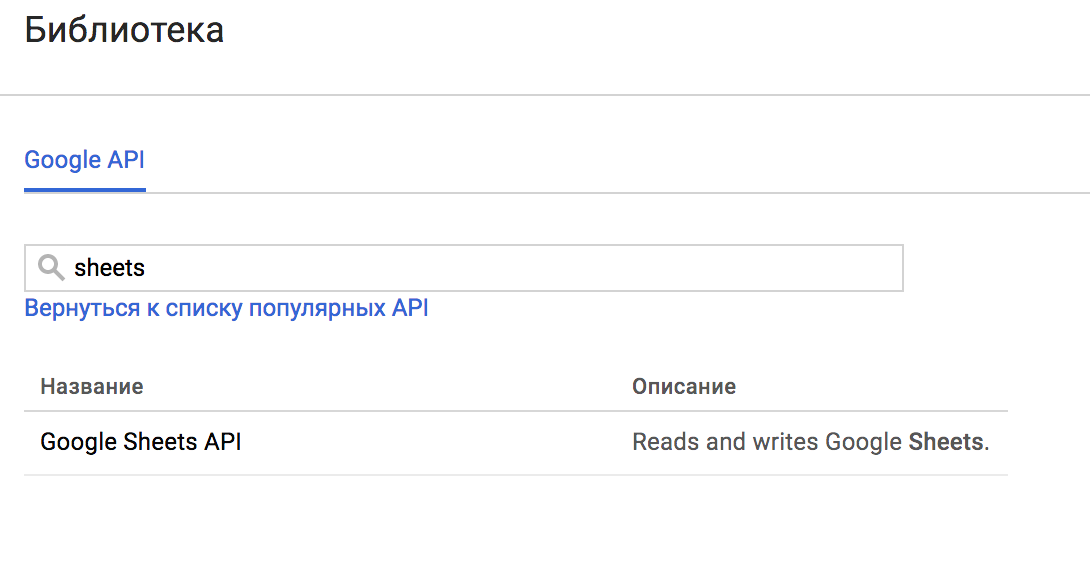
Sheets APIをアクティブにします。
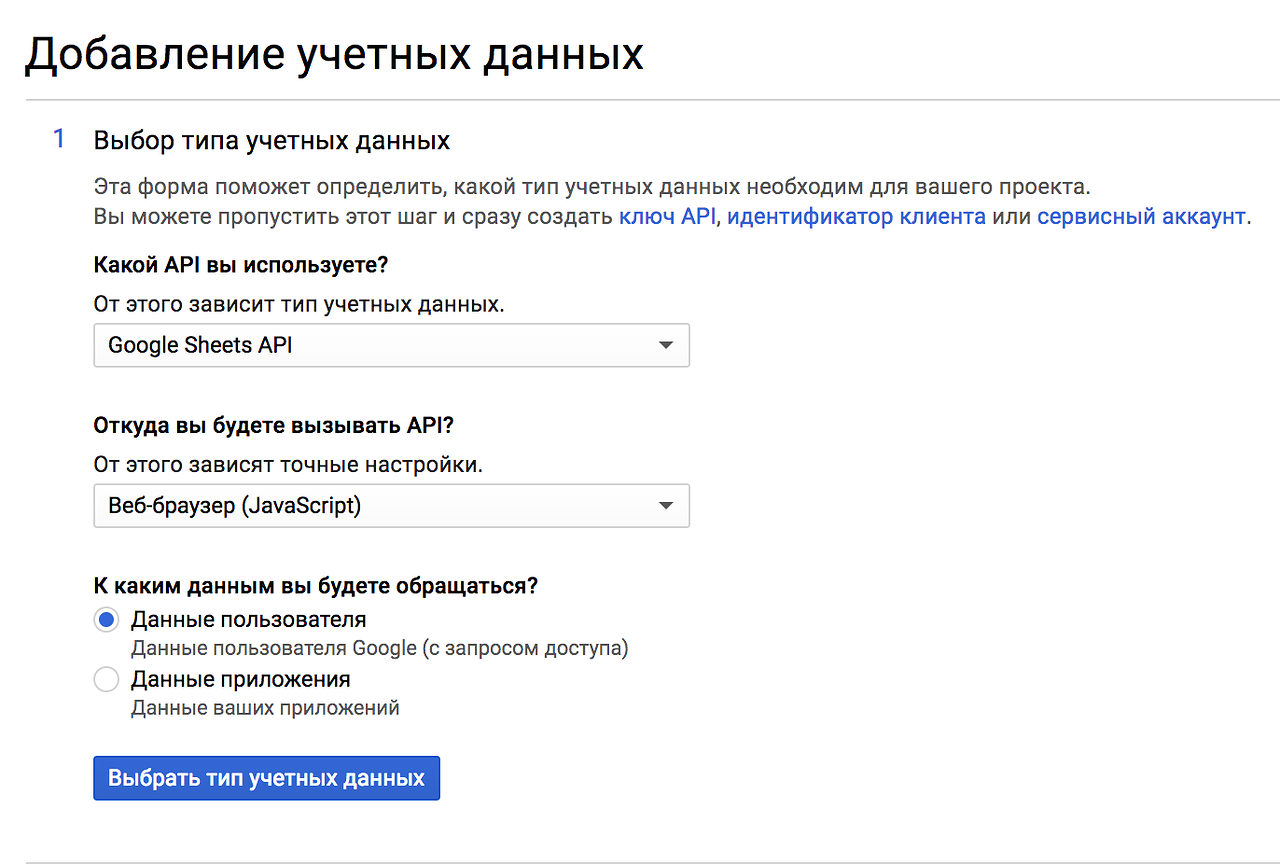
選択したAPIを使用するには、資格情報を作成する必要があります。 ブラウザからAPIを呼び出します。
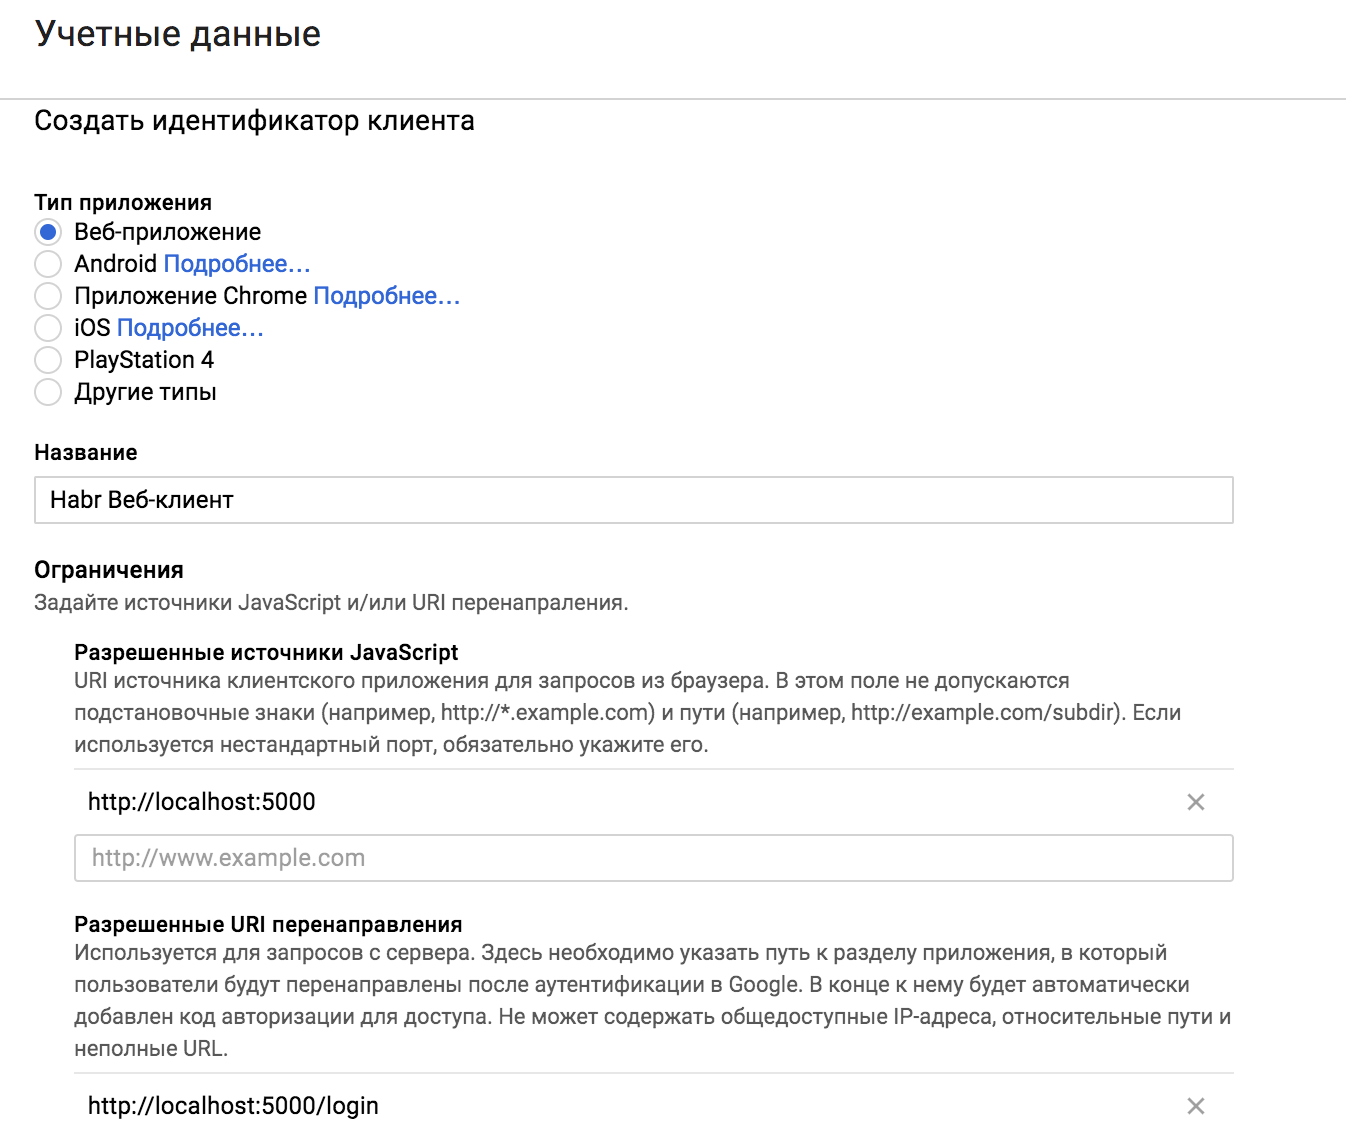
OAuth 2クライアント識別子を作成し、URL制限を設定します。 本稼働URLと開発URLの両方を指定する必要があります。
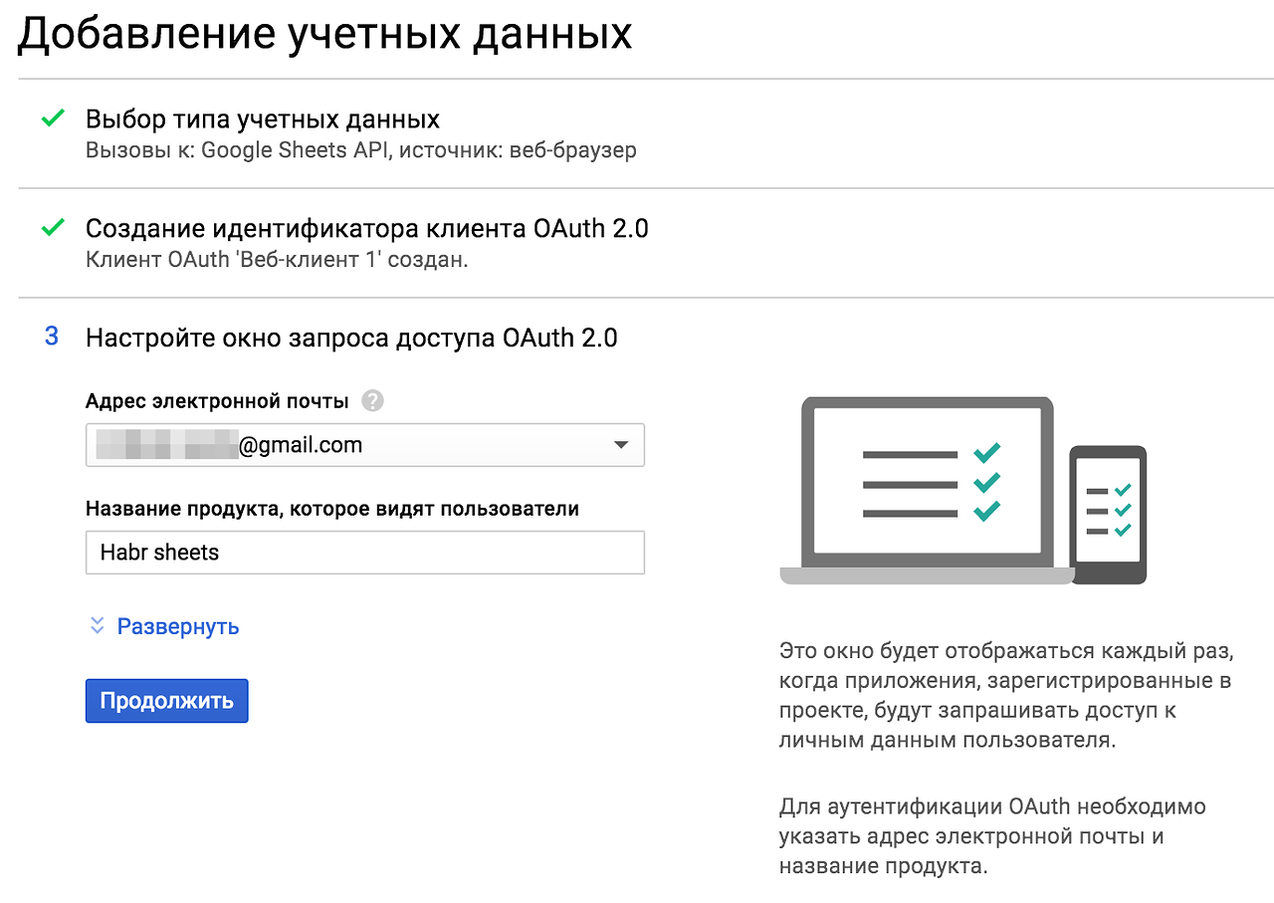
アクセス要求ウィンドウは、表示名、ロゴ、ライセンスを指定してカスタマイズすることもできます。
出力はclient_secrets.json資格情報ファイルである必要があります。 その後、完成したファイルをプロジェクトのリソースに配置する必要があります。
承認のためのスクリプト
どうぞ Google Sheets API v4は、認証コードを使用した認証のさまざまなシナリオをサポートしています。
- Webサーバーアプリケーション用。 いくつかの特定のサーブレットを実装し、web.xmlに追加する必要があります
- サービスアカウント。 サービスアカウントはGoogleで作成され、顧客にユーザーのリソースではなくリソースへのアクセスを提供します。
- インストール済みアプリケーション用。 コンソールアプリケーションからAPIを操作する例。
- クライアントアプリケーション用。 ブラウザーで、アクセスコードのリクエストを作成し、トークンと交換できます。
- アンドロイド用。
Webおよびクライアントアプリケーション用のスクリプトが適しています。 それらの作業スキームは一般的です:

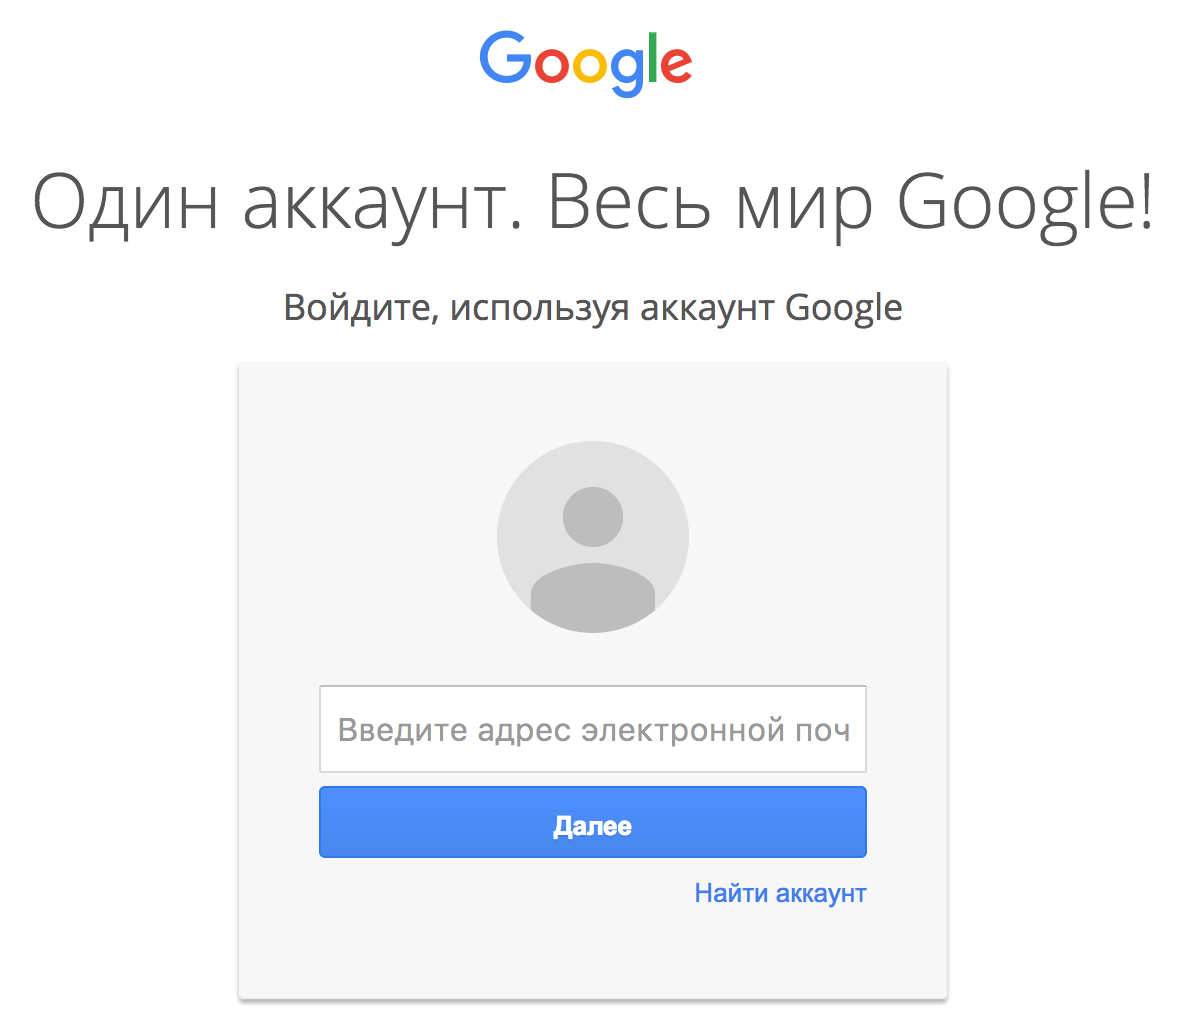
最初のステップは、Googleで認証キーをリクエストすることです。 ユーザーにアクセスフォームが表示されます。 認証コードを受け取ったら、アクセストークンと交換する必要があります。これがないと、Google APIと通信できません。 アクションのシーケンスは、OAuth 2.0 サンドボックスで確認できます。
Google oauth2アプリ
Webアプリケーションの基礎としてスプリングブートを使用します。 依存関係は次のとおりです。
<!-- Google OAuth Client Library for Java. --> <dependency> <groupId>com.google.oauth-client</groupId> <artifactId>google-oauth-client-java6</artifactId> <version>${google.oauth.client.version}</version> </dependency> <!-- Google OAuth2 API V2 Rev124 1.22.0 --> <dependency> <groupId>com.google.apis</groupId> <artifactId>google-api-services-oauth2</artifactId> <version>${google.oauth2.version}</version> </dependency> <!-- Google Sheets API V4 Rev38 1.22.0 --> <dependency> <groupId>com.google.apis</groupId> <artifactId>google-api-services-sheets</artifactId> <version>${google.sheets.version}</version> </dependency>
2つのサービスを作成しましょう。 GoogleConnectionは、ローカルファイルからクライアントデータをダウンロードし、受信後に資格情報を保存します。
GoogleConnectionService.java
@Service public class GoogleConnectionService implements GoogleConnection { private static final String CLIENT_SECRETS = "/client_secrets.json"; // .. @Override public GoogleClientSecrets getClientSecrets() { if (clientSecrets == null) { try { // load client secrets InputStreamReader clientSecretsReader = new InputStreamReader(getSecretFile()); clientSecrets = GoogleClientSecrets.load(Global.JSON_FACTORY, clientSecretsReader); } catch (IOException e) { e.printStackTrace(); } } return clientSecrets; } @Override public Credential getCredentials() { return credential; } // .. }
また、GoogleSheetsは表形式のデータを読み取るという基本的な仕事をします。
GoogleSheetsService.java
@Service public class GoogleSheetsService implements GoogleSheets { private Sheets sheetsService = null; @Override public List<List<Object>> readTable(GoogleConnection connection) throws IOException { Sheets service = getSheetsService(connection); return readTable(service, spreadsheetId, sheetName); } private Sheets getSheetsService(GoogleConnection gc) throws IOException { if (this.sheetsService == null) { this.sheetsService = new Sheets.Builder(Global.HTTP_TRANSPORT, Global.JSON_FACTORY, gc.getCredentials()) .setApplicationName(appName).build(); } return this.sheetsService; } }
3つのコントローラー間で一連の操作全体を分散します。 承認のためのコントローラー。
GoogleAuthorizationController.java
@RestController public class GoogleAuthorizationController { @Autowired private GoogleConnectionService connection; @RequestMapping(value = "/ask", method = RequestMethod.GET) public void ask(HttpServletResponse response) throws IOException { // Step 1: Authorize --> ask for auth code String url = new GoogleAuthorizationCodeRequestUrl(connection.getClientSecrets(), connection.getRedirectUrl(), Global.SCOPES).setApprovalPrompt("force").build(); response.sendRedirect(url); } }
彼の仕事の結果は、ログインのためのグーグルへのリダイレクトになります。
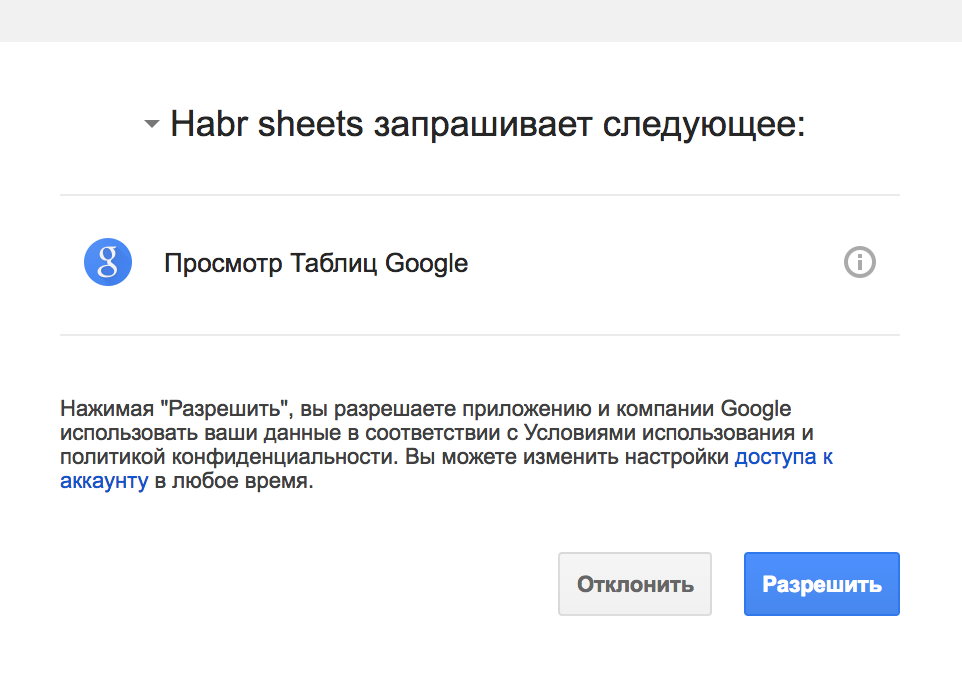
次に、ユーザーテーブルへのGoogleアプリケーションアクセスのリクエスト:
認証が成功した場合、フィードバックコントローラーはコードをトークンと交換し、元のURLにリダイレクトします。 交換自体がGoogleAuthorizationCodeTokenRequestクラスを担当します。
GoogleCallbackController.java
@RestController public class GoogleCallbackController { @Autowired private GoogleConnectionService connection; @RequestMapping(value = "/oauth2callback", method = RequestMethod.GET) public void callback(@RequestParam("code") String code, HttpServletResponse response) throws IOException { // Step 2: Exchange code --> access tocken if (connection.exchangeCode(code)) { response.sendRedirect(connection.getSourceUrl()); } else { response.sendRedirect("/error"); } } }
そして、実際には、テーブルデータの読み取りを実装する作業コントローラーです。
GoogleSheetController.java
@RestController public class GoogleSheetController { @Autowired private GoogleConnection connection; @Autowired private GoogleSheets sheetsService; @RequestMapping(value = "/api/sheet", method = RequestMethod.GET) public ResponseEntity<List<List<Object>>> read(HttpServletResponse response) throws IOException { List<List<Object>> responseBody = sheetsService.readTable(connection); return new ResponseEntity<List<List<Object>>>(responseBody, HttpStatus.OK); } }
また、認証なしで作業中のコントローラーにアクセスできないようにインターセプターも必要です。
GoogleSheetsInterceptor.java
public class GoogleSheetsInterceptor implements HandlerInterceptor { // .. @Override public boolean preHandle(HttpServletRequest request, HttpServletResponse response, Object obj) throws Exception { if (connection.getCredentials() == null) { connection.setSourceUrl(request.getRequestURI()); response.sendRedirect("/ask"); return false; } return true; } }
API v3と比較すると、各行はオブジェクトのリストです。
private List<List<Object>> readTable(Sheets service, String spreadsheetId, String sheetName) throws IOException { ValueRange table = service.spreadsheets().values().get(spreadsheetId, sheetName).execute(); List<List<Object>> values = table.getValues(); return values; }
A1表記を使用して、ブロックではなくページごとに読み取ります。 これを行うには、アプリケーションID設定にページIDパラメーターとタブ名を追加します。
google.spreadsheet.id=.. google.spreadsheet.sheet.name=..
始めます。 確認します。
その結果、OAuth 2.0を使用してサービスに接続するために使用されるGoogle APIクラスと、Webアプリケーションからそれらを使用する方法を把握する必要があります。
Spring SSOアプリケーション
OAuth2の操作を担当するアプリケーションコードは、春までに簡略化できます。 これを行うには、 Spring Security OAuthを接続します。
<dependency> <groupId>org.springframework.security.oauth</groupId> <artifactId>spring-security-oauth2</artifactId> </dependency>
これにより、OAuth2の日常的な操作を内部で隠し、アプリケーションを保護できます。
ユーザーシークレットをapplication.propertiesに転送します。
security.oauth2.client.client-id=Enter Client Id security.oauth2.client.client-secret=Enter Client Secret security.oauth2.client.accessTokenUri=https://accounts.google.com/o/oauth2/token security.oauth2.client.userAuthorizationUri=https://accounts.google.com/o/oauth2/auth security.oauth2.client.scope=openid,profile,https://www.googleapis.com/auth/spreadsheets security.oauth2.resource.user-info-uri=https://www.googleapis.com/oauth2/v3/userinfo
プロジェクトにセキュリティを接続することにより、すでに基本認証を有効にしています。 より適切なものに置き換えてください。
Googleからデータを読み取っているので、アプリケーションのユーザーを認証させます。 これを行うには、EnableOAuth2Ssoにアノテーションを1つだけ追加します。
@EnableOAuth2Sso @SpringBootApplication public class Application { //.. }
SSO認証ポイントが作成および構成されます。 WebSecurityConfigurerAdapterをオーバーライドする必要はありません。 構成で設定できるパラメーターは数個のみです。
security.ignored=/ security.basic.enabled=false security.oauth2.sso.login-path=/oauth2callback
この場合、login-pathはgoogleプロジェクトで指定されたリダイレクトのURIと一致する必要があります。 また、scopeパラメーターには、profileの値も含める必要があります。
追加のコントローラーとインターセプターは不要になりました。 今、彼らの仕事は春までに行われます。
GoogleConnectionクラスを変更します。 OAuth2コンテキストでの認証後に保存された認証コードを使用して、クレデンシャルを作成します。 そして、アプリケーション設定からクライアントデータを取得します。
GoogleConnectionService.java
@Service public class GoogleConnectionService implements GoogleConnection { @Autowired private OAuth2ClientContext oAuth2ClientContext; private GoogleCredential googleCredentials = null; // .. @Override public Credential getCredentials() { if (googleCredentials == null) { googleCredentials = new GoogleCredential.Builder() .setTransport(Global.HTTP_TRANSPORT) .setJsonFactory(Global.JSON_FACTORY) .setClientSecrets(clientId, clientSecret) .build() .setAccessToken(response.getAccessToken()) .setFromTokenResponse(oAuth2ClientContext .getAccessToken().getValue()); } return googleCredentials; } }
ブラウザでのデータの表示、エラー処理、セッションの使用、ログアウトなどは考慮されません。 それらの可用性とカスタマイズは、特定の要件に依存します。
以上です。 作業ソースはgithub'eにあります。 異なるアプローチ-異なるブランチ上。