例として、Googleクラウドエンジンでdebian 8を使用し、nginxを配置し、letsencryptで証明書を作成します。
方法がわからない場合:
echo "deb http://ftp.debian.org/debian jessie-backports main" >> /etc/apt/sources.list apt-get update apt-get install certbot -t jessie-backports -y certbot certonly --webroot -w /var/www/html -d domain.tld --email=your@email.tld --agree-tos # /var/www/html - ,
その結果、次のようになります。
重要事項:
-おめでとうございます! 証明書とチェーンはに保存されています
/etc/letsencrypt/live/http2.kricha.info/fullchain.pem。 あなたの証明書
2017-02-03に有効期限が切れます。 の新しいバージョンまたは調整されたバージョンを取得するには
この証明書は将来的には、単にcertbotを再度実行します。 に
非インタラクティブに*すべて*証明書を更新し、「certbot
更新»
つまり、すべてのキーはここにある/etc/letsencrypt/live/domain.tld/
# ls -la /etc/letsencrypt/live/http2.kricha.info/ total 8 drwxr-xr-x 2 root root 4096 Nov 5 17:53 . drwx------ 3 root root 4096 Nov 5 17:53 .. lrwxrwxrwx 1 root root 41 Nov 5 17:53 cert.pem -> ../../archive/http2.kricha.info/cert1.pem lrwxrwxrwx 1 root root 42 Nov 5 17:53 chain.pem -> ../../archive/http2.kricha.info/chain1.pem lrwxrwxrwx 1 root root 46 Nov 5 17:53 fullchain.pem -> ../../archive/http2.kricha.info/fullchain1.pem lrwxrwxrwx 1 root root 44 Nov 5 17:53 privkey.pem -> ../../archive/http2.kricha.info/privkey1.pem
このすべての美しさをnginx構成に追加します。
#let's encrypt certificates ssl_certificate /etc/letsencrypt/live/domain.tld/fullchain.pem; ssl_certificate_key /etc/letsencrypt/live/domain.tld/privkey.pem; ssl_trusted_certificate /etc/letsencrypt/live/domain.tld/chain.pem;
最終的には、次のようになります。
server { server_name domain.tld; listen 443 ssl http2; server_tokens off; keepalive_timeout 70; ssl_stapling on; ssl_stapling_verify on; resolver 127.0.0.1; resolver_timeout 10s; ssl on; #let's encrypt certificates ssl_certificate /etc/letsencrypt/live/domain.tld/fullchain.pem; ssl_certificate_key /etc/letsencrypt/live/domain.tld/privkey.pem; ssl_trusted_certificate /etc/letsencrypt/live/domain.tld/chain.pem; ssl_dhparam /etc/nginx/ssl/dhparam.pem; ssl_session_timeout 1h; ssl_session_cache shared:SSL:10m; ssl_protocols TLSv1 TLSv1.1 TLSv1.2; ssl_prefer_server_ciphers on; ssl_ciphers AES256+EECDH:AES256+EDH:!aNULL; add_header Strict-Transport-Security "max-age=63072000; includeSubDomains; preload" always; add_header X-Frame-Options DENY; add_header X-Content-Type-Options nosniff; root /var/www/html; index index.nginx-debian.html; location / { try_files $uri $uri/ =404; } error_log /var/log/nginx/domain.tld.error.log; access_log /var/log/nginx/domain.tld.access.log; } server { listen 80; listen [::]:80; server_name domain.tld; return 301 https://$host$request_uri; }
VBart :
ドキュメントの状態:nginx.org/ru/docs/http/ngx_http_core_module.html#resolver
DNSスプーフィングを防ぐために、安全で信頼できるローカルネットワークでDNSサーバーを使用することをお勧めします。
統合されたリゾルバはパフォーマンスのために調整されますが、安全性は犠牲になります。
あなたはまだファイルを見ることができます
cat /etc/resolv.conf nameserver 127.0.0.1
おそらく、構成済みのDNSサーバーが既に示されている可能性があります。 仕組みを確認します。
またはnslookup example.org 127.0.0.1
dig example.org @127.0.0.1
VBart :
通常はインストールされていません。 本格的なDNSサーバーの代わりに、 dnsmasqなどのDNSフォワーダーを使用できます。
DHEを行うには:
cd /etc/nginx mkdir ssl openssl dhparam -out ssl/dhparam.pem 2048
すべてが実行でき、 サービスnginxがリロードできるように思えますが、私たちにとってはFIG :応答としてこれを取得します。nginx.serviceのジョブが失敗しました。 詳細については、「systemctl status nginx.service」および「journalctl -xn」を参照してください。 、および詳細:
ov 05 18:01:15 http2 systemd[1]: Failed to read PID from file /run/nginx.pid: Invalid argument Nov 05 18:01:15 http2 systemd[1]: Started A high performance web server and a reverse proxy server. Nov 05 18:14:27 http2 systemd[1]: Reloading A high performance web server and a reverse proxy server. Nov 05 18:14:27 http2 nginx[24507]: nginx: [emerg] invalid parameter "http2" in /etc/nginx/sites-enabled/default:4 Nov 05 18:14:27 http2 systemd[1]: nginx.service: control process exited, code=exited status=1 Nov 05 18:14:27 http2 systemd[1]: Reload failed for A high performance web server and a reverse proxy server.
一般に、nginxは私たちが何を望み、何を望んでいるかをまったく理解しませんでした。 バージョンを見ると、 nginxバージョンが判明しています:nginx / 1.6.2 、OK、最新バージョンを置きます。
nginxの最新バージョンをインストールします
echo -e "deb http://nginx.org/packages/mainline/debian/ jessie nginx\ndeb-src http://nginx.org/packages/mainline/debian/ jessie nginx" >>/etc/apt/sources.list rm -rf /var/lib/dpkg/info/nginx* apt-get update apt-get upgrade --force-yes -y service nginx restart
ブラウザにアクセスして、次を確認します。

HTTP / 2.0 200ステータスが表示され 、喜ぶ、チェックインクローム:

プロトコルhttp / 1.1を見ると、悲しく
正しいnginxを収集します
apt-get install libpcre3 libpcre3-dev libpcrecpp0 libssl-dev zlib1g-dev cd /opt wget http://nginx.org/download/nginx-1.11.5.tar.gz wget https://www.openssl.org/source/openssl-1.0.2j.tar.gz tar xf nginx-1.11.5.tar.gz tar xf openssl-1.0.2j.tar.gz cd nginx-1.11.5 ./configure --prefix=/etc/nginx --sbin-path=/usr/sbin/nginx --modules-path=/usr/lib/nginx/modules --conf-path=/etc/nginx/nginx.conf --error-log-path=/var/log/nginx/error.log --http-log-path=/var/log/nginx/access.log --pid-path=/var/run/nginx.pid --lock-path=/var/run/nginx.lock --http-client-body-temp-path=/var/cache/nginx/client_temp --http-proxy-temp-path=/var/cache/nginx/proxy_temp --http-fastcgi-temp-path=/var/cache/nginx/fastcgi_temp --http-uwsgi-temp-path=/var/cache/nginx/uwsgi_temp --http-scgi-temp-path=/var/cache/nginx/scgi_temp --user=nginx --group=nginx --with-compat --with-file-aio --with-threads --with-http_addition_module --with-http_auth_request_module --with-http_dav_module --with-http_flv_module --with-http_gunzip_module --with-http_gzip_static_module --with-http_mp4_module --with-http_random_index_module --with-http_realip_module --with-http_secure_link_module --with-http_slice_module --with-http_ssl_module --with-http_stub_status_module --with-http_sub_module --with-http_v2_module --with-mail --with-mail_ssl_module --with-stream --with-stream_realip_module --with-stream_ssl_module --with-stream_ssl_preread_module --with-openssl=/opt/openssl-1.0.2j make make install service nginx restart
make installの代わりに、パッケージをビルドできます。
apt-get install checkinstall -y dpkg -i nginx_1.11.5-1_amd64.deb
クロムをチェックイン:

サファリで:
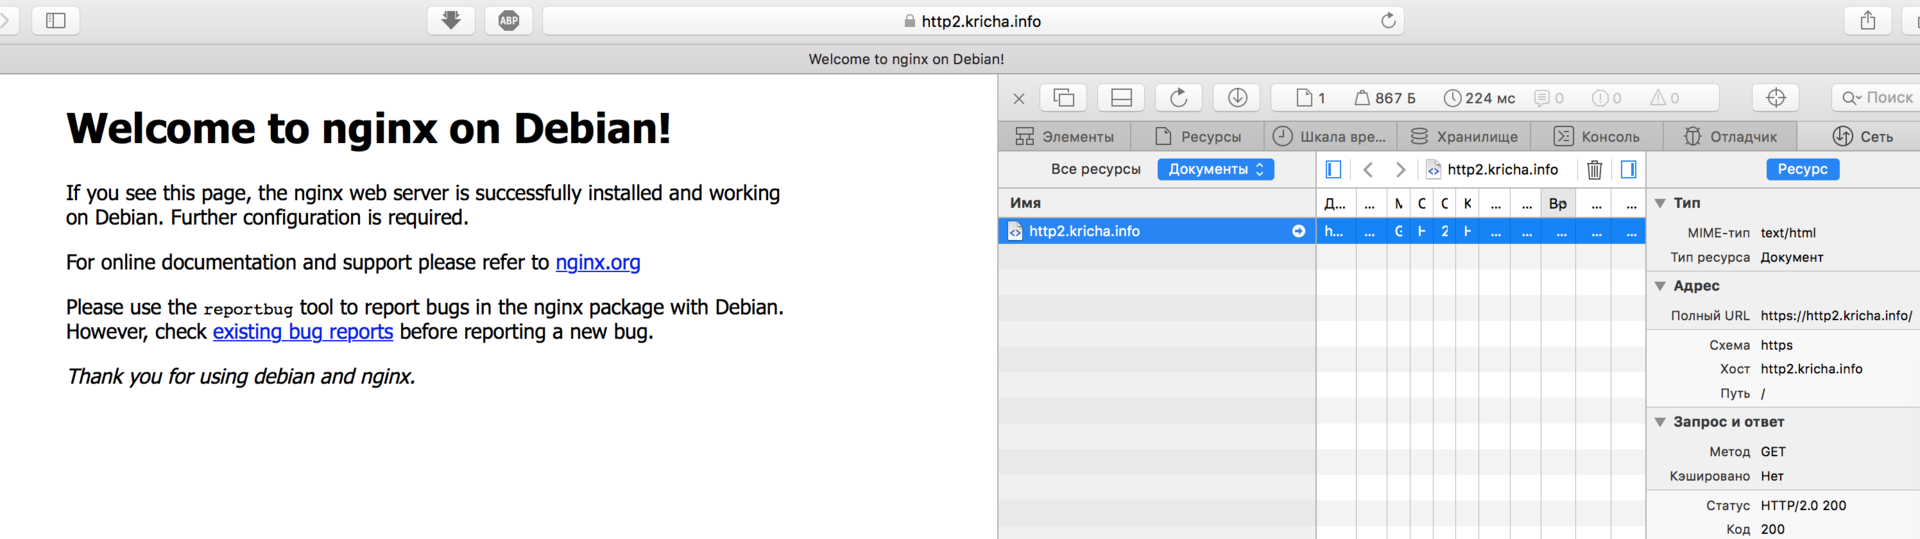
http2プロトコルが使用されていることがわかっているすべての場所で、www.ssllabs.comでも確認します。

利益! ラム酒を入れて寝ます! ご清聴ありがとうございました。誰かが助けてくれたことを願っています。