Google Protocol Buffers / Proto3をSpringプロジェクトに接続する方法の簡単な説明
Spring Boot:最小限の設定で「単純に」実行できるスタンドアロンWebアプリケーションを迅速に開発できます。
Google proto3:軽量で柔軟な自動データシリアル化エンジン。
この記事では、これらのテクノロジーをすばやく接続する方法について説明します。 資料のリンクをクリックして、テクノロジーに慣れることができます。
新しいスプリングブートプロジェクトを作成するには、Spring Initializr Webサイトを使用できます。
プロジェクトがMaven用に生成した依存関係としてWebを選択しました。
モデルモジュールのセットアップ
モデルモジュールには、拡張子が* .protoのファイルと自動的に生成されたJavaクラスのみが含まれます。 Proto *ファイルはsrc / main / protoに配置されます。
たとえば、health.protoを作成しました:
package demo.domain; option java_package = "demo.domain"; option java_outer_classname = "HealthCheckProtos"; message HealthCheck { required string response = 1; required string timestamp = 2; required string version = 3; }
Spring Controllerで使用するJavaクラスHealthCheckProtosの生成に基づいています。
必要なpom.xml設定:
<?xml version="1.0" encoding="UTF-8"?> <project xmlns="http://maven.apache.org/POM/4.0.0" xmlns:xsi="http://www.w3.org/2001/XMLSchema-instance" xsi:schemaLocation="http://maven.apache.org/POM/4.0.0 http://maven.apache.org/xsd/maven-4.0.0.xsd"> <modelVersion>4.0.0</modelVersion> <parent> <groupId>demo</groupId> <artifactId>spring-boot-proto3</artifactId> <version>0.0.1-SNAPSHOT</version> </parent> <artifactId>spring-boot-proto3-domain</artifactId> <packaging>jar</packaging> <name>spring-boot-proto3-domain</name> <description>Domain module</description> <properties> <protobuf.input.directory>${project.basedir}/src/main/proto</protobuf.input.directory> <protobuf.output.directory>${project.build.directory}/generated-sources</protobuf.output.directory> </properties> <dependencies> <dependency> <groupId>com.google.protobuf</groupId> <artifactId>protobuf-java</artifactId> </dependency> <dependency> <groupId>com.googlecode.protobuf-java-format</groupId> <artifactId>protobuf-java-format</artifactId> </dependency> </dependencies> <build> <plugins> <!-- copy protoc binary into build directory --> <plugin> <groupId>org.apache.maven.plugins</groupId> <artifactId>maven-dependency-plugin</artifactId> <version>2.10</version> <executions> <execution> <id>copy-protoc</id> <phase>generate-sources</phase> <goals> <goal>copy</goal> </goals> <configuration> <artifactItems> <artifactItem> <groupId>com.google.protobuf</groupId> <artifactId>protoc</artifactId> <version>${protobuf.version}</version> <classifier>windows-x86_64</classifier> <type>exe</type> <overWrite>true</overWrite> <outputDirectory>${project.build.directory}</outputDirectory> </artifactItem> </artifactItems> </configuration> </execution> </executions> </plugin> <!-- compile proto buffer files using copied protoc binary --> <plugin> <groupId>org.apache.maven.plugins</groupId> <artifactId>maven-antrun-plugin</artifactId> <version>1.8</version> <executions> <execution> <id>exec-protoc</id> <phase>generate-sources</phase> <configuration> <target> <property name="protoc.filename" value="protoc-${protobuf.version}-windows-x86_64.exe"/> <property name="protoc.filepath" value="${project.build.directory}/${protoc.filename}"/> <chmod file="${protoc.filepath}" perm="ugo+rx"/> <mkdir dir="${protobuf.output.directory}" /> <path id="protobuf.input.filepaths.path"> <fileset dir="${protobuf.input.directory}"> <include name="**/*.proto"/> </fileset> </path> <pathconvert pathsep=" " property="protobuf.input.filepaths" refid="protobuf.input.filepaths.path"/> <exec executable="${protoc.filepath}" failonerror="true"> <arg value="-I"/> <arg value="${protobuf.input.directory}"/> <arg value="--java_out"/> <arg value="${protobuf.output.directory}"/> <arg line="${protobuf.input.filepaths}"/> </exec> </target> </configuration> <goals> <goal>run</goal> </goals> </execution> </executions> </plugin> <plugin> <groupId>org.codehaus.mojo</groupId> <artifactId>build-helper-maven-plugin</artifactId> <version>1.9.1</version> <executions> <execution> <id>add-classes</id> <phase>generate-sources</phase> <goals> <goal>add-source</goal> </goals> <configuration> <sources> <$ource>${protobuf.output.directory}</$ource> </sources> </configuration> </execution> </executions> </plugin> </plugins> </build> </project>
ここでは、原則として、protocの分類子とmaven-antrun-pluginのprotoc.filenameを除き、すべてが標準です。残念ながら、ビルドマシンのシステムに接続されているため、Win X64でビルドしました。
Webモジュールのセットアップ
スプリングブートとproto3クラスを含むドメインモジュールがラバに接続されます。
<?xml version="1.0" encoding="UTF-8"?> <project xmlns="http://maven.apache.org/POM/4.0.0" xmlns:xsi="http://www.w3.org/2001/XMLSchema-instance" xsi:schemaLocation="http://maven.apache.org/POM/4.0.0 http://maven.apache.org/xsd/maven-4.0.0.xsd"> <modelVersion>4.0.0</modelVersion> <parent> <groupId>demo</groupId> <artifactId>spring-boot-proto3</artifactId> <version>0.0.1-SNAPSHOT</version> </parent> <artifactId>spring-boot-proto3-web</artifactId> <packaging>jar</packaging> <name>spring-boot-proto3-web</name> <description>Web module</description> <dependencies> <dependency> <groupId>org.springframework.boot</groupId> <artifactId>spring-boot-starter-web</artifactId> </dependency> <dependency> <groupId>demo</groupId> <artifactId>spring-boot-proto3-domain</artifactId> </dependency> </dependencies> <build> <plugins> <plugin> <groupId>org.springframework.boot</groupId> <artifactId>spring-boot-maven-plugin</artifactId> </plugin> </plugins> </build> </project>
その後、ProtobufHttpMessageConverterをHttpMessageConverterに追加する必要があります。
package demo.config; import java.util.HashMap; import java.util.List; import org.springframework.context.annotation.Bean; import org.springframework.context.annotation.Configuration; import org.springframework.http.converter.HttpMessageConverter; import org.springframework.http.converter.protobuf.ProtobufHttpMessageConverter; import org.springframework.web.servlet.config.annotation.ContentNegotiationConfigurer; import org.springframework.web.servlet.config.annotation.EnableWebMvc; import org.springframework.web.servlet.config.annotation.WebMvcConfigurerAdapter; @Configuration @EnableWebMvc public class WebConfiguration extends WebMvcConfigurerAdapter { /** * {@inheritDoc} */ @Override public void configureMessageConverters(List<HttpMessageConverter<?>> converters) { converters.add(protobufHttpMessageConverter()); } /** * {@inheritDoc} */ @Override public void configureContentNegotiation(ContentNegotiationConfigurer configurer) { configurer.replaceMediaTypes(new HashMap<>()) // .favorPathExtension(false) // .defaultContentType(ProtobufHttpMessageConverter.PROTOBUF); } @Bean ProtobufHttpMessageConverter protobufHttpMessageConverter() { return new ProtobufHttpMessageConverter(); } }
たとえば、proto3を使用して生成されたモデルを使用してアプリケーションのステータスを表示するコントローラーを作成しました。
package demo.web; import java.time.LocalDateTime; import demo.domain.HealthCheckProtos; import org.springframework.beans.factory.annotation.Value; import org.springframework.web.bind.annotation.RequestMapping; import org.springframework.web.bind.annotation.RestController; @RestController public class HealthCheckController { @Value("${health.controller.response}") private String response; @Value("${health.controller.version}") private String version; @RequestMapping("/ping") public HealthCheckProtos.HealthCheck get() { return HealthCheckProtos.HealthCheck.newBuilder() // .setResponse(response) // .setTimestamp(LocalDateTime.now().toString()) // .setVersion(version) // .build(); } }
クラスを生成する場合、proto3はモデルの作成に使用できるビルダーも生成します。
コントローラー要求の例
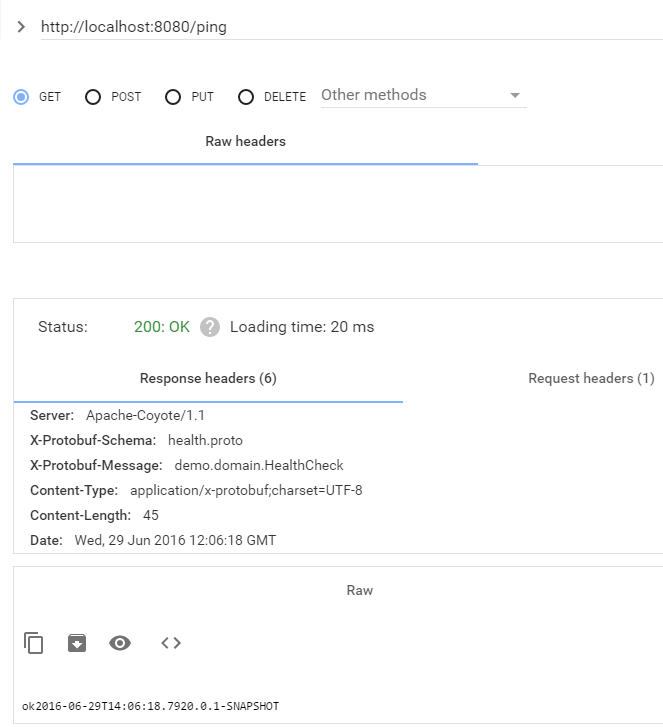 「alt = "画像" />
また、ヘッダー「Accept」:「application / json」を追加すると、jsonでシリアル化された同じ応答を取得できます。
次の材料が使用されました。
プロジェクトのソースコードは、ここからダウンロードできます: bitbucket.org/wickiup/spring-boot-proto3
スプリングブートのクイックスタート: projects.spring.io/spring-boot
proto3のクイックスタート: developers.google.com/protocol-buffers/docs/javatutorial