この記事では、XMLの代わりにJava Config(アノテーションとクラスを使用してSpringアプリケーションのコンテキストを構成するアプローチ)を使用して、Spring Securityで保護されたアプリケーションを作成します。
使用技術
- Spring 4.0.5リリース
- Spring Boot 1.0.1
- Spring Security 3.2.3リリース
- メイヴン
- Tomcat 8
- サーブレットAPI 3.1
- Java 1.8
これは、Spring MVCとSpring Securityに基づいた非常にシンプルなWebアプリケーションであるHello Worldになります。 すべての設定は、Javaクラスのみを使用して行い、XMLの1行の構成は行いません。
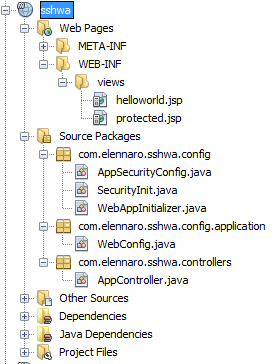
プロジェクト構造を見てみましょう。
プロジェクト構造。
Maven依存関係(pom.xmlから)
<dependencies> <dependency> <groupId>javax.servlet</groupId> <artifactId>javax.servlet-api</artifactId> <version>3.1.0</version> <scope>provided</scope> </dependency> <dependency> <groupId>javax.servlet.jsp</groupId> <artifactId>jsp-api</artifactId> <version>2.2</version> <scope>provided</scope> </dependency> <dependency> <groupId>org.springframework</groupId> <artifactId>spring-context</artifactId> <version>4.0.5.RELEASE</version> <type>jar</type> </dependency> <dependency> <groupId>org.springframework</groupId> <artifactId>spring-webmvc</artifactId> <version>4.0.5.RELEASE</version> <type>jar</type> </dependency> <!-- Add Spring Security --> <dependency> <groupId>org.springframework.security</groupId> <artifactId>spring-security-core</artifactId> <version>3.2.4.RELEASE</version> </dependency> <dependency> <groupId>org.springframework.security</groupId> <artifactId>spring-security-web</artifactId> <version>3.2.4.RELEASE</version> </dependency> <dependency> <groupId>org.springframework.security</groupId> <artifactId>spring-security-config</artifactId> <version>3.2.4.RELEASE</version> </dependency> <!-- Add Jstl Dependencies --> <dependency> <groupId>org.apache.taglibs</groupId> <artifactId>taglibs-standard-jstlel</artifactId> <version>1.2.1</version> </dependency> </dependencies>
次に、Spring MVCコントローラーのセットアップについて見ていきます。
コントローラー( AppController.java
)
package com.elennaro.sshwa.controllers; //Import section ommited... @Controller public class AppController { @RequestMapping(value = {"/", "/helloworld**"}, method = {RequestMethod.GET}) public ModelAndView welcomePage() { ModelAndView model = new ModelAndView(); model.addObject("title", "Spring Security Tutorial"); model.addObject("message", "Welcome Page !"); model.setViewName("helloworld"); return model; } @RequestMapping(value = "/protected**", method = RequestMethod.GET) public ModelAndView protectedPage() { ModelAndView model = new ModelAndView(); model.addObject("title", "Spring Security 3.2.4 Hello World Tutorial"); model.addObject("message", "This is protected page - Only for Admin Users!"); model.setViewName("protected"); return model; } @RequestMapping(value = "/confidential**", method = RequestMethod.GET) public ModelAndView adminPage() { ModelAndView model = new ModelAndView(); model.addObject("title", "Spring Security 3.2.4 Hello World Tutorial"); model.addObject("message", "This is confidential page - Need Super Admin Role!"); model.setViewName("protected"); return model; } }
コントローラーには、保護されていないリソースが1つと、リソースへの2つのパスがあり、管理者(admin)とスーパー管理者(superadmin)の役割によってアクセスが制限されます。 これらのリソースへのパスは次のとおりです。
- / hellowordにはパブリックアクセスがあり、セキュリティ制限は適用されません。
- /アクセスが制限された保護領域。管理者ロール(admin)を持つユーザーのみがアクセスできます。
- /機密の制限区域、スーパー管理者の役割を持つユーザーのみがアクセスできます。
各メソッドで、 Model (
ModelAndView
クラスのインスタンス)を作成して返します。 ビューコンポーネントの名前もモデルに示されています。 ビューのコンポーネントの名前を(許可を得て、一般的にビューのコンポーネントを英語ビューから呼び出す)特定の表示ファイル(この場合はJSPファイル)にバインドするには、
WebConfig.java
設定でクラスを登録する必要があります。 クラスの説明を以下に示します。
Spring MVC(WebConfig.java)の構成
Springフレームワークに、プレゼンテーションコンポーネントの場所と表示方法を伝える必要があります。 セキュリティ設定もバインドする必要があります。 これはすべて、
@Configuration
注釈付きのJavaクラスを使用して実行できます(将来、このようなクラス構成と呼びます)。
Webconfig.java
package com.elennaro.sshwa.config.application; //Import section ommited... @Configuration @EnableWebMvc @ComponentScan({ "com.elennaro.sshwa.config", "com.elennaro.sshwa.controllers" }) //@Import({ AppSecurityConfig.class }) public class WebConfig { @Bean public InternalResourceViewResolver viewResolver() { InternalResourceViewResolver viewResolver = new InternalResourceViewResolver(); viewResolver.setViewClass(JstlView.class); viewResolver.setPrefix("/WEB-INF/views/"); viewResolver.setSuffix(".jsp"); return viewResolver; } }
上記のコードを簡単に確認しましょう。
- 構成クラスを宣言します(
@Configuration
アノテーションを使用)。 -
@ComponentScan
注釈を使用して、com.elennaro.sshwa.config
およびcom.elennaro.sshwa.controllers
内のコンポーネントを検索するようにSpringフレームワークにcom.elennaro.sshwa.controllers
。 ここで専門家はアドバイスします:*
で一度にすべてではなく、特定のパッケージを常に指定する方が良いです。 つまり、com.elennaro.sshwa.*
すべてのパッケージを指定できますcom.elennaro.sshwa.*
そして、すべてが機能します。 しかし、同じ@ComponentScan
を使用して別の場所に現れた場合、せいぜいすべてのパケットを2回スキャンし、最悪の場合、いくつかの不快なエラーが発生します... - ビューがディレクトリ
/WEB-INF/views/
あることを指定し/WEB-INF/views/
- セキュリティ設定を含むクラス、Spring Securityコンフィギュレータ自体をインポートします(
@Import({ AppSecurityConfig.class }))
アノテーション@Import({ AppSecurityConfig.class }))
。 この行は、コード内で特別にコメント化されています。 AppSecurityConfigクラスを含むパッケージパスが@ComponentScan
アノテーションで指定されているため、セキュリティ設定(AppSecurityConfig.java
)が@Configuration
アノテーションでマークされたクラス(AppSecurityConfig.java
)がアプリケーションのベースアプリケーションコンテキストSpringによって自動的に検出および接続されることを示したいと思いました。 これにより、Springは構成クラスを自動的に検索して接続します。 -
AppController.java
コントローラー自体もコンポーネントをスキャンします。これを含むパッケージへのパスは@ComponentScan({ "com.elennaro.sshwa.config", "com.elennaro.sshwa.controllers" })
およびアノテーション@Controller
このクラスには@Controller
が指定されています。
次に、Spring Securityのセキュリティ設定を直接見ていきます。
セキュリティ設定(Spring Security-AppSecurityConfig.java、SecurityInit.java)
AppSecurityConfig.java
package com.elennaro.sshwa.config; //Import section ommited... @Configuration @EnableWebSecurity public class AppSecurityConfig extends WebSecurityConfigurerAdapter { @Autowired public void configureGlobal(AuthenticationManagerBuilder auth) throws Exception { auth.inMemoryAuthentication().withUser("user").password("user").roles("USER"); auth.inMemoryAuthentication().withUser("admin").password("admin").roles("ADMIN"); auth.inMemoryAuthentication().withUser("superadmin").password("superadmin").roles("SUPERADMIN"); } @Override protected void configure(HttpSecurity http) throws Exception { http.authorizeRequests() .antMatchers("/protected/**").access("hasRole('ROLE_ADMIN')") .antMatchers("/confidential/**").access("hasRole('ROLE_SUPERADMIN')") .and().formLogin().defaultSuccessUrl("/", false); } }
構成で最も重要な役割は、クラス注釈によって果たされます。
-
@Configuration
-
@EnableWebSecurity.
@EnableWebSecurity
、
WebSecurityConfigurerAdapter
クラスと連携して、認証を提供するために機能します。 デフォルトでは、Spring Securityには組み込みのアクティブなHTTP認証とWebフォーム認証があります。
さらに、ここではユーザーにロールを割り当て、アクセスが制限されているリソースのアドレスを指定します。制限はロールによって設定されます。 ユーザーの名前とパスワードは、簡単にするために、コードに直接示されています。 Spring Securityを使用すると、データベースなどのユーザーデータに別のソースを簡単に指定できます。 ユーザーにロールを割り当てる場所のロールは
ROLE_
プレフィックスなしで記述されますが、
access
方法では、 SPEL (Spring Expression Language)式言語を使用してリソース検証式(この場合は式)を指定します。ユーザーロール
hasRole('ROLE_ ')
)、ロールにプレフィックス
ROLE_
ます。 もう1つの認証の小さなトリック:
defaultSuccessUrl("/", false)
、2番目のパラメーター(
alwaysUse
)を
false
に設定すると、認証が成功した場合にユーザーを認証ページにアクセスしたページにリダイレクトできることがSpring Securityに
alwaysUse
されます。
これで、 AppSecurityConfig.javaにセキュリティ設定があり、 WebConfig.java MVC設定にあります。 セキュリティ設定がアプリケーションのメインコンテキストに含まれていることを確認する必要があります(つまり、これらは表示され、ルートアプリケーションコンテキストに取り込まれました)。 これを行うには、拡張(継承)クラスAbstractAnnotationConfigDispatcherServletInitializerを作成します。 特定のURLパターン(特定のリソースへのパス)がセキュリティレベルを通過するようにすべてを構成する必要があります(Spring Securityフィルターによってチェックされます)。 従来のアプローチは、セキュリティ資格情報を検証するサーブレットフィルターを構成することでした。 Setvlet 3.xの出現により、web.xmlでフィルターを宣言する必要がなくなり、すべての構成はJavaクラスを使用して実行できます。 そのためには、
AbstractAnnotationConfigDispatcherServletInitializer
が必要です。
SecurityInit.java
package com.elennaro.sshwa.config; //Import section ommited... public class SecurityInit extends AbstractSecurityWebApplicationInitializer { }
XML設定に精通している人にとって、上記のコードは次のようになります。
<filter> <filter-name>springSecurityFilterChain</filter-name> <filter-class> org.springframework.web.filter.DelegatingFilterProxy </filter-class> </filter> <filter-mapping> <filter-name>springSecurityFilterChain</filter-name> <url-pattern>/*</url-pattern> <dispatcher>ERROR</dispatcher> <dispatcher>REQUEST</dispatcher> </filter-mapping>
MVCとSpring Securityの構成が完了しました。 Spring MVCの初期化とURLパターンのマッピングを担当するServlet Managerを構成することは残っています。 繰り返しますが、web.xmlを介してサーブレットマネージャーの従来の構成を放棄し、Javaクラスを使用します。
サーブレットマネージャーの構成(WebAppInitializer.java)
WebAppInitializer.java
package com.elennaro.sshwa.config; //Import section ommited... public class WebAppInitializer extends AbstractAnnotationConfigDispatcherServletInitializer{ @Override protected Class<?>[] getRootConfigClasses() { return new Class[] {WebConfig.class}; // We dont need any special servlet config yet. } @Override protected Class<?>[] getServletConfigClasses() { return null; } @Override protected String[] getServletMappings() { return new String[] {"/"}; } }
ここでは、サーブレットマッピングを「/」に設定したため、Spring Servlet Managerによってすべてのリクエストがインターセプトされます。
WebAppInitializer.javaクラスはAbstractAnnotationConfigDispatcherservletinitializergetRootConfigClassesを継承し、その
getRootConfigClasses
メソッドを置き換えて、宣言した
WebConfig.class
アプリケーションの設定クラスを返すことに注意してください。
それだけです...ビューを登録し、アプリケーションを実行しようとします。
ビュー(ビュー)
helloworld.jsp
<%@ page language="java" contentType="text/html; charset=UTF-8" pageEncoding="UTF-8"%> <html> <head> <base href="${pageContext.request.scheme}://${pageContext.request.serverName}:${pageContext.request.serverPort}${pageContext.request.contextPath}/" /> <meta http-equiv="Content-Type" content="text/html; charset=UTF-8"> <title>Hello World</title> </head> <body> <header> <h1>Title : ${title}</h1> </header> <section> <h1>Message : ${message}</h1> </section> <div>Get <a href="protected">protected</a> resource for admin.</div> <div>Get <a href="confidential">confidential</a> resource for superadmin.</div> <footer> <div>Updated by Alex Art from <a href="https://in2circle.com" target="_blank">in2circle.com</a></div> </footer> </body> </html>
protected.jsp
<%@ page isELIgnored="false" %> <%@ page language="java" contentType="text/html; charset=UTF-8" pageEncoding="UTF-8"%> <%@ taglib prefix="c" uri="http://java.sun.com/jsp/jstl/core" %> <html> <head> <base href="${pageContext.request.scheme}://${pageContext.request.serverName}:${pageContext.request.serverPort}${pageContext.request.contextPath}/" /> <meta http-equiv="Content-Type" content="text/html; charset=UTF-8"> <title>Protected page</title> </head> <body> <h1>Title : ${title}</h1> <h1>Message : ${message}</h1> <c:if test="${pageContext.request.userPrincipal.name != null}"> <h2>Welcome : ${pageContext.request.userPrincipal.name} <%--@elvariable id="_csrf" type="org.springframework.web.bind.MissingServletRequestParameterException"--%> <c:url var="logoutUrl" value="/logout" /> <form action="${logoutUrl}" id="logout" method="post"> <input type="hidden" name="${_csrf.parameterName}" value="${_csrf.token}" /> <input type="submit" name="submit" value="Log Out"> </form> </c:if> </h2> <div>Get <a href="protected">protected</a> resource for admin.</div> <div>Get <a href="confidential">confidential</a> resource for superadmin.</div> <footer> <div>Updated by Alex Art from <a href="https://in2circle.com" target="_blank">in2circle.com</a></div> </footer> </body> </html>
ここで、ログアウトURLへのリンクが
logout
あり、デフォルトでリクエストのログアウトタイプがPOSTであり、ログアウトリクエストにcsrfトークンが含まれている必要があることが明確にわかります。
Spring Securityはログインページ自体を生成します。
フィニッシュライン。
アプリケーションの起動: http:// localhost:8080 / sshwa / helloworld /
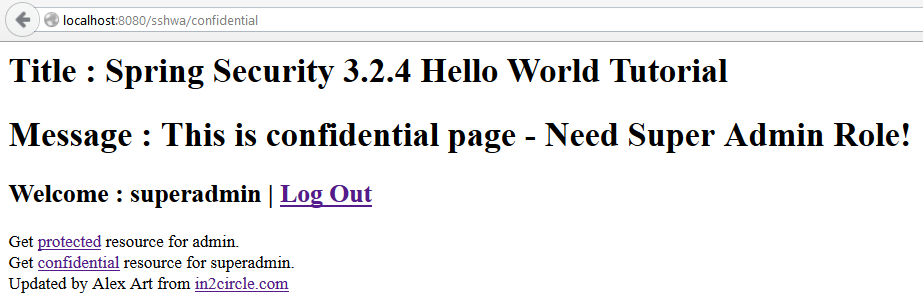
リソース/ helloworldを保護しないようにしたかった
URLをhttpに変更すると、 // localhost:8080 / sshwa / protected / Spring Securityはデフォルトの認証フォームで/ loginにリダイレクトします。 間違ったユーザー名またはパスワードを入力すると、エラーメッセージが表示され、SpringはURL / login?エラーにリダイレクトします。
権限のないユーザーの場合、Springは最初にルート( "/")に移動し、次に間違ったロールでリソースにアクセスしようとすると、 403コードのページが表示されます。
完全なアプリケーションコードは次の場所にあります。
github.com/elennaro/sshwa/tree/0.2-SNAPSHOT
将来、このチュートリアルを徐々に開発する時間があることを願っています(すべてをSpring Bootに移行し、Spring Security 4.0リリースがリリースされたら、テストを強化してください)。
ソースの資料に基づく: javahash.com/spring-security-hello-world-example コードが再設計され、テキストに一見有用なコメントが追加されました。
これは私の最初の資料であり、すべての希望とコメントを考慮に入れようとします。
PSログアウト時にエラーを見つけてくださったdrno-regに感謝します(テキストとソースが更新されました)。