Have we all ever written apps that make life easier. Not to order, but just for yourself. Notebooks, financial accounting programs, a set of cards for learning a foreign language - but do you have any good ideas in your life? And it would be great to have access to this program not only from your computer, but also from a working one! And then share with your friends your wonderful program!
Everything is fine if you, say, a PHP programmer - have cheap and even free sea hosting services.
What if you are a Java programmer? Ready-made Tomcat hosting is not cheap, and if you also have several such programs, then the desire to share them with friends will cost a pretty penny.
What to do?
Google will help us ...
For the following recipe we will need:
- IntelliJ Idea - 1 pc (you can use Eclipse, but at work our team works with Idea, and I’m somehow more familiar with Idea)
- Google Account - say your gmail mail
- Internet access - to download the Cloud Code plugin and upload your application to the cloud
- Name, address, telephone, credit or debit card number. But don’t worry, a penny will not be deducted from this card.
- About 15 minutes time
So let's go!
Launch Idea, select Ctrl-Alt-S> Plugins. Looking for Cloud Code by Google Cloud

Install, rediscover Idea
If you have a new project, then just when creating a project, we select support for Google App Engine Standard (why the standard? Because there is still flexible, but it does not exist for free, and in general it is more expensive).

If the program you have already written, then go to Tools> Cloud Code> App Engine> Add App Engine support> Google App Engine Standard.
Next, we would like to test the application on our computer.
To do this, download and install the Google Cloud SDK . In fact, Idea itself can manage the Google Cloud SDK - download and install the latest version, register all system variables, etc. To do this, in Settings> Other Settings> Cloud Code> Cloud SDK, select "Allow the plugin to manage and install the Cloud SDK". But my choice was to download and install manually.
Then we need to choose what exactly will be poured onto the cloud (or debugged locally). That is, to create an artifact. Go to Ctrl-Alt-Shift-S> Artifacts> +> Web Application Exploded and select which modules will go to our application
Continuing with setting up debugging on localhost.
Add a new Run-Debug Configuration. Template select Google App Engine Standard Local Server. And the only setting that needs to be changed is Artifact to deploy - select the artifact created in the previous step. If the drop-down list is empty, then either you forgot to create an artifact for your application, or its type is not Web Application Exploded, but some other type. You can also change the port. If you have other applications running on 8080, then cloud applications can be debugged, say, on 8888.
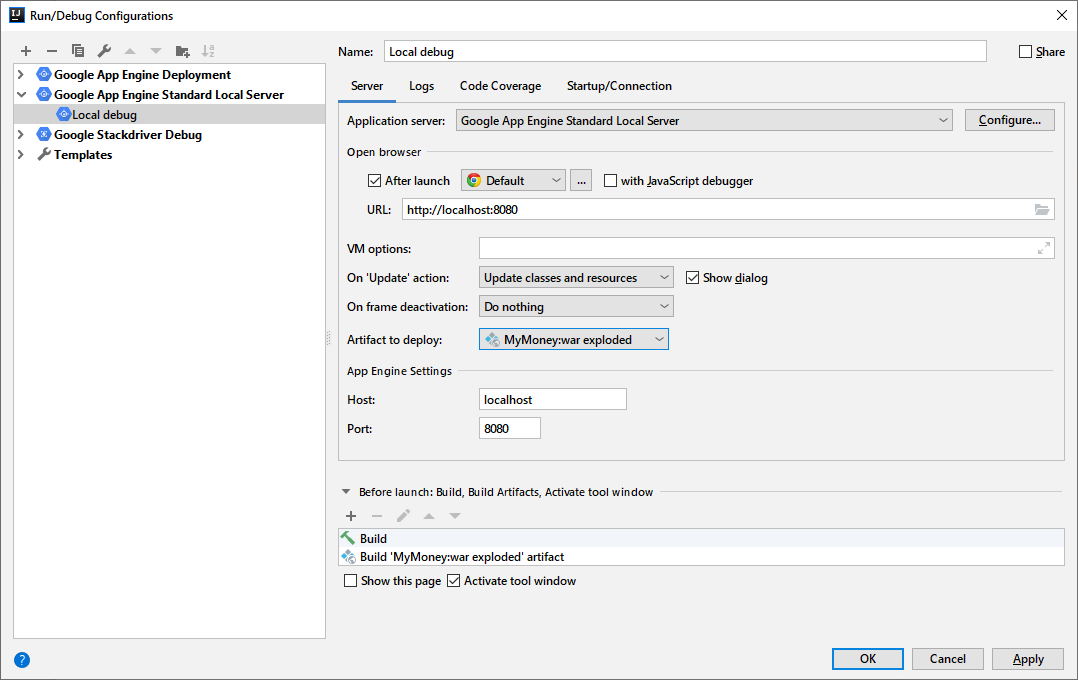
Save, run. The application will appear in your browser at localhost : 8080 (or 8888). If the program stumbles upon a breakpoint, then Idea will activate itself and crawl out over all the other windows.
By the way, breakpoints can be set not only on your Java classes (servlets and other server parts), but also on jsp pages. Then debugging will stop every time the browser requests this page
Fine! Locally, everything works, it's time to upload it to the server!
We go into our Google account, and go to the Google Cloud Console . At the top of the window, a proposal will appear to activate the trial and get $ 300 for using various cloud services. These $ 300 are valid for exactly a year, if you have not used them up for a year (and most likely you will not have used them up. For example, an application with 60 regular active users, each of which has a separate namespace in the DataStore with a dozen tables in each - all this costs about $ 4 per month). So, if you do not use these $ 300, then in a year they will disappear.

When you activate the trial, Google will ask you for all the data - name, address, phone number and credit or debit card number. Moreover, in the information window they assure that they will not remove a penny from the card, unless you yourself manually subscribe to a paid account. They explain this by checking that you are not a robot. In fact, this is done to make it easier for you to subscribe to paid services later. If you decide to buy a service, and here Google asks for a credit card number, you will think three times: “Do I need this service?” And if you already have credit card information, then the purchase is easier - clicked a button, confirmed - and now, you are already signed up!
But this is all the lyrics. Next we need to create a GCP project. A project is not necessarily a separate program. You can distribute hundreds of programs from the same project. A project in GCP is more a direction, a sphere of work. In the picture above, the project is called the API Project
We return to Idea. Go to Run / Debug Configurations again, but this time select the Google App Engine Deployment template. Here the settings are generally at a minimum. You need to select only the artifact in the Deployment line and the project created in the previous step of the GCP. If this is your first time doing this, Idea will ask you to log into your Google account.
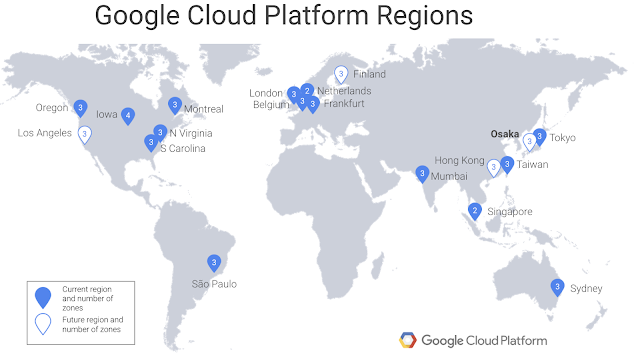
It would seem that all? But no. The fact is that App Engine associates your application with a virtual server. And this server must be located on one or another physical Google server - the so-called zone. In total, Google has 20 regions and 61 zones. It’s usually best to choose the zone closest to your customers - links within a zone open much faster than links between zones
After everything is configured, you can start uploading the application to the server. Formally, we would also need to create an app.yaml file with parameters for App Engine. In fact, the Cloud Tools plugin makes this task easier for us, and generates the standard app.yaml automatically.
When we upload the application to the cloud for the first time, it can take a long time, because Idea uploads all the necessary files to the server. Subsequently, it will only upload modified files, and everything will be a year faster.
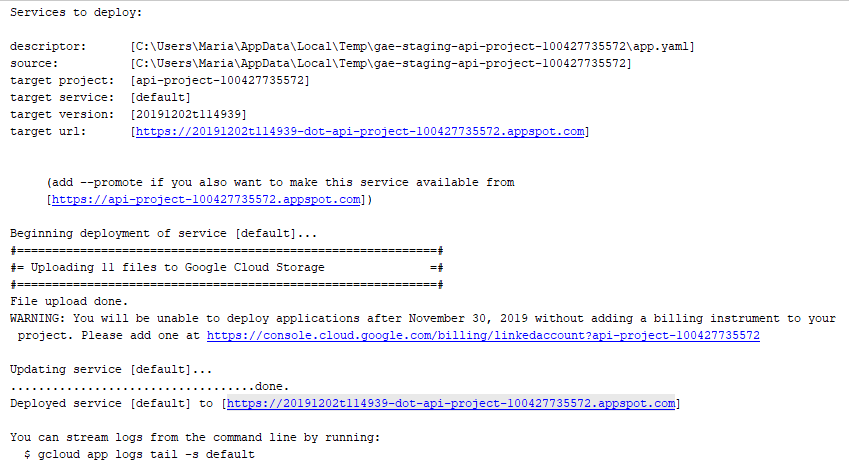
When the whole process is complete, your project will be available to the whole world through an automatically generated link ending in .appspot.com.
Congratulations! You are online!