All posts in the JavaFX series:
- JavaFX Tutorial: Getting Started
- JavaFX Tutorial: Hello world!
- JavaFX Tutorial: FXML and SceneBuilder
- JavaFX Tutorial: Basic Layouts
- JavaFX Tutorial: Advanced Layouts
- JavaFX Tutorial: CSS styling
- JavaFX Weaver: Integrating JavaFX and Spring Boot Applications
JavaFX & Spring
Currently, Java developers rarely work simply with Java. In most projects, they usually use the Spring Framework or Spring Boot. This approach has many advantages, as these projects include many useful features.
However, when you develop JavaFX applications, there is no easy way to integrate it with Spring. Integration does not work out of the box, as JavaFX applications have their own life cycle and provide for the creation of controller instances.
JavaFX-Weaver
JavaFX-Weaver is a Rene Gielen project whose goal is to integrate Spring and JavaFX. The setup, fortunately, is not so complicated.
Let's start
Let's try with the simplest Spring Boot project, and try to integrate JavaFX into it. You can create a new project using the Spring Initializr . You do not need to add any dependencies. If you want to avoid configuring JavaFX as a dependency, select a version earlier than Java 11 because it still contains JavaFX as part of the JDK .
Adding a Controller
We will need a controller and an accompanying .fxml view so that we can check whether our application works correctly with both Spring and JavaFX. Let's create a controller first and leave it blank for now.
public class MyController { }
Adding a View
Now we need a .fxml file that will be used with our controller as a view. Put it in the resource folder. For the integration to work correctly, you must create it in the resources folder, but in the directory structure corresponding to the package in which our controller is located.
For example, suppose our controller is in the package com.vojtechruzicka.javafxweaverexample . The .fxml file must be located here:
src \ main \ resources \ com \ vojtechruzicka \ javafxweaverexample
Let's name our file main-scene.fxml .
Dependencies
If you use regular Spring, the setup is a little different, but for Spring Boot you just need to add the following dependency to your pom.xml file:
<dependency> <groupId>net.rgielen</groupId> <artifactId>javafx-weaver-spring-boot-starter</artifactId> <version>1.3.0</version> </dependency>
Or this if you use Gradle:
implementation 'javafx-weaver-spring-boot-starter: 1.3.0'
Spring Boot Application Class
When we generated our base Spring Boot application, the main application class was also created for us. This class, annotated by @SpringBootApplication , is used as an entry point to run the entire application.
But wait! JavaFX also has its own main application class, which is used as an entry point for running JavaFX applications.
This is confusing. So, which one should be used to run our application, both Spring Boot and JavaFX?
We will still use our @SpringBootApplication with a slight modification. Instead of launching the Spring application directly, we will use it to launch our JavaFX application. The JavaFX application will be responsible for properly launching the Spring application context and integrating everything together using the JavaFX Weaver .
First we need to make sure that the Spring Boot application launches our JavaFX application.
import javafx.application.Application; import org.springframework.boot.autoconfigure.SpringBootApplication; @SpringBootApplication public class SpringBootExampleApplication { public static void main(String[] args) { // This is how normal Spring Boot app would be launched // SpringApplication.run(SpringBootExampleApplication.class, args); // JavaFxApplication doesn't exist yet, // we'll create it in the next step Application.launch(JavaFxApplication.class, args); } }
JavaFX Application Class
Our @SpringBootApplication application now calls the JavaFxApplication class, which does not yet exist. Let's create it.
public class JavaFxApplication extends Application { private ConfigurableApplicationContext applicationContext; @Override public void init() { String[] args = getParameters().getRaw().toArray(new String[0]); this.applicationContext = new SpringApplicationBuilder() .sources(SpringBootExampleApplication.class) .run(args); } }
When JavaFX is initialized, it creates a new configuration-based application context in our SpringBootExampleApplication , the main Spring Boot application class, which we changed in the previous step.
We now have a Spring Boot application working with our new application context. But we need to make sure the context is properly closed when the JavaFX application terminates. For example, when you close the window. Let's do it now.
@Override public void stop() { this.applicationContext.close(); Platform.exit(); }
The last part of the application is creating a new window (Stage) and showing it.
@Override public void start(Stage stage) { FxWeaver fxWeaver = applicationContext.getBean(FxWeaver.class); Parent root = fxWeaver.loadView(MyController.class); Scene scene = new Scene(root); stage.setScene(scene); stage.show(); }
This is where FxWeaver comes into play. We need to get its bean from the application context, and then use it to load our FXML.
Spring Managed Controllers
Traditionally, we would create our scene using FXMLLoader, which would load the FXML file and create the Controller instance declared in it for us.
FXMLLoader loader = new FXMLLoader(); URL xmlUrl = getClass().getResource("/main-scene.fxml"); loader.setLocation(xmlUrl); Parent root = loader.load(); Scene scene = new Scene(root); stage.setScene(scene); stage.show();
So why do we use FX Weaver? The problem is that FXMLLoader creates an instance of the controller for us. This means that it is not created or managed by Spring. Therefore, we cannot use dependency injection and other Spring utilities in our controllers. And that is why we introduced Spring in our JavaFX in the first place!
But when FX Weaver creates a controller for us, it creates it as a Spring-driven component, so we can take full advantage of Spring.
Enable Spring for the controller
The first thing we need to do is annotate the existing JavaFX controller with Component so that Spring recognizes and controls it. Then we need to add the @FxmlView annotation so that it is recognized by FX Weaver.
import net.rgielen.fxweaver.core.FxmlView; import org.springframework.stereotype.Component; @Component @FxmlView("main-stage.fxml") public class MyController { }
Pay attention to the @FxmlView parameter ("main-stage.fxml") . It indicates the name of your .fxml file, which should match the controller. It's not obligatory. If you do not specify it, Fx Weaver will use the controller class name as the file name with the extension .fxml . The FXML file must be in the same package as the controller, but in the resource folder.
Make sure everything works
Now let's make sure everything works and integrates well. Let's run our @SpringBootApplication application with its main method. You should see a simple window with the inscription, nothing special.
Well, that means the application is starting, but we haven’t done anything specific to Spring in our controller. No dependency injection or anything else. Let's try to do it now.
Adding a Service
To make sure that Spring integration works correctly, let's create a new service, managed by Spring. Later we will add it to our controller and will use it there.
import org.springframework.stereotype.Service; @Service public class WeatherService { public String getWeatherForecast() { return "It's gonna snow a lot. Brace yourselves, the winter is coming."; } }
Nothing special, this is a weather forecasting service that is not very dynamic right now, but that will be enough for our example.
Service Implementation
Now let's add our new service to our existing controller. This is a regular Spring, nothing special here.
@Component @FxmlView("main-stage.fxml") public class MyController { private WeatherService weatherService; @Autowired public MyController(WeatherService weatherService) { this.weatherService = weatherService; } }
Download forecast
Now we need to somehow load the data from our service. Let's change our view of FMXL, like this:
- Let's create a button, by clicking on which data from WeatherService is loaded
- Uploaded data is displayed in the label.
<?xml version="1.0" encoding="UTF-8"?> <?import javafx.scene.control.*?> <?import javafx.scene.layout.*?> <VBox xmlns="http://javafx.com/javafx" xmlns:fx="http://javafx.com/fxml" fx:controller="com.vojtechruzicka.javafxweaverexample.MyController" prefHeight="100.0" prefWidth="350.0" spacing="10" alignment="CENTER"> <Label fx:id="weatherLabel"/> <Button onAction="#loadWeatherForecast">Get weather</Button> </VBox>
Pay attention to the identifier $ inline $ fx: id = "weatherLabel" $ inline $ , we will use it to access the specified label in our controller in order to change its text.
onAction = "# loadWeatherForecast" is the method of our controller, which should be called when the button is clicked. We still need to add it to the controller. Let's do that.
Controller logic
The last step is to change our controller so that it responds to pressing buttons in the view, downloads the weather forecast data and sets it for our label.
Therefore, we need a link to the label from our point of view so that we can change its text. We need to choose his name corresponding to $ inline $ fx: id = "weatherLabel" $ inline $ .
@FXML private Label weatherLabel;
Now we need to add a method that is called when the button is clicked - onAction = "# loadWeatherForecast" .
public void loadWeatherForecast(ActionEvent actionEvent) { this.weatherLabel.setText(weatherService.getWeatherForecast()); }
In this method, we take the weather forecast from the service and assign it to the label that we defined earlier.
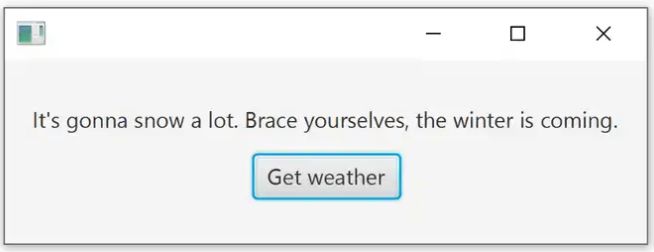
If you run the application now, after clicking the button, it should load the current weather forecast.
Access components from a view
As with regular JavaFX, you can declare components from a view for injection into your controller so that you can interact with them.
@FXML private Label weatherLabel;
We have already seen that everything works well. You just need to be careful with the timing. Our controller is annotated by Component , so this is a regular Spring managed bean. This means that it is created in Spring when the application context starts and all dependencies are implemented. However, weaving by FX Weaver comes later. And during this weave, component references are inserted.
That makes one sense. In your constructor and @PostConstruct, you can already work with the implemented Spring dependencies as usual. However, remember that during this time, references to components from the view are not yet available and therefore are null.
Conclusion
JavaFX Weaver provides a convenient and easy way to integrate Spring with JavaFX applications. Otherwise, this is not so simple, because JavaFX manages its own life cycle and the life cycle of its controllers. JavaFX Weaver makes integration possible and quite simple, so you can finally use all the interesting features of Spring even with JavaFX.