In this article, the leading UI / UX artist Nikita Kandybin and technical UI artist Olga Kinchak will share effective basic practices for optimizing Unity UI that are used by Banzai Games to create game interfaces, as well as point out the pitfalls of various solutions in design and layout . In almost all of the items listed below, you can do without code by setting up the components directly in the editor, and even providing something in advance at the stage of designing interface layouts.
Native Unity UI or, as it is also popularly called, uGUI is a fairly flexible and convenient tool for creating and editing game user interfaces. However, the lack of knowledge, awareness of the specifics of work and the improper use of the capabilities of the game engine sooner or later lead to problems. Be it a low frame rate, high CPU utilization, overheating of the device and other scary words for a project that wants to become (or continue to remain) successful.
For mobile platforms with their hardware limitations, performance and optimization issues become a stumbling block on the road to realizing everything you want. Nevertheless, this is not a reason to abandon Unity UI - the system is good, you just need to learn how to cook it.
Canvas Features
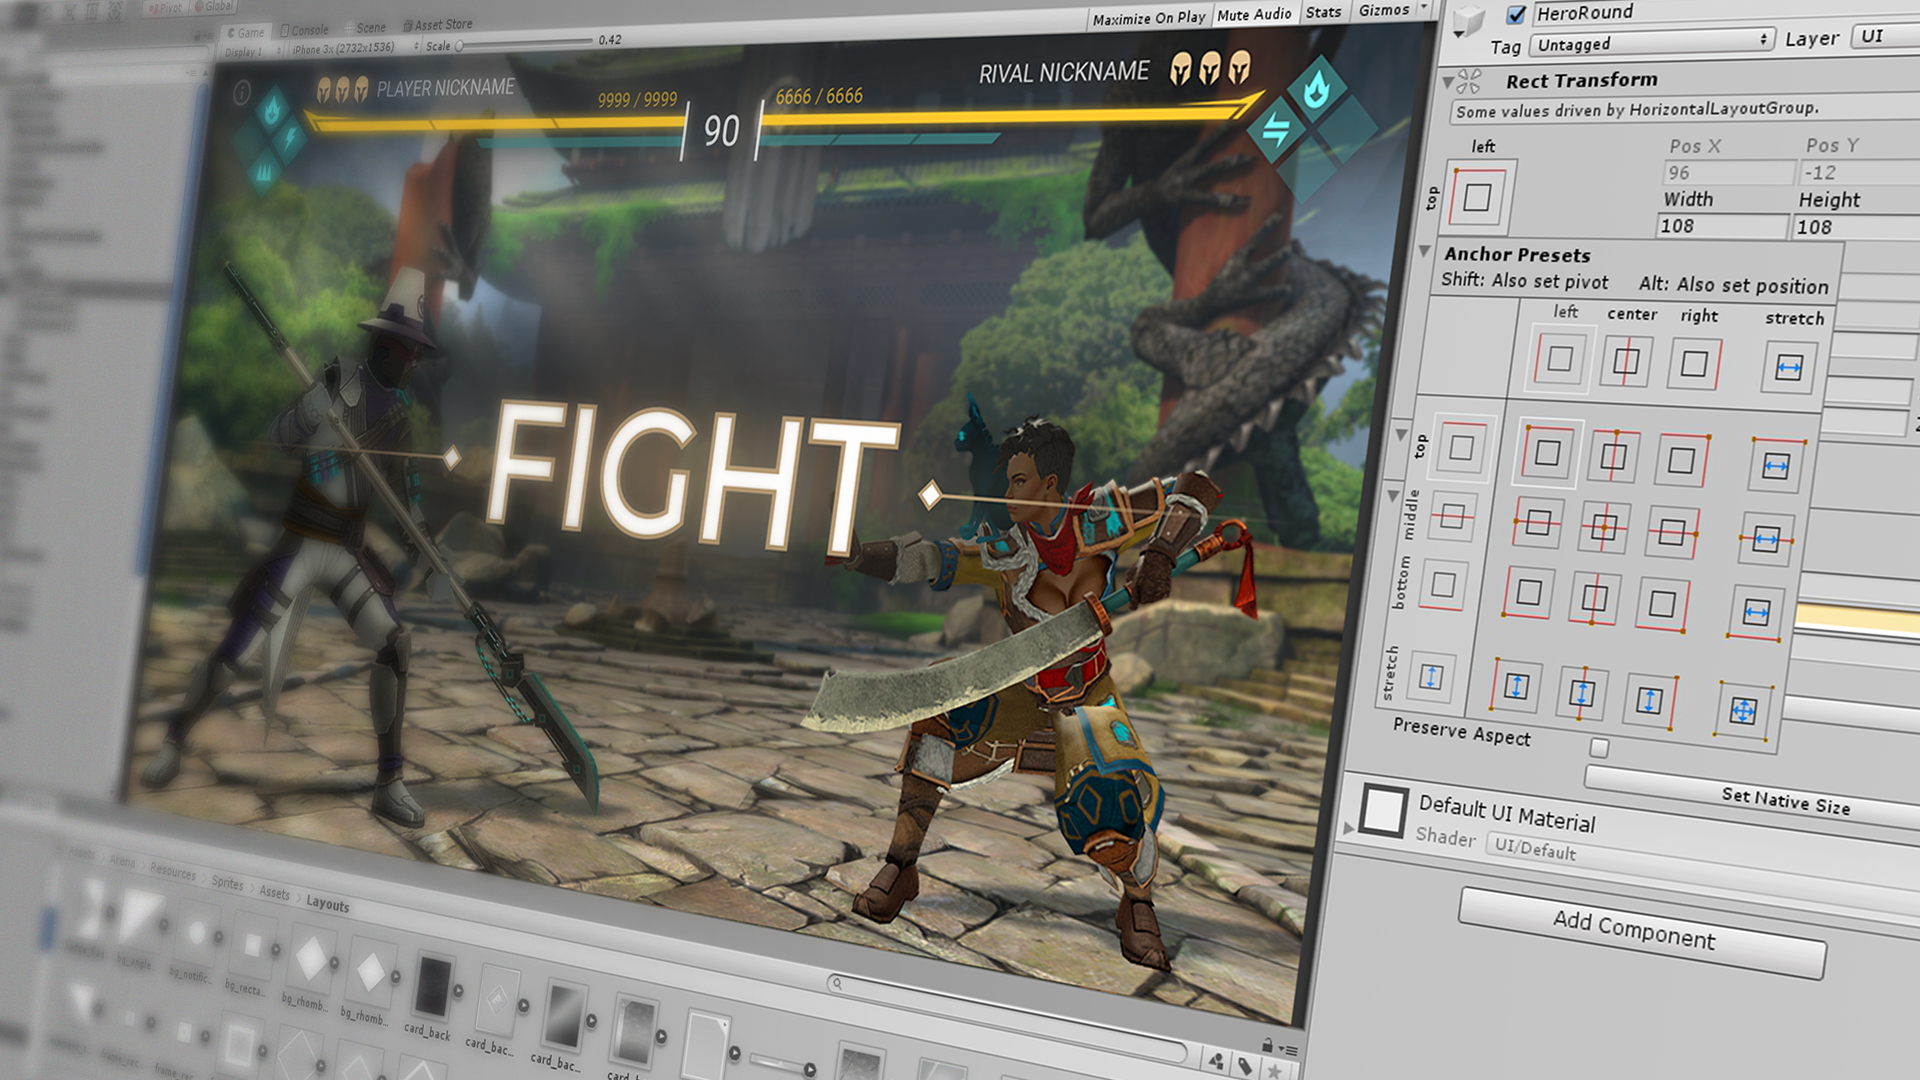
To begin with, let's look a little at how Unity UI is organized. The management of everything related to rendering the user interface in Unity is dealt with by Canvas (hereinafter simply “ canvas ”), which is the parent object for all child interface elements in the scene hierarchy.
Any change in the elements in the canvas, be it color, size, position, material, text, active state, etc. marks these objects as dirty , causing the canvas to redraw them. This process includes the analysis of changes, the reconstruction of the canvas and its further caching until at least one of the child elements is again marked as dirty.
Rebuilding takes place in several stages: calculating the positions of objects in layouts, analyzing the best ways to draw them, using masks, and recalculating the graphics of dirty objects. Canvas generates rendering commands that the Unity engine sends to the GPU and ultimately renders.
Each of these stages is associated with a whole heap of potential optimization problems, which we will try to cover further.
UI Kit for all occasions
In the process of rendering the user interface layouts, the UI Kit of the project is gradually formed - the whole variety of graphic elements (buttons, panels, background images, art, decor, icons, etc.), as well as the rules for their layout. In the future, all these elements will be cut into assets, poured into the engine and become a constructor for the final assembly of the game interface. It is very important to think over in advance what and in what form will fall into Unity and how resource-intensive it will become in the end.
The use of such popular methods as slicing , tiling and coloring in UI design is one of the most effective and common ways to save and reuse project resources repeatedly.
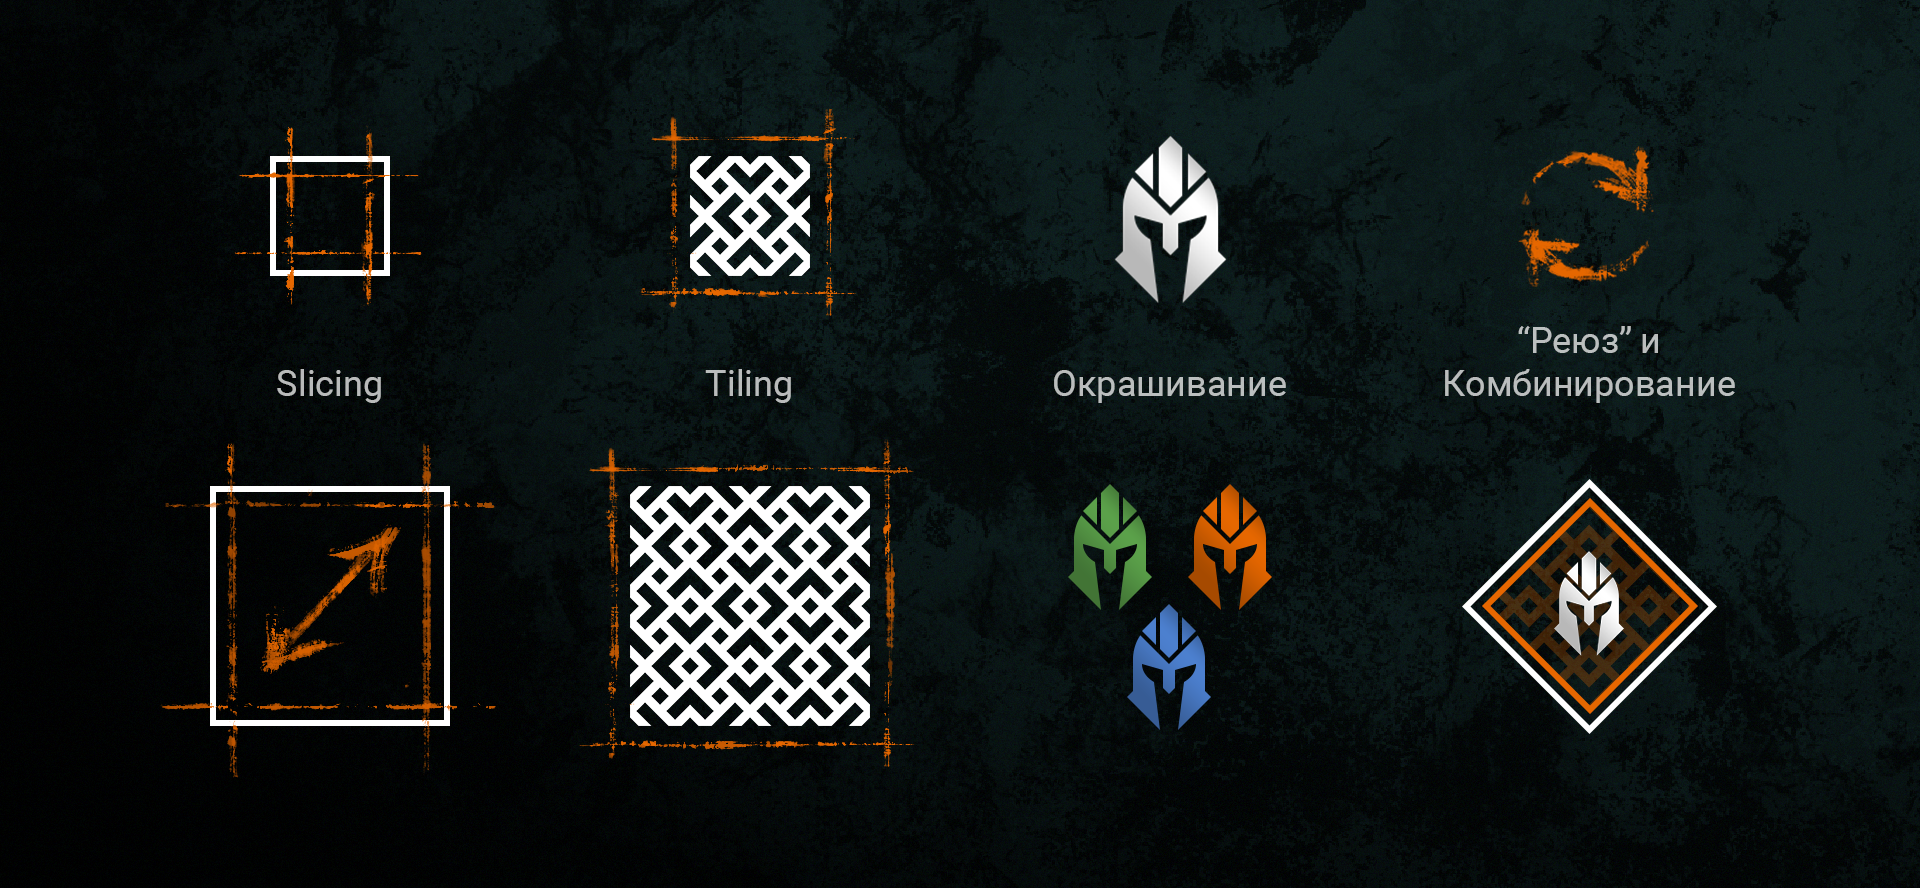
For example, slicing and tiling allow you to store the original graphic in a size much smaller than the interface elements created with its help. The objects remain constant in shape and with proper implementation there are no visible artifacts. These techniques are especially useful for adaptive layout in the zoo of mobile devices, when the interface should aesthetically stretch or contract when changing screen proportions.
In turn, coloring is an excellent complement to them. Instead of saving a line of multi-colored copies, you can tint just one graphic object to get much more variations. In addition, this method makes it possible to programmatically control various color schemes, without the need for the designer to change anything in the source files.
Combining the techniques and the assets drawn by you, nothing prevents you from creating complex interface designs from simple ones, decorating them with universal decorative elements and thereby maximally efficiently using ready-made resources. However, this approach has its own nuances.
Overdraw
And in this case, the nuances are the specifics of the pipeline rendering interface in Unity and the concept of overdraw. If it is very short, then overdraw is a term denoting a situation in which the same pixel is redrawn several times (i.e., extra work is done to fill it).
The fact is that all the interface elements in the Unity scene are drawn in Transparent in turn, from the farthest to the closest, mixing their colors with transparency - by default, considering them transparent, even if they are not. And this means that absolutely all active graphic objects in the hierarchy will be rendered, regardless of whether they are visually blocked by others or not. At the same time, a large number of overlapping elements can lead to an extremely high number of redraws of pixels, the colors of which need to be mixed, a decrease in their fill rate (fill rate) and, as a result, performance problems.
Using the “Overdraw” display mode of the same name in the Unity editor, it is quite convenient to monitor such bottlenecks and literally see redrawing in the scene. This optimization may seem rather insignificant at first glance, but when there are a lot of objects on the screen (and there are VERY many in complex interfaces) and they all begin to overlap, even such trifles can give a significant increase in performance.
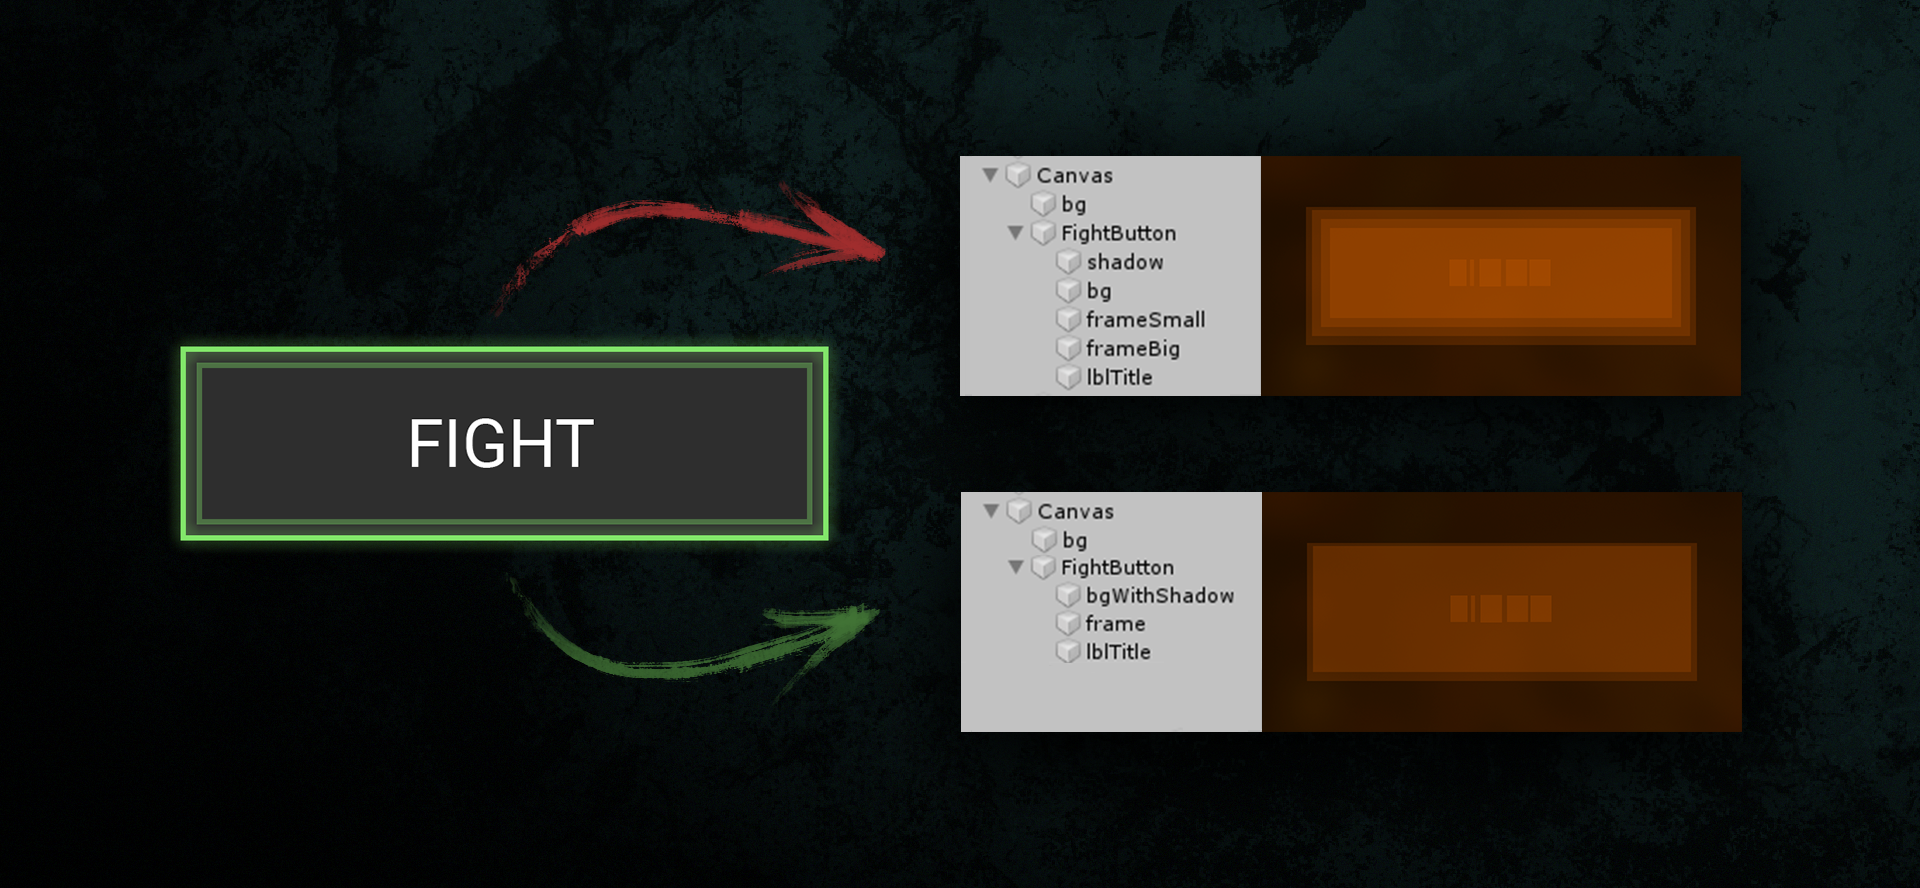
In the lower embodiment, the FIGHT button has a shadow, a substrate and a frame merged into one texture, in contrast to the upper one, where each of these layers is a separate sprite. Identical visual result - different Overdraw.
Therefore, in the process of creating an interface design, it is important to understand and remember that for solving problems with overdraw, by far the best way out is to create assets that combine as many decorative elements as possible in one texture. It is important to be able to balance in your visual decisions. Indeed, the complete invariance of their application and the increase in the size of texture atlases of the project can become a drawback of such combined textures.
Draw Calls and using atlases
All this variety of graphic elements that make up the game interface, the engine needs to be somehow assembled and transferred to the GPU. To draw an object in the scene, the draw call method is called and the data about it is passed to the GPU. The more such calls are sent in one frame, the longer the process of rendering the image takes, which leads to the risk of reducing the frame rate (FPS).
One of the most effective ways to reduce the number of calls to the rendering method is to use texture atlases - packing your textures into a single, larger one. The fact is that Unity tries to automatically combine (“ batch ”) the graphics into one draw call that meets certain criteria, thereby speeding up frame rendering. In our case, the most important thing here is that only objects that use the same materials and the common component of the renderer can get caught (Canvas Renderer - default renderer for the entire UI graphics). Thus, if the interface elements in the scene use standard UI material, then by combining their graphics in one common texture atlas, we can get the very desired one draw call to render the entire group.

However, there are some points. As mentioned earlier, objects in the frame are drawn from the farthest to the closest, that is, from the top to the bottom in the scene hierarchy. If the Rect Transform of one graphic object intersects at least a little with the other, both will be considered overlapping. Moreover, if in the scene between objects that could fit into one draw call, an object accidentally wedges with other material, then it will interrupt the union.
For example, text is one of the main reasons for additional rendering calls, as it has a material different from any other graphics and will always mercilessly interrupt the batching. Moreover, the sizes of text meshes and containers often occupy a much larger area than the character design itself, which is very easy to overlook. Therefore, it is extremely important to monitor the order of rendering motley objects, their layering and hierarchy inside the elements in the scene.
Render frame. Objects on the screen appear sequentially in a hierarchy, but unevenly due to the use of different materials and the interruption of batching.
The advantages in using texture atlases include the fact that they allow the engine to compress assets of arbitrary sizes, thereby reducing their total weight when stored in memory. The fact is that most compression algorithms require that the texture size be a multiple of a power of two (for example, 128x128, 256x256, 512x512, etc.). Atlases, which are by default such, take all the questions of compression upon themselves, eliminating the need to adjust the entire source graphics of your interface to the above criterion.
Also, when creating atlases, it is very important to be guided not only by the desire to conveniently “store” assets, but do it competently, efficiently, given the logic of the appearance of certain elements in the interface of your game. Even if only one tiny icon with a size of 16x16 pixels, packed in an atlas, is displayed on the screen, it will pull all its texture in 4K along the device’s memory. Even at the design stage, it is possible to figure out which elements will become unique and for which screens, and which will be a pass-through constructor for the game interface.
Using masks
Masks are a tool often used in user interface design. However, when using it, it is very important to consider the influence of masks on both overdraw and batching.
Unity offers us two different out of the box components to choose from: Mask and Rect Mask 2D . When using any of them, a graph that crawls outside the mask will still affect the overall fill rate, although it does not appear on the screen. Therefore, try to avoid situations in which only a small area of a large graphic object is cut out with a mask to achieve the desired result. Perhaps in some places it is better not to skimp on assets and save this piece as a separate picture.
As for the effect on draw calls, here our components are different. Both masks interrupt the batches between masked objects and their unmasked neighbors, but for different reasons. Mask uses a stencil buffer (template buffer), creating a different material in runtime for all its children. Because of this material, they will not fiddle with other elements in the scene, but they will still be able to mess with each other and even with other similarly disguised objects under a different Mask.
Rect Mask 2D material does not change, stencil does not use and additional overdraw from the graphics of the mask does not add, which makes it more productive in comparison. Nevertheless, the use of this component still breaks the batching, and, unlike Mask, interface elements under different Rect Mask 2D will no longer batch with each other.
Another limitation of native masks is their inability to work with a smooth change in the alpha channel. Unfortunately, at the moment, none of the above components can achieve the effect of a soft mask (soft mask), supporting gradients and translucency. For the desired result, you will have to turn to third-party solutions or try to implement them yourself.
In the Asset Store, you can find plugins that add the functionality of soft masks to the editor. Having such a tool at hand, he immediately finds widespread application in design - scrolling, animations, visual effects, decor, etc.
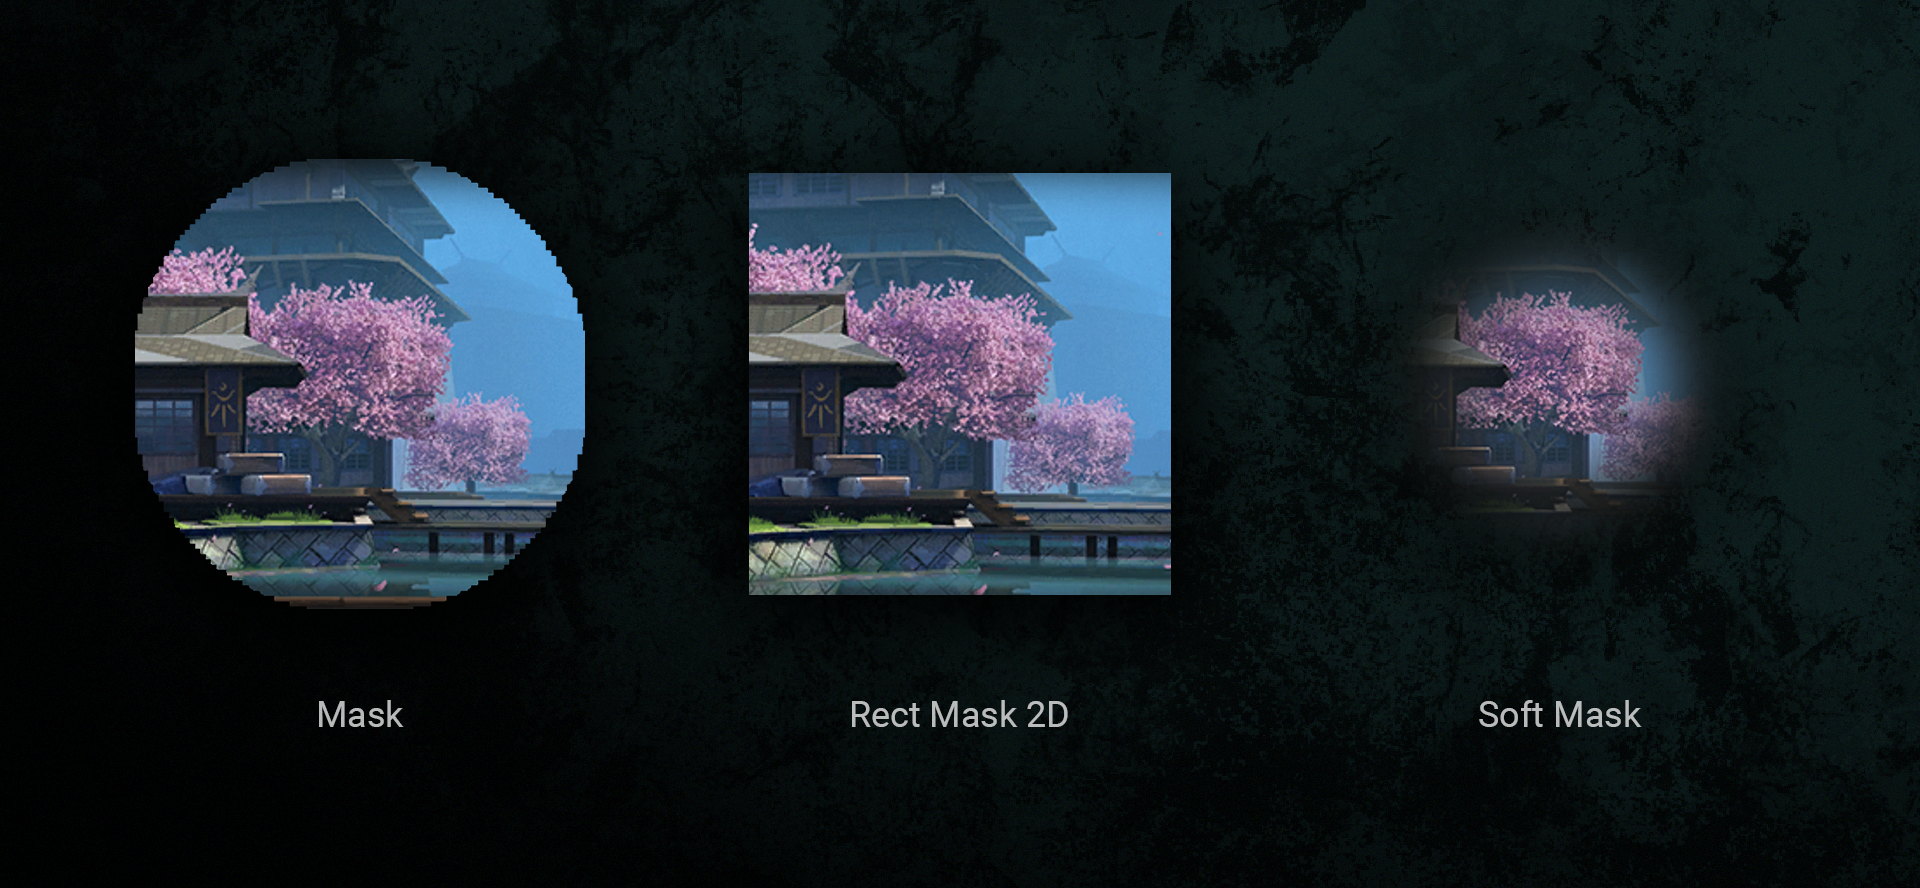
All three options mask the picture using one common source sprite.
However, do not deceive yourself much. Using soft masks is a pretty heavy feature, albeit a nice one, especially for mobile devices. So, for example, opening a large list of UI elements under such a mask on the whole screen with beautiful soft edges, at least, is guaranteed to cause an unpleasant frieze of the game. In such a situation, the solution for our team was to minimize the use of soft masks (where necessary), look for workarounds in the form of overlapping gradients (where possible), or split the addition of elements to the list by several frames to smear the performance drawdown from initialization soft masks.
Work with text
Under each text character, the native UI Text creates a separate quad, which means it is quite natural that the more text in the interface, the more geometry there is in the scene. In this case, when you make any changes to the text values, re-enable its components or the parent object, all this geometry will be rebuilt.
By default, all fonts that are added to Unity are marked as dynamic. With all the convenience, their use has a price. The dynamic font atlas is generated in runtime and is filled only with the symbols currently used in the text components of the scene. A separate atlas is created for each font, taking into account all the sizes of text characters encountered in the scene. Each appearance of a new character in the interface initiates updating and rebuilding of the font atlas, which sometimes can negatively affect performance.
Moreover, if there is already no free space in the current atlas for new text glyphs, Unity will rebuild it again, removing the characters that are not currently in use. And if this does not help, then it increases its size.
If the game does not use a huge number of characters, their set is predefined, then instead of dynamic fonts, it is much better to use static ones. In the font settings in the editor, you can pre-generate an atlas that will contain only the characters necessary for the project and will not change dynamically, bypassing all the costs mentioned in the previous paragraph.
Special mention deserves the Best Fit function, which allows you to automatically change the font size if the text does not fit into your Rect Transform. Unity employees themselves in official tutorials recall it with horror and do not recommend using it - everything is so bad, not optimized and quickly overloads the font atlas. Try to foresee the maximum possible sizes of text containers and make sure that everything fits everywhere, leaving a margin for all the intrigues of localization.
An alternative to UI Text can be a third-party TextMesh Pro , which uses only static fonts, and its Best Fit works much better and more economically. However, the minus of working with this component may be that for each localization and text style you will have to create your own separate set of font assets. Here everyone decides for himself what is closer to him and how convenient.
Bluer
Blur images ( blues ) for many years as user interface designers like and use in their work, but in Unity UI there is simply no ready-made optimized implementation for it.
A large number of real-time bluers, allowing you to stay dynamic, in Unity is a guaranteed way to kill performance in a mobile game. Its static version is much easier to carry - a screenshot is created, blurred into the required number of passes and is used in the future as a texture. There are many third-party assets that allow you to implement both approaches. However, if the use of real-time bluer for the interface is nevertheless justified and critical, try to carefully monitor at least to ensure that the materials of the bluer flutter together if there are several areas with blur on the screen.
Layout Group
Layout Groups is an extremely convenient tool in Unity UI that helps you automatically arrange an arbitrary number of elements with a given orientation, alignment and indentation. However, use it with caution. Sorting, searching for groups and calculating the positions of elements when redrawing the atlas is quite a costly affair, especially if there are Layout groups in the scene, and even more so if they are nested inside each other. Try, wherever possible, to do the competent use of anchors and pivots to transform UI elements, preferring them to Layout groups.

Raycast target
Jackdaw Raycast Target on the graphic components of the UI elements means that the latter can catch clicks from a user mouse or tapas on touch screens. The editor creates this checkbox by default for a newly created object with Image or Text components. In order to determine which object has been caught by the user, Graphic Raycaster, which processes input events in Unity UI, goes through the entire list of elements in the hierarchy marked as Raycast Target and sorts their order, calculating the intersections and overlapping of some objects with others .
If you leave the daw on only to those objects that really need it (for example, buttons), you can significantly reduce the list for crawling and sorting, thereby speeding up the useful work of the engine.

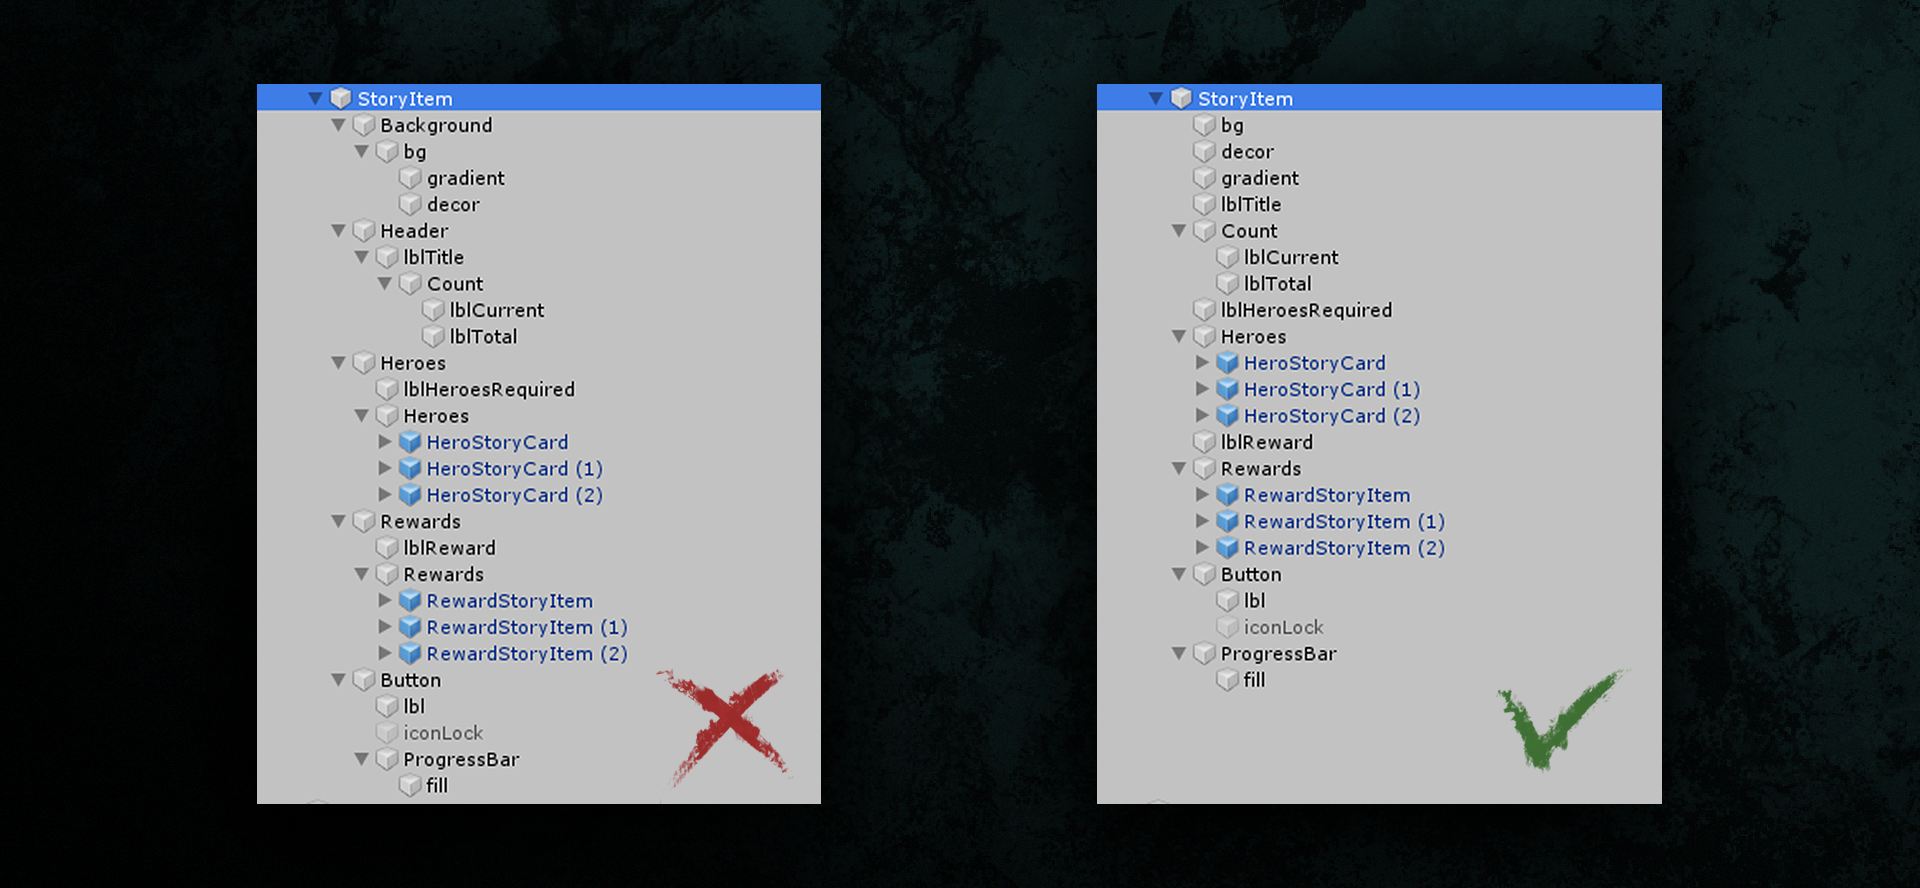
Hierarchy. The simpler - the easier
Both the Layout of the group and Graphic Raycaster continuously travel through the hierarchy tree of the scene, from the deepest children to the root, in the process of searching for various components.
The essence of optimizing this process is to try to shorten this path - to keep the hierarchy as flat as possible, avoiding investments, when you can do without them. Creating folder objects for the management of other interface elements is possible and more convenient for perception, but you should not abuse them in order not to complicate the hierarchy structure.
Canvas Separation
At the very beginning of the article, we already found out that canvas strives to be rebuilt on any sneeze from its child objects. To prevent all interface elements from participating in this process at all, some of them can be rendered into sub-canvas . Such canvas will be rebuilt independently, independently of others, thereby not polluting them in any way. The best way to use this is to sort the user interface elements into static and dynamic. For example, if you have an inventory window with a scroll of objects, placed in a separate canvas, the scroll will be rebuilt independently, without disturbing once again the static background elements.
It would seem that here it is - the solution to all the problems with unnecessary rebuilding. But everything has its own “buts.” Controlling a large number of canvas can become trite uncomfortable. It is also very important to remember that elements belonging to different canvas are guaranteed to not batter with each other. Therefore, when making structural decisions, it is better to use the separation of interface elements into different canvases carefully and be sure to check in the Profiler whether this approach can really give a noticeable increase in performance.
In our projects, only elements for the background image, which is common to most screens in the game interface and most often static, are taken out into a separate canvas.
And so we took all this into account, worked on the bugs and got a more or less optimized static interface. It's time to add movement to it, but even here you can easily break firewood.
Particle system

Anyone who has ever tried to add a Particle System to the interface knows very well that this is how to mix liquids of different densities - one will certainly be displayed on top of the other, as you don’t spin.
Standard particles in Unity do not take into account the sorting of objects in canvas and are not able to work with masks. Therefore, third-party components from the Asset Store come to the rescue, which solve the above issues, but at the same time often increase the resource cost of the particle system. Therefore, the performance requirements for particles in the user interface are much more stringent than, say, in locations or for characters. In addition, a large number of large particles stacked on top of each other can significantly increase overdraw.
It also happens that simple shaders (for example, with scroll or texture distortion), which are a more economical and optimized solution in the issue of redrawing, can even become an alternative to a particle system to achieve certain visual effects.
Animation
Consider a common situation. It is necessary to animate the button and all its states - Unity kindly offers us an Animation Controller (hereinafter simply referred to as the “animator” ) with a basic soup set of animations for different states, which remains only to be edited, and even without the need to run runtime to check the result. Conveniently? Very comfortably. And again an insidious default trap. After all, every frame the animator will redraw this object, marking it as dirty, even if no animation is currently playing on the screen at all.
Therefore, for cases when the animated interface elements visually remain static most of the time, it is better not to use the native animator. A replacement for him in this matter can serve as a system of tween-animations . For example, using the free DOTween plugin. However, to increase productivity, you will have to pay by the need to write animations in the form of scripts already without a convenient visual timeline, like the animator from the Unity box.
An example of animating an arbitrary interface element ...

... and how this animation can be implemented using completely different approaches.
Until we parted
This, perhaps, dwell. The topic is really very extensive - we touched only on issues that lie on the surface and do not require code intervention ... But, as you know, there is no limit to perfection.
Optimization is always about choice, about finding a balance between different, and sometimes even conflicting, decisions. Do not go to extremes with any of its methods without preliminary analysis and confidence that your actions are guaranteed to lead to a positive result.
No need to immediately squeeze and make a highly optimized gray square on a gray background, refusing the game in a “tasty” interface. Nevertheless, each time digging deeper, you have the opportunity to avoid an increasing number of problems at the start. Situations vary from project to project, from goal to goal, but the general principles always remain the same.
The guys at Unity, of course, don't sit back either. The official Unity Learn guides are replenished with good articles about optimizing the UI, and new versions of the engine are slowly, but correct the problems of the old ones. Judging by the latest announcements, Unity is already preparing a completely new unified tool for editing user interfaces - at first glance, very much like CSS for web development. The new system promises to completely rework interface rendering and significantly improve performance. Well, let's see what happens in the end. In the meantime, we are working with what we have.
Read / watch / listen:
Unity Learn Guide
Blog User Tips
How Batching Works
Optimization lecture (about UI - in the second half)
Who cares - the new Unity UI editor
Follow Banzai Games on social networks: Facebook , Vkontakte , Instagram , LinkedIn
The Banzai Games team requires Senior Unity Developer. Read more about the vacancy here .