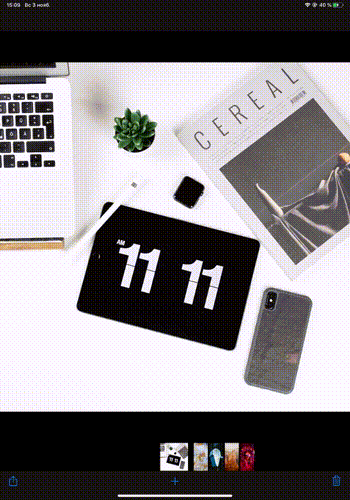
It is enough for the developer to call a couple of methods - and here in his application a camera is already available that automatically scans documents. But, in addition to the configured cameras, you need to provide customers with convenient access to the scan results, i.e. automatically taken photos. And if the client scans the contract or charter, then there can be a lot of such photos.
In this post I will talk about the difficulties that arose during the implementation of the editor screen with the results of document capture. The screen itself is a two
UICollectionView
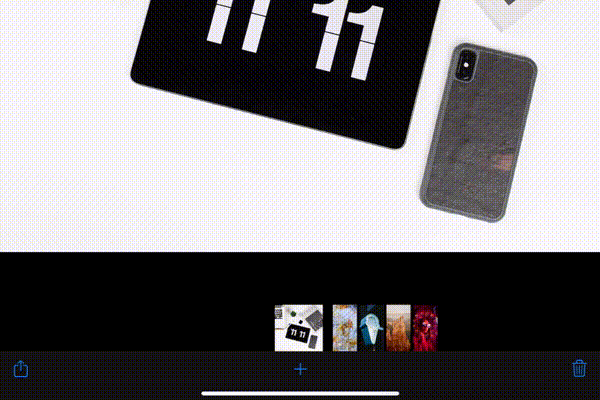
, I will call them large and small. I will omit the possibilities of manually adjusting the borders of the document and other work with the document, and I will focus on animations and layout features during the scroll. Below on GIF you can see what happened in the end. A link to the repository will be at the end of the article.

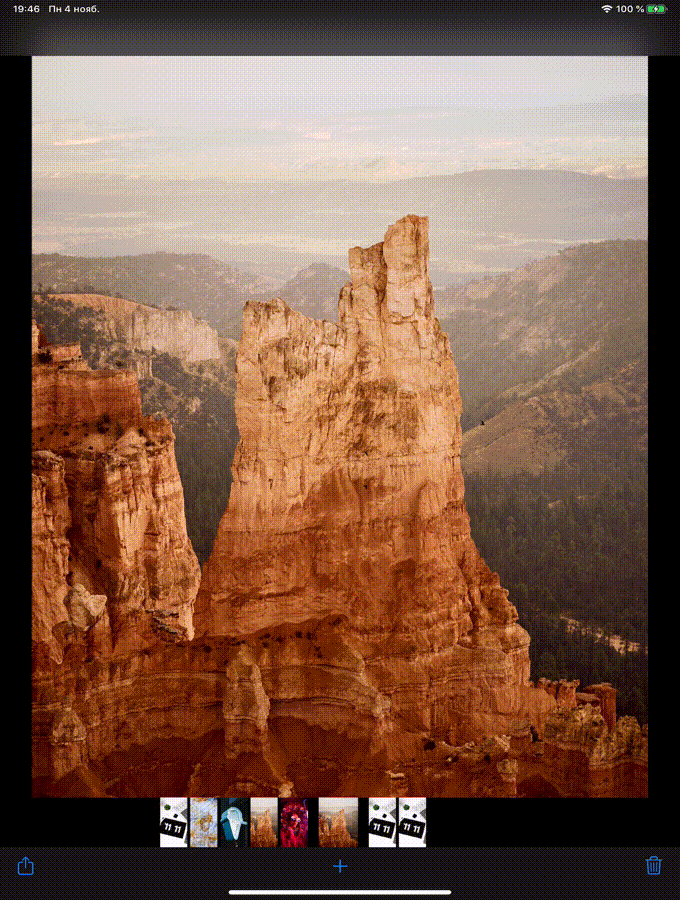
As references, I often pay attention to Apple system applications. When you carefully look at animations and other interface solutions of their applications, you begin to admire their attentive attitude to various trifles. Now we will look at the Photos application (iOS 12) as a reference. I will draw your attention to the specific features of this application, and then we will try to implement them.
We will cover most of the customization
UICollectionViewFlowLayout
, see how common techniques such as parallax and carousel are implemented, and discuss the problems associated with custom animations when inserting and deleting cells.
Features Review
To add specifics, I will describe what specific little things pleased me in the Photos application, and then I will implement them in the appropriate order.
- Parallax effect in a large collection
- Elements of a small collection are centered.
- Dynamic size of items in a small collection
- The logic of placing the elements of a small cell depends not only on the contentOffset, but also on user interactions
- Custom animations for move and delete
- The index of the "active" cell is not lost when changing orientation
1. Parallax
What is parallax?
Parallax scrolling is a technique in computer graphics where background images move past the camera more slowly than foreground images, creating an illusion of depth in a 2D scene and adding to the sense of immersion in the virtual experience.You can notice that when scrolling, the frame of the cell moves faster than the image that is in it.

Let's get started! Create a subclass of the cell, put the UIImageView into it.
class PreviewCollectionViewCell: UICollectionViewCell { private(set) var imageView = UIImageView() override init(frame: CGRect) { super.init(frame: frame) addSubview(imageView) clipsToBounds = true imageView.snp.makeConstraints { $0.edges.equalToSuperview() } } }
Now you need to understand how to shift the
imageView
, creating a parallax effect. To do this, you need to redefine the behavior of cells during scrolling. Apple:
Avoid subclassingOk, let's create our layout object .UICollectionView
. The collection view has little or no appearance of its own. Instead, it pulls all of its views from your data source object and all of the layout-related information from the layout object. If you are trying to lay out items in three dimensions, the proper way to do it is to implement a custom layout that sets the 3D transform of each cell and view appropriately.
UICollectionView
has a property
collectionViewLayout
, from which it learns information about the positioning of cells.
UICollectionViewFlowLayout
is the implementation of the abstract
UICollectionViewLayout
, which is the
collectionViewLayout
property.
Create a subclass ofUICollectionViewLayout
is waiting for someone to subclass it and provide the appropriate content.UICollectionViewFlowLayout
is a concrete class ofUICollectionViewLayout
that has all its four members implemented, in the way that the cells will be arranged in a grid manner.
UICollectionViewFlowLayout
and override its
layoutAttributesForElements(in:)
. The method returns an array of
UICollectionViewLayoutAttributes
, which provides information on how to display a particular cell.
The collection requests attributes every time the
contentOffset
changes, as well as when the layout is invalid. In addition, we will create custom attributes by adding the
parallaxValue
property, which determines how much the frame of the picture is delayed from the frame of the cell. For attribute subclasses, you must override
NSCopiyng
for them. Apple:
If you subclass and implement any custom layout attributes, you must also override the inherited isEqual: method to compare the values of your properties. In iOS 7 and later, the collection view does not apply layout attributes if those attributes have not changed. It determines whether the attributes have changed by comparing the old and new attribute objects using the isEqual: method. Because the default implementation of this method checks only the existing properties of this class, you must implement your own version of the method to compare any additional properties. If your custom properties are all equal, callHow to find outsuper
and return the resulting value at the end of your implementation.
parallaxValue
? Let's calculate how much you need to move the center of the cell so that it stands in the center. If this distance is greater than the width of the cell, then hammer on it. Otherwise, divide this distance by the width of the cell . The closer this distance is to zero, the weaker the parallax effect.
class ParallaxLayoutAttributes: UICollectionViewLayoutAttributes { var parallaxValue: CGFloat? } class PreviewLayout: UICollectionViewFlowLayout { var offsetBetweenCells: CGFloat = 44 override func shouldInvalidateLayout(forBoundsChange newBounds: CGRect) -> Bool { return true } override class var layoutAttributesClass: AnyClass { return ParallaxLayoutAttributes.self } override func layoutAttributesForElements(in rect: CGRect) -> [UICollectionViewLayoutAttributes]? { return super.layoutAttributesForElements(in: rect)? .compactMap { $0.copy() as? ParallaxLayoutAttributes } .compactMap(prepareAttributes) } private func prepareAttributes(attributes: ParallaxLayoutAttributes) -> ParallaxLayoutAttributes { guard let collectionView = self.collectionView else { return attributes } let width = itemSize.width let centerX = width / 2 let distanceToCenter = attributes.center.x - collectionView.contentOffset.x let relativeDistanceToCenter = (distanceToCenter - centerX) / width if abs(relativeDistanceToCenter) >= 1 { attributes.parallaxValue = nil attributes.transform = .identity } else { attributes.parallaxValue = relativeDistanceToCenter attributes.transform = CGAffineTransform(translationX: relativeDistanceToCenter * offsetBetweenCells, y: 0) } return attributes } }


When the collection receives the necessary attributes, the cells apply them. This behavior can be overridden in the subclass of the cell. Let's
imageView
on the value depending on
parallaxValue
. However, for shifting pictures with
contentMode == .aspectFit
to work correctly, this is not enough, because the picture frame does not coincide with the
imageView
frame, by which the content is cropped when
clipsToBounds == true
. Put a mask that matches the size of the image with the appropriate
contentMode
and we will update it if necessary. Now everything works!
extension PreviewCollectionViewCell { override func layoutSubviews() { super.layoutSubviews() guard let imageSize = imageView.image?.size else { return } let imageRect = AVMakeRect(aspectRatio: imageSize, insideRect: bounds) let path = UIBezierPath(rect: imageRect) let shapeLayer = CAShapeLayer() shapeLayer.path = path.cgPath layer.mask = shapeLayer } override func apply(_ layoutAttributes: UICollectionViewLayoutAttributes) { guard let attrs = layoutAttributes as? ParallaxLayoutAttributes else { return super.apply(layoutAttributes) } let parallaxValue = attrs.parallaxValue ?? 0 let transition = -(bounds.width * 0.3 * parallaxValue) imageView.transform = CGAffineTransform(translationX: transition, y: .zero) } }

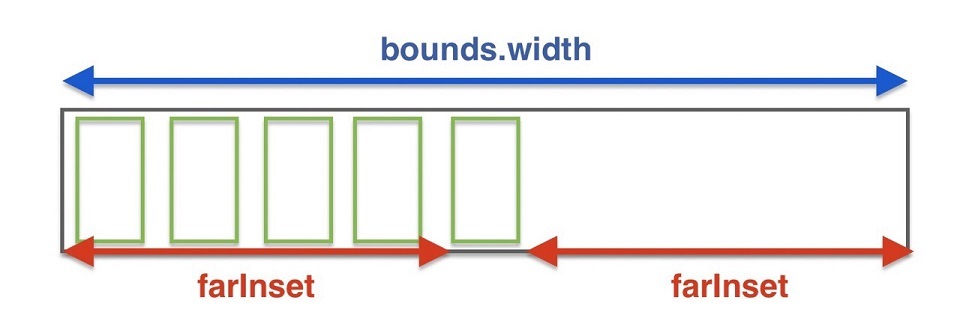
2. Elements of a small collection are centered


Everything is very simple here. This effect can be achieved by setting large
inset
on both the left and right. When scrolling to the right / left, it is necessary to start
bouncing
only when the last cell has left the visible content. That is, the visible content should equal the size of the cell.
extension ThumbnailFlowLayout { var farInset: CGFloat { guard let collection = collectionView else { return .zero } return (collection.bounds.width - itemSize.width) / 2 } var insets: UIEdgeInsets { UIEdgeInsets(top: .zero, left: farInset, bottom: .zero, right: farInset) } override func prepare() { collectionView?.contentInset = insets super.prepare() } }


More about centering: when the collection finishes scrolling, the layout requests a
contentOffset
to stop at. To do this, override
targetContentOffset(forProposedContentOffset:withScrollingVelocity:)
. Apple:
If you want the scrolling behavior to snap to specific boundaries, you can override this method and use it to change the point at which to stop. For example, you might use this method to always stop scrolling on a boundary between items, as opposed to stopping in the middle of an item.To make everything beautiful, we will always stop in the center of the nearest cell. Calculating the center of the nearest cell is a rather trivial task, however, you need to be careful and consider the
contentInset
.
override func targetContentOffset(forProposedContentOffset proposedContentOffset: CGPoint, withScrollingVelocity velocity: CGPoint) -> CGPoint { guard let collection = collectionView else { return super.targetContentOffset(forProposedContentOffset: proposedContentOffset, withScrollingVelocity: velocity) } let cellWithSpacing = itemSize.width + config.distanceBetween let relative = (proposedContentOffset.x + collection.contentInset.left) / cellWithSpacing let leftIndex = max(0, floor(relative)) let rightIndex = min(ceil(relative), CGFloat(itemsCount)) let leftCenter = leftIndex * cellWithSpacing - collection.contentInset.left let rightCenter = rightIndex * cellWithSpacing - collection.contentInset.left if abs(leftCenter - proposedContentOffset.x) < abs(rightCenter - proposedContentOffset.x) { return CGPoint(x: leftCenter, y: proposedContentOffset.y) } else { return CGPoint(x: rightCenter, y: proposedContentOffset.y) } }

3. The dynamic size of the elements of a small collection
If you scroll a large collection, the
contentOffset
changes for a small one
contentOffset
. Moreover, the central cell of a small collection is not as large as the rest. Side cells have a fixed size, and the central one is the same as the aspect ratio of the picture that it contains.


You can use the same technique as in the case of parallax. Let's create a custom
UICollectionViewFlowLayout
for a small collection and redefine
prepareAttributes(attributes:
Given that further the layout logic of the small collection will be complicated, we will create a separate entity for storing and calculating cell geometry.
struct Cell { let indexPath: IndexPath let dims: Dimensions let state: State func updated(new state: State) -> Cell { return Cell(indexPath: indexPath, dims: dims, state: state) } } extension Cell { struct Dimensions { let defaultSize: CGSize let aspectRatio: CGFloat let inset: CGFloat let insetAsExpanded: CGFloat } struct State { let expanding: CGFloat static var `default`: State { State(expanding: .zero) } } }

UICollectionViewFlowLayout
has a
collectionViewContentSize
property that determines the size of the area that can be scrolled. In order not to complicate our life, let us leave it constant, independent of the size of the central cell. For the correct geometry for each cell, you need to know the
aspectRatio
picture and the remoteness of the center of the cell from
contentOffset
. The closer the cell, the closer its
size.width / size.height
to
aspectRatio
. When resizing a specific cell, move the remaining cells (to the right and left of it) using
affineTransform
. It turns out that to calculate the geometry of a particular cell, you need to know the attributes of neighbors (visible).
extension Cell { func attributes(from layout: ThumbnailLayout, with sideCells: [Cell]) -> UICollectionViewLayoutAttributes? { let attributes = layout.layoutAttributesForItem(at: indexPath) attributes?.size = size attributes?.center = center let translate = sideCells.reduce(0) { (current, cell) -> CGFloat in if indexPath < cell.indexPath { return current - cell.additionalWidth / 2 } if indexPath > cell.indexPath { return current + cell.additionalWidth / 2 } return current } attributes?.transform = CGAffineTransform(translationX: translate, y: .zero) return attributes } var additionalWidth: CGFloat { (dims.defaultSize.height * dims.aspectRatio - dims.defaultSize.width) * state.expanding } var size: CGSize { CGSize(width: dims.defaultSize.width + additionalWidth, height: dims.defaultSize.height) } var center: CGPoint { CGPoint(x: CGFloat(indexPath.row) * (dims.defaultSize.width + dims.inset) + dims.defaultSize.width / 2, y: dims.defaultSize.height / 2) } }
state.expanding
is considered almost the same as
parallaxValue
.
func cell(for index: IndexPath, offsetX: CGFloat) -> Cell { let cell = Cell( indexPath: index, dims: Cell.Dimensions( defaultSize: itemSize, aspectRatio: dataSource(index.row), inset: config.distanceBetween, insetAsExpanded: config.distanceBetweenFocused), state: .default) guard let attribute = cell.attributes(from: self, with: []) else { return cell } let cellOffset = attribute.center.x - itemSize.width / 2 let widthWithOffset = itemSize.width + config.distanceBetween if abs(cellOffset - offsetX) < widthWithOffset { let expanding = 1 - abs(cellOffset - offsetX) / widthWithOffset return cell.updated(by: .expand(expanding)) } return cell } override func layoutAttributesForElements(in rect: CGRect) -> [UICollectionViewLayoutAttributes]? { return (0 ..< itemsCount) .map { IndexPath(row: $0, section: 0) } .map { cell(for: $0, offsetX: offsetWithoutInsets.x) } .compactMap { $0.attributes(from: self, with: cells) } }
4. The logic of placing the elements of a small cell depends not only on the contentOffset, but also on user interactions
When a user scrolls through a small collection, all cells are the same size. When scrolling through a large collection, this is not so. ( see gifs 3 and 5 ). Let's write an animator that will update the properties of the
ThumbnailLayout
layout. The animator will store
DisplayLink
in himself and call the block 60 times per second, providing access to the current progress. It is easy to
easing functions
various
easing functions
to the animator. The implementation can be viewed on the github at the link at the end of the post.
Let's enter the
expandingRate
property in
ThumbnailLayout
, by which
expanding
all
Cell
will be multiplied. It turns out that
expandingRate
says how much
aspectRatio
particular picture will affect its size if it becomes centered. With
expandingRate == 0
all cells will be the same size. At the start of the scroll of a small collection, we will run an animator that sets the
expandingRate
to 0, and at the end of the scroll, vice versa, to 1. In fact, when updating the layout, the size of the central cell and the side cells will change. No
contentOffset
with
contentOffset
and jerking!
class ScrollAnimation: NSObject { enum `Type` { case begin case end } let type: Type func run(completion: @escaping () -> Void) { let toValue: CGFloat = self.type == .begin ? 0 : 1 let currentExpanding = thumbnails.config.expandingRate let duration = TimeInterval(0.15 * abs(currentExpanding - toValue)) let animator = Animator(onProgress: { current, _ in let rate = currentExpanding + (toValue - currentExpanding) * current self.thumbnails.config.expandingRate = rate self.thumbnails.invalidateLayout() }, easing: .easeInOut) animator.animate(duration: duration) { _ in completion() } } }

func scrollViewWillBeginDragging(_ scrollView: UIScrollView) { if scrollView == thumbnails.collectionView { handle(event: .beginScrolling) // call ScrollAnimation.run(type: .begin) } } func scrollViewDidEndDragging(_ scrollView: UIScrollView, willDecelerate decelerate: Bool) { if scrollView == thumbnails.collectionView && !decelerate { thumbnailEndScrolling() } } func scrollViewDidEndDecelerating(_ scrollView: UIScrollView) { if scrollView == thumbnails.collectionView { thumbnailEndScrolling() } } func thumbnailEndScrolling() { handle(event: .endScrolling) // call ScrollAnimation.run(type: .end) }

5. Custom animations for move and delete
There are many articles telling how to make custom animations to update cells, but in our case they will not help us. Articles and tutorials describe how to override attributes of an updated cell. In our case, changing the layout of the deleted cell causes side effects - the
expanding
neighboring cell, which tends to take the place of the deleted one during the animation, changes.
Updating content in a
UICollectionViewFlowLayout
works as follows. After deleting / adding a cell, the
prepare(forCollectionViewUpdates:)
method is launched, giving an array of
UICollectionViewUpdateItem
, which tells us which cells at which indexes were updated / deleted / added. Next, the layout will call a group of methods
finalLayoutAttributesForDisappearingItem(at:) initialLayoutAttributesForAppearingDecorationElement(ofKind:at:)
and their friends for decoration / supplementary views. When the attributes for the updated data are received,
finalizeCollectionViewUpdates
is called. Apple:
The collection view calls this method as the last step before proceeding to animate any changes into place. This method is called within the animation block used to perform all of the insertion, deletion, and move animations so you can create additional animations using this method as needed. Otherwise, you can use it to perform any last minute tasks associated with managing your layout object's state information.The trouble is that we can specialize attributes only for the updated cell, and we need to change them for all cells, and in different ways. The new center cell should change
aspectRatio
, and the side ones should
transform
.

After examining how the default animation of collection cells during deletion / insertion works, it became known that the cell layers in
finalizeCollectionViewUpdates
contain
CABasicAnimation
, which can be changed there if you want to customize the animation for the remaining cells. Things got worse when the logs showed that between
performBatchUpdates
and
prepare(forCollectionViewUpdates:)
,
prepareAttributes(attributes:)
prepare(forCollectionViewUpdates:)
is called, and there may already be the wrong number of cells, although
collectionViewUpdates
have not started yet, it’s very difficult to maintain and understand this. What can be done about this? You can disable these built-in animations!
final override func prepare(forCollectionViewUpdates updateItems: [UICollectionViewUpdateItem]) { super.prepare(forCollectionViewUpdates: updateItems) CATransaction.begin() CATransaction.setDisableActions(true) } final override func finalizeCollectionViewUpdates() { CATransaction.commit() }

Armed with the animators already written, we will do all the necessary animations on request for deletion, and we will launch the
dataSource
update at the end of the animation. Thus, we will simplify the animation of the collection when updating, since we ourselves control when the number of cells will change.
func delete( at indexPath: IndexPath, dataSourceUpdate: @escaping () -> Void, completion: (() -> Void)?) { DeleteAnimation(thumbnails: thumbnails, preview: preview, index: indexPath).run { let previousCount = self.thumbnails.itemsCount if previousCount == indexPath.row + 1 { self.activeIndex = previousCount - 1 } dataSourceUpdate() self.thumbnails.collectionView?.deleteItems(at: [indexPath]) self.preview.collectionView?.deleteItems(at: [indexPath]) completion?() } }
How will such animations work? In
ThumbnailLayout
let's store optional brochures that update the geometry of specific cells.
class ThumbnailLayout { typealias CellUpdate = (Cell) -> Cell var updates: [IndexPath: CellUpdate] = [:] // ... override func layoutAttributesForElements(in rect: CGRect) -> [UICollectionViewLayoutAttributes]? { let cells = (0 ..< itemsCount) .map { IndexPath(row: $0, section: 0) } .map { cell(for: $0, offsetX: offsetWithoutInsets.x) } .map { cell -> Cell in if let update = self.config.updates[cell.indexPath] { return update(cell) } return cell } return cells.compactMap { $0.attributes(from: self, with: cells) } }
Having such a tool, you can do anything with the geometry of the cells, throwing updates during the work of the animator and removing them in the compliment. There is also the possibility of combining updates.
updates[index] = newUpdate(updates[index])
The delete animation code is rather cumbersome; it is located in the DeleteAnimation.swift file in the repository. The animation of focus switching between cells is implemented in the same way.


6. The index of the “active” cell is not lost when changing orientation
scrollViewDidScroll(_ scrollView:)
is called even if you simply pop in some value in the
contentOffset
, as well as when changing the orientation. When the scroll of two collections is synchronized, some problems may arise during the updates of the layout. The following trick helps: on layout updates, scrollView.delegate can be set to
nil
.
extension ScrollSynchronizer { private func bind() { preview.collectionView?.delegate = self thumbnails.collectionView?.delegate = self } private func unbind() { preview.collectionView?.delegate = nil thumbnails.collectionView?.delegate = nil } }
When updating cell sizes at the time of orientation change, it will look like this:
extension PhotosViewController { override func viewWillTransition(to size: CGSize, with coordinator: UIViewControllerTransitionCoordinator) { super.viewWillTransition(to: size, with: coordinator) contentView.synchronizer.unbind() coordinator.animate(alongsideTransition: nil) { [weak self] _ in self?.contentView.synchronizer.bind() } } }
In order to not lose the desired
contentOffset
when changing the orientation, you can update
targetIndexPath
in
scrollView.delegate
. When you change the orientation, the layout will be disabled if you override
shouldInvalidateLayout(forBoundsChange:)
. When changing
bounds
layout will ask for clarification of
contentOffset
, to clarify it, you need to redefine
targetContentOffset(forProposedContentOffset:)
. Apple:
During layout updates, or when transitioning between layouts, the collection view calls this method to give you the opportunity to change the proposed content offset to use at the end of the animation. You might override this method if the animations or transition might cause items to be positioned in a way that is not optimal for your design.
The collection view calls this method after calling theprepare()
andcollectionViewContentSize
methods.
override func targetContentOffset(forProposedContentOffset proposedContentOffset: CGPoint) -> CGPoint { let targetOffset = super.targetContentOffset(forProposedContentOffset: proposedContentOffset) guard let layoutHandler = layoutHandler else { return targetOffset } let offset = CGFloat(layoutHandler.targetIndex) / CGFloat(itemsCount) return CGPoint( x: collectionViewContentSize.width * offset - farInset, y: targetOffset.y) }

Thanks for reading!
All code can be found at github.com/YetAnotherRzmn/PhotosApp