This situation can occur for various reasons. However, most often at the start of development, the backend is simply not written and the client starts without it. In this case, the start of development is delayed by 2-4 months
Sometimes the server just shuts down (crashes), sometimes it doesn’t have time to roll out the necessary methods, sometimes there are data problems, etc. All these problems led us to write a small Mocker service that allows you to replace the real backend.

How did i come to this
How did I come to this? My first year at the company was ending and they put me on a brand new e-commerce project. The manager said that the project needs to be completed in 4 months, but the backend team (on the customer side) will begin development only after 1.5 months. And during this time we have to throw already a lot of UI-features.
I suggested writing a moch backend (before I became an iOS developer, I played with .NET in the uni). The implementation idea was simple: according to a given specification, it was necessary to write stub methods that would take data from pre-prepared JSON files. They decided on that.
After 2 weeks, I went on vacation and thought: “Why don't I automatically generate all this?” So for 2 weeks of vacation I wrote a semblance of an interpreter that takes the APIBlueprint specification and generates the .NET Web App from it (C # code).
As a result, the first version of this thing appeared and we lived on it for almost 2.5 months. I can’t give real numbers, how much this helped us, but I remember how they said in retrospect that if it weren’t for this system, there would be no release.
Now, several years later, I took into account the mistakes made by me (and there were a lot of them) and completely rewrote the instrument.
Taking this opportunity - many thanks to colleagues who helped with feedback and advice. And also to the leaders who endured all my “engineering arbitrariness”.
Introduction
As a rule, any client-server application looks something like this:
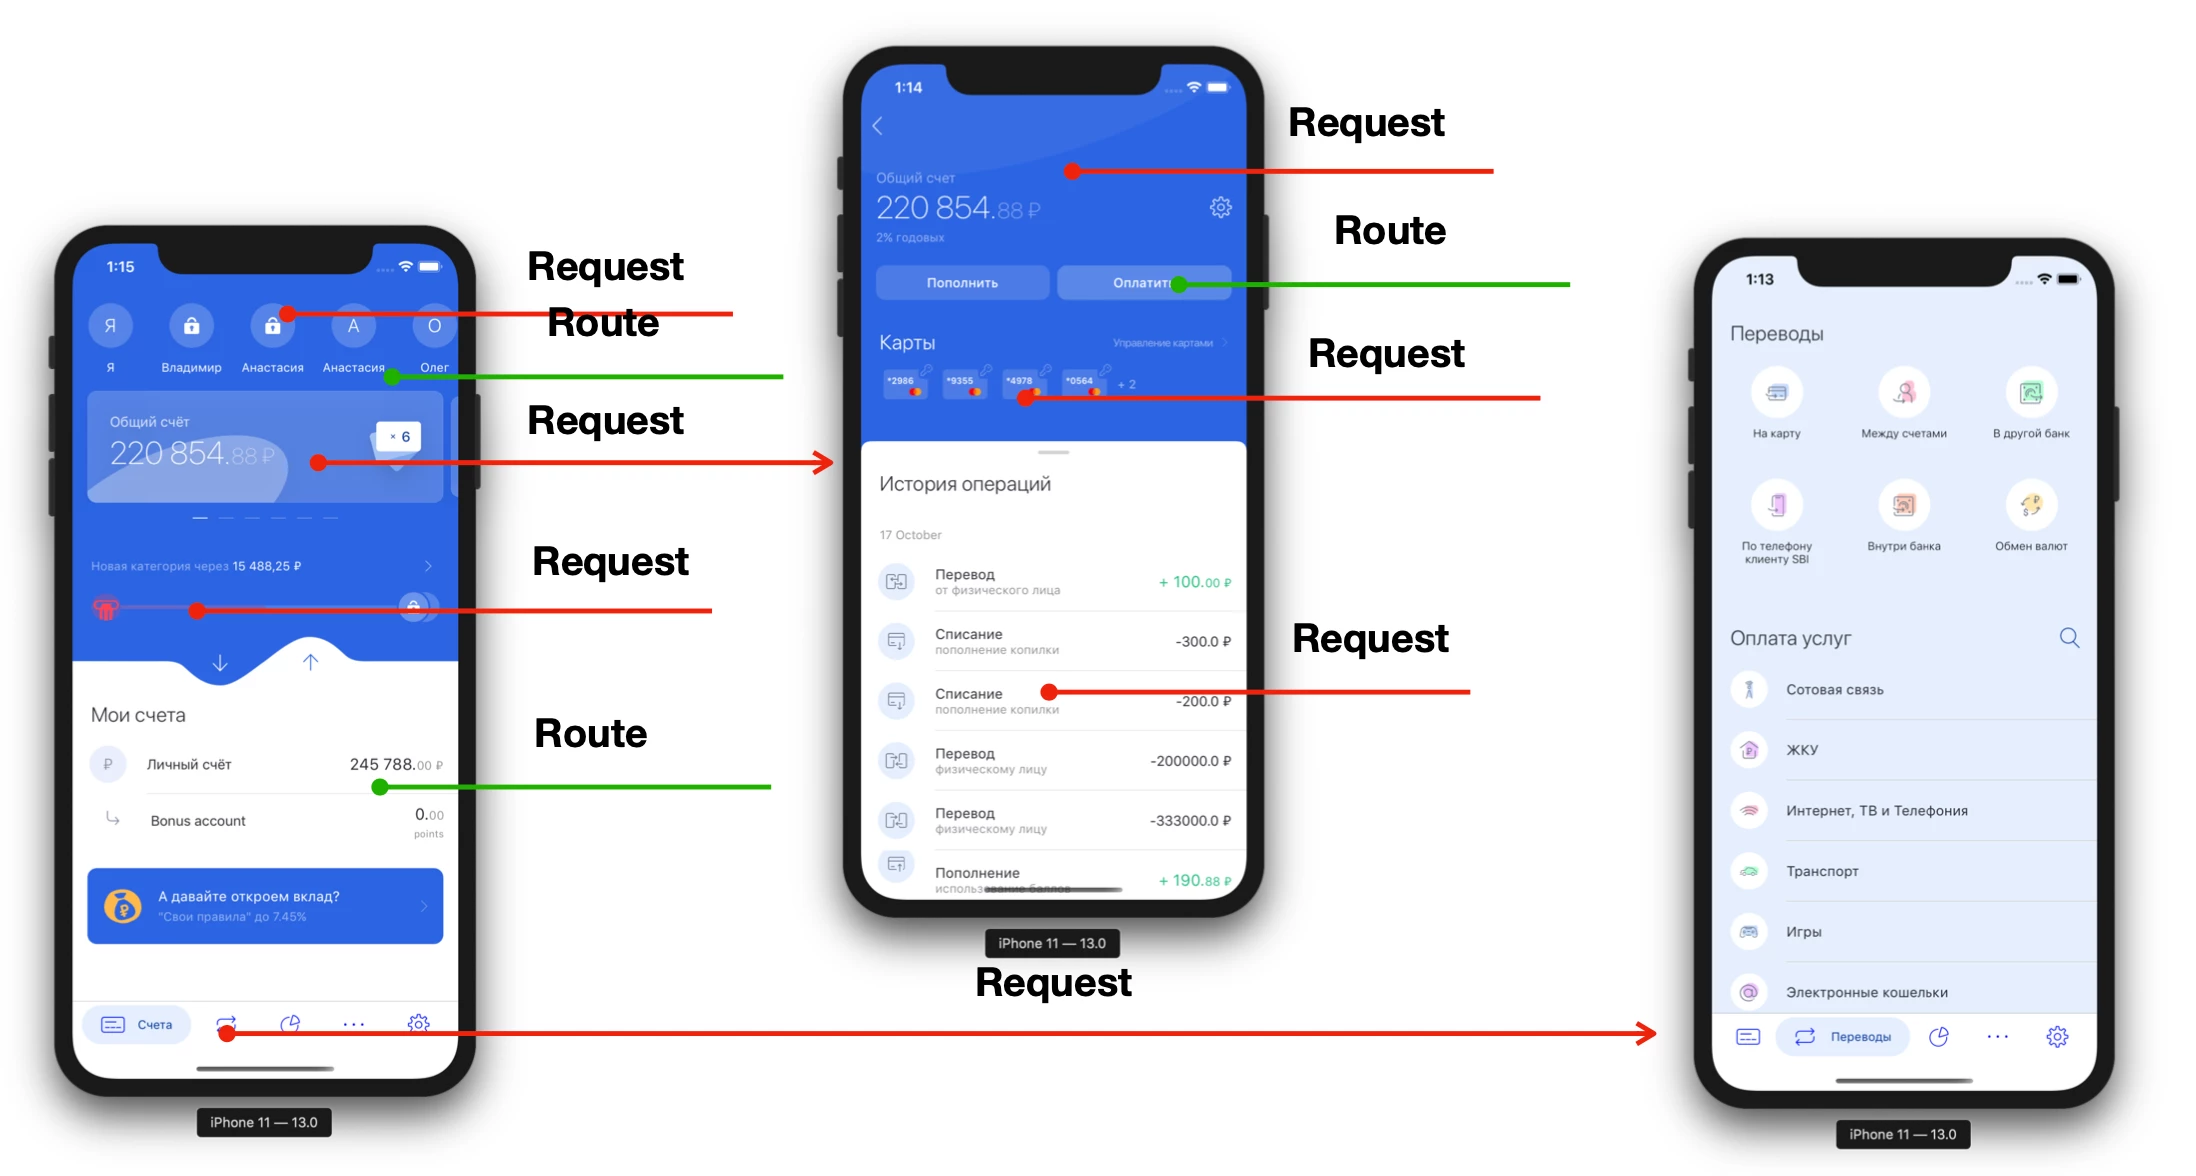
Each screen has at least 1 query (and often more). Moving deep into the screens, we need to make more and more requests. Sometimes we can’t even make the transition until the server tells us “Show the button”. That is, the mobile application is very much tied to the server, not only during its direct work, but also at the development stage. Consider the abstract product development cycle:

- First we design. We decompose, describe and discuss.
- Having received the tasks and requirements, we begin development. We write the code, typeset, etc.
- After we have implemented something, the assembly is being prepared, which will go for manual testing, where the application’s work is checked on different cases.
- If everything is fine with us, and the testers test the assembly, it goes to the customer who performs the acceptance.
Each of these processes is very important. Especially the latter, since the customer must understand at what stage we really are, and sometimes he needs to report on the results to management or investors. Typically, such reports occur, including in the format of a demonstration of a mobile application. In my practice, there was a case when a customer demonstrated literally half of the MVP, which worked only on mokas. The mok app looks like the present and quacks like the present. So it’s real (:
However, this is a pink dream. Let's look at what really happens if we don't have a server.

- The development process will be slower and more painful, since we can’t write services normally, we can’t check all the cases either, we have to write stubs that will need to be removed later.
- After we did the assembly in half with grief, it gets to testers who look at it and do not understand what to do with it. You can’t check anything, half does not work at all, because there is no server. As a result, they miss a lot of bugs: both logical and visual.
- Well, after "as they could see", you need to give the assembly to the customer and then the most unpleasant begins. The customer cannot really evaluate the work, he sees 1-2 cases out of all possible and certainly cannot show it to his investors.
In general, everything is going downhill. And unfortunately, such situations happen almost always: sometimes there is no server for a couple of months, sometimes half a year, sometimes just in the process the server is very late or you need to quickly check the boundary cases that can be reproduced using data manipulations on a real server.
For example, we want to check how the application behaves if the user’s payment is longer than the due date. It is very difficult (and long) to reproduce such a situation on the server and we need to do this artificially.
Therefore, there are the following problems:
- The server is completely missing. Because of this, it is impossible to design, test and present.
- The server does not have time, which interferes with development and may interfere with testing.
- We want to test boundary cases, and the server cannot allow this without long gestures.
- Affect testing and threatening presentations.
- The server crashes (once, during the stable development, we lost the server for 3.5 days).
To combat these problems, Mocker was created.
Principle of operation
Mocker is a small web service that is hosted somewhere, listens to traffic on a specific port and can respond with pre-prepared data to specific network requests.
The sequence is as follows:
1. The client sends a request.
2. Mocker receives the request.
3. Mocker finds the desired mock.
4. Mocker returns the desired mock.
If everything is clear with points 1,2 and 4, then 3 raises questions.
In order to understand how the service finds the mock necessary for the client, we first consider the structure of the mock itself.
Mock is a JSON file in the following format:
{ "url": "string", "method": "string", "statusCode": "number", "response": "object", "request": "object" }
Let's analyze each field separately.
url
This parameter is used to specify the URL of the request that the client accesses.
For example, if a mobile application makes a request to url
host.dom/path/to/endpoint
, then in the
url
field we need to write
/path/to/endpoint
.
That is, this field stores the relative path to the endpoint .
This field should be formatted in the url-template format, i.e. it is allowed to use the following formats:
-
/path/to/endpoint
- normal url address. When the request is received, the service will compare the lines character by character. -
/path/to/endpoint/{number}
- url with path pattern. A Mock with such a URL will respond to any request that matches this pattern. -
/path/to/endpoint/data?param={value}
- url with parameter-pattern. Mock with such a url will trigger a request containing the given parameters. Moreover, if one of the parameters is not in the request, then it will not match the template.
Thus, by controlling the URL parameters, you can clearly determine that a certain mock will return to a specific url.
method
This is the expected http method. For example
POST
or
GET
.
The string must contain only capital letters.
statusCode
This is the http status code for the response. That is, by requesting this mock, the client will receive a response with the status recorded in the statusCode field.
response
This field contains the JSON object that will be sent to the client in the body of the response to his request.
request
The body of the request that is expected to be received from the client is recorded here. This will be used to give the desired response depending on the request body of the request. For example, if we want to change the answers depending on the request parameters.
{ "url": "/auth", "method": "POST", "statusCode": 200, "response": { "token": "cbshbg52rebfzdghj123dsfsfasd" }, "request": { "login": "Tester", "password": "Valid" } }
{ "url": "/auth", "method": "POST", "statusCode": 400, "response": { "message": "Bad credentials" }, "request": { "login": "Tester", "password": "Invalid" } }
If the client sends a request with the body:
{ "login": "Tester", "password": "Valid" }
Then in response he will receive:
{ "token": "cbshbg52rebfzdghj123dsfsfasd" }
And in case we want to check how the application will work if the password is entered incorrectly, a request will be sent with the body:
{ "login": "Tester", "password": "Invalid" }
Then in response he will receive:
{ "message": "Bad credentials" }
And we can check the case with the wrong password. And so for all the other cases.
And now we’ll figure out how grouping and searching for the desired moq work.
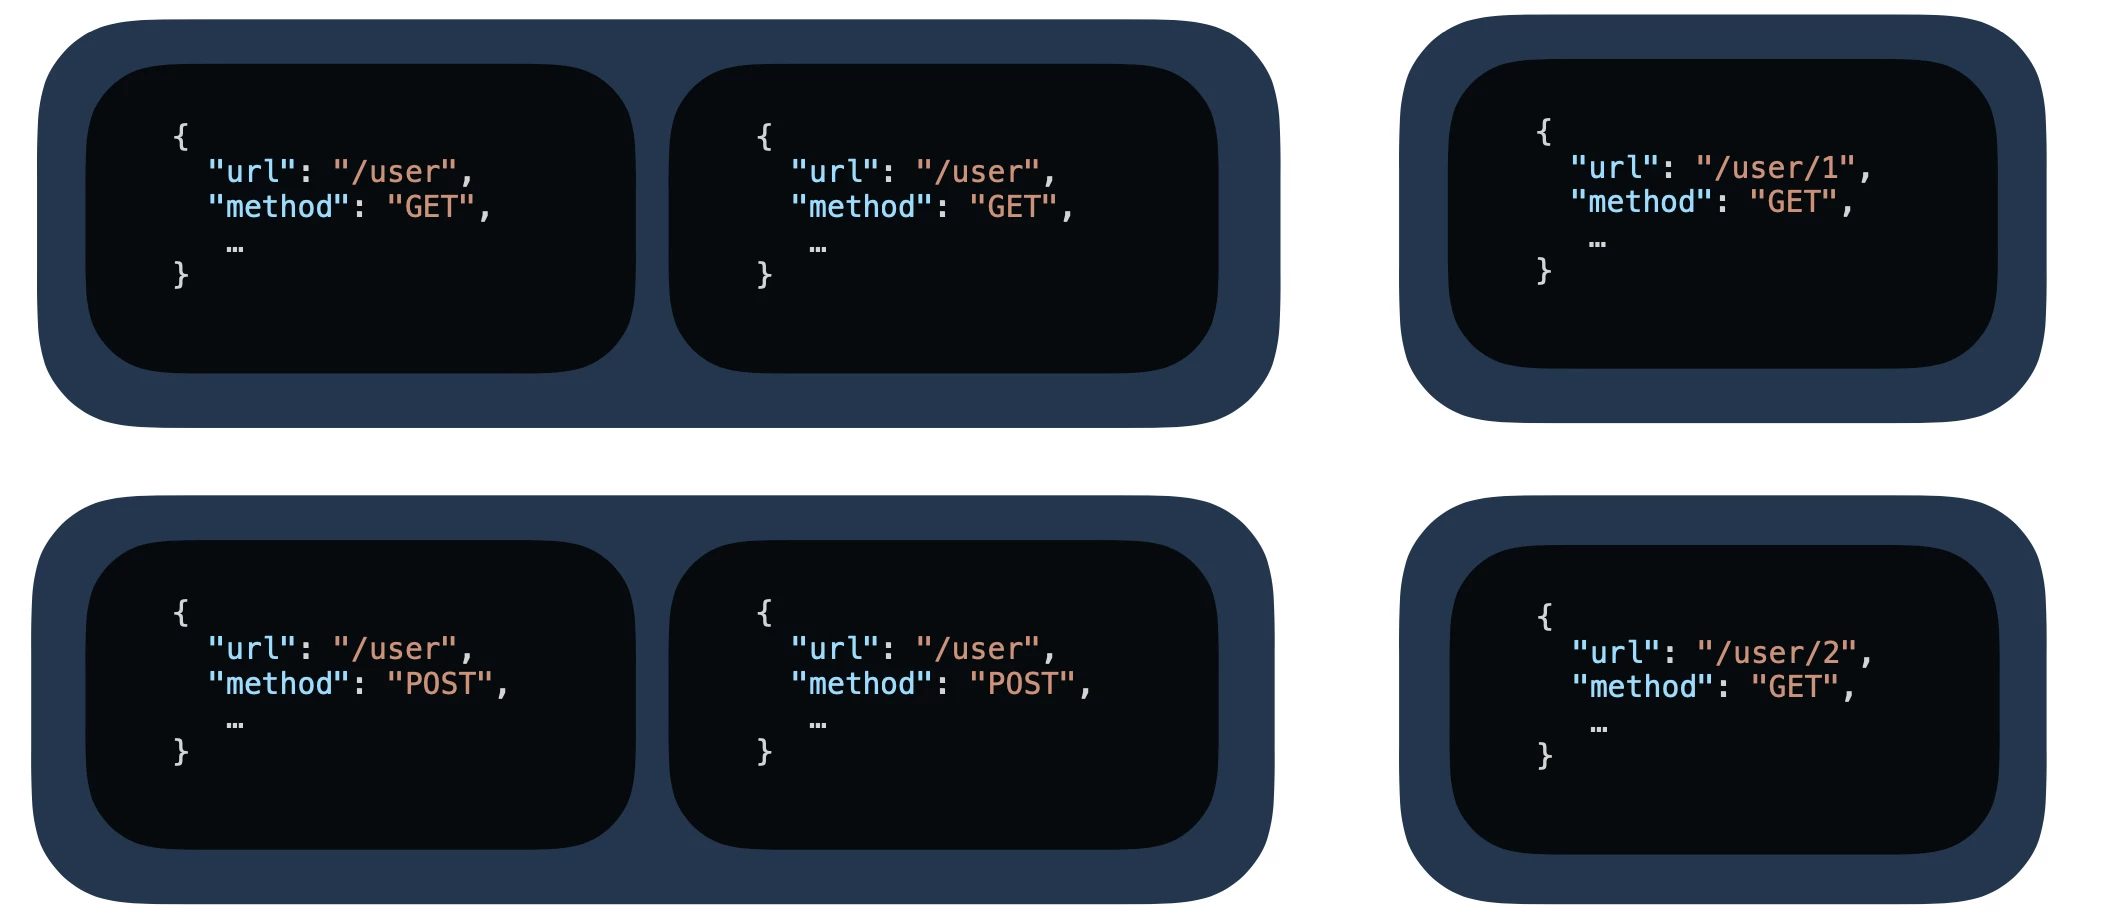
In order to quickly and easily search for the desired mok, the server loads all the mokas into memory and groups them in the right way. The picture above shows an example of grouping.
The server combines different mokas by url and method . This is necessary, among other things, so that we can create many different moks on one url.
For example, we want that constantly pulling Pull-To-Refresh, different answers come and the state of the screen changes all the time (to check all boundary cases).
Then we can create many different moks with the same method and url parameters, and the server will return them to us iteratively (in turn).
For example, let us have such mokas:
{ "url": "/products", "method": "GET", "statusCode": 200, "response": { "name": "product", "currency": 1, "value": 20 } }
{ "url": "/products", "method": "GET", "statusCode": 200, "response": { "name": "gdshfjshhkfhsdgfhshdjgfhjkshdjkfsfgbjsfgskdf", "currency": 5, "value": 100000000000 } }
{ "url": "/products", "method": "GET", "statusCode": 200, "response": null }
{ "url": "/products", "method": "GET", "statusCode": 400, "response": null }
Then, when we call the GET / products method for the first time, we will first get the answer:
{ "name": "product", "currency": 1, "value": 20 }
When we call the second time, the iterator pointer will shift to the next element and return to us:
{ "name": "gdshfjshhkfhsdgfhshdjgfhjkshdjkfsfgbjsfgskdf", "currency": 5, "value": 100000000000 }
And we can check how the application behaves if we get some big values. And so on.
Well, and when we get to the last element and call the method again, the first element will return to us again, because the iterator will return to the first element.
Caching proxy
Mocker can work in caching proxy mode. This means that when a service receives a request from a client, it takes out the address of the host on which the real server and the scheme are located (to determine the protocol). Then it takes the received request (with all its headers, so if the method requires authentication, then it’s okay, your
Authorization: Bearer ...
transferred) and cuts out the service information from it (the same
host
and
scheme
) and sends the request to the real server.
After receiving the response with the 200th code, Mocker saves the answer to the Mock file (yes, you can then copy or change it) and returns to the client what it received from the real server. Moreover, it does not just save the file to a random place, but organizes the files so that you can then work with them manually. For example, Mocker sends a request to the following URL:
hostname.dom/main/products/loans/info
. Then it will create the
hostname.dom
folder, then inside it it will create the
main
folder, inside it the
products
folder ...
In order to avoid duplicate mocks, the name is formed on the basis of the http-method (GET, PUT ...) and a hash from the response body of the real server . In this case, if there is already a mock on a specific answer, then it will simply be overwritten.
This feature can be activated individually for each request. To do this, add three headers to the request:
X-Mocker-Redirect-Is-On: "true", X-Mocker-Redirect-Host: "hostaname.ex:1234", X-Mocker-Redirect-Scheme: "http"
Explicit indication of the path to the mocks
Sometimes you want Mocker to return only those mokas that we want, and not all that are in the project.
Especially relevant for testers. It would be convenient for them to have some kind of prepared set of mokas for each of the test cases. And then, during testing, QA just selects the folder it needs and works quietly, because there is no more noise from third-party mocks.
Now this is possible. In order to enable this function, you need to use a special header:
X-Mocker-Specific-Path: path
For example, let Mocker have such a folder structure at the root
root/ block_card_test_case/ mocks.... main_test_case/ blocked_test_case/ mocks...
If you need to run a test case about blocked cards, then
X-Mocker-Specific-Path: block_card_test_case
If you need to run a test case associated with locking the main screen, then
X-Mocker-Specific-Path: main_test_case/blocked_test_case
Interface
At first, we worked with mokas directly via ssh, but with an increase in the number of mokas and users, we switched to a more convenient option. Now we are using CloudCommander.
In the docker-compose example, it binds to the Mocker container.
It looks something like this:
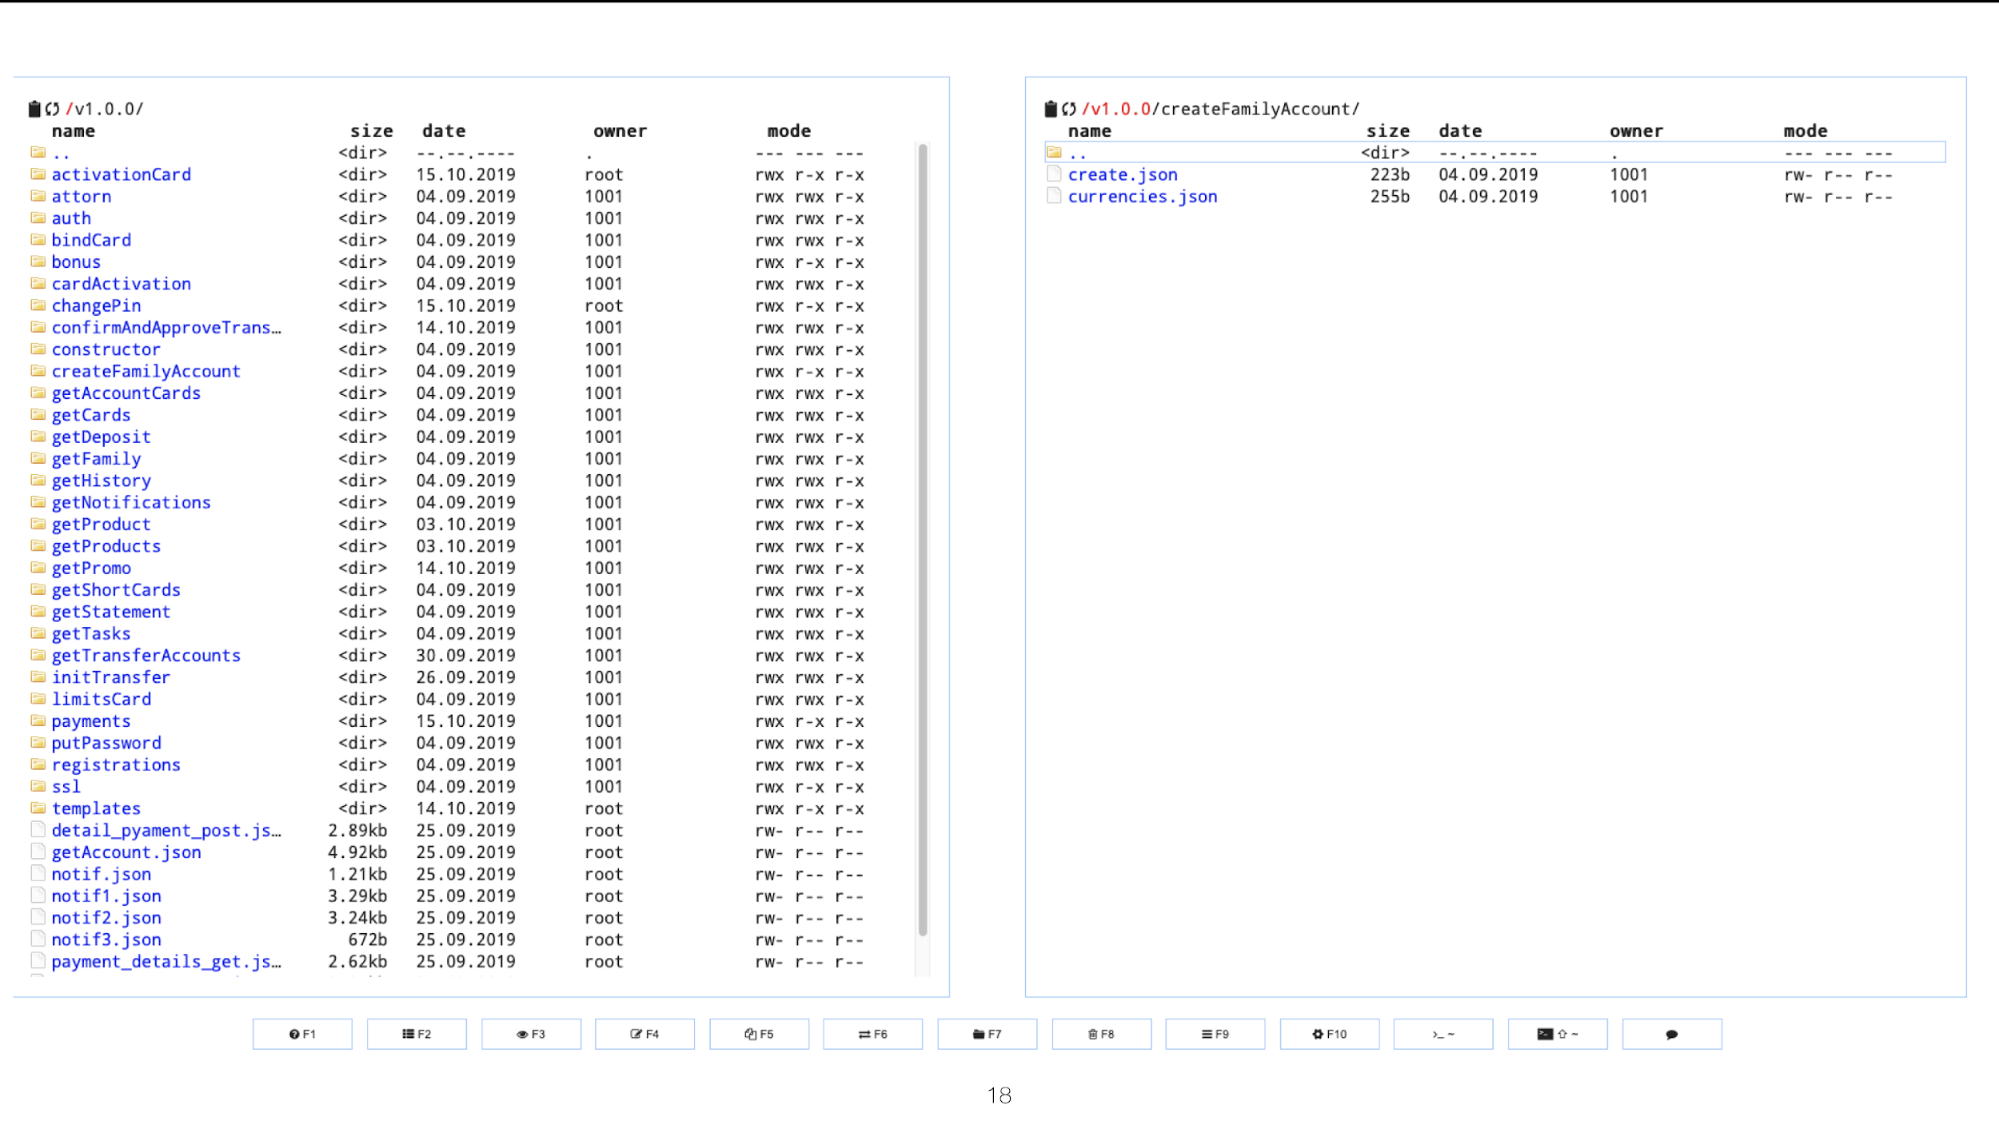
Well, the bonus is a web-editor, which allows you to add / change moki directly from the browser.

This is also a temporary solution. In the plans to get away from working with moks through the file system to some database. And accordingly, it will be possible to control the mokas themselves from the GUI to this DB.
Deployment
The easiest way to deploy Mocker is to use Docker. In addition, by deploying the service from the docker, the web-based interface through which it is more convenient to work with moks will automatically deploy Files needed for deployment through Docker are in the repository.
However, if this option does not suit you, you can independently assemble the service from the source. Enough for this:
git clone https://github.com/LastSprint/mocker.git cd mocker go build .
Then you need to write a config file ( example ) and start the service:
mocker config.json
Known Issues
- After each new file, you need to do
curl mockerhost.dom/update_models
so that the service reads the files again. I did not find a quick and elegant way to update it otherwise - Sometimes CloudCommander bugs (or I did something wrong) and it does not allow editing moki that were created through the web-based interface. It is treated by clearing the browser cache.
- The service works only with
application/json
. The plans supportform-url-encoding
.
Total
Mocker is a web service that solves the problems of developing client-server applications when the server is not ready for some reason.
The service allows you to create many different mocks to the same URL, allows you to connect Request and Response with each other by explicitly specifying parameters in the url, or directly by setting the expected request body. The service has a web-based interface that greatly simplifies the life of users.
Each user of the service can independently add the necessary endpoint and the request he needs. In this case, on the client, in order to switch to a real server, it is enough to simply replace the constant with the host address.
I hope this article will help people who suffer from similar problems and, perhaps, we will work together to develop this tool.
GitHub repository .