Studying Runet, I could not find a single article that would describe ALL the stages of development and production of the device case.
None. Everything on the Internet relates only to one or two aspects of this process. Well, for example: let's sketch the case and print it on a 3D printer. Or buy a model and drill holes in it. Although there are a couple of materials on Habré, but they are also not as full of information as they could be.
But so that all the stages, from the idea to serial production, are painted, I did not find this. Therefore, I decided to write my guide, as filled as possible with facts, pictures and examples.
How to design a housing - work scheme
You can almost certainly design the enclosure for your device yourself. The main thing is to have a good idea of the whole cycle, from idea to production.
The development of the corps is a process divided into several mandatory stages. I won’t even discuss it: it has been checked many times. Even if you are not going to get involved in “large” production (for example, if you plan to make the device only for yourself), it would be better if you followed the correct sequence of steps.
And for those who doubt their abilities, I’ll say right away that you can definitely figure it all out: the software has stepped forward, and now you don’t have to spend several years to put the first prototype of the case on your table.
Here is a diagram that we will follow:

Phased design of the device case
1. The challenge
I have a test in my work that allows you to weed out sorrow-innovators-compilers. I ask you to send a description of their idea with formal (numerical) characteristics. For example, the idea is so-and-so, the device should function so-and-so and so-and-so, the cost price is about this and that. If the product is a clean compiler (we’ll fasten Wi-Fi + a cloud service with a blockchain to the teapot) then there will be no description (as a rule): the person is most likely lazy, he needs to be listened to, the task was described from his words.
But the problem here is not even laziness, but the reluctance to think about the key characteristics of the product that are directly related to the complexity of the future product. It’s not for me to explain to you that even the functionality, battery life, cost bar (and sales) directly affect the “iron” component of the future device.
That is why it is necessary to formulate everything that we want to translate, and describe in the document. Even if it’s clear that this will still change 30 times, yes. Therefore, we pass to paragraph 1.1.
1.1. Formulate Wishlist
Let's start with 5 main questions:
- Why do you need a case - what will you do with it? Use at home, create a prototype for an investor or start selling the device?
The answer to this question immediately tells you to what stage of readiness you need to design the building. After all, there are technologies that forgive mistakes during development (for example, 3D printing), and there are those that can destroy the project (molds, more on that below). - What is the circulation of your device is planned in the first year?
I understand that often there can be no clear answer to this question, but at least suppose. One device? Tens, hundreds or thousands?
The choice of production technology depends on the answer, which, in turn, greatly affects the project budget. Read more about this in the note on how to evaluate the case . And here are examples of prices for the production of cases with different sizes and circulations, and made using various technologies.
- How important is the design to the case?
We all love beautiful and comfortable things. But is design so important for starting a project? Read more about this in this article . - In what conditions will the device or device work?
In ordinary, at room temperature? And if on the street under the snow?
The video of the same, but better quality, is on the channel of NPP Technotron . - Who are your competitors?
If you answered this question that there are no competitors, then something is wrong here: you either were too lazy to look for, or, in principle, incorrectly assess your client’s real need and how your product solves it (a little bit on topics here: formlab.ru / konkurent).
The answers to all these questions will form the basis of the terms of reference.
1.2. Set the cost price and circulation
A very important point. At first, few people think about the maximum cost of a product. The faster it is understood (at least at the level of filling + body), the sooner the project will be completed, and the less wandering and iteration will be.
If there is absolutely no data, you can look at competitors. We take the weighted average direct competitor, look at the sale price of his product, divide it into three parts: cost price + marketing + margin.
Here in this bar of cost we will have to spin. And I emphasize - it doesn’t matter how accurate this estimate is, the main thing is the order of costs for one product, which will then affect everything: which circulation is better to plan, which components to use and how high the starting costs will be.
Note to the hostess: even if you produce a product with a circulation less than that of competitors, it will not work to get a price lower than that of them. Those start-up costs that they have been fighting off for several years are just ahead of you.
1.3. Complete the terms of reference
All the information that we have collected above must be entered into the terms of reference. Its form depends only on you - write as you see fit. Well, or download our template (free.formlab.ru/tz.zip) with instructions for filling in the archive, there are even a couple of “live” examples (formlab.ru/tz).
2. Design
Another question that I often ask in conversations with clients is: “How important is design to you?” The overwhelming majority replies that it is important and understandable (but where not?), But it is better to ask an additional question: “Do you have competitors?” Do they invest in the design of their products? ”And just the answers to these questions will give a clearer and deeper idea of how much the design is needed for the product’s sales. I already touched on this topic on Habré .
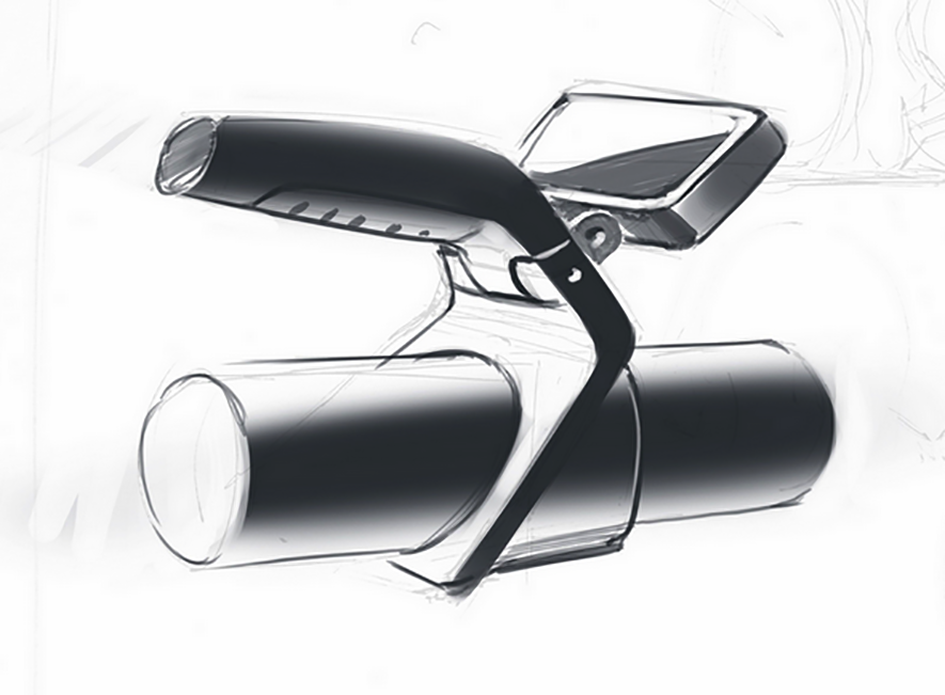
2.1. Jot down an idea
Sketching (aka manual sketches) allows you to imagine what the future building will look like. Now you say: why is this needed? Nevertheless, it will be clear.
Not quite right.
Experience shows that project visualization is important because we all see the same things in different ways. If you need other developers to see the future case of the device just like you, draw it - the way you can.

Be sure to draw the case of the future device - how it goes. You don’t need to be an artist here
You can simply start sketching one element, and it immediately becomes clear whether you are going in that direction or not:
Sketch
You can sketch on a napkin or A4 sheet; on the way home in the subway, in a cafe, on the knee - but anywhere. I repeat, quality does not matter.
2.2. Draw a sketch
Hand drawing is only good for one thing - speed. But often what is shown in the picture (if you are not a professional designer) is unrealizable in practice. Therefore, it is necessary to "land" your idea, pulling it to reality - from dimensions to detailing elements. It’s better to take a screenshot of the image of your electronic board and try to sketch over how you see the case on top of the resulting picture.
Here, quality is also not very important: the main thing is that the person to whom you demonstrate this will present what exactly you wanted to show, and that you are correctly understood:
- proportions;
- what parts the body will consist of;
- where are the controls and displays of the device;
- materials of which the parts are made.
It makes sense to check the result on someone who is doing the project with you. For example, show the drawing to the programmer who is sitting at the next table, and ask him how he understood the idea (and whether he understood it at all).
Detailed drawing
If a colleague, after looking at a drawing, starts asking about problems (“The board will not enter here, but how do you miss the cable here?”), Excellent. This means that, most likely, the form factor and proportions of the case are correct, he took your idea.
Well, then you just need to developers begin to agree on the details and "expand" the problem areas of the future product with additional explanatory drawings.
2.3 Develop a 3D model
If you have a little command of CAD, skip this step. If not, there’s only one piece of advice: start using CAD :) (but not AutoCAD - this is not it).
Below I bring my own list of the necessary software - with links to the official websites of developers. At the stage of model development, you can use the simplest and even free programs. After all, the task of the stage is relatively simple - just imagine the future building in real dimensions and proportions.
3D model
I strongly recommend that you design the design immediately in engineering software (from the list below) - save yourself a pack of nerves and a bucket of blood. No polygonal 3ds maxs and analogues. In extreme cases, you can use surface modelers (Rhino, Alias studio), and then in skilled hands.
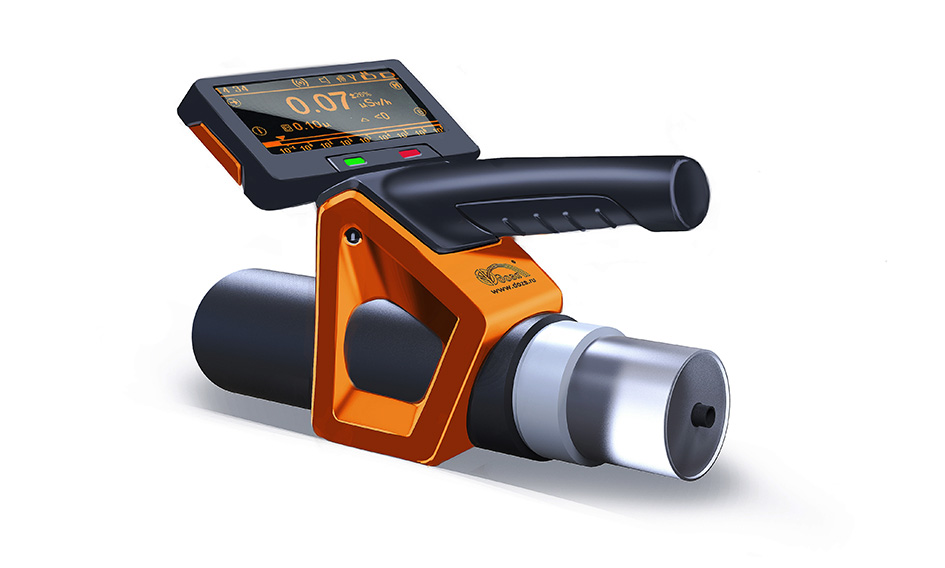
2.4. Visualization
This point could be skipped at all - visualization (rendering a model with photorealistic materials), in my observation, disappears from projects in its pure form. This is because the result (beautiful pictures) has lost its significance for the real product development process. It is needed only for advertising departments - so that managers can show pictures to investors, partners and superiors.
But if you still have to show your project to someone, then the visualizers built into CAD will be more than enough. If not, it’s easier to turn to freelancers and entrust this task to them - there is a ton of software that makes beautiful pictures literally on the fly (google keyshot , for example).
On renders it makes sense to show the degree of gloss (dullness) of the surface and color:

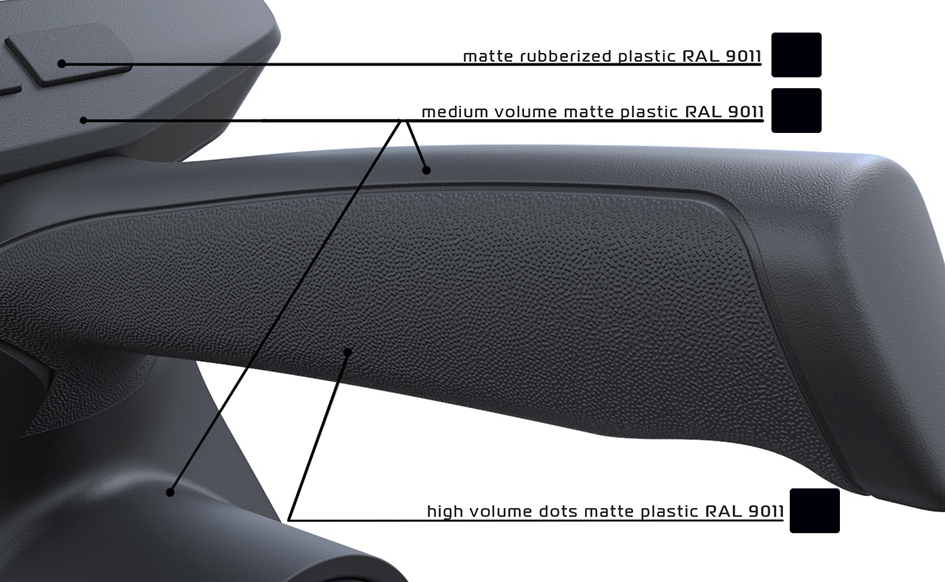
The handle of the device is made of frosted plastic
3. Engineering
In which program is it better to design the housing
Well, the appearance is roughly defined, now let's get down to engineering the future building and begin to study its design. Here you already have to master a new program - a computer-aided design system or CAD (CAD).
There are several dozen such programs, all different and designed for different audiences and solving different problems. So I made a list of those that fit most.
I must say right away that you need to search for free versions yourself, but they are freely available, they simply have restrictions or are intended for non-commercial use.
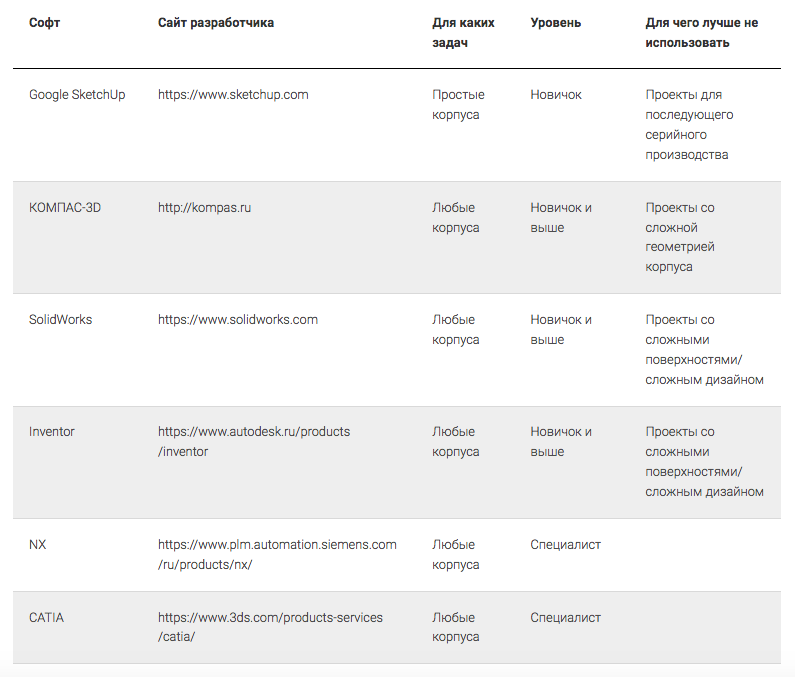
This is a list of CAD systems that I myself have encountered, but there are a great many of them - for every taste, task and wallet. Those who wish more CAD software are welcome to Wikipedia .
If you have enough qualifications to design electronics, then I recommend immediately looking at Compass, Solidworks or Inventor: these are easy programs to study, there are a lot of materials and videos on working with them on the network, and they have everything for development and production; in short, projects can be made in them based on any production technology. They are also almost omnivorous in terms of formats. I myself used SolidWorks for many years, I saw problems only when using complex surfaces.
3.1. Element layout
Now you need to simulate your board or main components in 3D. We will continue to build our building around this model. Try to more accurately measure all the details, the principle “by eye” is better not to apply - it is ideal to use the model from the manufacturer of the components and the board itself and check everything with “pens” on “live” parts - with a caliper.
No need to be afraid to make a mistake - there is always the opportunity to roll back and fix some size.
3.2. Engineering modeling
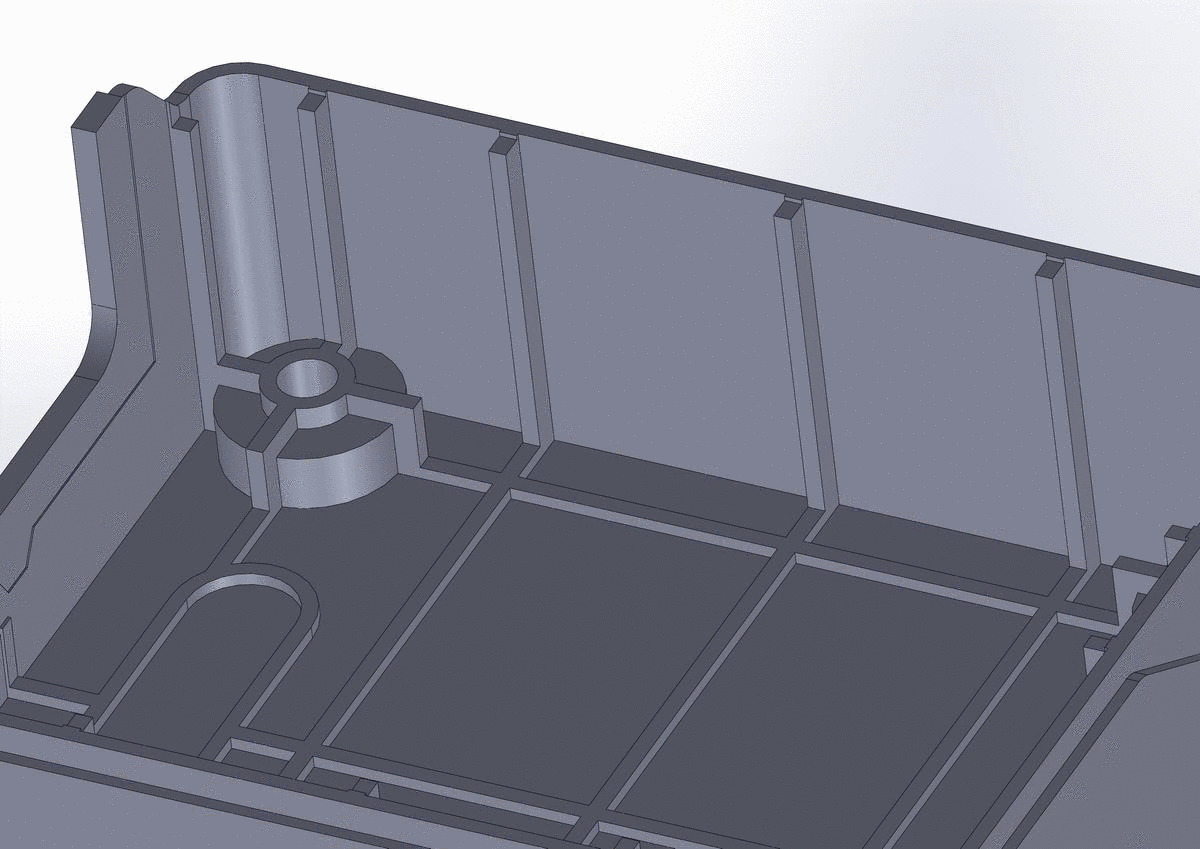
We build a housing around the board, starting from the basic primitives and the largest sizes and gradually detailing.
There are a few basic rules to follow:
- There should be no overlapping parts;
- You need to imagine how the case should be assembled, and all the details should be mated with each other;
- we must strive for equal thickness: all the walls of the body should be approximately the same thickness, for example, 1.5 mm:

You can read more about the design of the plastic housing here → formlab.ru/kak_razrabotat_korpus_iz_plastika.
3.3. Development for production technology
“Do I plan to produce my product in series or do it only for myself?”
At this stage in the development of the corps, it is very important to answer such a question as honestly as possible. If you are not planning, then go straight to the next stage of the development process. If there is a “series” in the plans, then you need to decide what edition the product will be produced.
And here - in detail about the circulation and its calculation.
Now, let's limit our Wishlist to a couple of dozen buildings. Such a circulation is ideally suited for the technology of casting polyurethane into silicone molds (parts are made of a material that is identical to ordinary plastic).
But first, we will make our product more technological. We need the body to be able to get out of the silicone mold (snap), which means that all the walls of the mold should be at a slight slope (slopes), literally 3 ° vertically:
Giving technological slopes to the ribs
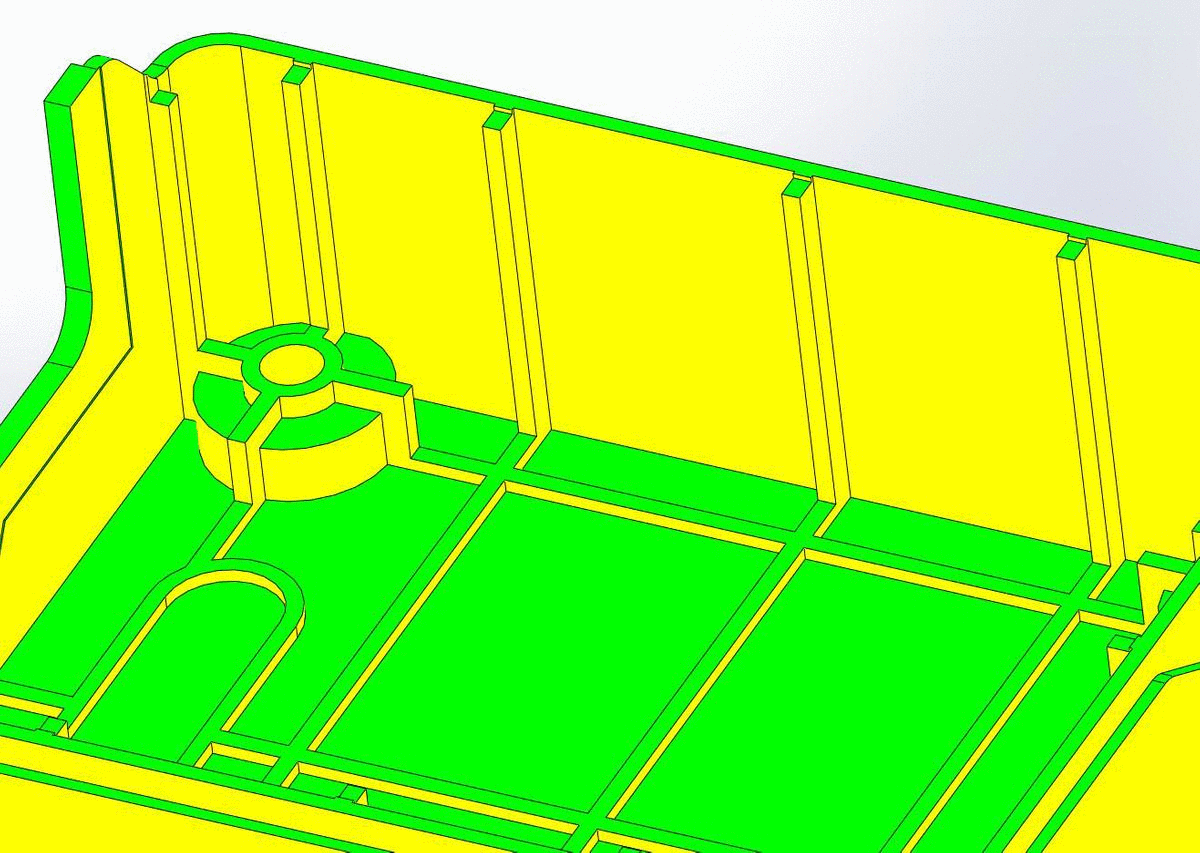
Check passed - surfaces turn green
I repeat again - no need to be afraid to make a mistake. The development cycle is designed so that all errors appear, and they can be fixed.
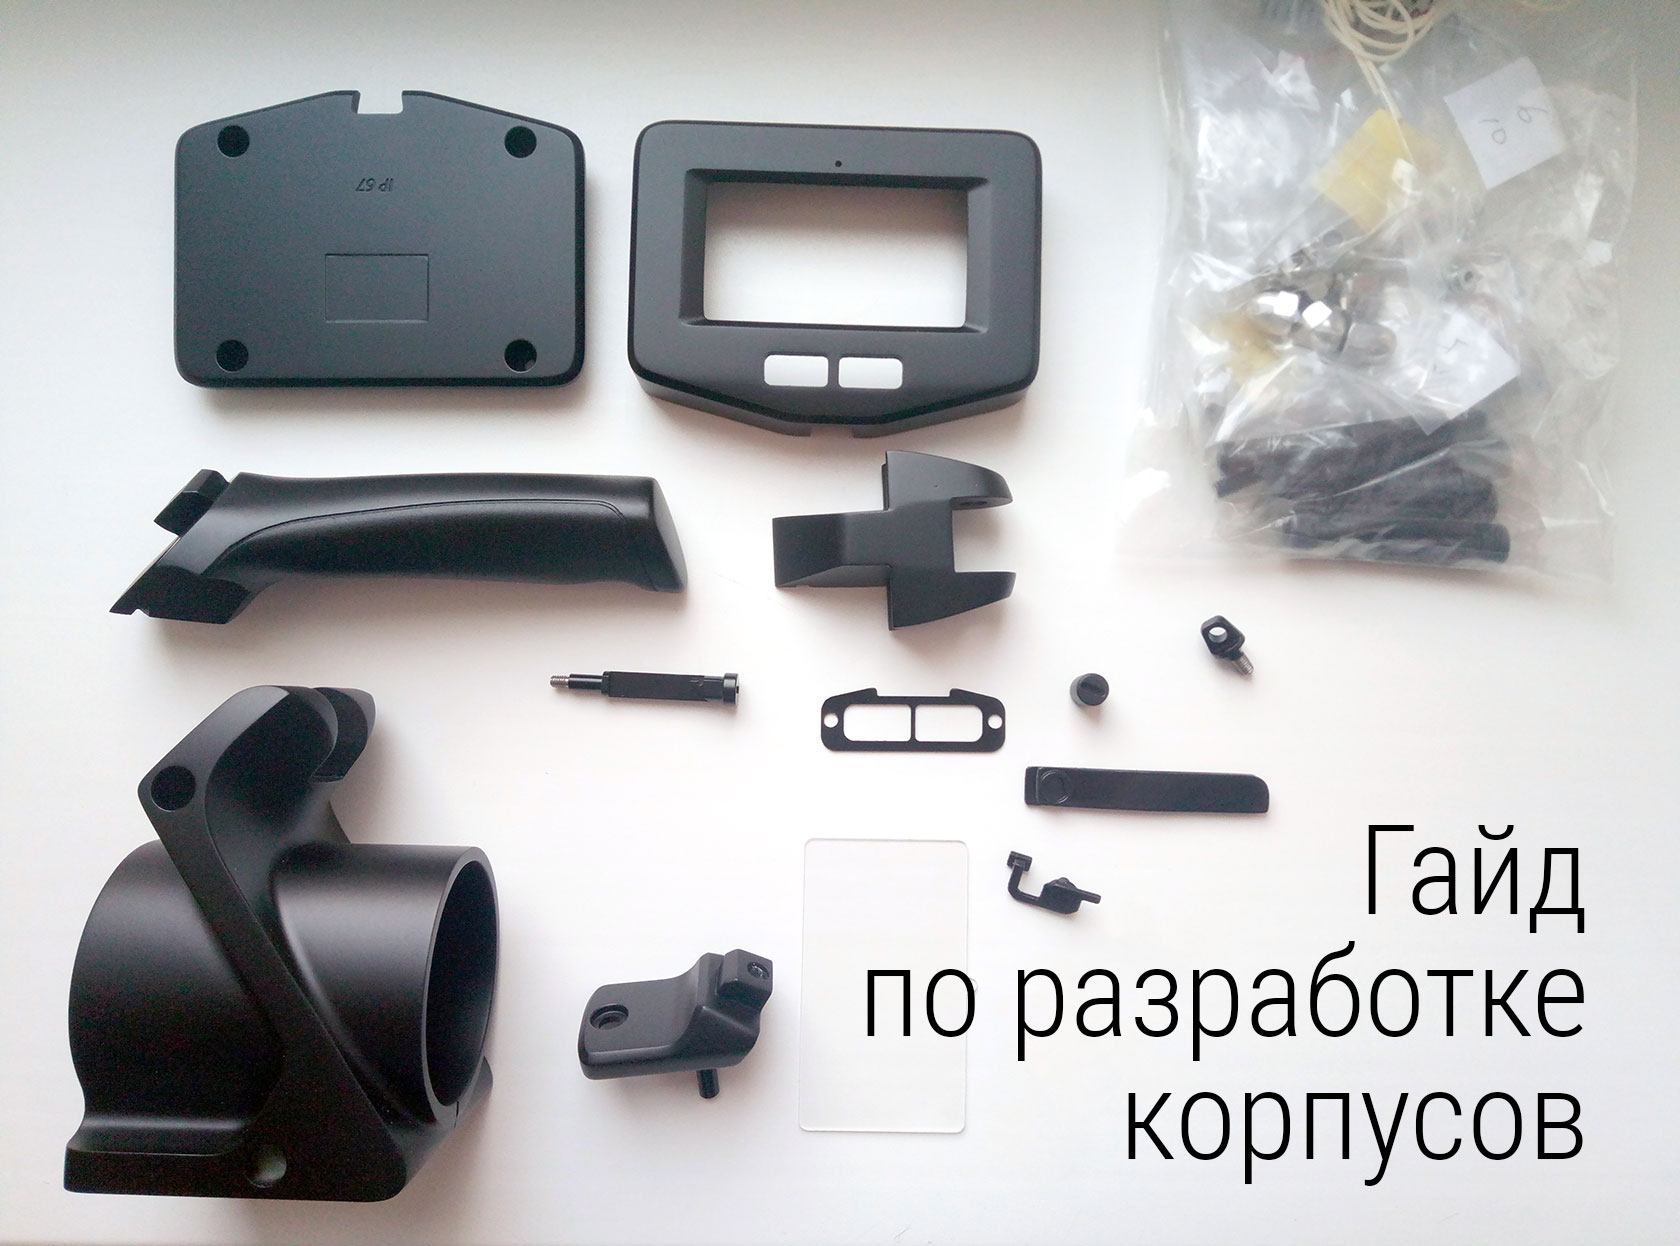
4. Design documentation
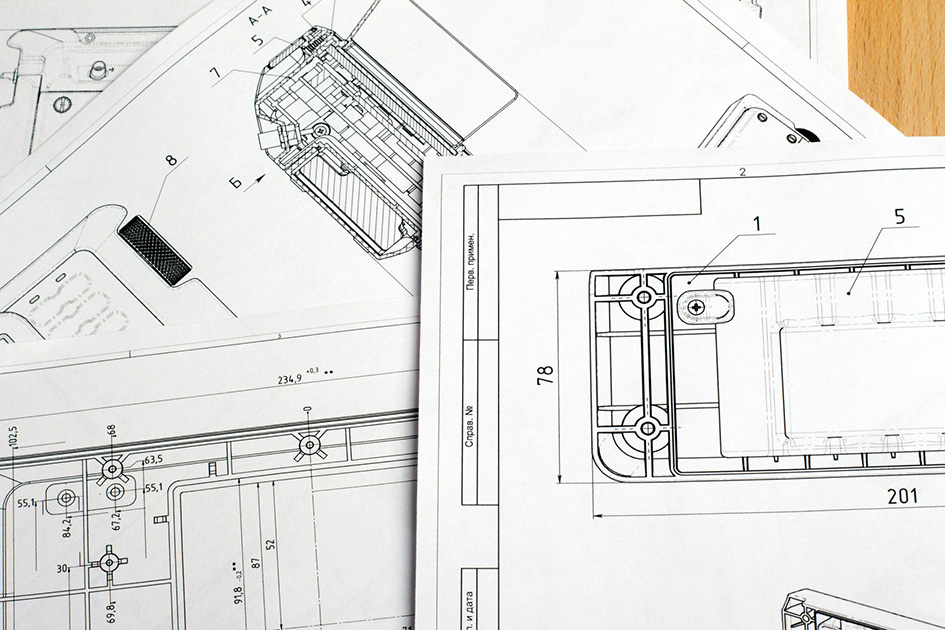
Examples of design documentation here → formlab.ru/cad.
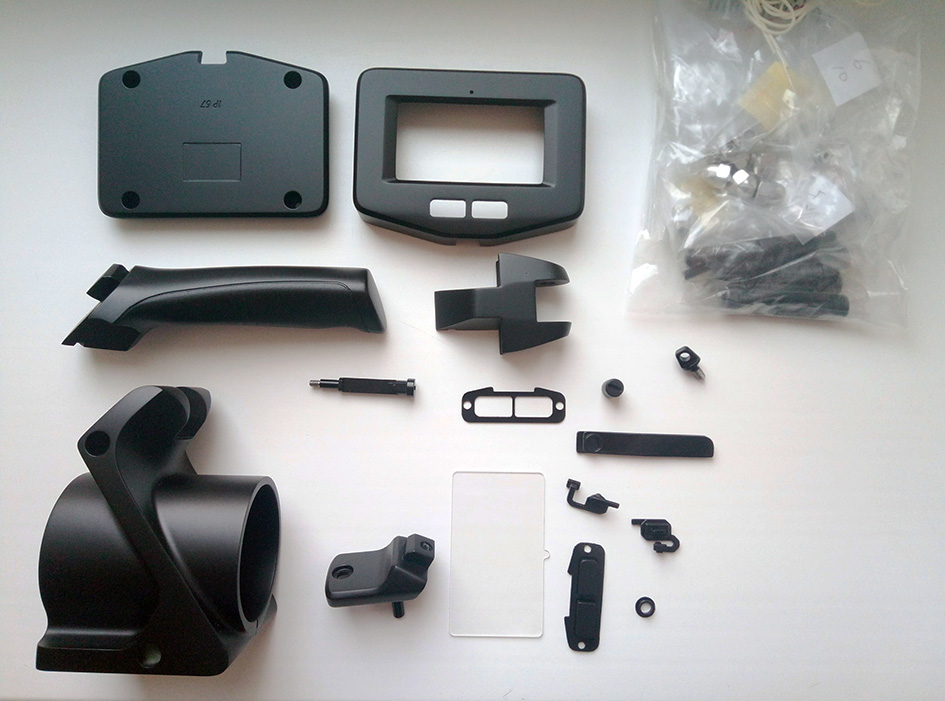
The package of design documentation is, in fact, a single package of files that should describe your production and all its components in the most detail for production. Inside will be (except for three-dimensional models from the previous section) detailed and assembly drawings, specifications (list of parts with their parameters), a document on production costs for this documentation.
All drawings are made, as a rule, in the same CAD system in which you developed the models, but I still recommend sending them to specialists with relevant experience for training: you can get burned very well without noticing a design error or without giving the necessary information on the drawing.
4.1. Parts and assembly drawings
I heard more than once that drawings are less and less used in design work. But this is not entirely true - the drawing cannot be replaced with anything. The thing is that the drawing describes what cannot be described in the model: tolerances, manufacturing accuracy, materials, methods for interfacing dependent parts, and much more - according to the standards for design documentation. If not by standards, then different enterprises will have different interpretations of documentation, which means that the number of problems in production can grow many times over.
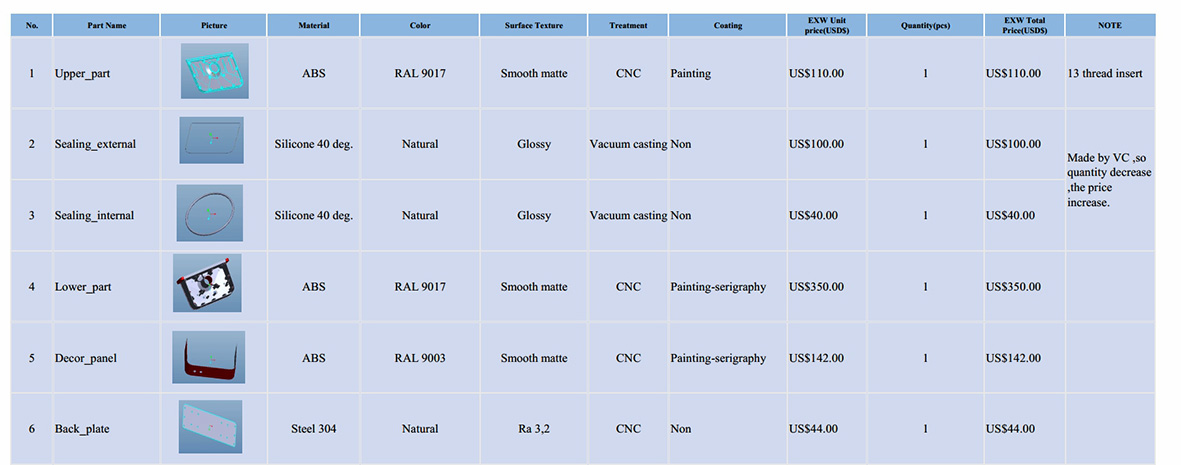
4.2. Specifications
Also an important component of the design documentation package. This description of all the details, quantity, material from which the case is made, price (if the component is purchased) and any other important information - all in the form of a single plate, which is filled at the very end of the development and supplements a package with drawings and a model.
4.3. Cost estimate
It’s a commercial offer, it’s also quotation, it’s an offer:
And if there is a red seal, it’s generally good:

5. Prototype
In fact, our case is designed, but this is still a picture on the monitor, a 3D model.
Experience shows that in any 3D model there are a number of drawbacks that are simply impossible to calculate in a virtual development environment. To identify and fix problems, you need a physical model - a prototype case. Let’s do it.
To do this, you need to export your model from the source program to a universal format, for example, .stl, and send it to a company that deals with 3D printing. There are a lot of them, a search to help you (and I would not chase the smallest price tag - it does not end with anything good).
The first question from such a printing company would be: “And by what technology do you want to print your case?”

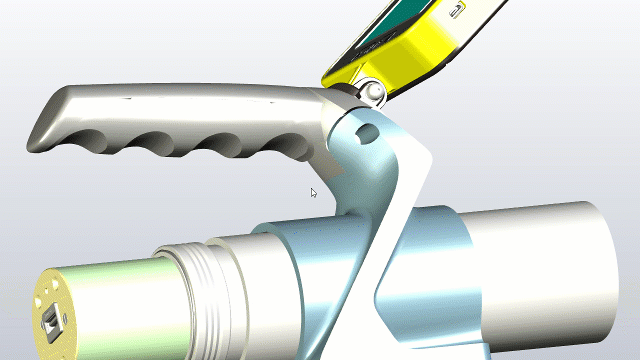
Body prototype
A reasonable question: there are already several dozen technologies, and each of them has its pros and cons. So let's decide: what do we want from the prototype?
- Of course, assemble the device and see how it will look - i.e. close the issue of collection. At the same time, check whether the device looks as expected.
- I would like to test the device in my life, tuck it in my pocket, put it outside under the snow or dip it into a real puddle to check for leaks.
- Show to investor, client, at the exhibition - solve marketing issues, business task, etc.
Unfortunately, the prototype of the first generation will not be able to simultaneously solve all these problems. On it, you can only check the collection and conditionally evaluate the appearance. “Conditionally” - because the printed model of the case will be far from the real one, produced in series. But so far this is not necessary.
5.1. Prototype production
For the prototype of the first generation (or layout), it is better to choose the cheapest technology - printing with plastic thread , or FDM . In short, the case will be printed from plastic filament in layers from the bottom up, something like this:
Printers that print with plastic thread or using FDM technology are now everywhere. All this is inexpensive (a couple of thousand rubles per case, the prices are conditional hereinafter).
Sometimes it’s even advisable to buy a printer and make layouts immediately during development, but this only saves time.
If the means allow, it is better to order better printing using SLA or SLS technologies (here the cost will already be from 10 thousand rubles). About how to choose the right production technology for the case, I already reported on Habré . And so as not to get up twice, here is my video about “ When and why is 3D printing useless ?”
Milling of plastic and metal - the necessary body or part is milled from a plastic blank, which differs little from the serial product. Such a case will cost from 30 thousand rubles.
Casting in silicone is generally a good option (and the only one if you need tightness of the case or “rubber”, ie flexible parts). Such a case will already cost from 50 thousand rubles.
5.2. Assembly and testing
As a result of prototyping, you will immediately see where there are problems in the construction and design of the case. Therefore, the next step will be the return to the previous stage and making changes to the model. And so - several times, depending on your accuracy and experience.
Specialists manage a couple of generations of prototypes and move on, beginners need more - sometimes it even reaches dozens. Why is prototyping important? The more prototypes will be manufactured, the more problems will be identified, which means that the final product will be as thought out as possible.
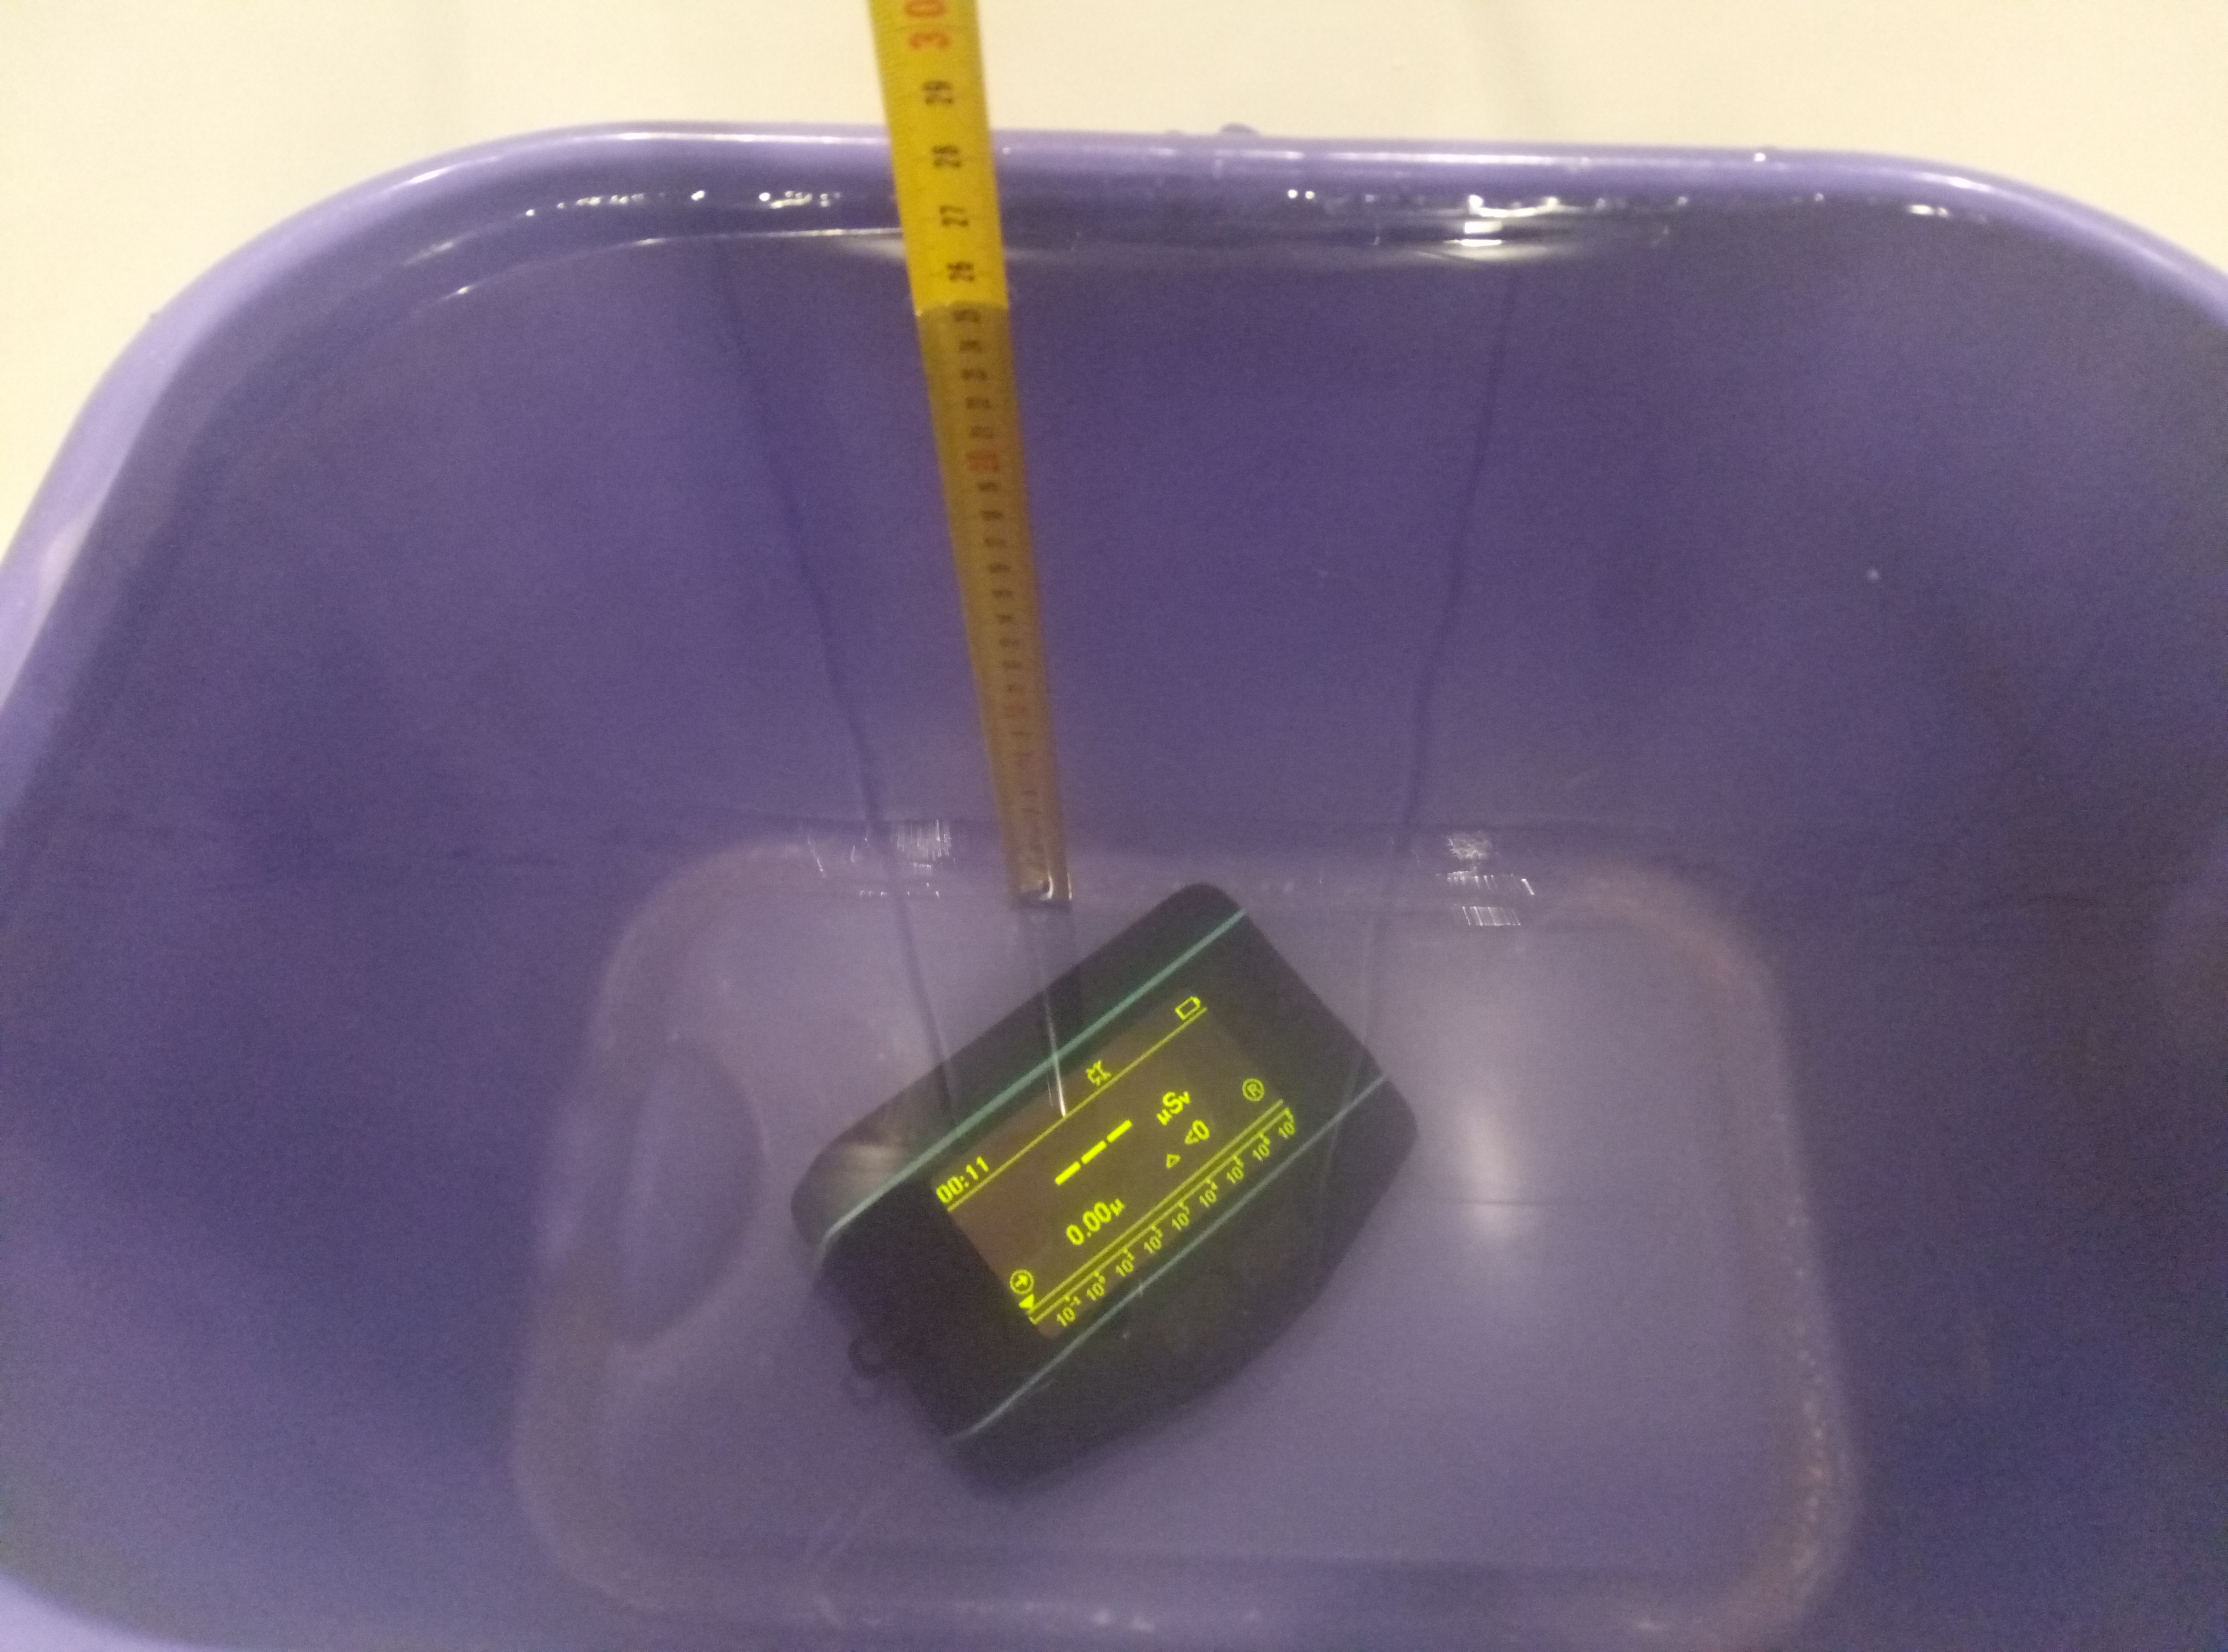
Tests: the device in the case developed by us lay for a day in a bucket of water and after that continued to work
5.3. Editing models and documentation
No one even thinks about this item at the start, and avoiding edits is unrealistic: always (even not so - on absolutely all projects) after the testing stage (prototyping, prototyping) errors are identified that need to be fixed in the model and documentation. And then again and again. Corrections should continue until the team runs out of budget or the feeling that the model is “licked” completely, the prototype is perfect, you need to go to mass production.
6. Test batch
The test batch differs from the serial one, firstly, in circulation: these are, as a rule, only a few products. Secondly, another, less massive, technology. And that is exactly why each copy from the test batch is “golden”. On Habr even prompted the term golden sample, - it fully reflects the essence. Let's see how to organize all this.
6.1. Production
Any production begins with preparation for it. Let's see how this is done (do not forget that our conditional circulation is two dozen buildings). As a production technology, we take polyurethane molding in a silicone mold.
Search for production
Finding a production is no different than choosing any other contractor. With the exception of the budget, it is absolutely uninteresting for a large plant to deal with a small order. In this case, you must either persevere or immediately weed out those who do not make contact.
The algorithm is as follows: we are looking for enterprises that use the technology that we need in production, we attach our model to the application in the universal .step (or .iges) format, we write a letter to the factory where we indicate the circulation, requirements (color, body rigidity, availability on inscriptions) and send it to all who are found. Waiting for feedback. Production that will respond to your letter will certainly ask you clarifying questions. Answer them in detail.
For those who are too lazy to look for manufacturers of the case on their own, we have made the “Zakazist” site - zakaz.ist/plast.
Another recommendation is to ignore the geography of the enterprise: it makes no sense to choose “closer”. This will definitely not give you real control over the production process, but it will definitely increase the price. China here is generally a separate story about which volumes can be written.
Mold production
As I wrote earlier, we now restrict ourselves to a simple example - casting polyurethane in silicone molds. Other technologies are more complicated.
When the contract is concluded and its advance part is paid, the plant begins to produce molds for production. Since we agreed that we need dozens of cases, that means the mold will be made of silicone, and before that we will be given a master model of our case. There is a lot of video on the network with this process (look for the key “casting into silicone molds”), and below is a photograph of the mold itself:

In such a snap, they begin to produce test cases of cases - to understand how you will be satisfied with the resulting case. If it doesn’t work, then you need to make changes to the model of the case, and then start the whole development process again, or limit yourself to a “cosmetic” alteration. It is difficult to guess the number of changes and the degree of changes, guarantees are also unrealistic, you just need to show common sense and discuss the changes with the plant’s specialists.
6.2. User Feedback
And this is exactly what the test batch is being done for - users will tell you things that they can’t get to on their own. Conventionally, we assume that the device will be used like this, but for a real user the scenario will be completely different; and how - about this you can even not guess.
For clarity, an example. A couple of years after the product went into series, it turned out that users were forced to regularly open the device’s case. And the design of the fasteners and latches was made in the calculation of the reverse scenario - they hung and forgot.And if a test batch were made and decisions were made with an eye to testing not only the prototype, but also this batch, then the problem would not have come to a conclusion. But there was no test batch, and users are still breaking the case (more on formlab.ru/alarm_system_pritok).
Be sure to not only listen to what they say (because everyone is lying and not talking), but also try to understand what they are silent about (for example, a lot of things become clear from examining the samples, if you see chips on the case, scratches from a screwdriver, pinched screws, etc.) .d.) All this gives a ton of information that will tell about the problems of installation and ergonomics much better than the user himself - he may not say anything, as he considers that this is not essential for the project: so, nonsense, you think, it was a little uncomfortable crawl with a screwdriver or for a long time could not get in the screw head, because it is not visible well.
Everything collected in this way, including even seemingly small things, must be carefully collected into a single document, determine the importance of each identified problem or problem, and make the necessary changes to the documentation and the model.
6.3. Editing models and documentation
Everything is simple here - an adequate production will definitely let you know about errors in your model that will need to be fixed in accordance with the recommendation given by this production.
However, if you are told that the model is “low-tech”, but do not specify why, be sure to ask directly what exactly you don't like. Or contact a third-party designer to check the model and eliminate the shortcomings.
You can still be mistaken until the choice of technology - there is an opportunity to return to the previous stages, to fix, change or test something. But from this point on, playing back will become more difficult and many times more expensive.
One of the most common problems, for example, when the prototyping stage was not completed (here: formlab.ru/12mln-v-minus is a story about how people burned 12 million rubles in such a way) or which tools were not taken into account at the production stage slight changes at that moment. The latch does not work as long as necessary, something crunches during assembly or the seam between the parts of the body is uneven - all this can be fixed at the factory to
However, if you worked well with the mistakes in the previous stages, then there will be no problems with the production.
And, of course, a lot depends on the technology that you chose for the production of your building: each has a different cost, approach and features.
7. Series production
7.1. Production

Here's what the development and launch of a simple plastic case in small print looks like.
Is it hard? Not.You just need to move - step by step - and not force the process.
I am sure that you have or have questions about the article. I will be glad to complement it with what is interesting or seems important to you.
Afterword
What aspects of housing design have I not touched on here?
- Development of buildings for large print runs (from 10,000 pieces).
The process itself will be the same as above, but much depends on the complexity of your case, on design requirements, and in general the task can be radically more complicated than described. But again, in general, the steps are the same.
- “I need a sheet metal case.”
About the same, but the design of the case itself, of course, is different. For example, here is a translation (formlab.ru/kak_razrabotat_korpus_iz_metalla) of an article on how to design such a building, but the topic is very large in itself.
- Industrial design, when the case requires not just design, but development to defeat competitors.
This will somehow devote a separate article.
- Ergonomic problems and the convenience of the case as a whole.
Also a serious topic, worthy of a separate material.
The conclusion is banal: the development and organization of production of the case on its own is not the most difficult thing.
It is very likely that this process will work without errors. The main thing is not to rush, do everything consistently and constantly check yourself at each stage.

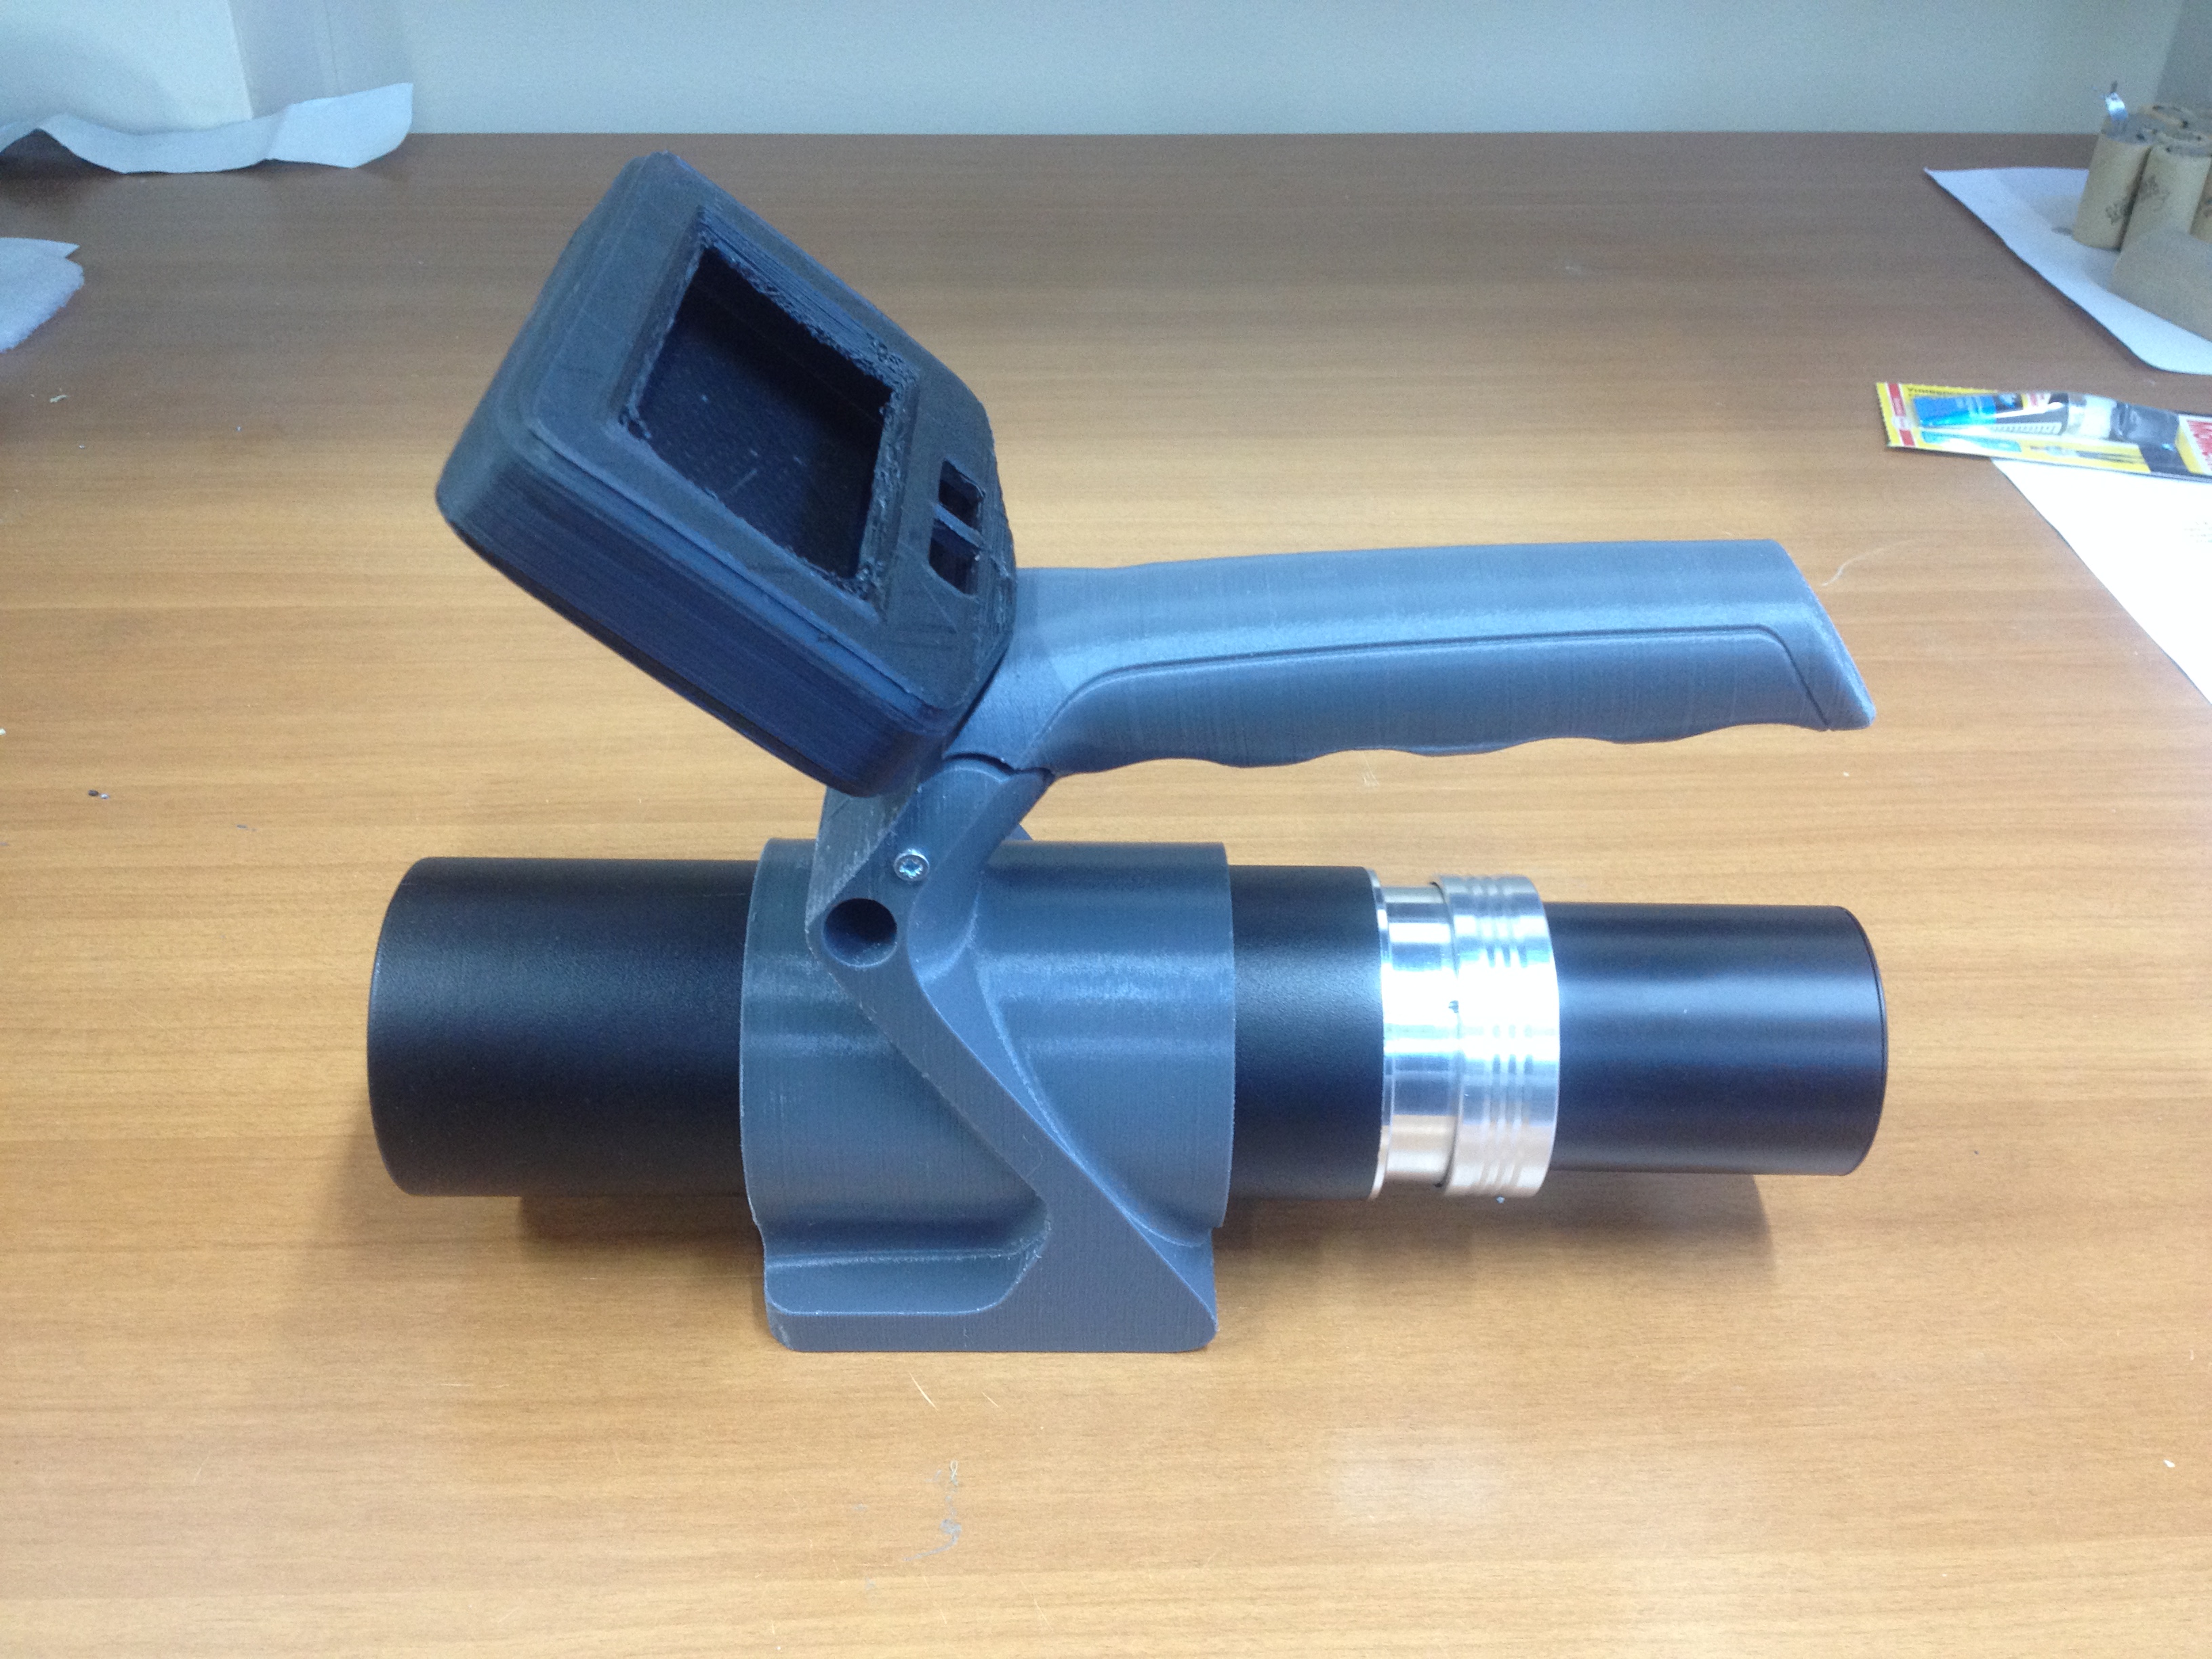
The result of the development: the case of the Zyablik MKS-17D dosimeter-radiometer
PS If you are still not enough, go to the page → formlab.ru/habr and download the Advanced Enclosure Development Guide guide. This guide is written specifically for the most
