You see a guide in front of you that tells you how to create a chat application in Python, Django, and React.
Unlike other manuals, I do not use Python and Django for WebSocket connections. Despite the fact that it sounds cool from a technical point of view, it works rather sluggishly and in itself is expensive, especially if you have a decent number of users. Languages like C ++, Go, and Elixir do a much better job of the chat core.
In this tutorial, we will use Stream, a chat API that takes care of WebSocket connections and other heavy aspects using Go, Raft and RocksDB.
Content:
- React demo chat interface
- Install Django / Python
- User Authorization
- Django rest framework
- Generation of tokens for access to the chat Stream server
- React Authorization Integration
- Sending messages from a Python server
- Last thoughts
Github repository with code from an article
Let's get started!
Step 1: React Demo Chat Interface
Before we start thinking about the Python part, let's deploy a simple interface on React so that we have something beautiful and visual:
$ yarn global add create-react-app $ brew install node && brew install yarn # skip if installed $ create-react-app chat-frontend $ cd chat-frontend $ yarn add stream-chat-react
Replace the code in
src/App.js
with the following:
import React from "react"; import { Chat, Channel, ChannelHeader, Thread, Window } from "stream-chat-react"; import { MessageList, MessageInput } from "stream-chat-react"; import { StreamChat } from "stream-chat"; import "stream-chat-react/dist/css/index.css"; const chatClient = new StreamChat("qk4nn7rpcn75"); // Demo Stream Key const userToken = "eyJ0eXAiOiJKV1QiLCJhbGciOiJIUzI1NiJ9.eyJ1c2VyX2lkIjoiY29vbC1za3ktOSJ9.mhikC6HPqPKoCP4aHHfuH9dFgPQ2Fth5QoRAfolJjC4"; // Demo Stream Token chatClient.setUser( { id: "cool-sky-9", name: "Cool sky", image: "https://getstream.io/random_svg/?id=cool-sky-9&name=Cool+sky" }, userToken ); const channel = chatClient.channel("messaging", "godevs", { // image and name are required, however, you can add custom fields image: "https://cdn.chrisshort.net/testing-certificate-chains-in-go/GOPHER_MIC_DROP.png", name: "Talk about Go" }); const App = () => ( <Chat client={chatClient} theme={"messaging light"}> <Channel channel={channel}> <Window> <ChannelHeader /> <MessageList /> <MessageInput /> </Window> <Thread /> </Channel> </Chat> ); export default App;
Now, use the
yarn start
command to see the chat in action!
Step 2: Install Django / Python (skip this step if you already have everything you need)
Make sure you have Python 3.7 and it is running:
$ brew install python3 $ pip install virtualenv virtualenvwrapper $ export WORKON_HOME=~/Envs $ source /usr/local/bin/virtualenvwrapper.sh $ mkvirtualenv chatexample -p `which python3` $ workon chatexample
If it doesn’t work, try the following code:
$ python3 -m venv chatexample $ source chatexample/bin/activate
Now that you are in your virtual environment, you should see python 3 at startup:
$ python --version
To create a new project in Django, use the following code:
$ pip install django $ django-admin startproject mychat
And run the application:
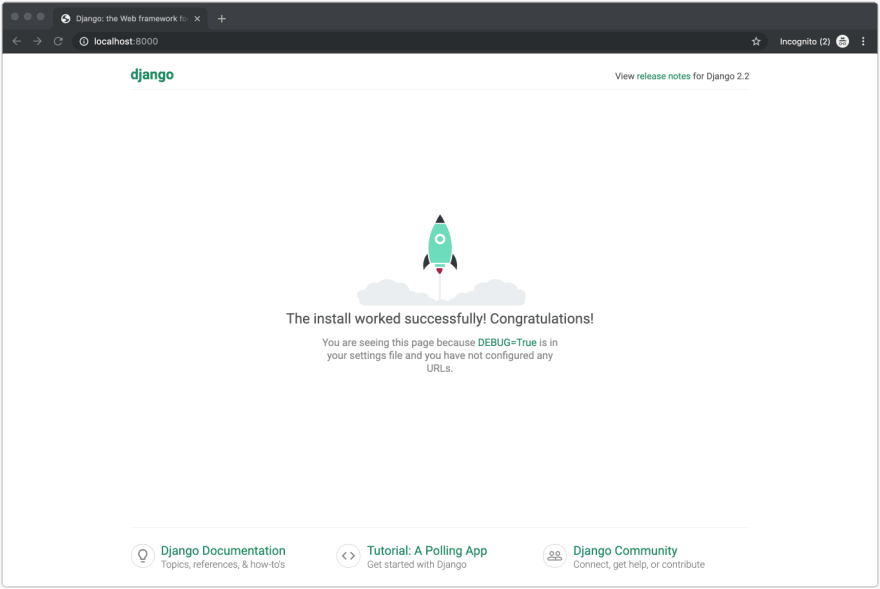
$ cd mychat $ python manage.py runserver
Now when you open
http://localhost:8000
, you will see the following:
Step 3: User Authorization
The next step is to configure user authorization in Django.
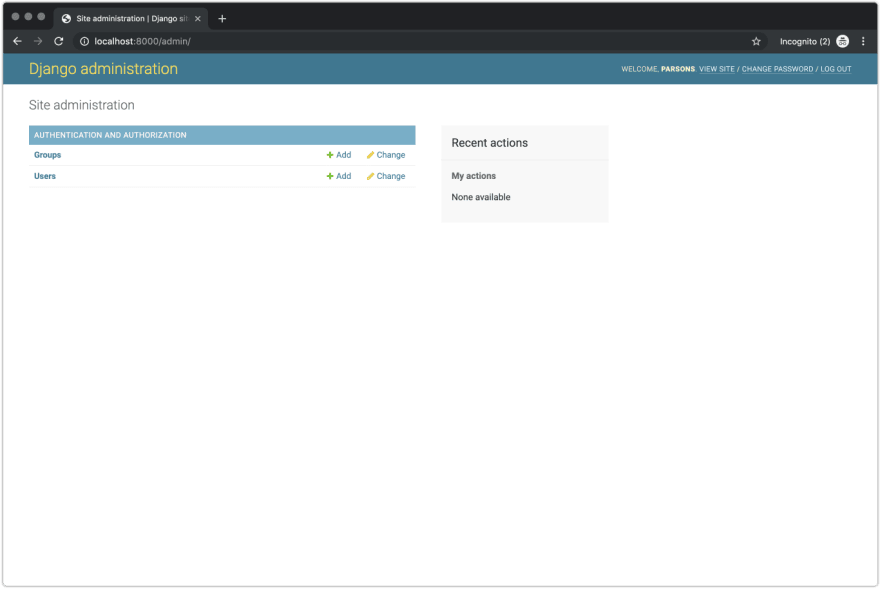
$ python manage.py migrate $ python manage.py createsuperuser $ python manage.py runserver
Go to
http://localhost:8000/admin/
and log in. Voila!
You will see an administrator tab similar to the one below:
Step 4: Django Rest Framework
One of my favorite packages for integrating React with Django is the Django Rest Framework. To make it work, you need to create endpoints for:
- User registration
- User login.
We could make them ourselves, however there is a package called Djoser that solves this problem. It will configure the necessary API endpoints for user registration, login, password reset, etc.
To install Djoser, use the following:
$ pip install djangorestframework djoser
After that, edit
urls.py
and change the contents of the file as follows:
from django.contrib import admin from django.urls import path, include urlpatterns = [ path('admin/', admin.site.urls), path('auth/', include('djoser.urls')), path('auth/', include('djoser.urls.authtoken')), ]
When done, edit
settings.py
and make changes:
INSTALLED_APPS = [ 'django.contrib.admin', 'django.contrib.auth', 'django.contrib.contenttypes', 'django.contrib.sessions', 'django.contrib.messages', 'django.contrib.staticfiles', 'rest_framework', 'rest_framework.authtoken', 'djoser', ] REST_FRAMEWORK = { 'DEFAULT_AUTHENTICATION_CLASSES': ( 'rest_framework.authentication.TokenAuthentication', ) }
For more information about the API endpoints that Djoser provides, see the following:
https://djoser.readthedocs.io/en/latest/sample_usage.html
Now let's continue and test the registration endpoint:
$ curl -X POST http://127.0.0.1:8000/auth/users/ --data 'username=djoser&password=alpine12'
Step 5: Generate Tokens to Access the Chat Stream Server
Now we need to configure Djoser views to generate Stream tokens. So, let's begin.
Let's organize our files a bit and create a chat application folder in our project (make sure you are in the correct directory):
$ python manage.py startapp auth
Install stream-chat:
$ pip install stream-chat
Create a custom serializer in
auth/serializers.py
using the following logic:
from djoser.serializers import TokenSerializer from rest_framework import serializers from djoser.conf import settings as djoser_settings from stream_chat import StreamChat from django.conf import settings class StreamTokenSerializer(TokenSerializer): stream_token = serializers.SerializerMethodField() class Meta: model = djoser_settings.TOKEN_MODEL fields = ('auth_token','stream_token') def get_stream_token(self, obj): client = StreamChat(api_key=settings.STREAM_API_KEY, api_secret=settings.STREAM_API_SECRET) token = client.create_token(obj.user.id) return token
Lastly, use a custom serializer to update the
settings.py
file:
STREAM_API_KEY = YOUR_STREAM_API_KEY # https://getstream.io/dashboard/ STREAM_API_SECRET = YOUR_STREAM_API_SECRET DJOSER = { 'SERIALIZERS': { 'token': 'auth.serializers.StreamTokenSerializer', } }
Restart the migration:
$ python manage.py migrate
To verify that it works, get to the endpoint using a POST request:
$ curl -X POST http://127.0.0.1:8000/auth/token/login/ --data 'username=djoser&password=alpine12'
Return should
auth_token
and
stream_token
.
Step 6: Integrate React Authorization
For obvious reasons, adding authorization to the frontend is an important step. In our case, this is especially useful, since we can extract the user token from the API (which runs on Python) and use it dynamically when sending messages.
First, install CORS, the middleware package for Django:
$ pip install django-cors-headers
Then modify the
settings.py
file to refer to the
djors-cors-header
:
INSTALLED_APPS = ( ... 'corsheaders', ... ) MIDDLEWARE = [ ... 'corsheaders.middleware.CorsMiddleware', 'django.middleware.common.CommonMiddleware', ... ]
Finally, add the following to your
settings.py
file:
CORS_ORIGIN_ALLOW_ALL = True
The next step will require a few changes to your interface. First you need to make sure that you have all the dependencies installed through yarn:
$ yarn add axios react-dom react-router-dom
Next, create the following files in the
src/
directory:
- AuthedRoute.js
- UnauthedRoute.js
- withSession.js
- Login.js
- Chat.js
App.js
import React from "react"; import { BrowserRouter as Router, Switch } from "react-router-dom"; import Chat from "./Chat"; import Login from "./Login"; import UnauthedRoute from "./UnauthedRoute"; import AuthedRoute from "./AuthedRoute"; const App = () => ( <Router> <Switch> <UnauthedRoute path="/auth/login" component={Login} /> <AuthedRoute path="/" component={Chat} /> </Switch> </Router> ); export default App;
AuthedRoute.js
import React from "react"; import { Redirect, Route } from "react-router-dom"; const AuthedRoute = ({ component: Component, loading, ...rest }) => { const isAuthed = Boolean(localStorage.getItem("token")); return ( <Route {...rest} render={props => loading ? ( <p>Loading...</p> ) : isAuthed ? ( <Component history={props.history} {...rest} /> ) : ( <Redirect to={{ pathname: "/auth/login", state: { next: props.location } }} /> ) } /> ); }; export default AuthedRoute;
UnauthedRoute.js
import React from "react"; import { Redirect, Route } from "react-router-dom"; const AuthedRoute = ({ component: Component, loading, ...rest }) => { const isAuthed = Boolean(localStorage.getItem("token")); return ( <Route {...rest} render={props => loading ? ( <p>Loading...</p> ) : !isAuthed ? ( <Component history={props.history} {...rest} /> ) : ( <Redirect to={{ pathname: "/" }} /> ) } /> ); }; export default AuthedRoute;
withSession.js
import React from "react"; import { withRouter } from "react-router"; export default (Component, unAuthed = false) => { const WithSession = ({ user = {}, streamToken, ...props }) => user.id || unAuthed ? ( <Component userId={user.id} user={user} session={window.streamSession} {...props} /> ) : ( <Component {...props} /> ); return withRouter(WithSession); };
Login.js
import React, { Component } from "react"; import axios from "axios"; class Login extends Component { constructor(props) { super(props); this.state = { loading: false, email: "", password: "" }; this.initStream = this.initStream.bind(this); } async initStream() { await this.setState({ loading: true }); const base = "http://localhost:8000"; const formData = new FormData(); formData.set("username", this.state.email); formData.set("password", this.state.password); const registration = await axios({ method: "POST", url: `${base}/auth/users/`, data: formData, config: { headers: { "Content-Type": "multipart/form-data" } } }); const authorization = await axios({ method: "POST", url: `${base}/auth/token/login/`, data: formData, config: { headers: { "Content-Type": "multipart/form-data" } } }); localStorage.setItem("token", authorization.data.stream_token); await this.setState({ loading: false }); this.props.history.push("/"); } handleChange = e => { this.setState({ [e.target.name]: e.target.value }); }; render() { return ( <div className="login-root"> <div className="login-card"> <h4>Login</h4> <input type="text" placeholder="Email" name="email" onChange={e => this.handleChange(e)} /> <input type="password" placeholder="Password" name="password" onChange={e => this.handleChange(e)} /> <button onClick={this.initStream}>Submit</button> </div> </div> ); } } export default Login;
Chat.js
import React, { Component } from "react"; import { Chat, Channel, ChannelHeader, Thread, Window } from "stream-chat-react"; import { MessageList, MessageInput } from "stream-chat-react"; import { StreamChat } from "stream-chat"; import "stream-chat-react/dist/css/index.css"; class App extends Component { constructor(props) { super(props); this.client = new StreamChat("<YOUR_STREAM_APP_ID>"); this.client.setUser( { id: "cool-sky-9", name: "Cool Sky", image: "https://getstream.io/random_svg/?id=cool-sky-9&name=Cool+sky" }, localStorage.getItem("token") ); this.channel = this.client.channel("messaging", "godevs", { image: "https://cdn.chrisshort.net/testing-certificate-chains-in-go/GOPHER_MIC_DROP.png", name: "Talk about Go" }); } render() { return ( <Chat client={this.client} theme={"messaging light"}> <Channel channel={this.channel}> <Window> <ChannelHeader /> <MessageList /> <MessageInput /> </Window> <Thread /> </Channel> </Chat> ); } } export default App;
Be sure to replace
YOUR_STREAM_APP_ID
with the valid Stream app ID, which can be found on the dashboard .
Restart the application on the front end and you will see the authorization! Enter the email address and password, the token will be requested and stored in local storage.
Step 7: Sending Messages from the Python Server
If you suddenly want to create a chat API using your Python backend, there is a special command that you can use.
Make sure the installed applications look like this in
settings.py
:
INSTALLED_APPS = [ 'corsheaders', 'django.contrib.admin', 'django.contrib.auth', 'django.contrib.contenttypes', 'django.contrib.sessions', 'django.contrib.messages', 'django.contrib.staticfiles', 'rest_framework', 'rest_framework.authtoken', 'djoser', ]
Next, create the chat / management / commands directory. In this directory, add a file called
broadcast.py
with the following contents:
from django.core.management.base import BaseCommand, CommandError from django.conf import settings from stream_chat import StreamChat class Command(BaseCommand): help = 'Broadcast the message on your channel' def add_arguments(self, parser): parser.add_argument('--message') def handle(self, *args, **options): client = StreamChat(api_key=settings.STREAM_API_KEY, api_secret=settings.STREAM_API_SECRET) client.update_user({"id": "system", "name": "The Server"}) channel = client.channel("messaging", "kung-fu") channel.create("system") response = channel.send_message({"text": "AMA about kung-fu"}, 'system') self.stdout.write(self.style.SUCCESS('Successfully posted a message with id "%s"' % response['message']['id']))
You can try sending a chat message as follows:
$ python manage.py broadcast --message hello
And you will see such a response:

Last thoughts
I hope you enjoyed this tutorial on creating a chat application in Django, Python, and React!
For an interactive tour of Stream Chat , please take a look at our guide on creating an API on the Stream website . If you enjoy digging into the code for Stream Chat React components, full documentation can be found here . If you want to create a chat on Stream, we are pleased to offer various SDKs for popular languages and frameworks up to the latest iOS (Swift) .
That's all. See you at the open webinar on Django ORM Tricks .