Recently, we released InterSystems API Manager (IAM), a new component of the InterSystems IRIS Data Platform that provides monitoring, control and traffic control to / from the web API within the IT infrastructure.
In this article, I will show you how to configure IAM and demonstrate some of the many features that are available to you with IAM. InterSystems API Manager allows you to:
- Observe the API, understand who uses the API, which APIs are the most popular, and which require improvement.
- Control who uses the API and restrict the use of the API from simple access restrictions to restrictions depending on the request - you have customizable controls and you can quickly respond to changes in API consumption patterns.
- Protect APIs with centralized security mechanisms such as OAuth2.0, LDAP, or Key Token Authentication.
- Simplify the work of third-party developers and provide them with excellent experience with the API by opening a special portal for developers.
- Scale the API and ensure minimal delay in response.
Management of the API is necessary for the transition to SOA or microservice architecture, simplifying integration between individual (micro) services, making them accessible to all external and internal consumers. As a result, new APIs are becoming easier to create, maintain, and consume.
If you are already using InterSystems IRIS, you can add the IAM option to your license. The IAM option is free for InterSystems IRIS customers, but to start using IAM, you need to request a new license key from InterSystems.
If you are not already using InterSystems IRIS and are only planning on trying out the InterSystems API Manager, contact InterSystems.
Getting started and installation
InterSystems IAM customers can download the "Software Distribution" section from the WRC website and run it as a Docker container. Minimum system requirements:
- Docker 04.17.0+.
- Docker Compose 1.12.0+.
- InterSystems IRIS 2019.1.1+.
Initially, you need to download the Docker image (Important! The archive with the WRC is not a Docker image, you need to unpack it, inside the Docker image):
docker load -i iam_image.tar
This command will make the IAM image available for later use on your server. IAM works as a separate container, so you can scale it independently of InterSystems IRIS. To start IAM, you need access to InterSystems IRIS to download the license.
Configure InterSystems IRIS:
- Turn on the web app
/api/IAM
- Enable
IAM
User - Change
IAM
User Password
Now run the IAM container. In the archive you will find iam-setup
scripts for Windows and Unix (and Mac). These scripts will help you set up environment variables correctly, allowing the IAM container to connect to InterSystems IRIS. Here is an example of a script on Mac:
source ./iam-setup.sh Welcome to the InterSystems IRIS and InterSystems API Manager (IAM) setup script. This script sets the ISC_IRIS_URL environment variable that is used by the IAM container to get the IAM license key from InterSystems IRIS. Enter the full image repository, name and tag for your IAM docker image: intersystems/iam:0.34-1-1 Enter the IP address for your InterSystems IRIS instance. The IP address has to be accessible from within the IAM container, therefore, do not use "localhost" or "127.0.0.1" if IRIS is running on your local machine. Instead use the public IP address of your local machine. If IRIS is running in a container, use the public IP address of the host environment, not the IP address of the IRIS container. xxx.xxx.xxx.xxx Enter the web server port for your InterSystems IRIS instance: 52773 Enter the password for the IAM user for your InterSystems IRIS instance: Re-enter your password: Your inputs are: Full image repository, name and tag for your IAM docker image: intersystems/iam:0.34-1-1 IP address for your InterSystems IRIS instance: xxx.xxx.xxx.xxx Web server port for your InterSystems IRIS instance: 52773 Would you like to continue with these inputs (y/n)? y Getting IAM license using your inputs... Successfully got IAM license! The ISC_IRIS_URL environment variable was set to: http://IAM:****************@xxx.xxx.xxx.xxx:52773/api/iam/license WARNING: The environment variable is set for this shell only! To start the services, run the following command in the top level directory: docker-compose up -d To stop the services, run the following command in the top level directory: docker-compose down URL for the IAM Manager portal: http://localhost:8002
As you can see, the full image name, IP address, InterSystems IRIS port and password for the IAM user are all you need to get started.
Instead of running the script, you can set the environment variables manually:
ISC_IAM_IMAGE=intersystems/iam:0.34-1-1 ISC_IRIS_URL=http://IAM:<PASS>@<IP>:<PORT>/api/iam/license
Launch
Now run IAM by running the command:
docker-compose up -d
This command organizes the IAM containers and ensures that everything is started correctly. The status of the containers is checked using the command:
docker ps
Open the localhost:8002
admin interface in a browser.

So far, it’s empty, because it’s a completely new site. Let's change it. IAM supports the concept of workspaces for dividing the API into modules and / or teams. Go to the "default" workspace that we will use for our experiments.

The number of requests for this workspace is still zero, but you will get an idea of the basic concepts of IAM in the menu on the left. The first two elements: Services and Routes are the most important:
- Service is an API to which we want to provide access to consumers. Thus, the REST API in InterSystems IRIS is a Service, as, for example, the Google API, if you want to use it.
- The Route decides which Service the incoming requests should be redirected to. Each Route has a specific set of conditions, and if they are met, the request is sent to the corresponding Service. For example, a Route may match an IP, a sender's domain, HTTP methods, parts of a URI, or a combination of these examples.
Service
Let's create the InterSystems IRIS Service, with the following values:
| Field | Value | Description |
|---|---|---|
| name | iris | Service Name |
| host | IP | InterSystems IRIS server host or ip |
| port | 52773 | InterSystems IRIS Server Web Port |
| path | / api / atelier | Root path |
| protocol | http | Protocol |
Leave the remaining values by default. Click the Create
button and write down the ID of the created Service.
Route
Now let's create a route:
| Field | Value | Description |
|---|---|---|
| path | / api / atelier | Root path |
| protocol | http | Protocol |
| service.id | guid from 3 | Service (ID from the previous step) |
Leave the remaining values by default. Click the Create
button and write down the ID of the created Route. By default, IAM listens for incoming requests on port 8000. Now requests sent to http://localhost:8000
and starting with /api/atelier
redirected to InterSystems IRIS.
Testing
Let's try to create a request in a REST client (I use Postman ).

Send a GET request to http://localhost:8000/api/atelier/
(don't forget /
at the end) and get a response from InterSystems IRIS. Each request goes through an IAM that collects metrics:
- HTTP status code.
- Delay.
- Monitoring (if configured).
I made a few more requests (including two requests for non-existent endpoints, such as / api / atelier / est /), the results are immediately visible on the dashboard:

Work with plugins
Now that we have the Route configured, we can control our API. We can add features that complement our service.
The most common way to change API behavior is to add a plugin. Plugins isolate individual functionality and can be connected to the IAM both globally and only to individual entities, such as User (user group), Service or Route. We will start by adding the "Rate Limiting" plugin to the Route. To establish a connection between the plug-in and the route, we need a unique identifier (ID) for the route.
Request Limit
Click Plugins in the menu on the left sidebar. You see all active plugins on this screen, but since this IAM server is new, there are no active plugins yet. So proceed to the next step by clicking "New Plugin".
The plugin we need is located in the "Traffic Control" category and is called "Rate Limiting". Select it. There are quite a few settings that you can set here, but we are only concerned about two fields:
| Field | Value | Description |
|---|---|---|
| route_id | ID | Route ID |
| config.minute | 5 | Number of requests per minute |
That's all. The plugin is configured and active. I note that we can choose different time intervals, such as minute, hour or day. Settings can be combined (for example, 1000 requests per hour and at the same time 100 requests per minute). I chose the minutes, as this makes it easy to check the plugin.
If you send the same request again to Postman, you will see that the response is returned with 2 additional headers:
- XRateLimit-Limit-minute: 5
- XRateLimit-Remaining-minute: 4
This tells the client that he can make up to 5 requests per minute and in the current time interval he can make 4 more requests.

If you make the same request again and again, in the end you will run out of available quota and instead you will receive an HTTP status code 429 with the following response body:
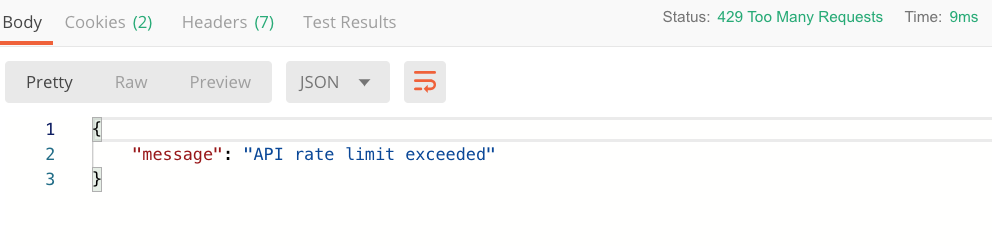
Wait a minute and you will be able to send requests again.
This is a convenient mechanism that allows you to:
- Protect the backend from load surges.
- Tell customers how many requests they can make.
- Monetize the API.
You can set values for different time intervals and thus smooth the API traffic for a certain period of time. Suppose you allow 600 requests per hour on a specific Route. There are an average of 10 requests per minute. But nothing prevents the client from completing all 600 requests in the first minute of the hour. Maybe this is what you need. You may want to achieve a more even load within an hour. By setting the value of the config.minute
field to 20, you guarantee that your users make no more than 20 requests per minute and 600 requests per hour. This allows small jumps in the minute interval compared to the fully averaged stream of 10 requests per minute, but users cannot use the hourly quota for one minute. Now they will need at least 30 minutes to use all their queries. Clients will receive additional headers for each specified time interval, for example:
| HTTP Header | Value |
|---|---|
| X-RateLimit-Limit-hour | 600 |
| X-RateLimit-Remaining-hour | 595 |
| X-RateLimit-Limit-minute | twenty |
| X-RateLimit-Remaining-minute | sixteen |
Of course, there are many different ways to customize query limits depending on what you want to achieve.
conclusions
I’ll end with this, I think the material is quite enough for the first article about InterSystems API Manager. We used only one of more than 40 plugins. You can do many more interesting things with IAM:
- Add a central authentication mechanism for all your APIs.
- Scale the load using the balancer to several Services.
- Add new functionality and bug fixes for the test audience before a full upgrade.
- Provide internal and external developers with a dedicated web portal documenting all APIs.
- Cache requests to reduce response timeout and reduce system backend load.
References
Webinar
We invite you to the webinar "API Management with InterSystems API Management", which will be held on November 21 at 10:00 Moscow time (GMT + 3).
InterSystems API Manager (IAM) is a new component of the InterSystems IRIS Data Platform that provides monitoring, control and traffic control to / from the web API within the IT infrastructure. At the webinar, we will demonstrate the key features of InterSystems API Management:
- API traffic monitoring tools.
- API traffic control tools, including bandwidth control, limiting the number of API calls, maintaining lists of allowed and forbidden lists of IP addresses, etc.
- API Security Configuration Tools.
- A developer portal for publishing interactive documentation on the API.
- A single access point to the API.
The webinar is designed for architects, developers and system administrators.