Welcome to the first part of my talk about implementing MVC in Unity using Scriptable Objects. In this article I wrote only about the basics of working with Scriptable Objects, and in general the text will be simple and clear.
First, find out what Unity developers say about Scriptable Objects:
- This is a class that can be inherited from to create an object that should not be attached to another object in the scene.
- The greatest benefit from such an created object will be if you use it only to save data.
Now it’s logical to ask: why Scriptable Objects?
Scriptable Objects is part of the functionality of the Unity engine, so such objects have many built-in features for working with the editor.
I like the approach used when developing projects on Unity. You can create your own tools and easily customize those that are installed by default. Scriptable Objects significantly expand your capabilities, as they allow you to create custom containers for data and store them as assets in the project.

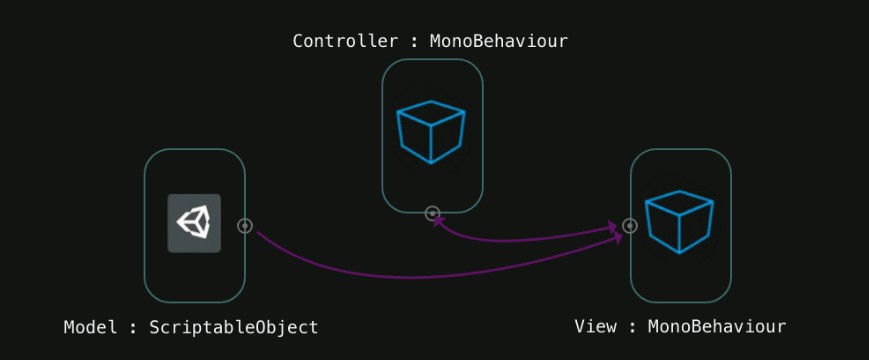
The image above is an example of using Scriptable Object in Unity. A single .asset file created in a project may contain information necessary for the operation of several systems and ensure the preservation of their settings. If you want to know more, there’s an excellent video on YouTube with a presentation on SO (Scriptable Object) called “ Overthrowing the MonoBehaviour Tyranny in a Glorious Scriptable Object Revolution ”.
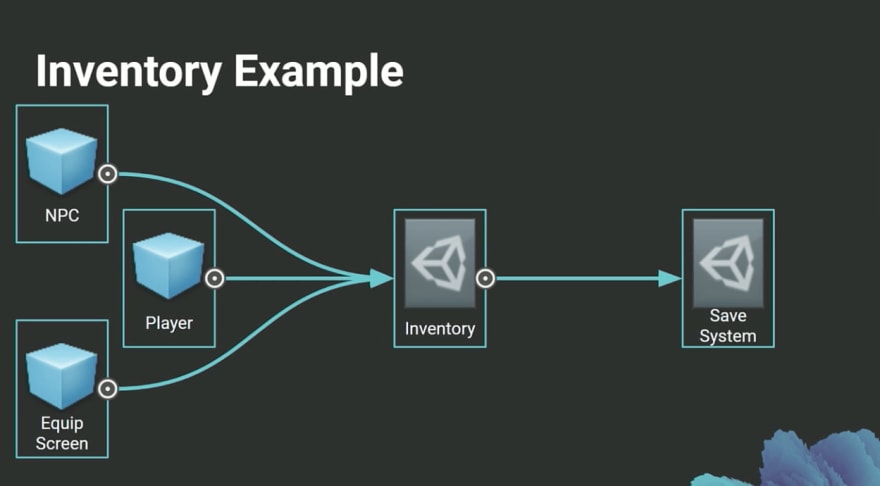
Another great example is shown above. Here, game objects reference an Inventory object, and the Save System manages them all. This image is from another excellent lecture, “Game Architecture with Scriptable Objects” ( Game Architecture with Scriptable Objects ), I highly recommend reading it.
Another great feature is that when you figure out Scriptable Objects, you probably won't want to use other data storage formats, such as JSON or XML, since SO is the most convenient format for storing data in Unity.
Well, let's look at Scriptable Objects in action.
using UnityEngine; public class ItemData : ScriptableObject { public string itemName; public ItemType type; public float attack; } public enum ItemType { Dagger, Axe, Sword, Staff }
We wrote a class called
ItemData
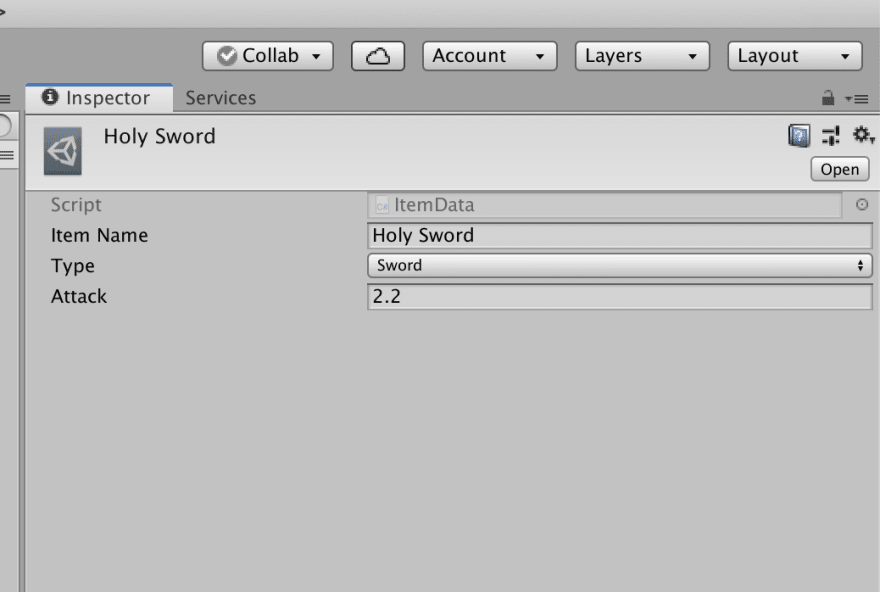
and several properties typical of RPG games. Next, we will create several such items in the project, get access to them from the script and display the values in the console. But first, add one important line to our code.
using UnityEngine; [CreateAssetMenu] public class ItemData : ScriptableObject { public string itemName; public ItemType type; public float attack; } public enum ItemType { Dagger, Axe, Sword, Staff }
The
CreateAssetMenu
attribute, which we added before the
ItemData
class, tells Unity that we want to create .asset files in which our class will be stored through the menu. Otherwise, we will not be able to do this using the right mouse button or the Create button in the project folder.
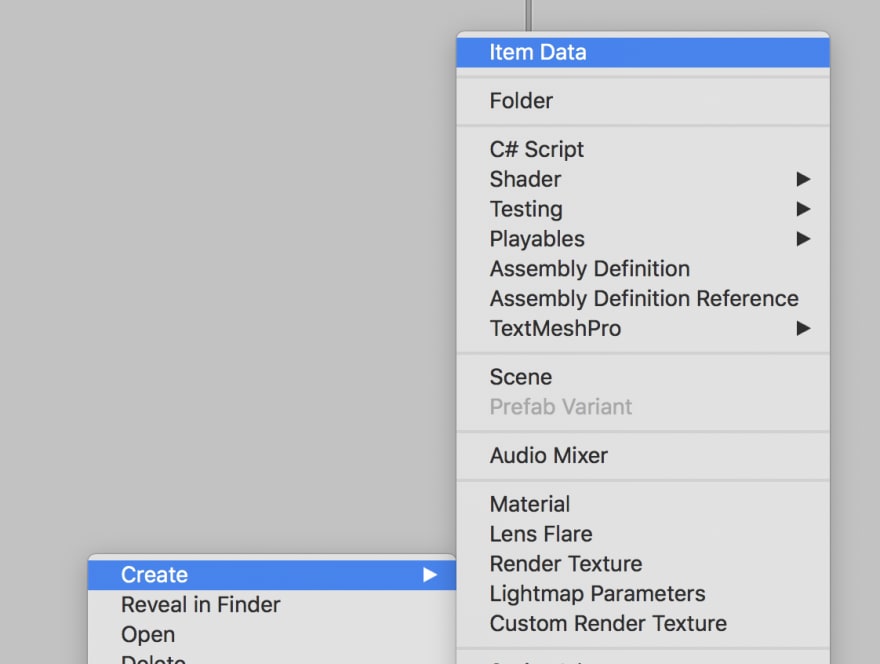

Create a folder called
Items
and try to create an
ItemData
object in this folder.
Now let's write another script called
Inventory
to work with the data file.
using UnityEngine; public class Inventory : MonoBehaviour { public ItemData[] inventory; }
Add a method to it that will output information to the console. We also run a check so as not to go beyond the bounds of the array, but to loop around the array.
using UnityEngine; public class Inventory : MonoBehaviour { public ItemData[] inventory; int index = 0; public void NextItemInfo() { if (index > inventory.Length) { index = 0; } Debug.Log("Item name: " + inventory[index].name); Debug.Log ("Attack power: " + inventory[index].attack); switch(inventory[index].type) { case ItemType.Axe: Debug.Log("Item type: Axe"); break; case ItemType.Dagger: Debug.Log("Item type: Dagger"); break; case ItemType.Staff: Debug.Log("Item type: Staff"); break; case ItemType.Sword: Debug.Log("Item type: Sword"); break; } index ++; } }
I will assign a call to our method to the space bar. In Unity, this is very easy to do. Thanks to the
Input
class, we can check in the
Update
method whether the required key has been pressed.
using UnityEngine; public class Inventory : MonoBehaviour { public ItemData[] inventory; int index = 0; private void Update() { if (Input.GetKeyDown(KeyCode.Space)) { NextItemInfo(); } } public void NextItemInfo() { if (index > inventory.Length) { index = 0; } Debug.Log("Item name: " + inventory[index].name); Debug.Log ("Attack power: " + inventory[index].attack); switch(inventory[index].type) { case ItemType.Axe: Debug.Log("Item type: Axe"); break; case ItemType.Dagger: Debug.Log("Item type: Dagger"); break; case ItemType.Staff: Debug.Log("Item type: Staff"); break; case ItemType.Sword: Debug.Log("Item type: Sword"); break; } index ++; } }
It's time to switch back to the Unity editor. We will populate our
inventory
array with previously created
ItemData
files from the
Items
folder. But first, create an empty object in the scene and add our
Inventory
script to it.

Now let's run the project and test it.
Working! And now I want to show you that the Scriptable Object can store not only data, but also methods for working with them. For example, let's add a method to calculate the price in the
ItemData
class. For more information on this, check out the docs here and here .
using UnityEngine; [CreateAssetMenu] public class ItemData : ScriptableObject { public string itemName; public ItemType type; public float attack; public float GetPrice() { return attack * 40; } }
Then we use our new method in the
Inventory
class.
using UnityEngine; public class Inventory : MonoBehaviour { public ItemData[] inventory; int index = 0; private void Update() { if (Input.GetKeyDown(KeyCode.Space)) { NextItemInfo(); } } public void NextItemInfo() { if (index == inventory.Length) { index = 0; } Debug.Log("Item name: " + inventory[index].name); Debug.Log ("Attack power: " + inventory[index].attack); switch(inventory[index].type) { case ItemType.Axe: Debug.Log("Item type: Axe"); break; case ItemType.Dagger: Debug.Log("Item type: Dagger"); break; case ItemType.Staff: Debug.Log("Item type: Staff"); break; case ItemType.Sword: Debug.Log("Item type: Sword"); break; } Debug.Log("Item price: " + inventory[index].GetPrice()); index ++; } }
Now we will reproduce everything and look at the result.

Examples from this tutorial are on GitHub !
The first part of the story came to an end. In the next article, we will talk about using MVC in Unity. But, since we are already familiar with Scriptable Objects, we’ll add a few new features to make it cooler and harder like the real Unity gurus do.