
Habr was a little bit surprised that there were very few articles published on the topic of (beta-) GitHub’s features - Actions.
It would seem that this understatement can be explained by the fact that the functionality is still in testing, albeit "beta". But it’s a useful beta feature that allows you to use this tool in private repositories. It is about working with this technology that I will discuss in this article.
Prehistory
If you start in order, you should probably mention the moment that in the process of searching for a quick, convenient, easy and free option to store your personal site "About Me" I had to spend several nights and go through many articles.
Someone chooses hosting, someone a cloud server, and those who do not want to understand the work, interaction and payment of all this - like uploading static sites to the repository, since now it can be done on GitHub and GitLab .
Of course, this is everyone’s personal choice.
My final choice was in favor of GitHub Pages.
Whoever doesn’t know, gh-pages
is such an option of storing documentation in the form of a website and it is provided for free, and in addition to the documentation it is proposed to store personal sites. This functionality is provided by GitHub to all users and is available in the repository settings.
For the project repository, the gh-pages
branch is used; for the user site, a separate repository called username.github.io
with the source codes of the site in the master
branch is used.
You can see the documentation for more details, but I only note that GitHub with amazing generosity allows everyone to bind their own domain to such a site by simply adding a CNAME
file with the domain name and setting up the DNS of its domain provider on the GitHub server.
I am sure that there are many articles on how to deploy such a site, so this is not about that.
Occurrence of a problem
The problem was that when using a static generator there is a need to compose additional crutches scripts and use libraries to simplify the process of generating pages and loading them into the repository. Simply, if you store the source in a separate private repository, then every time you make any changes to the site, you had to deploy a local environment for the subsequent generation of static pages and publication in the main site repository.
There is an abundance of static generators and they all have the same problem. These actions take too much time and effort, and as a result stop work on the site, especially after several migrations from OS to OS or incidents with data loss on hard drives (this was the case in my case) .
Just recently, either in a pop-up notification on the site, or in the GitHub newsletter, a newly-built CI / CD was noticed, which made it possible to carry out these actions with minimal effort.
I will not focus on this subclause, but I will share a couple of theses which I came to during the selection and use of the following:
1) it is worth choosing a generator for your programming language, or one that was as clear as possible. I came to this idea at a time when I myself had to add some functionality for the site, put down crutches for its greater stability and automation. In addition, this is a good reason to write additional functionality in the form of plugins;
2) on which particular generator to dwell, this is a personal choice, but it should be borne in mind that for the initial immersion in the functionality of the GitHub Pages functionality, you must first install Jekyll . Fortunately, it allows you to generate a site from source directly in the repository (I will repeat this with my choice) .
My choice of generator is based on the first point. Pelican which is written in Python easily replaced the stranger to me Jekyll (used almost a year) . As a result, even creating and editing articles, a robot over a site gives additional experience in an interesting language for me.
__
Formulation of the problem
The main task will be to write such a script (actually a configuration file) that would automatically generate static pages from a private repository. The solution will use the functionality of the virtual environment. The script itself will add the finished pages to the public repository.
Solution tools
Tools that we will use to solve the problem:
- GitHub Actions;
- Python 3.7
- Pelican;
- Git
- GitHub Pages.
Solution
So, having got a little acquainted with the documentation and figured out how to write scripts for Actions, it became clear that this mechanism will completely solve the problem. At the time of writing, to use this functionality, you must subscribe to beta testing !

Description of new functionality by Github
Writing an Actions script begins by creating a named file in the .github
folder and its subfolder workflows
. You can do this either manually or from the editor in the Actions tab on the repository page.

Example blank script form
name: CI # : Actions on: [push] # , jobs: # , build: # , .. runs-on: ubuntu-latest # .. steps: # - uses: actions/checkout@v1 # - name: Run a one-line script # 1 run: echo Hello, world! # 1 (bash- ) - name: Run a multi-line script # 2 run: | # 2 () echo Add other actions to build, echo test, and deploy your project.
Let's write your own based on the template:
0) The name can be left and “CI”. It's a matter of taste.
1) Next, you need to select the action / trigger that will lead to the launch of the script, in our case this is the usual push of a new commit to the repository.
on: push
2) The image on the basis of which the script will be launched will also be left as an example, since Ubuntu is quite satisfied with the necessary functionality. Looking at the available tools , it becomes clear that this can be any necessary or just a convenient image (or a docker container based on it).
build: runs-on: ubuntu-latest
3) In the steps, first set up the environment to prepare for the main work.
3.1) go to the branch we need (standard checkout
step):
- uses: actions/checkout@v1
3.2) install Python:
- name: Set up Python uses: actions/setup-python@v1 with: python-version: 3.7
3.3) set the dependencies of our generator:
- name: Install dependencies run: | python -m pip install --upgrade pip pip install -r requirements.txt
3.4) create a directory in which the site pages will be generated:
- name: Make output folder run: mkdir output
4) In order for the work on the site to be consistent, namely not to delete previous changes and to add changes to the site repository without conflicts, the next step is to clone the site repository every time:
- name: Clone master branch run: git clone "https://${{ secrets.ACCESS_TOKEN }}@github.com/${GITHUB_ACTOR}/${GITHUB_ACTOR}.github.io.git" --branch master --single-branch ./output
This step calls the system variables:
-
GITHUB_ACTOR
GitHub sets the variable itself, and this is the name of the user who caused the script to run; - The
secrets.ACCESS_TOKEN
variable is the generated token for controlling Github , we can transfer it as an environment variable by setting the settings of our repository in theSecrets
tab. Please note, when generating the token will be provided to us once, there will be no more access to it. As well as the values of Secrets.
5) We proceed to the generation of our pages:
- name: Generate static pages run: pelican content -o output -s publishconf.py
The parameters passed to the generator are responsible for the directory where the generated files will be sent ( -o output
) and the configuration file that we use to generate ( -s publishconf.py
; for an approach to sharing the local config and the config for publication, see the Pelican documentation ) .
Let me remind you that the repository of the site has already been cloned into the output
folder.
6) Configure git and index our modified files:
- name: Set git config and add changes run: | git config --global user.email "${GITHUB_ACTOR}@https://users.noreply.github.com/" git config --global user.name "${GITHUB_ACTOR}" git add --all working-directory: ./output
In this paragraph, the already known variable is used, and the working directory is specified in which the commands from this step will be launched. The command to go to the working directory would otherwise look like - cd output
.
7) Generate a commit message, commit the changes and push them into the repository. To ensure that the commit is not wasted, and accordingly does not produce an error in bash (the output is not 0
), we first check whether it is necessary to commit and push something at all. To do this, use the git diff-index --quiet --cached HEAD --
which will output 0
if there are no changes relative to the previous version of the site, and there are 1
such changes. Then we process the result of this command. Thus, we will write useful information about the state of the site at this stage in the information about the execution of the script, instead of automatically crashing and sending us a report on the crash of the script.
We also carry out these actions in our directory with ready-made pages.
- name: Push and send notification run: | COMMIT_MESSAGE="Update pages on $(date +'%Y-%m-%d %H:%M:%S')" git diff-index --quiet --cached HEAD -- && echo "No changes!" && exit 0 || echo $COMMIT_MESSAGE # Only if repo have changes git commit -m "${COMMIT_MESSAGE}" git push https://${{ secrets.ACCESS_TOKEN }}@github.com/${GITHUB_ACTOR}/${GITHUB_ACTOR}.github.io.git master working-directory: ./output
Result
As a result, such a script allows you not to think about creating static pages. By adding changes directly to the private repository, whether working with git from under any system or creating a file through GitHub’s web interface, Actions will do it all by themselves. In case of an unexpected drop in the script, a notification will be sent to the mail.
I’ll leave my working version, it added the notification that the commit was launched into the main repository in the last step.
The Secrets described above are used where the bot token and user ID to which the message is to be sent is added.
name: Push content to the user's GitHub pages repository on: push jobs: build: runs-on: ubuntu-latest steps: - uses: actions/checkout@v1 - name: Set up Python uses: actions/setup-python@v1 with: python-version: 3.7 - name: Install dependencies run: | python -m pip install --upgrade pip pip install -r requirements.txt - name: Make output folder run: mkdir output - name: Clone master branch run: git clone "https://${{ secrets.ACCESS_TOKEN }}@github.com/${GITHUB_ACTOR}/${GITHUB_ACTOR}.github.io.git" --branch master --single-branch ./output - name: Generate static pages run: pelican content -o output -s publishconf.py - name: Set git config and add changes run: | git config --global user.email "${GITHUB_ACTOR}@https://users.noreply.github.com/" git config --global user.name "${GITHUB_ACTOR}" git add --all working-directory: ./output - name: Push and send notification run: | COMMIT_MESSAGE="Update pages on $(date +'%Y-%m-%d %H:%M:%S')" git diff-index --quiet --cached HEAD -- && echo "No changes!" && exit 0 || echo $COMMIT_MESSAGE git commit -m "${COMMIT_MESSAGE}" git push https://${{ secrets.ACCESS_TOKEN }}@github.com/${GITHUB_ACTOR}/${GITHUB_ACTOR}.github.io.git master curl "https://api.telegram.org/bot${{ secrets.BOT_TOKEN }}/sendMessage?text=$COMMIT_MESSAGE %0ALook at ${GITHUB_ACTOR}.github.io %0ARepository%3A github.com/${GITHUB_ACTOR}/${GITHUB_ACTOR}.github.io&chat_id=${{ secrets.ADMIN_ID }}" working-directory: ./output
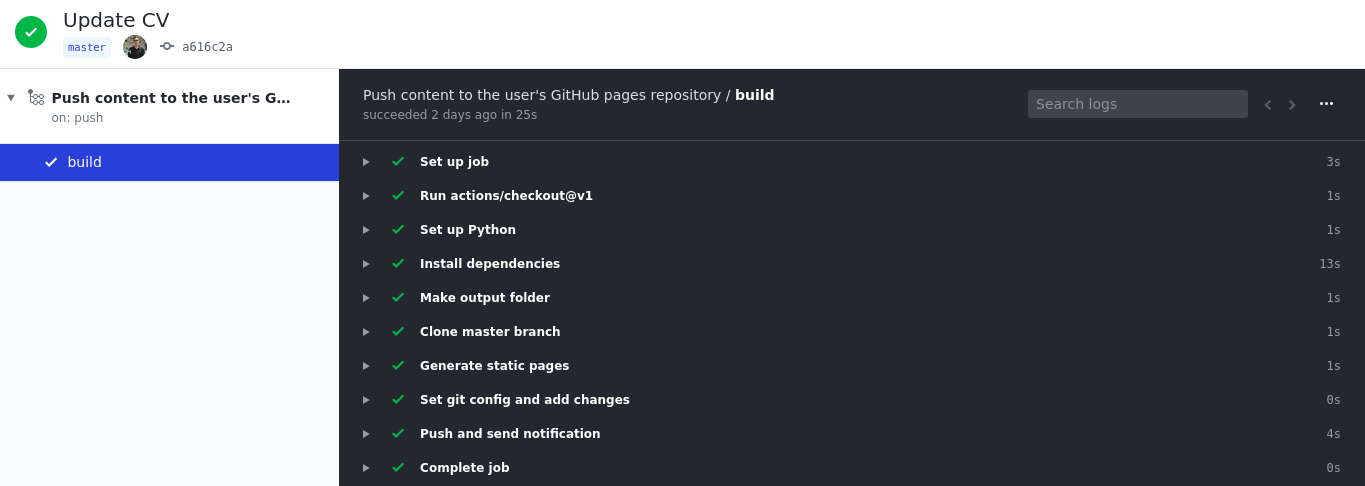
The result of one of the launches displayed in the Actions tab of the repository with sources
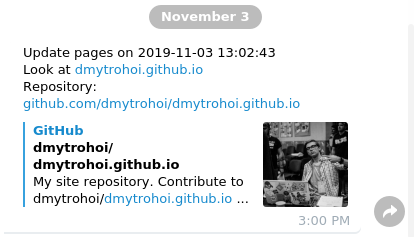
Message from the bot about the completion of the script
useful links
Actions Overview
Actions Syntax
Trigger list
Variants of virtual environments
Github pages
Static Generator list