Now I will show you how to make a chat for the team / users / friends if you do not have your backend or do not want to waste time developing it. We will make a simple text chat and it will take us about an hour.
To write a working network chat without a backend is almost impossible, it must be in one form or another. We will use Chatix and its JavaScript SDK. Chatix and SDK will be engaged in message storage and network tasks, and we will deal with the front-end.
The finished project code is available on GitHub
Demo
Project structure
- App (the root component of the application, acts as a state guardian, because in this lesson we will not add Redux or any other state manager)
- Header (the header of our application that displays the logo, the name of the chat and allows the user to write their name)
- LogoHeader
- Roomtitle
- Main
- MemberList (chat list)
- MemberItem []
- ChatField (container for everything related to chat messages)
- Messagecontainer
- Message [] (presentation of the message; in this lesson we will only work with text messages)
- SendMessageForm (form for sending a new chat message)
- ChatixSDK (headless component responsible for working with the backend)
Important note about state storage. Of course, it would be more convenient to add Redux here and process state changes through it, but in order to save time, we will store the state in the root component of the App and will forward data to the child components and call their parents from the child methods.
For example, when we get the name of the chat, we will save it in the state of the App component and pass it throughprops
:App → Header → RoomTitle
. When the user writes a message, we will send it from SendMessageForm to the App:SendMessageForm → ChatField → Main → App
.
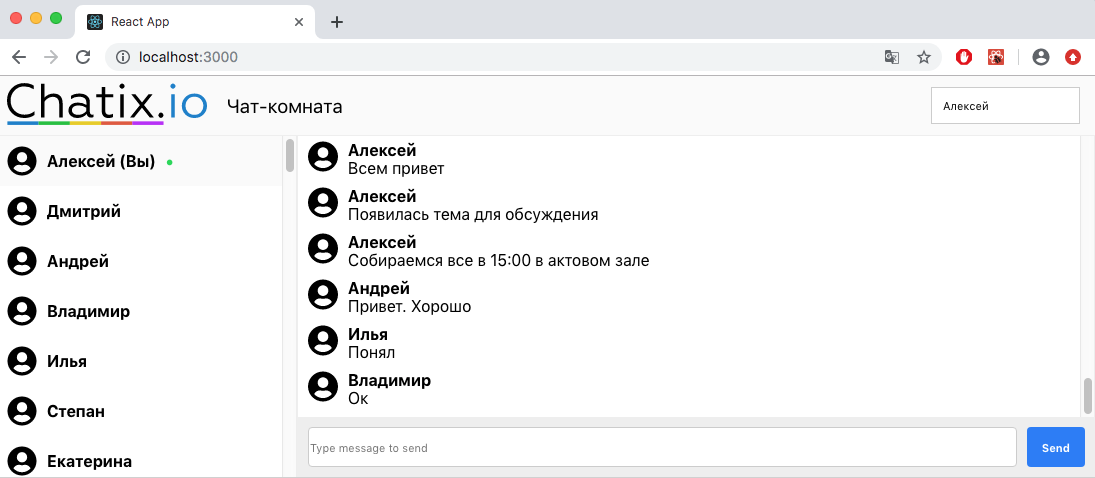
Our chat will look something like this in design:
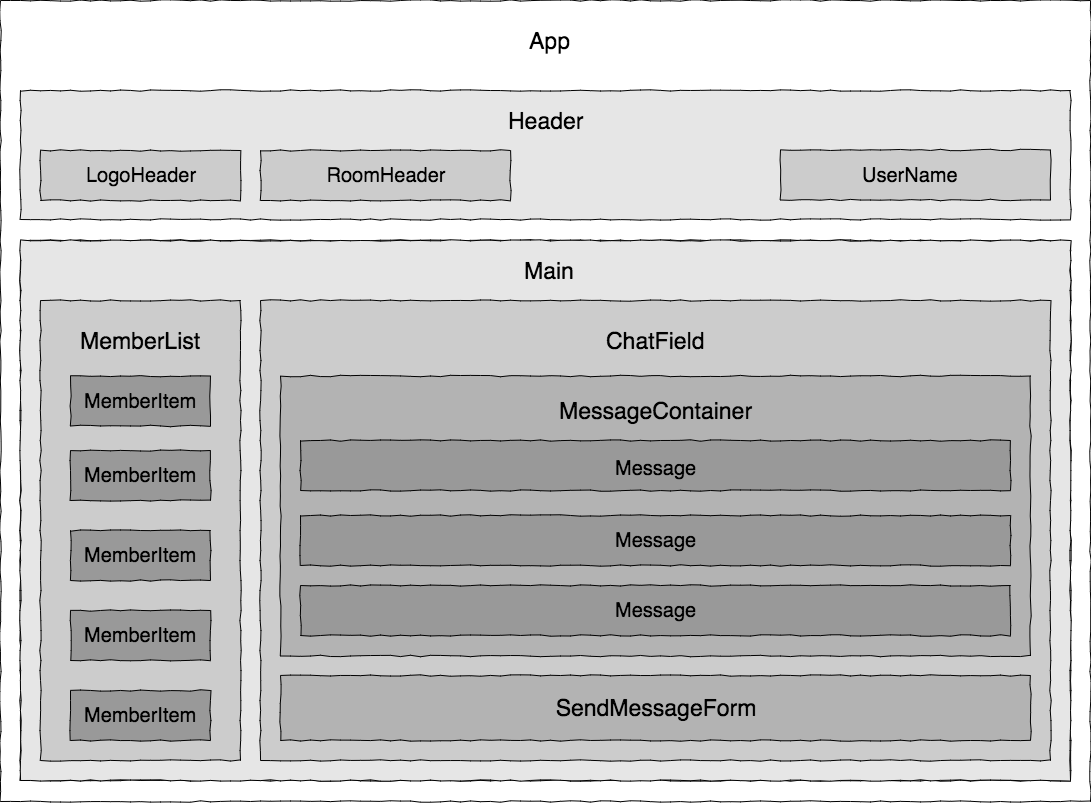
Interaction between components
Our components must transmit data to each other and in order for everything to work as it should, let's determine now how they will interact with each other.

As you can see in the figure, the main component for us is the App
, which provides data to the child components (due to the reactivity, we simply assign prop
and the child component will respond to changes), and the child components successively forward method calls to the App
. This is not the best architecture that can (and should) be done for a production project, but it will do for our lesson.
Project creation
Create visual components
Hat
First you need to create a new project, for this we will use create-react-app .
npx create-react-app chatix-chatroom cd chatix-chatroom
Run the project with the command
npm start
Let's start by creating a header.
First, add a logo to the header. To do this, inside the src folder, create the components folder, and in it the logo_header folder. We upload the logo to this folder and create 2 LogoHeader.js and LogoHeader.css files
LogoHeader.js
import React from 'react' import logo from './chatix_logo.svg'; import './LogoHeader.css'; function LogoHeader(){ return ( <div className="LogoHeader"> <img src={logo} className="App-logo" alt="Chatix logo" /> </div> ); } export default LogoHeader;
LogoHeader.css
.LogoHeader{ flex-basis: 200px; flex-grow: 0; flex-shrink: 0; }
Everything is clear here, in this component a file with a logo and styles is simply imported.
I will not add the code of the style files here anymore, you can see them on the page of the finished project
Now display the name of the chat room. To do this, create a room-title folder and in it the RoomTitle component. We will throw the name into this component through props, so we write props.chatroomName
and now we will transfer it here.
Roomtitle
import React from 'react'; import './RoomTitle.css'; function RoomTitle(props){ return ( <div className="RoomTitle"> <h1>{props.chatroomName}</h1> </div> ); } export default RoomTitle;
Then we create the header component itself and place the logo and the name of the chat room in it. Immediately throw the chat name into the child component through prop chatroomName
.
I remind you that we agreed that all the data (application state) will be stored by the root component of the App . From it we will transfer the header first to Header and from Header to RoomTitle .
components \ header \ Header.js
Header.js
import React from 'react'; import './Header.css' import LogoHeader from '../logo_header/LogoHeader'; import RoomTitle from '../room-title/RoomTitle'; function Header(props) { return ( <header> <LogoHeader/> <RoomTitle chatroomName={props.chatroomName} /> </header> ); } export default Header;
Next, open the App.js file and add the Header.js component to it .
Then in the state we add the name and through props we forward it to the header.
Also in the header you need to add the name of the current user. To do this, add the user object to the state and similarly forward it to the header
import React from 'react'; import './App.css'; import Header from './components/header/Header'; class App extends React.Component { constructor(props){ super(props); chatroomName: '-', me: { is_online: true, name: "", uuid: "98s7dfh9a8s7dhf" } } render() { return ( <div className="App"> <Header chatroomName={this.state.chatroomName} me={this.state.me} /> </div> ); }; } export default App;
Now in the header you need to add an input with the name of the current user and assign the handler to change so that we can transfer the new username to the App component.
To do this, we add the handleChangeName
handler function to the input with the name and call the props.updateVisitor
callback function in which we pass the user object with the updated name.
Header.js
function Header(props) { const [name, setName] = useState(props.me.name ? props.me.name : props.me.uuid.substr(-10)) const handleChangeName = (e) => { setName(e.target.value) let visitor = {...props.me}; visitor.name = e.target.value; props.updateVisitor(visitor) } return ( <header> <LogoHeader/> <RoomTitle chatroomName={props.chatroomName}/> { props.me ? <input className='name-input' value={name} placeholder=' ' onChange={(e) => handleChangeName(e)} /> : null } </header> ); }
Now add this function props.updateVisitor
to the App and props.updateVisitor
it to the props.updateVisitor
. So far, it just updates the user object in the state, but then through it we will update the user on the server.
onUpdateVisitor = (visitor) => { this.setState({me: visitor}) }
So, now our application looks like this and so far only knows how to update the name. Go ahead

Sidebar
Now let's get down to creating a sidebar.
The sidebar will be located inside the main component on the Main.js page.
We create it components \ main \ Main.js , then create a component with a list of users components \ member-list \ MemberList.js and immediately create a component that will display the users themselves components \ member-item \ MemberItem.js .
To make it clearer how these 3 components are related, take a look at the project diagram at the beginning of the article.
The components are created, now let's go in order.
First, add the array of users to the state of the App component and add the Main component. Then we will forward these users into it.
The app
class App extends React.Component { constructor(props) { super(props); this.state = { chatroomName: '-', members: [ { is_online: true, name: "", uuid: "98s7dfh9a8s7dhf" }, { is_online: true, name: "", uuid: "mnzxcv97zx6chvo" }, { is_online: false, name: "", uuid: "kjuhv987ashdfoua" }, { is_online: false, name: "", uuid: "jdhnf978WEHJSNDL" }, ], me: { is_online: true, name: "", uuid: "98s7dfh9a8s7dhf" } }; } render() { return ( <div className="App"> <Header chatroomName={this.state.chatroomName} me={this.state.me} /> <Main members={this.state.members} me={this.state.me} /> </div> ); }; }
In the Main component, add the MemberList component and forward the array of users into it.
Main.js
function Main(props) { return( <section className="Main"> <MemberList members={props.members} /> </section> ); }
And in the MemberList component , we loop through all users and for each return the MemberItem component and pass the user object to it.
MemberList.js
function MemberList(props) { const members = props.members.map((member) => <MemberItem key={member.uuid} member={member} /> ); return ( <section className="MemberList"> {members} </section> ); }
The MemberItem component is already directly displaying the user in the sidebar. In it we check the user’s name, if it is not installed, then display the first 10 characters of the identifier. We also check the status online / offline and compare the identifier with the identifier of the current user, so that in front of him to display the mark "(You)".
function MemberItem(props) { function getName(){ let name = '' if (props.member.uuid === props.me.uuid) { if(props.me.name) { name = props.me.name } else { name = props.me.uuid.substring(props.me.uuid.length-10, props.me.uuid.length); } } else { if(props.member.name){ name = props.member.name } else { name = props.member.uuid.substring(props.member.uuid.length-10, props.member.uuid.length); } } return name; } return( <div className="MemberItem"> <img src={ icon } alt={ props.member.name }/> <span> { getName() } { props.member.uuid === props.me.uuid && " () " } </span> { props.member.is_online && <span className="online">•</span> } </div> ); }
Done. Now the application looks like this

Message List and Submission Form
Now we’ll deal with the message list and the sending form.
First, add an array with messages to the state of the App component.
The app
this.state = { chatroomName: '-', messages: [ { content: " 1", sender_id: "mnzxcv97zx6chvo", uuid: "dg897sdfg" }, { content: " 2", sender_id: "98s7dfh9a8s7dhf", uuid: "8723hernm" }, { content: " ", sender_id: "mnzxcv97zx6chvo", uuid: "435nbcv98234" } ], members: [ { is_online: true, name: "", uuid: "98s7dfh9a8s7dhf" }, { is_online: true, name: "", uuid: "mnzxcv97zx6chvo" }, { is_online: false, name: "", uuid: "kjuhv987ashdfoua" }, { is_online: false, name: "", uuid: "jdhnf978WEHJSNDL" }, ], me: { is_online: true, name: "", uuid: "98s7dfh9a8s7dhf" } };
And forward them to the Main component
The app
<Main members={this.state.members} messages={this.state.messages} me={this.state.me} />
Now create the component conponents / chat-field / ChatField.js
Connect it to Main and forward the messages to it.
Main
function Main(props) { return( <section className="Main"> <MemberList me={props.me} members={props.members} /> <ChatField messages={props.messages} /> </section> ); }
Next, create the component conponents / message-container / MessageContainer.js
Connect it to ChatField and also forward messages to it.
Chatfield
function Main(props) { return( <section className="Main"> <MemberList me={props.me} members={props.members} /> <ChatField messages={props.messages} /> </section> ); }
Next, we will loop through all the messages and for each return the component that will show it.
Let's create it conponents / message / Message.js . In it we display the visitor’s icon, his name or identifier if no name is indicated and the message text itself.
Message
function Message(props) { const getSenderName = () => { if (props.sender) { return props.sender.name ? props.sender.name : props.sender.uuid.substr(-10); } return "Unknown sender"; }; return( <div className="Message"> <div className="message-sender-icon"> <img src={icon} alt="visitor icon"/> </div> <div className="message-bubble"> <div className="message-sender-name">{getSenderName()}</div> <div className="message-content">{props.message.content}</div> </div> </div> ); }
Now, in the MessageContainer, we loop through all the messages and for each return the Message component to which we pass the message object
Messagecontainer
function MessageContainer(props) { const messageList = props.messages.map(message => <Message key={message.uuid} sender={props.members.find((member) => member.uuid === message.sender_id)} message={message} /> ); return ( <section className="MessageContainer" ref={messagesContainer}> {messageList} </section> ); }
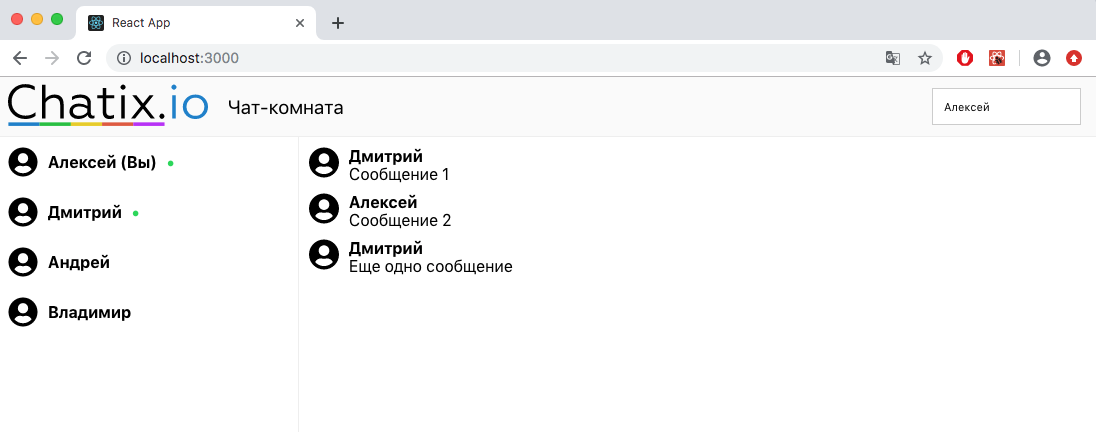
Now the project looks like this:
Now create a component with a form for sending messages components / send-message-form / SendMessageForm.js . In it, we will create an input and a button for sending. When the input is changed, the text from it is written to the state, and when you click on the button, we call the onSendNewMessage
callback function and transfer the message from the state to it. onSendNewMessage
will create the onSendNewMessage
function a bit later in the App component and forward it through props.
Sendmessageform
class SendMessageForm extends React.Component { constructor(props) { super(props); this.state = { message: '' }; } currentMessageChanged = (e) => { this.setState({message: e.target.value }); } sendMessageClicked = async (e) => { e.preventDefault(); if (this.state.message.length > 0) { await this.props.onSendNewMessage(this.state.message); this.setState({...this.state, ...{message : ''}}); } } render(){ return ( <section className="SendMessageForm"> <form> <input type="text" value={this.state.message} onChange={this.currentMessageChanged} placeholder="Type message to send"/> <button type="submit" onClick={this.sendMessageClicked} > Send </button> </form> </section> ); } }
Now place the SendMessageForm component inside the ChatField .
Chatfield
function ChatField(props) { return( <section className="ChatField"> <MessageContainer members={props.members} messages={props.messages} /> <SendMessageForm onSendNewMessage={props.onSendNewMessage}/> </section> ); }
In the Main component, we will also onSendNewMessage
function in the ChatField .
Main
<ChatField members={props.members} messages={props.messages} onSendNewMessage={props.onSendNewMessage} />
Now create this function in the App and forward it to Main .
The app
onSendNewMessage = async (message) => { console.log(message) }
The app
<Main members={this.state.members} messages={this.state.messages} onSendNewMessage={this.onSendNewMessage} me={this.state.me} />
Done. Now, when you click on the send message button, it will be transferred to the App component.
Now the application looks like this:

So, now everything is displayed in our application and everything works as it should, but so far with static data, and in order to revitalize our chat, you need to connect it with the backend.
Backend connection
To do this, the first thing you need to do is install the chatix-core package.
npm i chatix-core
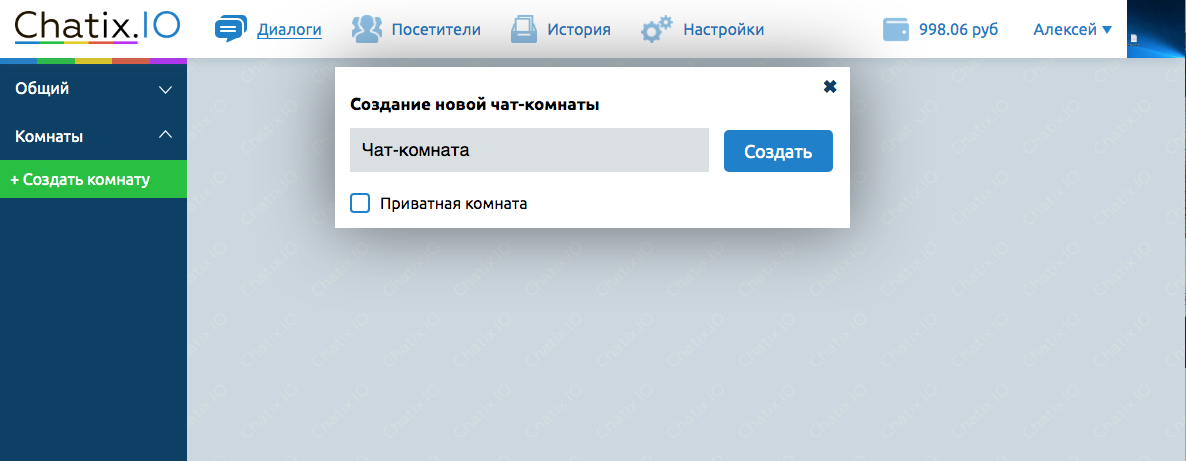
Then create an account on chatix and create a chat room. To do this, go to chatix.io and register.
After registration, you can see the websiteId site identifier in the admin interface on the chat settings page.
Now create a new chat room with which we will work.
We return to our project and create a new component through which we will work with the server.
components \ chatix \ ChatixSDK.js
We import ChatixCore in it.
import ChatixCore from 'chatix-core';
In the ChatixSDK component , create an instance of the ChatixCore class and pass websiteId as an argument.
const websiteId = "_WEBSITE_ID"; this.sdk = new ChatixCore(websiteId);
Now in this.sdk you can use the methods for working with the chat room. See the list of methods on the chatix-core project page
Next, we need to connect to the server and get data about the chat room created earlier. There are asynchronous start () and getChatroom () methods for this.
After you receive the chat room object, let's immediately take its name and transfer it to the App . To do this, add the callback function updateChatroomTitle(chatroom.title)
in the App and call it in the ChatixSDK .
ChatixSDK
class ChatixSDK extends React.Component { constructor(props){ super(props); const websiteId = "_WEBSITE_ID"; this.chatroomId = "_CHATROOM_ID"; this.sdk = new ChatixCore(websiteId); this.sdk.start() .then( async () => { try { // refresh information about chatroom and call passed handler const chatroom = await this.sdk.getChatroom(this.chatroomId); if (props.updateChatroomTitle) { props.updateChatroomTitle(chatroom.title); } } catch (err) { console.error(err); } }) .catch((e) => { console.error(e); }); } render(){ return null; } }
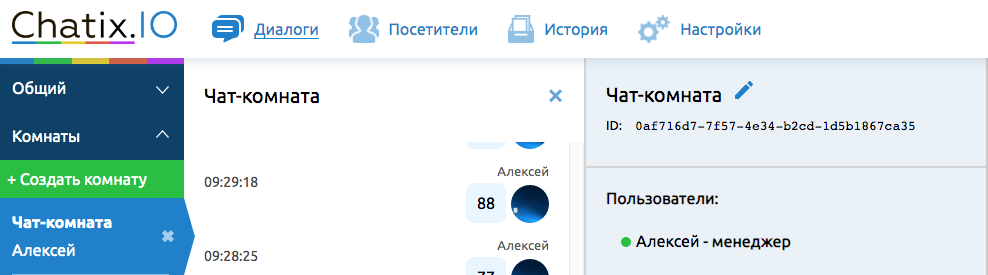
you can look at this.chatroomId
in the manager interface by opening the desired chat room.
Now in the App we’ll connect the ChatixSDK component and throw the updateChatroomTitle function into it, which will update the chat name. We also add a ref
link to it so that we can access this component.
The app
this.chatixSDK = React.createRef();
setChatroomTitle = (newName) => { const newStateFragment = { chatroomName: newName}; this.setState({...this.state, ...newStateFragment}); };
The app
render() { return ( <div className="App"> <Header chatroomName={this.state.chatroomName} me={this.state.me} updateVisitor={this.onUpdateVisitor} /> <Main members={this.state.members} messages={this.state.messages} onSendNewMessage={this.onSendNewMessage} me={this.state.me} /> <ChatixSDK ref={this.chatixSDK} updateChatroomTitle={this.setChatroomTitle} /> </div> ); };
Done. Now, immediately after connecting to the server, we request chat data, get its name and write it to the state of the App component, and since changes in the state cause the component to be rendered again, the name in the header will be updated automatically. Now the default name in the state can be replaced with an empty string.
The app
chatroomName: ''
Now let's fill the sidebar with real users.
But before you get the list of users, you must connect to the chat, for this, in the ChatixSDK inside the this.sdk.start()
function, we get a list of all the user's chat rooms, check if it is connected to the current one and if not, then connect it.
ChatixSDK
const myChatrooms = await this.sdk.getMyChatrooms(); if (myChatrooms.filter(x => x.id===this.chatroomId).length === 0) { await this.sdk.connectToChatroom(this.chatroomId); }
After we make sure that our user is connected to the chat room, we can get a list of participants in this chat.
ChatixSDK
// lets get all chatroom members using infinite loop with break on empty server response let membersPage = 1; let allChatroomMembers = []; while(true) { let pagedMembers = await this.sdk.getChatroomMembers(this.chatroomId, membersPage++, 10); allChatroomMembers = [...allChatroomMembers, ...pagedMembers]; if (pagedMembers.length === 0) { break; } }
Here, in an infinite loop, we request users page by page until we get everyone, as soon as we get everyone, we break the loop. After that, just like the name of the chat room, we forward it to the parent component using the callback function.
ChatixSDK
if (props.setChatroomMembers) { props.setChatroomMembers(allChatroomMembers); }
Now, in the App component, create this callback function setChatroomMembers
which will sort users by their online / offline status and alphabetically and write them to state.
App.js
setChatroomMembers = (members) => { members.sort(this.sortMembers); const newStateFragment = { members: members}; this.setState({...this.state, ...newStateFragment}); }
Add the sorting function sortMembers . It sorts users by status and alphabetically.
App.js
sortMembers(a, b) { if (a.is_online === true && b.is_online === false) { return -1; } else if (b.is_online === true && a.is_online === false) { return 1; } else { if (a.name && b.name) { if (a.name.toLocaleUpperCase() > b.name.toLocaleUpperCase()) { return 1; } else if (a.name.toLocaleUpperCase() < b.name.toLocaleUpperCase()) { return -1; } } else if (a.name && !b.name) { return -1; } else if (!a.name && b.name) { return 1; } if (a.uuid > b.uuid) { return -1; } else { return 1; } } }
Next, we forward the setChatroomMembers function in the ChatixSDK .
The app
render() { return ( <div className="App"> <Header chatroomName={this.state.chatroomName} me={this.state.me} updateVisitor={this.onUpdateVisitor} /> <Main members={this.state.members} messages={this.state.messages} onSendNewMessage={this.onSendNewMessage} me={this.state.me} /> <ChatixSDK ref={this.chatixSDK} updateChatroomTitle={this.setChatroomTitle} setChatroomMembers={this.setChatroomMembers} /> </div> ); };
Now, immediately after connecting to the server, we, as well as with the header, request a list of all connected users and write it to the state of the App component. And also change the default value of the user list in the state.
The app
members: []
Now, by exactly the same principle, we get the object of the current user and an array of messages and also write them to the App state
ChatixSDK
// lets load 100 last messages from current chatroom const lastMessages = await this.sdk.getChatroomMessages(this.chatroomId, null, 100); if (props.setChatroomMessages) { props.setChatroomMessages(lastMessages); } if (props.setMe) { const me = this.sdk.getVisitor(); this.props.setMe(me); }
The app
<ChatixSDK ref={this.chatixSDK} setMe={this.setMe} updateChatroomTitle={this.setChatroomTitle} setChatroomMembers={this.setChatroomMembers} setChatroomMessages={this.setChatroomMessages} />
Next, we will send messages.
We already have the onSendNewMessage
function in the App that displays the message we send to the console. Instead, we will simply call the sendChatroomMessage
method to send the message from the ChatixSDK .
This is an asynchronous method and it returns the object of the sent message in the response, which we immediately add to the message array in the state. By the way, please note that we are this.chatixSDK
link created earlier.
The app
onSendNewMessage = async (message) => { let receivedMsg = await this.chatixSDK.current.sendChatroomMessage(message); const currentMessages = this.state.messages; currentMessages.push(receivedMsg); const newStateFragment = {messages: currentMessages}; this.setState({...this.state, ...newStateFragment}); }
Since a change in the state causes it to be re-rendered, the list of messages will be updated automatically. But we need to make sure that when adding messages, the scroll in the message block goes down.
To do this, open the MessageContainer component and using the useEffect hook , monitor the message array for changes, and as soon as it has changed and the messages are added, we get a scrollHeight block with messages and scroll it by the same amount
function MessageContainer(props) { const messagesContainer = React.createRef(); useEffect(() => { messagesContainer.current.scrollTop = messagesContainer.current.scrollHeight }, [props, messagesContainer]); const messageList = props.messages.map(message => <Message key={message.uuid} sender={props.members.find((member) => member.uuid === message.sender_id)} message={message} /> ); return ( <section className="MessageContainer" ref={messagesContainer}> {messageList} </section> ); }
Now let's finish updating the username. We have already created an input in the header and when changing it, we forward the updated user object to the App component and there we display it in the console. Let's finish this function. To do this, add the method call this.chatixSDK.current.updateVisitor(user)
to it, this will update the data on the server. And just update the data in the local state, for this we update the this.state.me
object and in the this.state.members
array this.state.members
also find the current user and update him. This is necessary to update the name of the current user in the messages sent to them.
The app
onUpdateVisitor = (user) => { this.chatixSDK.current.updateVisitor(user) this.setMe(user) let currentUser = this.state.members.find((member) => (member.uuid === user.uuid)) let currentUserIndex = this.state.members.indexOf(currentUser) let newMembers = [...this.state.members] newMembers[currentUserIndex] = user; this.setState({ members: newMembers }) }
Now we need to learn how to respond to incoming messages, connecting / disconnecting users and changing information and connected users.
To do this, in the ChatixSDK.js file in the constructor, we need to override the callback functions. You can see the full list of functions and arguments on the chatix-core project page.
We are currently interested in onChatroomMessageReceived , onMemberConnectedToChatroom , onMemberDisconnectedFromChatroom and onApplyVisitorInfo .
We redefine them and for each function we call our callback which we will create in the App .
this.sdk.onChatroomMessageReceived = (chatroomId, message) => { if (chatroomId === this.chatroomId) { this.props.onNewMessageReceived(message); } }; this.sdk.onMemberConnectedToChatroom = (chatroomId, member) => { if (chatroomId === this.chatroomId && props.addChatroomMember) { this.props.addChatroomMember(member); } }; this.sdk.onMemberDisconnectedFromChatroom = (chatroomId, member) => { if (chatroomId === this.chatroomId && props.removeChatroomMember) { this.props.removeChatroomMember(member); } }; this.sdk.onApplyVisitorInfo = (visitor) => { this.props.onMemberUpdated(visitor) }
Next, go to the App and create these functions.
onNewMessageReceived (message)
This function takes a message object and simply adds it to state with the rest of the messages. After that, the component will be rendered again and it will be displayed in the list, just like when sending an outgoing message.
The app
onNewMessageReceived = (message) => { const currentMessages = this.state.messages; currentMessages.push(message); const newStateFragment = {messages: currentMessages}; this.setState({...this.state, ...newStateFragment}); }
App
addChatroomMember(member)
state members. .
App
addChatroomMember = (member) => { const newStateFragment = {}; const currentMembers = this.state.members; currentMembers.push(member); currentMembers.sort(this.sortMembers); newStateFragment.members = currentMembers; this.setState({...this.state, ...newStateFragment}); }
App
removeChatroomMember(memberId)
state members state .
removeChatroomMember = (memberId) => { const currentMembers = this.state.members; const filteredMembers = currentMembers.filter(x=> x.uuid !== memberId); const newStateFragment = {members: filteredMembers}; this.setState({...this.state, ...newStateFragment}); }
onMemberUpdated(updatedMember)
. . state .
App
onMemberUpdated = (updatedMember) => { let oldMember = this.state.members.find(member => member.uuid === updatedMember.uuid); oldMember = this.state.members.indexOf(oldMember); let newStateMembers = this.state.members; newStateMembers[oldMember] = updatedMember; this.setState({ members: newStateMembers }) }
ChatixSDK
ChatixSDK
<ChatixSDK ref={this.chatixSDK} setMe={this.setMe} updateChatroomTitle={this.setChatroomTitle} setChatroomMembers={this.setChatroomMembers} addChatroomMember={this.addChatroomMember} removeChatroomMember={this.removeChatroomMember} setChatroomMessages={this.setChatroomMessages} onNewMessageReceived={this.onNewMessageReceived} onMemberUpdated={this.onMemberUpdated} />
Done! \ , , / .
alekseyso
Additional materials:
SDK Chatix ()
SDK Chatix (npm)
192 -