This article will be useful to beginners QA experts, as well as those who are interested in the features and capabilities of such popular testing frameworks as Selenide and Selenoid.
Here we look at some basic project on Selenium. We will see how to connect Selenium and TestNG to the project, an example of Page Object with a description of the page elements and the methods used.
Further, acquaintance with Selenide : we will consider the framework itself, its main features and advantages, adding Selenide to a test project. Consider working with elements, checks, and expectations available in Selenide.
And finally, let's connect the Selenoid framework to our project to run tests in the Docker container and outside it.

* The article was prepared on the basis of a report by Nikita Kalinichenko - Senior QA specialist at IntexSoft.
The article contains links to external materials.
1. Selenium + TestNG
We are considering a project on the Maven builder , so we can find a description of the project structure in the pom.xml file. In order to use Selenium and TestNG , appropriate dependencies must be added to our pom.xml file. You can observe them between the dependencies tags below:
<?xml version="1.0" encoding="UTF-8"?> <project xmlns="http://maven.apache.org/POM/4.0.0" xmlns:xsi="http://www.w3.org/2001/XMLSchema-instance" xsi:schemaLocation="http://maven.apache.org/POM/4.0.0 http://maven.apache.org/xsd/maven-4.0.0.xsd"> <modelVersion>4.0.0</modelVersion> <groupId>test</groupId> <artifactId>test</artifactId> <version>1.0-SNAPSHOT</version> <dependencies> <dependency> <groupId>org.seleniumhq.selenium</groupId> <artifactId>selenium-java</artifactId> <version>3.141.59</version> </dependency> <dependency> <groupId>org.testing</groupId> <artifactId>testing</artifactId> <version>6.14.3</version> <scope>test</scope> </dependency> </dependencies> </project>
Next, we will look at an example of a Page Object:
import... public class SignUpPage { private WebDriver driver; public SignUpPage(WebDriver driver) { this.driver = driver; } private By emailFriend = cssSelector("#register-email"); private By confirmEmailFriend = cssSelector("#register-confirm-email"); private By passwordField = cssSelector("#register-password"); private By displayNameField = cssSelector("#register-displayname"); private By monthDropDown = cssSelector("#register-dob-month"); private By dayField = cssSelector("#register-dob-day"); private By yearField = cssSelector("#register-dob-year"); private By shareCheckbox = cssSelector("#register-thirdparty"); private By registerButton = cssSelector("#register-button-email-submit"); // email public SignUpPage typeEmail(String email) { // driver.findElement(emailField).sendKeys(email); return this; } // Confirm email public SignUpPage typeConfirmEmailFriend(String email) {...} // password public SignUpPage typePassword(String Password) {...} // public SignUpPage typeName(String name) {...} // public SignUpPage setMonth(String month) {...} // Day public SignUpPage typeDay(String day) {...} // Year public SignUpPage typeYear(String year) {...}
As we can see, at the top of the java file is a description of variables with locators for the elements of the registration page. Below the variable section are methods directly for interacting with the elements of our page.
Let's open the tests themselves:
// private WebDriver driver; // private SignUpPage page; @BeforeMethod public void setUp() { // geckodriver System.setProperty("webdriver.gecko.driver", "C:\\Users\\Nikita\\IdeaProjects\\autotests_examples\\drivers\\geckodriver.exe"); // driver = new FirefoxDriver(); // , driver.manage().timeouts().impicitlyWait(10, TimeUnit.SECONDS); // url webdrivera get driver.get("https://www.spotify.com/us/signup/"); }
As you can see, in the BeforeMethod annotation we describe what we will have before each method.
@Test public void typeInvalidYear() { // driver page = new SignUpPage(driver); // page.setMonth("December"); // .typeDay("20") // .typeYear("85") // .setShare(true); // , ; Assert.assertTrue(page.isErrorVisible("Please enter a valid year."));
The Test annotation provides code for test methods.
@AfterMethod //, public void tearDown() { driver.quit(); }
And the AfterMethod annotation contains code that should execute after each method.
When running tests using Selenium , the following will happen:
- Opening a separate browser window
- Go to url
- Test code execution
- Closing the session and browser window after each test
The next test will do the same. It should be mentioned that running tests on Selenium is quite a resource-intensive process.
2. Selenide: what, where, and how
What is Selenide itself, what are its main features and advantages?
In short, Selenide is a wrapper around Selenium WebDriver that makes it quick and easy to use when writing tests. At its core, Selenide is a tool for automating user actions in a browser, focused on the convenience and ease of implementing business logic in autotests in the user's language, without being distracted by the technical details of working with the “browser driver”. For example, we do not need to focus on working with the expectations of elements in the process of automating testing of dynamic web applications, as well as on the implementation of high-level actions on elements.
Key and main advantages of Selenide:
- Concise jQuery-style syntax
- Automatically solve most problems with Ajax, expectations and timeouts
- Browser Life Management
- Automatically create screenshots
Selenide's goal is to focus on the business logic of the tests and not “waste” mental energy on technical details.
Translation of the project on Selenide
In order to connect Selenide and start working with it, in the pom.xml file between dependencies tags we specify the dependence on Selenide. Since we no longer need the Selenium addiction, we simply remove it.
<dependency> <groupId>com.codeborne</groupId> <artifactId>selenide</artifactId> <version>5.2.8</version> </dependency>
Further, in order to connect and start using Selenide in our project, we need to make several imports. Import examples:
import static com.codeborne.selenide.Selenide. *;
import static com.codeborne.selenide.Selectors. *;
import static com.codeborne.selenide.Condition. *;
import static com.codeborne.selenide.CollectionCondition. *;
For more information on how to connect Selenide using the rest of the project builders, see the Quick Start section of the Selenide documentation.
Work with elements, checks and expectations
Let's move on to the work of Selenide with elements and get acquainted with some of the checks and expectations available to us at Selenide.
import... public class SignUpTest { // private SignUpPage page; @BeforeClass public static void setUp() { //Property baseurl, Configuration url baseurl = "https://www.spotify.com"; //Property browser, Configuration browser = "chrome"; }
In the test file, we replace the BeforeMethod annotation with the BeforeClass annotation, since we no longer need it, Selenide eliminates the need to write Before and After methods - Selenide takes over the AfterMethod function. We only have the BeforeClass annotation left to register a pair of properties .
In the BeforeClass annotation , we registered the property baseurl , which is in the configuration class and will be the base url. Therefore, the driver.get that we used in our Selenium tests is no longer needed. In the property browser, we set the browser on which we will run our tests.
In our test project, we can completely abandon the Selenium driver, Selenide will take care of all the work with it, encapsulating it in its classes. We will only have to focus on the logic of the tests themselves.
Let's move on to using Selenide on our page:
// Selenide open public SignUpPage open() { // Selenide.open (relativeOrAbsoluteUrl: "/us/signup/"); return this; } // email public SignUpPage typeEmail(string Email) { // $(emailFriend).sendKeys(email); return this; }
When you call the open method, Selenide itself launches the browser and opens the page. He also makes sure that the browser closes at the end. In Selenide. open, we can register either the full path with http , or pass some relative to baseurl - relative url . As baseurl, we specified the absolute path, therefore, in the Selenide method. open it will be enough for us to specify "/".
// email public SignUpPage typeEmail(String email) { // $(emailField.sendKeys(email); return this; } // Confirm email public SignUpPage typeConfirmEmailField(String email) { // $(confirmEmailField).setValue(email); return this; }
In order to find an element using Selenide, we need to specify $ instead of driver.findElement , which is used in Selenium. That is, using the method of one character in length, we can directly find the element itself. By default, the search method is accepted as a string, similar to the jQuery JavaScript library.
In order to use Selenide to find a list of elements, you need to specify two $$ characters. Instead of List <WebElement , we prescribe ElementsCollection , which is already extended by additional methods.
To work with elements, we can use both standard Selenium methods (sendKeys ()) and setValue () or a shorter version of val () .
Based on the name, as we see, the Selenide methods are more understandable. The click () method remains that way. Although Selenide has several click () methods : contextClick () (simulating a right-click), doubleClick () (simulating a double-click on an element), etc. Having already found an element, we can continue the search using other locators.
From the Selenium driver.findElement (By) method, the Selenide find () method differs in that it can immediately receive CSS selectors and operates with Selenide elements, and not with Web elements. In principle, Selenide elements are a smarter and with their own methods alternative to Selenium Web elements.
Selenide already contains methods that would have to be done through an action class or in some other way. It allows you to write concise and “beautiful” methods written in a language that is understandable to all. Selenide also has a great deal of flexibility, thanks to which we can use the standard features of Selenium.
Other Selenide methods can also be found in the official documentation .
Consider the wide and understandable examples of checks that Selenide provides us with:
// , page.getError("Please enter a valid year.").shouldBe(Condition.visible); // , page.getError("When were you born?").shouldNotBe(Condition.visible); // page.getErrors().shoildHave(CollectionCondition.size(6)); // page.getErrorByNumber(3).shouldHave(Condition.text("Please enter your birth month."));
The Selenide verification scheme allows us to take an element, find it and use the following formulations for it: should, shouldBe, shouldHave, shouldNot, shouldNotBe and shouldNotHave. The verification scheme is reduced to finding the element and calling it of these formulations. Further in brackets we indicate either the state to which it should correspond or not correspond, or some attribute.
Depending on the logic and our needs, we use certain methods. If we want to check that the element exists, we use the should (exist) method, if we want to check the visibility of the element, we use shouldBe (visible), etc. In fact, we use only three formulations: either should, shouldBe, shouldHave, or their inverse shouldNot, shouldNotBe, shouldNotHave.
Checks on elements or collections of elements are performed on Selenide using the methods described above, which pass the condition for verification. They play the role of waiting for the moment when the element will satisfy some condition, and not only perform a check on the condition.
The wording in Selenide is quite logical and understandable. We can write our checks, either using the hints of the development environment, or logical assumptions. And by itself, we can always look at the implementation code of the necessary methods in the documentation or look at the implementation of the method itself.
Automatic screenshots in the test
For JUnit :
To automatically take a screenshot after each test that fails, you can import and specify Rule
import com.codeborne.selenide.junit.screenShooter; @Rule public ScreenShooter makeScreenshotOnFailure = ScreenShooter.failledTests();
But in essence, this is a rudiment, since Selenide has long been automatically taking screenshots when tests fall. This is very convenient for analyzing our mistakes. By default, Selenide puts screenshots in the build / reports / tests folder.
In order to automatically take a screenshot after each test (including green), you can use the following command:
@Rule public ScreenShooter makeScreenshotOnFailure = ScreenShooter.failedTests().succeededTests();
For TestNG, we also import:
import com.codeborne.selenide.testng.ScreenShooter; @Listeners({ ScreenShooter.class})
To take screenshots after green tests, you need to call the following command before running the tests:
ScreenShooter.captureSuccessfulTests = true;
You can also take a screenshot anywhere in the test in one line:
import static com.codeborne.selenide.selenide.screenshot; screenshot("my_file_name");
In this case, Selenide will create two files: my_file_name.png and my_file_name.html
3. Docker: Features and Benefits
Let's go directly to Docker and consider its advantages:
- Accelerated development process. No need to install auxiliary tools; they can be run in containers
- Convenient application encapsulation
- Clear monitoring
- Easy scaling
When we talk about Docker, the following points should be made clear:
A container is an executable instance that encapsulates the required software. It consists of images. It can be easily removed and re-created in a short amount of time.
An image is the basic element of each container.
Docker Hub is a public interface repository provided by Docker Inc. It stores many images. The resource is a source of “official” images made by the Docker team or created in collaboration with a software developer.
Install Docker
To get Docker on Windows, we go to https://hub.docker.com and download the Docker Desktop app for Windows or MacOS and install it later.
For Ubuntu Linux, install Docker with the command sudo apt install docker.io
Next, you need to start Docker and configure it to start automatically when the system boots up by executing the following commands:
- sudo systemctl start docker
- sudo systemctl enable docker
4. Selenoid: features and benefits
Selenoid is a server that runs isolated browsers in Docker containers.
Benefits of using Selenoid:
- Unified environment for running parallel autotests
- Isolated environment: each browser runs in a separate container, which allows us to completely isolate the environment of our browser
- Scalability: the environment does not affect the quality and continuous testing
- Consumption and utilization of resources: Selenoid allows you to maintain a high load without additional resource costs; in addition, it recycles all inactive containers after the end of its session, thereby constantly maintaining the amount of free memory needed.
- Installation: does not take much time and is carried out, in fact, with a single command
- Simultaneous support of several versions of one browser: this option is available only with Selenoid, for this you need to create several containers with the necessary browsers
- Focus: the operating system works in such a way that only one window can be in focus. When running multiple browsers on the same machine, windows may begin to compete for focus. Selenoid does not have such a problem, since each test runs in a separate container
- User Interface and Logs: Selenoid allows you to quickly access existing logs. In addition, it is possible to integrate with the ELK stack for faster collection and analysis of current files.
Also, Selenoid is quite convenient to use and has an informative interface.
Install Selenoid
Preparatory steps for installing Selenoid:
- An installed and running Docker is required, as the use of Selenoid with Docker is further discussed.
- The easiest way to install Selenoid is to download the Configuration Manager, which is used to automate the installation of Aerokube products, which is Selenoid
- Rename the downloaded file to cm.exe (for easy interaction)
- Run Selenoid with the command:
./cm.exe selenoid start --vnc
./cm.exe selenoid-ui start
As a result of the ./cm.exe selenoid start - vnc command, images will be downloaded from the VNC server, that is, images in which it is possible to see the browser screen in real time. Also, during the execution of this command, the latest version of Selenoid will be downloaded along with the containers, web driver executable files, configuration files will be created and the last step will immediately launch Selenoid itself.
With the following command ./cm.exe selenoid-ui start, we download and run Selenoid UI - a graphical shell through which we can see the progress of our tests in real time, video recordings of script execution, examples of configuration files, collect some statistics, etc. d.
Selenoid by default runs on the standard Selenium 4444 port. You can override the port using the --port switch .
Selenoid was created to work in large Selenium clusters and therefore does not have a built-in user interface. Therefore attempt to open
Endpoint for
Selenoid UI statistics and sessions
Selenoid UI is available at http: // localhost: 8080 /
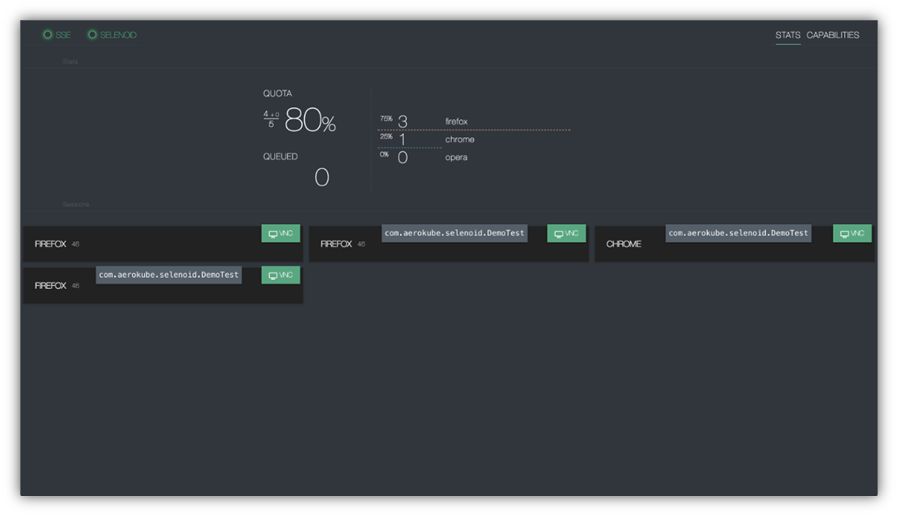
Here we can get acquainted with statistics and sessions. View current quota usage, pending browsers and the queue itself. Selenoid UI receives updates through SSE, so you do not need to refresh the page in the browser to see what is happening. After any temporary interruptions, the page content will automatically refresh.
If we are talking about simultaneous testing on various devices: for example, we have a cross-platform web application with real-time chat functionality, then we can simultaneously test the interaction between them, which is certainly convenient.
Selenoid UI Features
Selenoid UI also has the following features:
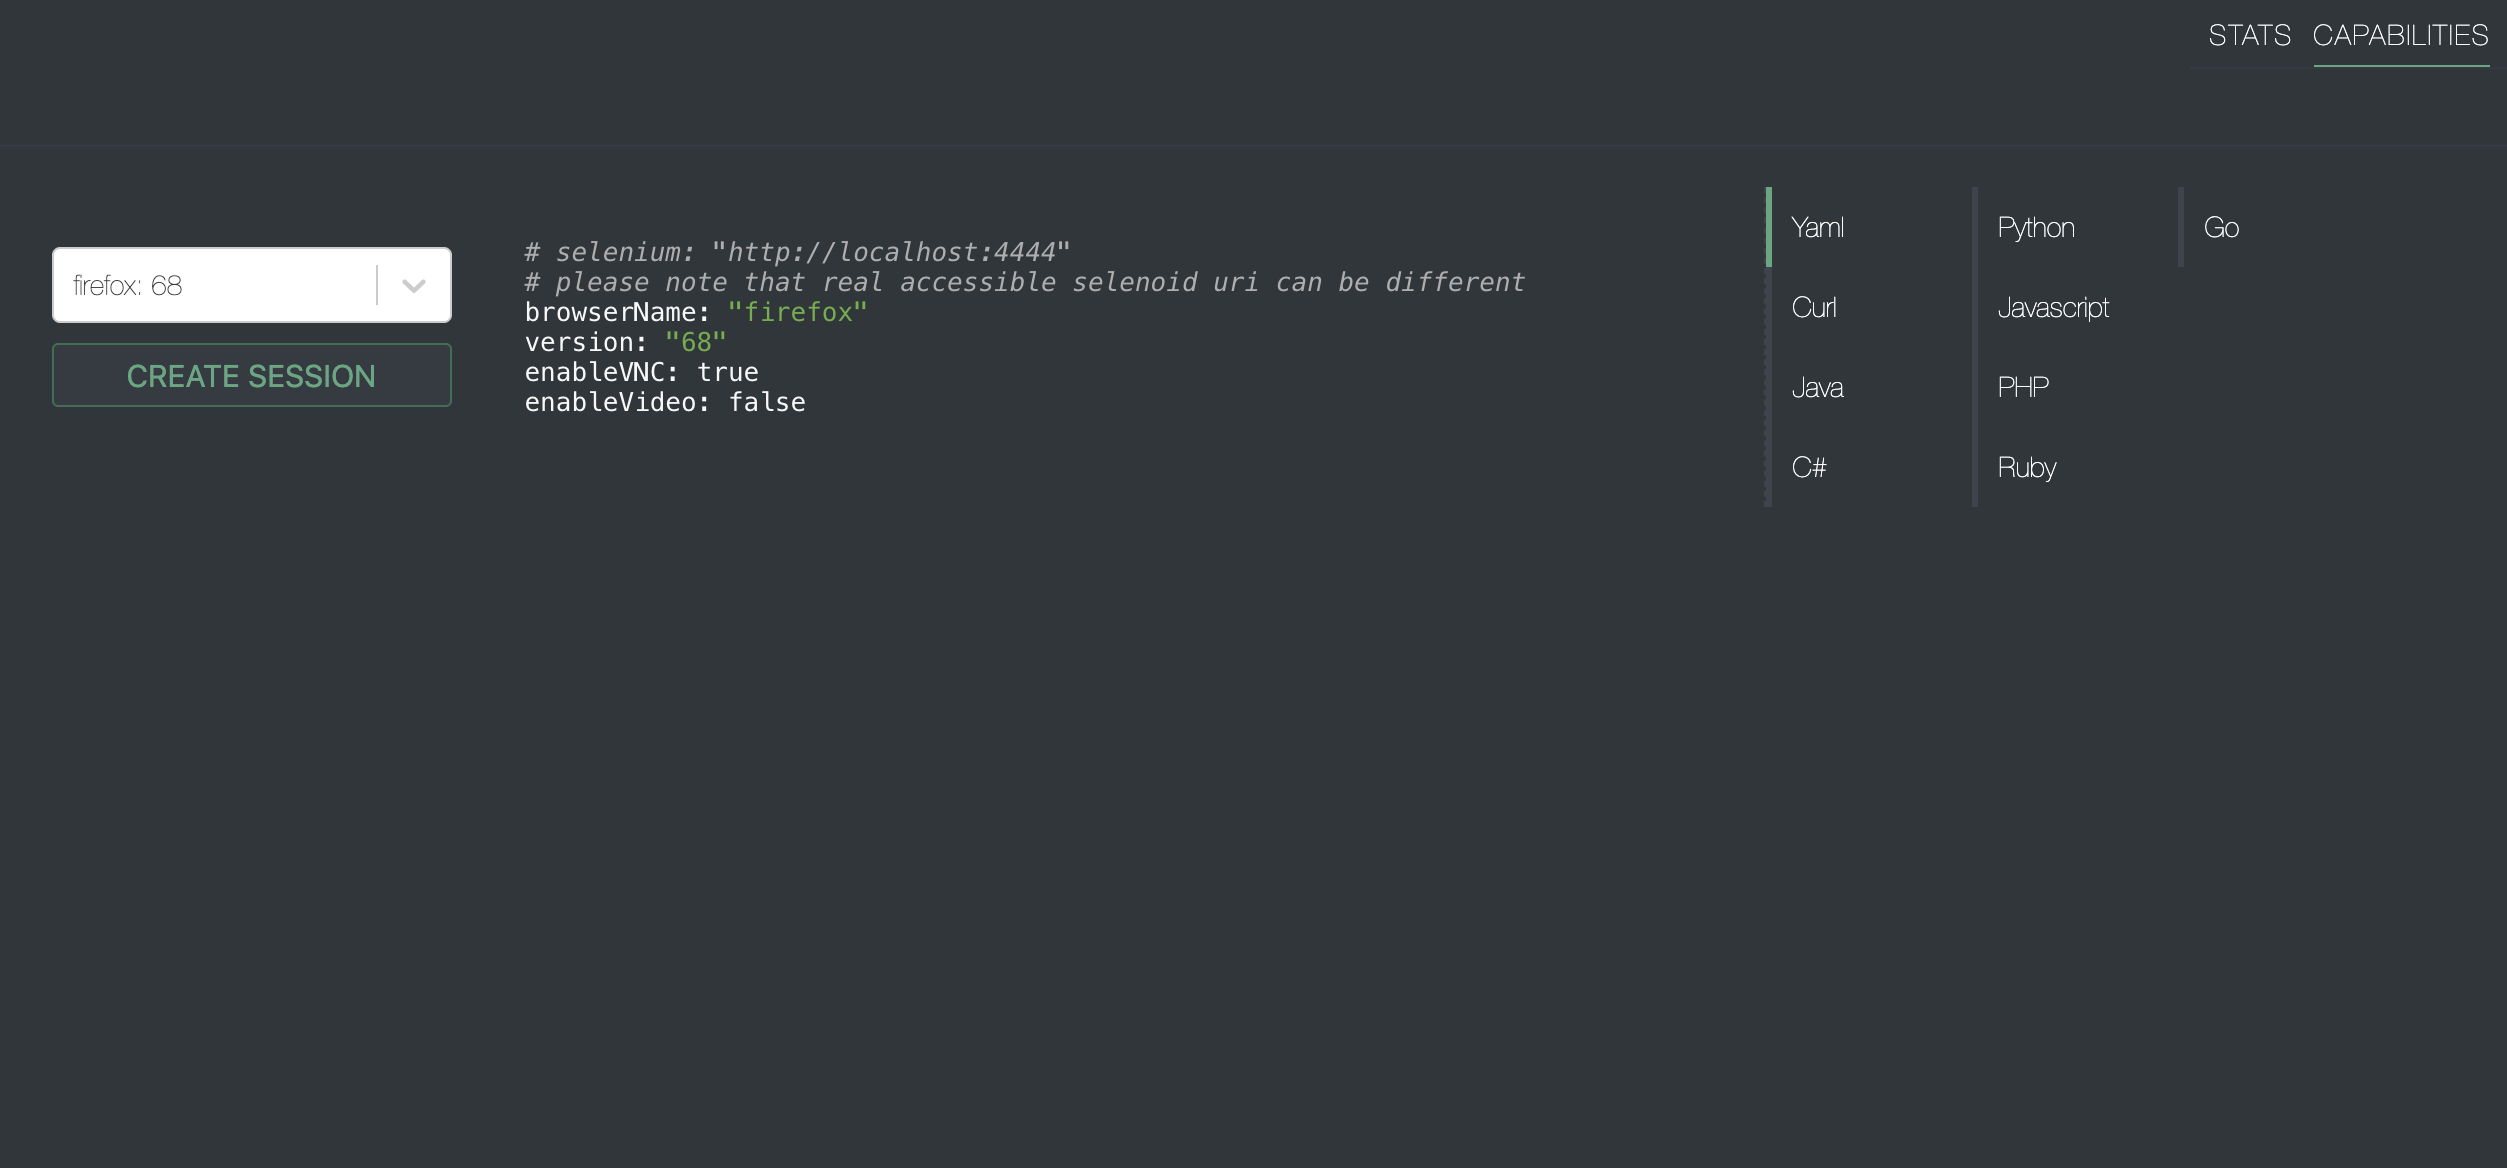
We can choose a browser from the list of available browsers and the user interface will provide us with an example setup with the correct capabilities . The screenshot shows that the examples are available for several languages.

When choosing a browser, we can launch it manually directly in the interface. During the execution of tests, it is possible to connect to the vnc port in real time and gain access to the screen of the desired browser, and even intervene in the process of executing autotests.
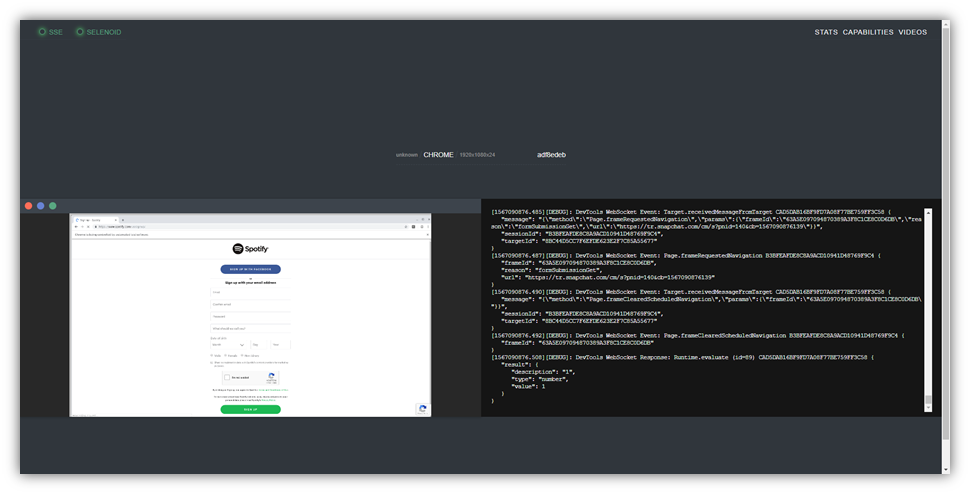
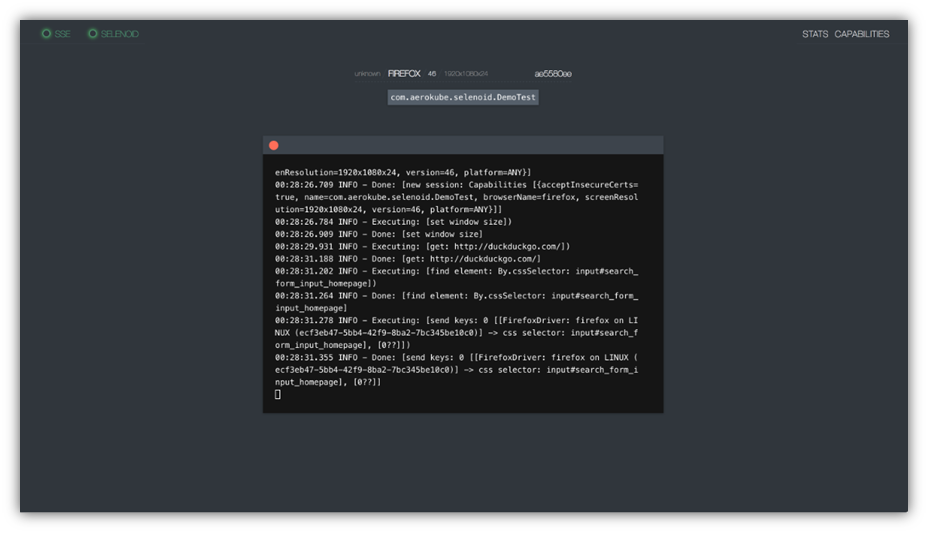
Logs and VNC
If you use capability enabaleVnc = true , you can see a list of available statistics on the page. VNC allows us to see the browser and interact with it. While our log will display all the actions of the browser.
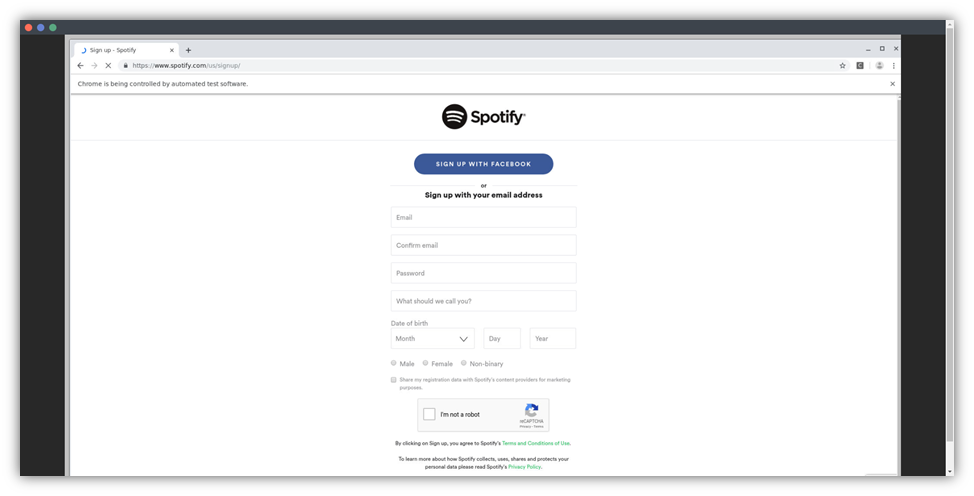
VNC session:
The full-screen VNC mode is as follows:
You can also see docker container logs for each session even without VNC. That is, if, for example, you did not use the --vnc flag when installing Selenoid itself, then you will only see logs.
It is also possible to watch videos of our tests. You can access video files by opening http: // localhost: 4444 / video / , or by going to the “Videos” tab in Selenoid UI.
Connecting to a Selenide Selenoid project to run your tests in a docker container
In order to connect Selenoid, to the BeforeClass annotation we need to add the following configuration:
Configuration.remote = "http://localhost:4444/wd/hub"; Configuration.browser = "chrome"; Configuration.browserSize = "1920x1080"; DesiredCapabilities capabilities = new DesiredCapabilities(); capabilities.setCapability(capabilityName: "enableVNC", value: true); capabilities.setCapability(capabilityName: "enableVideo", value: true); Configuration.browserCapabilities = capabilities;
We delete the Property baseurl , which indicated on which browser the tests were run, since now we use the property
Configuration.browser = "chrome" ;
In a project, it looks like this:
@BeforeClass public static void setUp() { //Url Configuration.remote = "http://10.0.75.1:4444/wd/hub"; // Configuration.browser = "chrome"; // Configuration.browserSize = "1920x1080"; // DesiredCapabilities, - DesiredCapabilities capabilities = new DesiredCapabilities(); // capabilities.setCapability(capabilityName: "enableVNC", value: true); // capabilities.setCapability(capabilityName: "enableVideo", value: true); // Browser capabilities Configuration.browserCapabilities = capabilities;
Selenoid
- : Selenoid Tmpfs – , . , , , .
- Selenoid : . Browser Capabilities .
- : Selenoid Google Chrome true Browser Capabilities :
ChromeOptions options = new ChromeOptions();
options.setCapability(“enableVideo”,true);
Selenoid Docker
Selenoid uses containers to launch browsers, however there are cases when launching a browser in a container is not possible. For example, on Windows we have Internet Explorer that cannot be run inside the container. Selenoid can be used as a “lightweight” Selenium server replacement to run Internet Explorer, Firefox or Chrome on Windows, for example, to use Selenoid with Internet Explorer.
To do this, we need:
1. Download the latest IEDriverServer archive and unzip it to a directory (in our example C: \)
2. Download the last binary Selenoid file
3. Create a browsers.json configuration file
Example of browsers.json fragment:
{ "internet explorer": { "default": "11", "versions": { "11": { "image": ["C:\\IEDriverServer.exe", "--log-level=DEBUG"] } } } }
4. Run Selenoid:
./selenoid_win_amd64.exe -conf ./browsers.json -disable-docker
5. Run tests using endpoint http: // localhost: 4444 / wd / hub with the following capabilities :
browserName = internet explorer
version = 11
6. In order to start Chrome, you need to download the Chromedriver binary file and, accordingly, change browsers.json
7. By default, Selenoid does not process the logs of the running driver, so you need to run Selenoid with the -capture-driver-logs flag to add driver logging for each session in the main log.
Summarizing
The solution based on Selenide + Selenoid in the Docker container demonstrates a high level of flexibility in customizing the runtime environment. The stability of this solution, significant time savings when using it, and a number of additional features allow us to optimize the process and ensure high quality software products in a short time, as a result, it is easy to give preference to the above solutions, since they allow you to quickly and accurately perform testing automation tasks.