bear_hug: games in ASCII art in Python3.6 +
For my games in ASCII art, I wrote the bear_hug library with an event queue, a collection of widgets, ECS support, and other useful little things. In this article we will see how to use it to make a minimal working game.
Disclaimers
- I am the only developer of the library, so I can be biased.
- bear_hug is essentially a wrapper around bearlibterminal , so there will be no relatively low-level operations with glyphs.
- Similar functionality exists in clubsandwich , but I did not use it and I can not compare it.
Under the hood of bear_hug is bearlibterminal , an SDL library for creating a pseudo-console window. That is, in pure TTY, like some ncurses, it will not work. But then the picture is the same on Linux, on Windows, and does not depend on the settings of the user terminal. This is important, especially for games, because when you change the font ASCII-art, God may well turn into what:
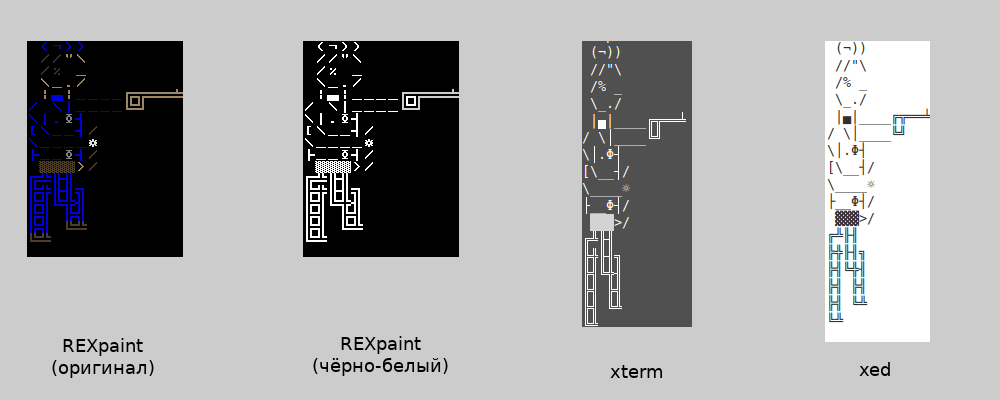
The same drawing in its original form and after copy-paste to different programs
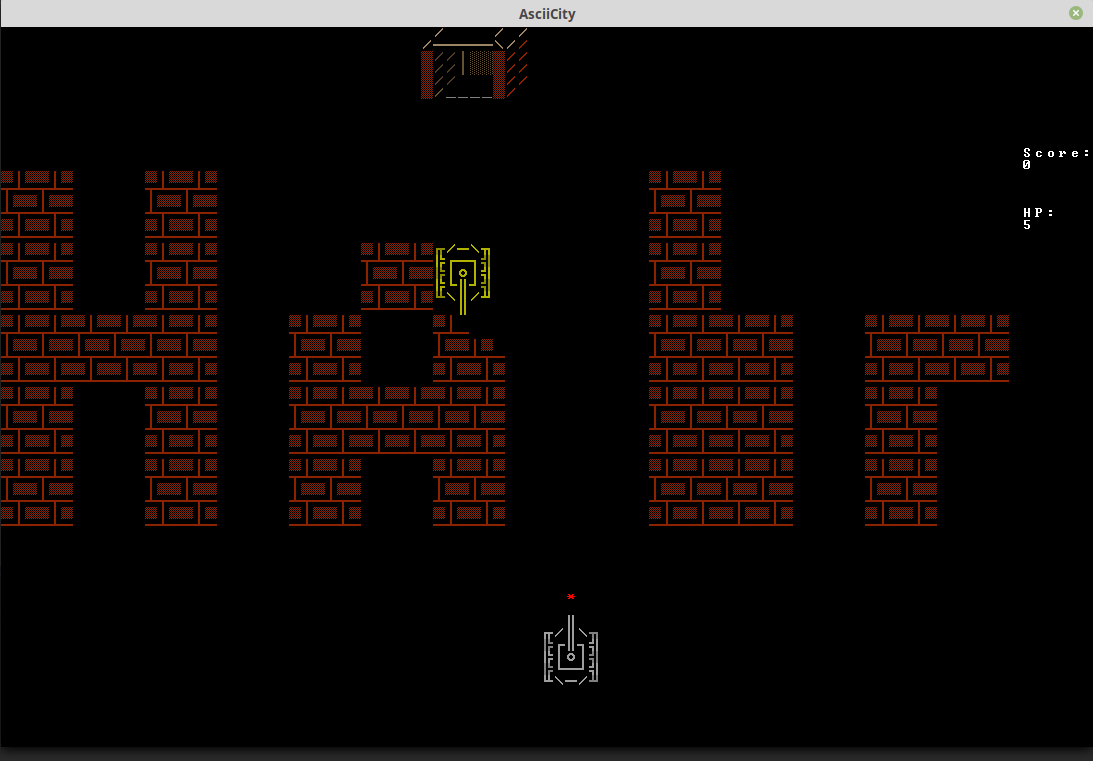
Of course, the library was written for relatively large-scale projects. But, in order not to be distracted by game design and architecture, in this article we will create something simple. A one-night project, in which there is something to show the basic functions of the library. Namely - a simplified clone of those same tanks with Dandy (they are also Battle City). There will be a player’s tank, enemy tanks, destructible walls, sound and scoring. But the main menu, levels and selected bonuses will not be. Not because it would be impossible to add them, but because this project is nothing more than a Halloworld.
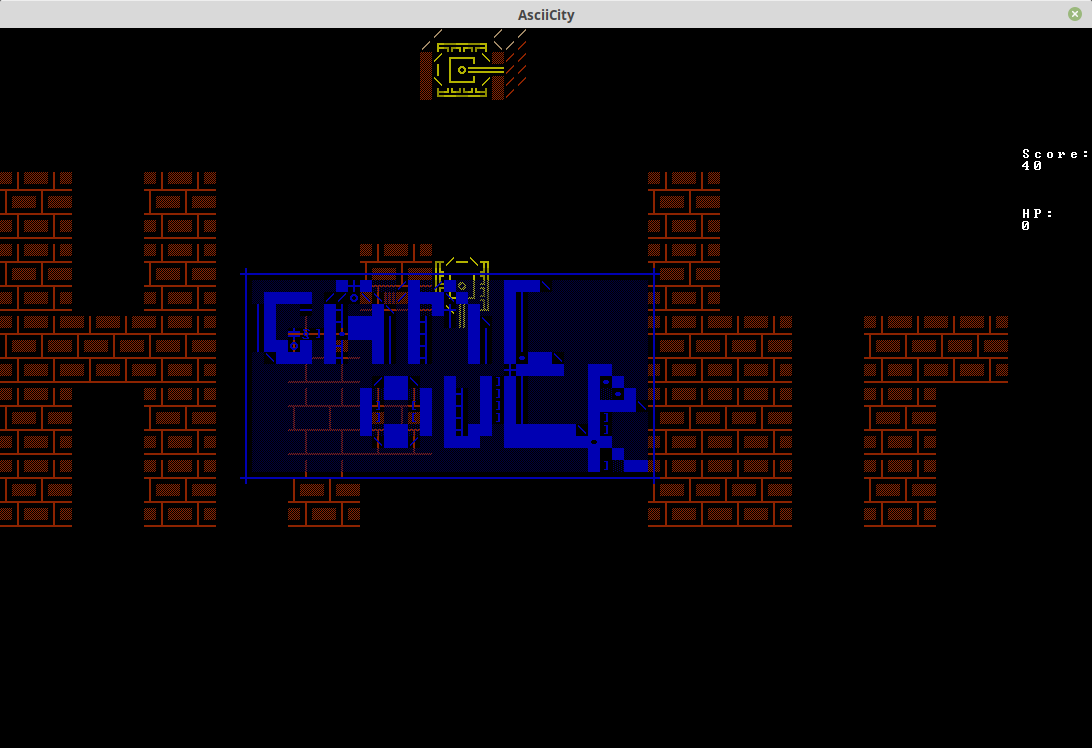
A gameover will be, but there will be no victory. Because life is pain.
All material used in the article is on the github ; the library itself is also on PyPI (under the MIT license).
First of all, we need assets. To draw ASCII art, I use REXpaint from Josh Ge (aka Kyzrati), the developer of the science fiction bagel Cogmind . The editor is free, although not open source; the official version is only for Windows, but everything works fine under wine. The interface is quite clear and convenient:
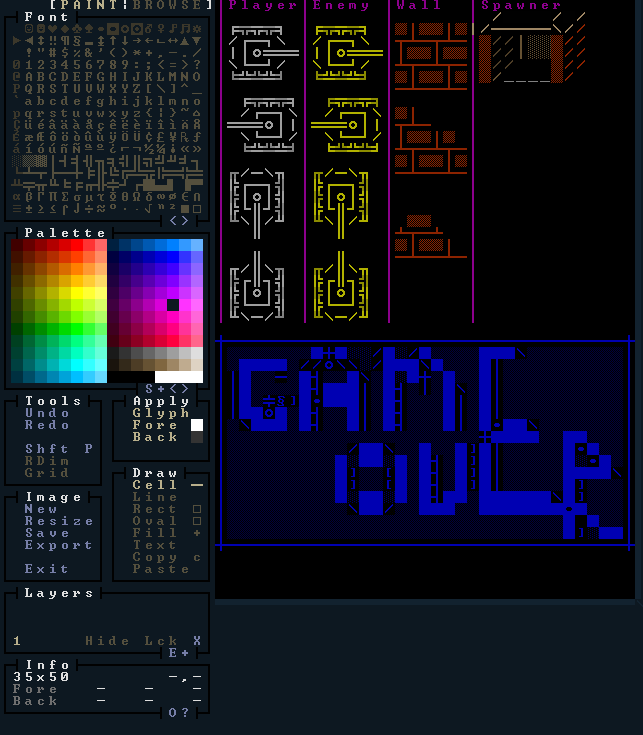
We save in the local binary format .xp and copy from
/path/to/rexpaint/images
to the folder with the future game. In principle, loading images from .txt files is also supported, but it is obviously impossible to save the colors of individual characters in a text file. And editing ASCII art in a notebook is not convenient for me personally. In order not to hardcode the coordinates and size of each element, this data is stored in a separate JSON file:
battlecity.json
[ { "name": "player_r", "x": 1, "y": 2, "xsize": 6, "ysize": 6 }, { "name": "player_l", "x": 1, "y": 8, "xsize": 6, "ysize": 6 }, ... ]
Sounds under free licenses are downloaded from the Internet. So far, only .wav is supported. That's all with assets, you can start coding. First of all, you need to initialize the terminal and the event queue.
game.py
# terminal = BearTerminal(font_path='cp437_12x12.png', size='91x60', title='AsciiCity', filter=['keyboard', 'mouse']) # dispatcher = BearEventDispatcher() # , loop = BearLoop(terminal, dispatcher)
The terminal is the actual window of the game. You can place widgets on it, and it throws input events as necessary. As keys when creating a terminal, you can use all the terminal options bearlibterminal ; in this case, we set the font, window size (in characters), window title, and input methods of interest to us.
As for the event queue, it has a very simple interface: dispatcher.add_event (event) adds the event to the queue, and dispatcher.register_listener (listener, event_types) allows you to subscribe to it. A signer (for example, a widget or component) must have an on_event callback, which takes an event as a single argument and either returns nothing or returns another event or set of events. The event itself consists of type and value; the type here is not in the sense of str or int, but in the sense of “variety”, for example, 'key_down' or 'tick'. The queue accepts only events of types known to it (built-in or created by the user) and sends them to on_event all those who subscribe to this type. It does not check the values in any way, but there are conventions within the library about what is a valid value for each type of event.
First, we queue a couple of Listeners. This is the base class for objects that can subscribe to events, but are not widgets or components. In principle, it is not necessary to use it, as long as the signatory had the on_event method.
Listeners
# dispatcher.register_listener(ClosingListener(), ['misc_input', 'tick']) # dispatcher.register_listener(EntityTracker(), ['ecs_create', 'ecs_destroy']) # jukebox = SoundListener({'shot': 'shot.wav', 'explosion': 'explosion.wav'}) # https://freesound.org/people/EMSIarma/sounds/108852/ # https://freesound.org/people/FlashTrauma/sounds/398283/ dispatcher.register_listener(jukebox, 'play_sound')
A complete list of built-in event types is in the documentation . It is easy to notice that there are events for the creation and destruction of entities, but not for damage. Since we will have objects that do not fall apart from one shot (the player’s walls and tank), we will create it:
Event Type Registration
# , # dispatcher.register_event_type('ac_damage') # logger = LoggingListener(sys.stderr) dispatcher.register_listener(logger, ['ac_damage', 'play_sound'])
We agree that, as a value, this event will have a tuple from the ID of the entity that suffered the damage, and the value of the damage. LoggingListener is just a debugging tool that prints all received events wherever they say, in this case in stderr. In this case, I wanted to make sure that the damage passes correctly, and that the sound is requested always when it should.
With Listeners for now, you can add the first widget. We have this ECSLayout class playing field. This is such a Layout, which can put widgets on entities and move them in response to ecs_move events, and at the same time considers collisions. Like most widgets, it has two required arguments: a nested list of characters (possibly empty - space or None) and a nested list of colors for each character. Named colors are accepted as colors, RGB in the format `0xAARRGGBB` (or` 0xARGB`, `0xRGB`,` 0xRRGGBB`) and in the format '#fff'. The sizes of both lists must match; otherwise, an exception is thrown.
First widget
# . 8460, 9160. # 7 chars = [[' ' for x in range(84)] for y in range(60)] colors = copy_shape(chars, 'gray') layout = ECSLayout(chars, colors) # 'all' - , dispatcher.register_listener(layout, 'all')
Since we now have what to place in-game objects on, we can start creating entities. All code of entities and components is moved to a separate file. The simplest of them is a destructible brick wall. She knows how to be in a certain place, display her widget, serve as an object of collision and receive damage. After enough damage, the wall disappears.
entities.py
def create_wall(dispatcher, atlas, entity_id, x, y): # wall = Entity(entity_id) # wall.add_component(PositionComponent(dispatcher, x, y)) wall.add_component(CollisionComponent(dispatcher)) wall.add_component(PassingComponent(dispatcher)) wall.add_component(DestructorComponent(dispatcher)) # , # - / images_dict = {'wall_3': atlas.get_element('wall_3'), 'wall_2': atlas.get_element('wall_2'), 'wall_1': atlas.get_element('wall_1')} wall.add_component(SwitchWidgetComponent(dispatcher, SwitchingWidget(images_dict=images_dict, initial_image='wall_3'))) wall.add_component(VisualDamageHealthComponent(dispatcher, hitpoints=3, widgets_dict={3: 'wall_3', 2: 'wall_2', 1: 'wall_1'})) # dispatcher.add_event(BearEvent('ecs_create', wall)) dispatcher.add_event(BearEvent('ecs_add', (wall.id, wall.position.x, wall.position.y)))
First of all, the entity object itself is created. It contains only a name (which must be unique) and a set of components. They can either be transferred all at once upon creation, or, as here, added one at a time. Then all the necessary components are created. As a widget, SwitchWidget is used, which contains several drawings of the same size and can change them by command. By the way, drawings are loaded from the atlas when creating a widget. And finally, the announcement of the creation of the entity and the order to draw it on the necessary coordinates go into the queue.
Of the non-built-in components, there is only health. I created the base class “Health component” and inherited from it the “Health component changing widget” (to show the wall intact and at several stages of destruction).
class HealthComponent
class HealthComponent(Component): def __init__(self, *args, hitpoints=3, **kwargs): super().__init__(*args, name='health', **kwargs) self.dispatcher.register_listener(self, 'ac_damage') self._hitpoints = hitpoints def on_event(self, event): if event.event_type == 'ac_damage' and event.event_value[0] == self.owner.id: self.hitpoints -= event.event_value[1] @property def hitpoints(self): return self._hitpoints @hitpoints.setter def hitpoints(self, value): if not isinstance(value, int): raise BearECSException( f'Attempting to set hitpoints of {self.owner.id} to non-integer {value}') self._hitpoints = value if self._hitpoints < 0: self._hitpoints = 0 self.process_hitpoint_update() def process_hitpoint_update(self): """ Should be overridden by child classes. """ raise NotImplementedError('HP update processing should be overridden') def __repr__(self): # return dumps({'class': self.__class__.__name__, 'hitpoints': self.hitpoints})
When creating a component, the 'name' key is passed to super () .__ init__. When a component is added to an entity, under the name from this key, it will be added to the __dict__ of the entity and can be accessed through entity_object.health. In addition to the convenience of the interface, this approach is good because it prohibits the issuance of entities of several homogeneous components. And the fact that it is hardcoded inside the component does not allow you to mistakenly insert, for example, the WidgetComponent into the slot of the health component. Immediately upon creation, the component subscribes to the event classes of interest to it, in this case ac_damage. Having received such an event, the on_event method will check whether it’s about its owner for an hour. If so, he will subtract the desired value from the hit points and pull the callback to change health, the base class is abstract. There is also the __repr__ method, which is used for serialization in JSON (for example, for saving). It is not necessary to add it, but all built-in components and most built-in widgets have it.
Inheriting from the underlying health component of VisualDamageHealthComponent overrides the callback on health change:
class VisualDamageHealthComponent
class VisualDamageHealthComponent(HealthComponent): """ . HP=0 """ def __init__(self, *args, widgets_dict={}, **kwargs): super().__init__(*args, **kwargs) self.widgets_dict = OrderedDict() for x in sorted(widgets_dict.keys()): self.widgets_dict[int(x)] = widgets_dict[x] def process_hitpoint_update(self): if self.hitpoints == 0 and hasattr(self.owner, 'destructor'): self.owner.destructor.destroy() for x in self.widgets_dict: if self.hitpoints >= x: self.owner.widget.switch_to_image(self.widgets_dict[x])
While the health is above 0, he asks the component responsible for the widget to draw the wall in the desired state. Here, the call described above is used through the attribute of the entity object. Once the hitpoints are over, the component responsible for the correct destruction of the entity and all components will be called in the same way.
For other entities, everything is similar, only the set of components is different. Tanks are added with controllers (input for the player, AI for opponents) and rotating widgets, for shells - a collision component that causes damage to those they hit. I will not analyze each of them, because it is bulky and rather trivial; look only at the projectile collider. It has a collided_into method, called when the host entity crashed into something:
bullet component collider
def collided_into(self, entity): if not entity: self.owner.destructor.destroy() elif hasattr(EntityTracker().entities[entity], 'collision'): self.dispatcher.add_event(BearEvent(event_type='ac_damage', event_value=( entity, self.damage))) self.owner.destructor.destroy()
To make sure that it is really possible to get a victim (which may be wrong for, for example, background elements), the projectile uses EntityTracker (). This is a singleton that tracks all created and destroyed entities; through it, you can get an entity object by name and do something with its components. In this case, it is verified that entity.collision (the victim collision handler) exists at all.
Now in the main file of the game, we simply call all the necessary functions for creating entities:
Back to game.py
# , - atlas = Atlas(XpLoader('battlecity.xp'), 'battlecity.json') # create_player_tank(dispatcher, atlas, 30, 50) # wall_array = [[0 for _ in range(14)], [0 for _ in range(14)], [1, 0, 1, 0, 0, 0, 0, 0, 0, 1, 0, 0, 0, 0], [1, 0, 1, 0, 0, 1, 0, 0, 0, 1, 0, 0, 0, 0], [1, 1, 1, 0, 1, 0, 1, 0, 0, 1, 1, 0, 1, 1], [1, 0, 1, 0, 1, 1, 1, 0, 0, 1, 1, 0, 1, 0], [1, 0, 1, 0, 1, 0, 1, 0, 0, 1, 1, 0, 1, 0], [0 for _ in range(14)], [0 for _ in range(14)], [0 for _ in range(14)] ] for y in range(10): for x in range(14): if wall_array[y][x] == 1: create_wall(dispatcher, atlas, f'wall{x}{y}', x*6, y*6) # - . . create_spawner_house(dispatcher, atlas, 35, 0)
Point and hitpoint counters are not entities and are not on the battlefield. Therefore, they are not added to ECSLayout, but directly to the terminal to the right of the map. The corresponding widgets inherit from Label (text output widget) and have an on_event method to find out what interests them. Unlike Layout, the terminal does not automatically update widgets every tick, so after changing the text, the widgets tell him to do this:
listeners.py
class ScoreLabel(Label): """ """ def __init__(self, *args, **kwargs): super().__init__(text='Score:\n0') self.score = 0 def on_event(self, event): if event.event_type == 'ecs_destroy' and 'enemy' in event.event_value and 'bullet' not in event.event_value: # self.score += 10 self.text = f'Score:\n{self.score}' self.terminal.update_widget(self) class HPLabel(Label): """ """ def __init__(self, *args, **kwargs): super().__init__(text='HP:\n5') self.hp = 5 def on_event(self, event): if event.event_type == 'ac_damage' and event.event_value[0] == 'player': self.hp -= event.event_value[1] self.text = f'HP:\n{self.hp}' self.terminal.update_widget(self)
The enemy generator and the object responsible for the output of “GAME OVER” are not displayed at all, so they inherit from Listener. The principle is the same: objects listen to the queue, wait for the right moment, and then create an entity or widget.
game over
# - . . . class GameOverListener(Listener): """ """ def __init__(self, *args, widget=None, **kwargs): print (args) super().__init__(*args, *kwargs) self.widget = widget def on_event(self, event): if event.event_type == 'ecs_destroy' and event.event_value == 'player': self.terminal.add_widget(self.widget, pos=(20, 20), layer=5)
Now we have created everything we need, and we can start the game.
We launch
# , Listeners terminal.start() terminal.add_widget(layout) terminal.add_widget(score, pos=(85, 10)) terminal.add_widget(hp, pos=(85, 15))
Widgets are added to the screen only after it starts. Entities could be added to the map earlier - creation events (in which the whole entity is stored, including the widget) are simply stored in the queue and resolved at the first tick. But the terminal can add widgets only after a window has been successfully created for it.
At this point, we have a working prototype, you can
All Articles