DIY DeepFake [Part 1]
Despite all the delights of the Internet, it has many disadvantages, and one of the most terrible is misleading people. Clickbait, photo editing, false news - all these tools are actively used to deceive ordinary users on the world’s network, but in recent years a new potentially dangerous tool known as DeepFake has been gaining momentum.
I was interested in this technology recently. For the first time I learned about it from the report of one of the speakers at the “AI Conference 2018”. A video was shown there, in which, according to the audio recording, the algorithm generated a video with the appeal of Barack Obama. Link to a selection of videos created using this technology . The results inspired me greatly, and I decided to better understand this technology in order to oppose it in the future. To do this, I decided to write DeepFake in C #. As a result, I got such a result.
Enjoy reading!
General principles
The starting point was this project. From it, I learned exactly how face replacement in video works.
Video demonstrating the work of the FaceSwap project :
I decided to break the work into 3 parts:
1st) Replacing a face in one photo with a face from another, without using a 3D mask
2nd) Finalization of the replacement using the 3D mask
3rd) Video Processing
Face replacement in the photo can be decomposed into the following points:
Embed one image in another
The first thing I started with was embedding one image into another. The zad1.py script is used to demonstrate embedding in the original project.
As a result, the file “eyeHandBlend.jpg” is created, where the eye is embedded in the hand.

This algorithm consists of 2 parts, the first transfers the color from the area with the face in the original picture to the face that needs to be inserted. The second makes the edges of the image with the desired face transparent, reducing transparency as it approaches the center of the image.
I completely transferred the first part from the original project.
To make the edges more transparent than the central part of the image, for calculating the alpha channel, a radial basis function of the following form was introduced:
k and n were selected empirically.
i - pixel index along the OX axis
j - pixel index along the OY axis
- component x of the center of the image
- component y of the center of the image
As a result, I got the following result:

Face search
To search for faces in the photo, there are many algorithms:
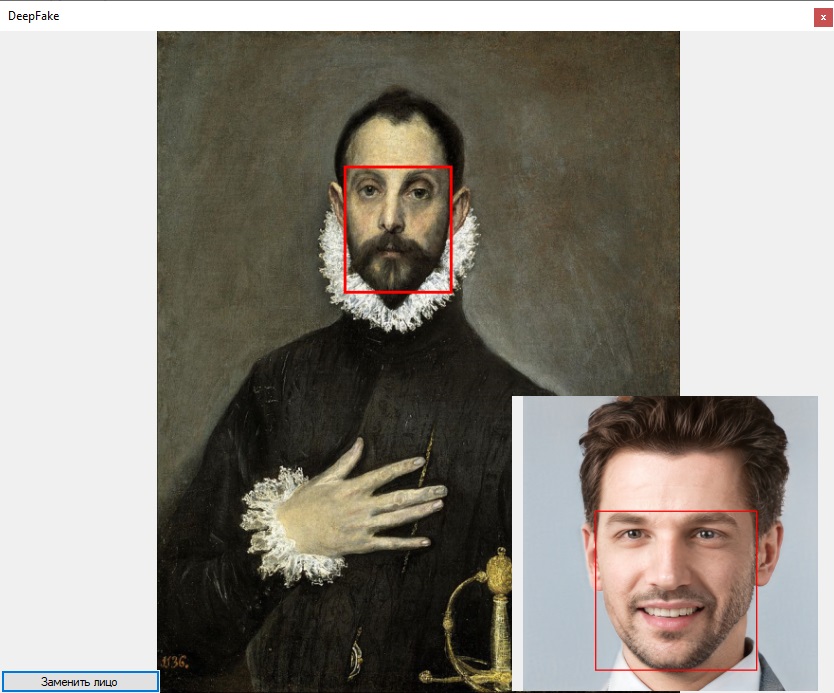
Initially, the Viola-Jones algorithm was used, but it turned out to be not accurate enough, because highlighted faces not exactly. The selection area of one person did not coincide with the selection area of the second, due to which the replacement occurred with defects, an example of the selection of faces using this algorithm is shown below. Faces can be displaced, i.e. in one image it captures both ears, on the other only one. Such defects have a rather bad effect on the final result (in the photo, working with DLib, the previous library did not always find a face, but unfortunately the screenshots were not saved).

Next, I decided to use Landmarks from the Dlib library. Found DlibDotNet , which is written on .Net Core. For use in the .Net Framework, an intermediate project on .Net Standard 2.0 was created with the main functions, face search and Landmarks highlighting.
Then he wrote a library on .Net Framework 4.6.1, in which he implemented all the logic.
An example of getting Langmarks:
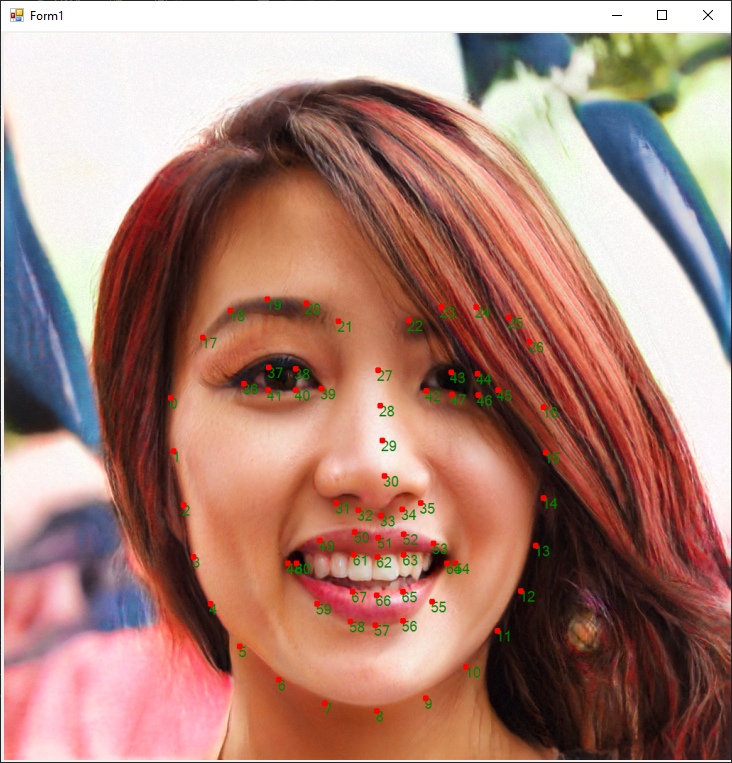
A person can be distinguished more precisely by finding the leftmost, right, upper and lower points and building frames on them.
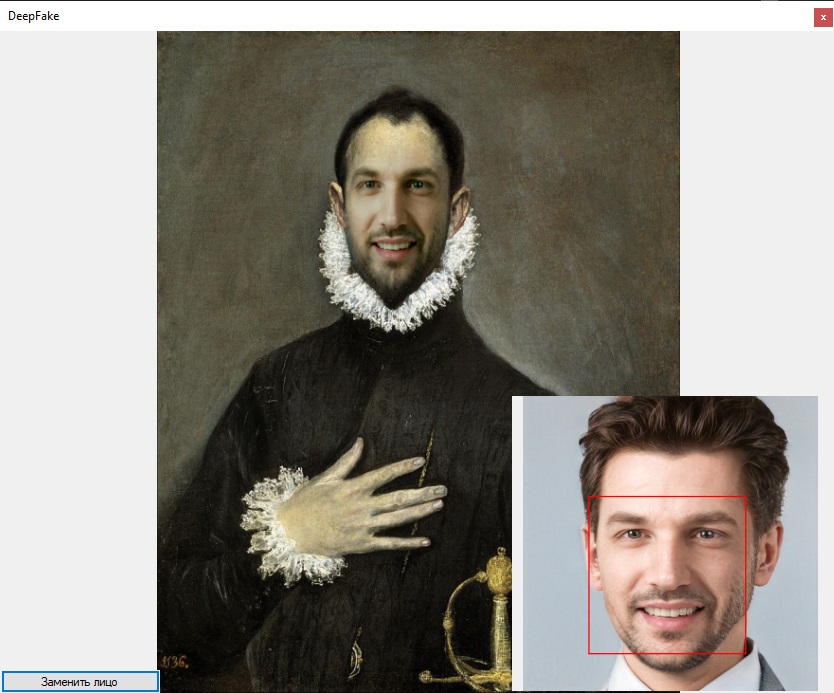
Then the face was cut out of the picture in the lower right corner and inserted, using the algorithm described above, into the picture: “Caballero de la mano en el pecho”.
The following result was obtained.
In the next article, I plan to consider creating a 3D mask from a photograph.
I was interested in this technology recently. For the first time I learned about it from the report of one of the speakers at the “AI Conference 2018”. A video was shown there, in which, according to the audio recording, the algorithm generated a video with the appeal of Barack Obama. Link to a selection of videos created using this technology . The results inspired me greatly, and I decided to better understand this technology in order to oppose it in the future. To do this, I decided to write DeepFake in C #. As a result, I got such a result.
Enjoy reading!
General principles
The starting point was this project. From it, I learned exactly how face replacement in video works.
- Uploading a picture with which we will take a face
- Face extraction
- 3D mask creation
- Video is framed
- The area of face localization in the frame is calculated
- The angle and facial expression are calculated
- Transfer rotation and facial expressions to a 3D model
- Rendering
- Replacing a real person on the frame with the result of rendering
Video demonstrating the work of the FaceSwap project :
I decided to break the work into 3 parts:
1st) Replacing a face in one photo with a face from another, without using a 3D mask
2nd) Finalization of the replacement using the 3D mask
3rd) Video Processing
Face replacement in the photo can be decomposed into the following points:
- Uploading a picture with which we will take a face
- Loading the image onto which we will project the face
- Face extraction
- Scaling the face taken from image 2 to the aspect ratio in image 1
- Replacing a face in picture 1 with a face in picture 2
Embed one image in another
The first thing I started with was embedding one image into another. The zad1.py script is used to demonstrate embedding in the original project.
As a result, the file “eyeHandBlend.jpg” is created, where the eye is embedded in the hand.
This algorithm consists of 2 parts, the first transfers the color from the area with the face in the original picture to the face that needs to be inserted. The second makes the edges of the image with the desired face transparent, reducing transparency as it approaches the center of the image.
I completely transferred the first part from the original project.
Python code
def colorTransfer(src, dst, mask): transferredDst = np.copy(dst) #indeksy nie czarnych pikseli maski maskIndices = np.where(mask != 0) #src[maskIndices[0], maskIndices[1]] zwraca piksele w nie czarnym obszarze maski maskedSrc = src[maskIndices[0], maskIndices[1]].astype(np.int32) maskedDst = dst[maskIndices[0], maskIndices[1]].astype(np.int32) meanSrc = np.mean(maskedSrc, axis=0) meanDst = np.mean(maskedDst, axis=0) maskedDst = maskedDst - meanDst maskedDst = maskedDst + meanSrc maskedDst = np.clip(maskedDst, 0, 255) transferredDst[maskIndices[0], maskIndices[1]] = maskedDst return transferredDst
Code ported to C #
static public Bitmap NewColor(Bitmap src, Bitmap ins, Rectangle r) { List<Vector> srV = new List<Vector>(); List<Vector> inV = new List<Vector>(); ; for (int i = rX; i < rX + r.Width-2; i+=3) { for (int j = rY; j < rY + r.Height-3; j+=4) { Color color = src.GetPixel(i, j); Color color2 = ins.GetPixel(i, j); srV.Add(new double[] { color.R, color.G, color.B }.ToVector()); inV.Add(new double[] { color2.R, color2.G, color2.B }.ToVector()); } } Vector meanSrc = Vector.Mean(srV.ToArray()) / 255; Vector meanInk = Vector.Mean(inV.ToArray()) / 255; Tensor tensor = ImgConverter.BmpToTensor (ins.Clone(r, PixelFormat.Format32bppArgb)); tensor = tensor.DivD(meanInk); tensor = tensor.PlusD(meanSrc); tensor = tensor.TransformTensor(x => { if (x < 0) x = 0; if (x > 1) x = 1; return x; }); return ImgConverter.TensorToBitmap(tensor); }
To make the edges more transparent than the central part of the image, for calculating the alpha channel, a radial basis function of the following form was introduced:
k and n were selected empirically.
i - pixel index along the OX axis
j - pixel index along the OY axis
- component x of the center of the image
- component y of the center of the image
As a result, I got the following result:
Face search
To search for faces in the photo, there are many algorithms:
- Viola-Jones Algorithm (Haar Cascades)
- Hog + svm
- R-CNN
- Fast r-cnn
- Faster r-cnn
- Yolo
Initially, the Viola-Jones algorithm was used, but it turned out to be not accurate enough, because highlighted faces not exactly. The selection area of one person did not coincide with the selection area of the second, due to which the replacement occurred with defects, an example of the selection of faces using this algorithm is shown below. Faces can be displaced, i.e. in one image it captures both ears, on the other only one. Such defects have a rather bad effect on the final result (in the photo, working with DLib, the previous library did not always find a face, but unfortunately the screenshots were not saved).
Next, I decided to use Landmarks from the Dlib library. Found DlibDotNet , which is written on .Net Core. For use in the .Net Framework, an intermediate project on .Net Standard 2.0 was created with the main functions, face search and Landmarks highlighting.
C # Code
public int[] Face(byte[] bts, int row, int col, int st) { var img = Dlib.LoadImageData<RgbPixel> (ImagePixelFormat.Bgr, bts, (uint)row, (uint)col, (uint)st ); var face = faceDetector.Operator(img)[0]; int[] rect = { face.Left, face.Top, (int)face.Width, (int)face.Height}; return rect; } public List<int[]> FacePoints(byte[] bts, int row, int col, int st) { List<int[]> points = new List<int[]>(); var img = Dlib.LoadImageData<RgbPixel> (ImagePixelFormat.Bgr, bts, (uint)row, (uint)col, (uint)st); var face = faceDetector.Operator(img)[0]; var shape = shapePredictor.Detect(img, face); for (var i = 0; i < shape.Parts; i++) { var point = shape.GetPart((uint)i); points.Add(new int[] { point.X, point.Y }); } return points; }
Then he wrote a library on .Net Framework 4.6.1, in which he implemented all the logic.
An example of getting Langmarks:
A person can be distinguished more precisely by finding the leftmost, right, upper and lower points and building frames on them.
Then the face was cut out of the picture in the lower right corner and inserted, using the algorithm described above, into the picture: “Caballero de la mano en el pecho”.
The following result was obtained.
- The persons used to demonstrate the algorithms are taken from this project .
- Used libraries .
- Shape predictor (68 points) .
- Link to the project .
In the next article, I plan to consider creating a 3D mask from a photograph.
All Articles