Xamarin.Forms Shell
At the end of May, Microsoft released the Xamarin.Forms Shell release - a shell aimed at simplifying the creation of cross-platform mobile applications and including the following functionality: side menu, tabs, navigation, search.
Let's start by creating an empty Xamarin.Forms project in Visual Studio 2019. Please note, at the moment, Shell officially supports only 2 platforms: iOS and Android, UWP is still under development. I recommend immediately updating all nuget packages in the solution.

Next, create the Shell-derived class AppShell, to do this, add the XAML file to the general project with the following contents:
AppShell.xaml
AppShell.xaml.cs
then in the file App.xaml.cs we indicate that AppShell will act as MainPage:
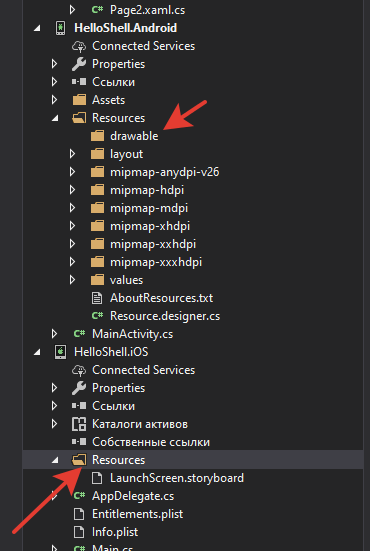
and a couple of ContentPage pages: Page1 and Page2. Also, images will be used in our test application, so we will add them to platform-dependent projects, for androids in the Resources => drawable folder, and for ios in the Resources folder.
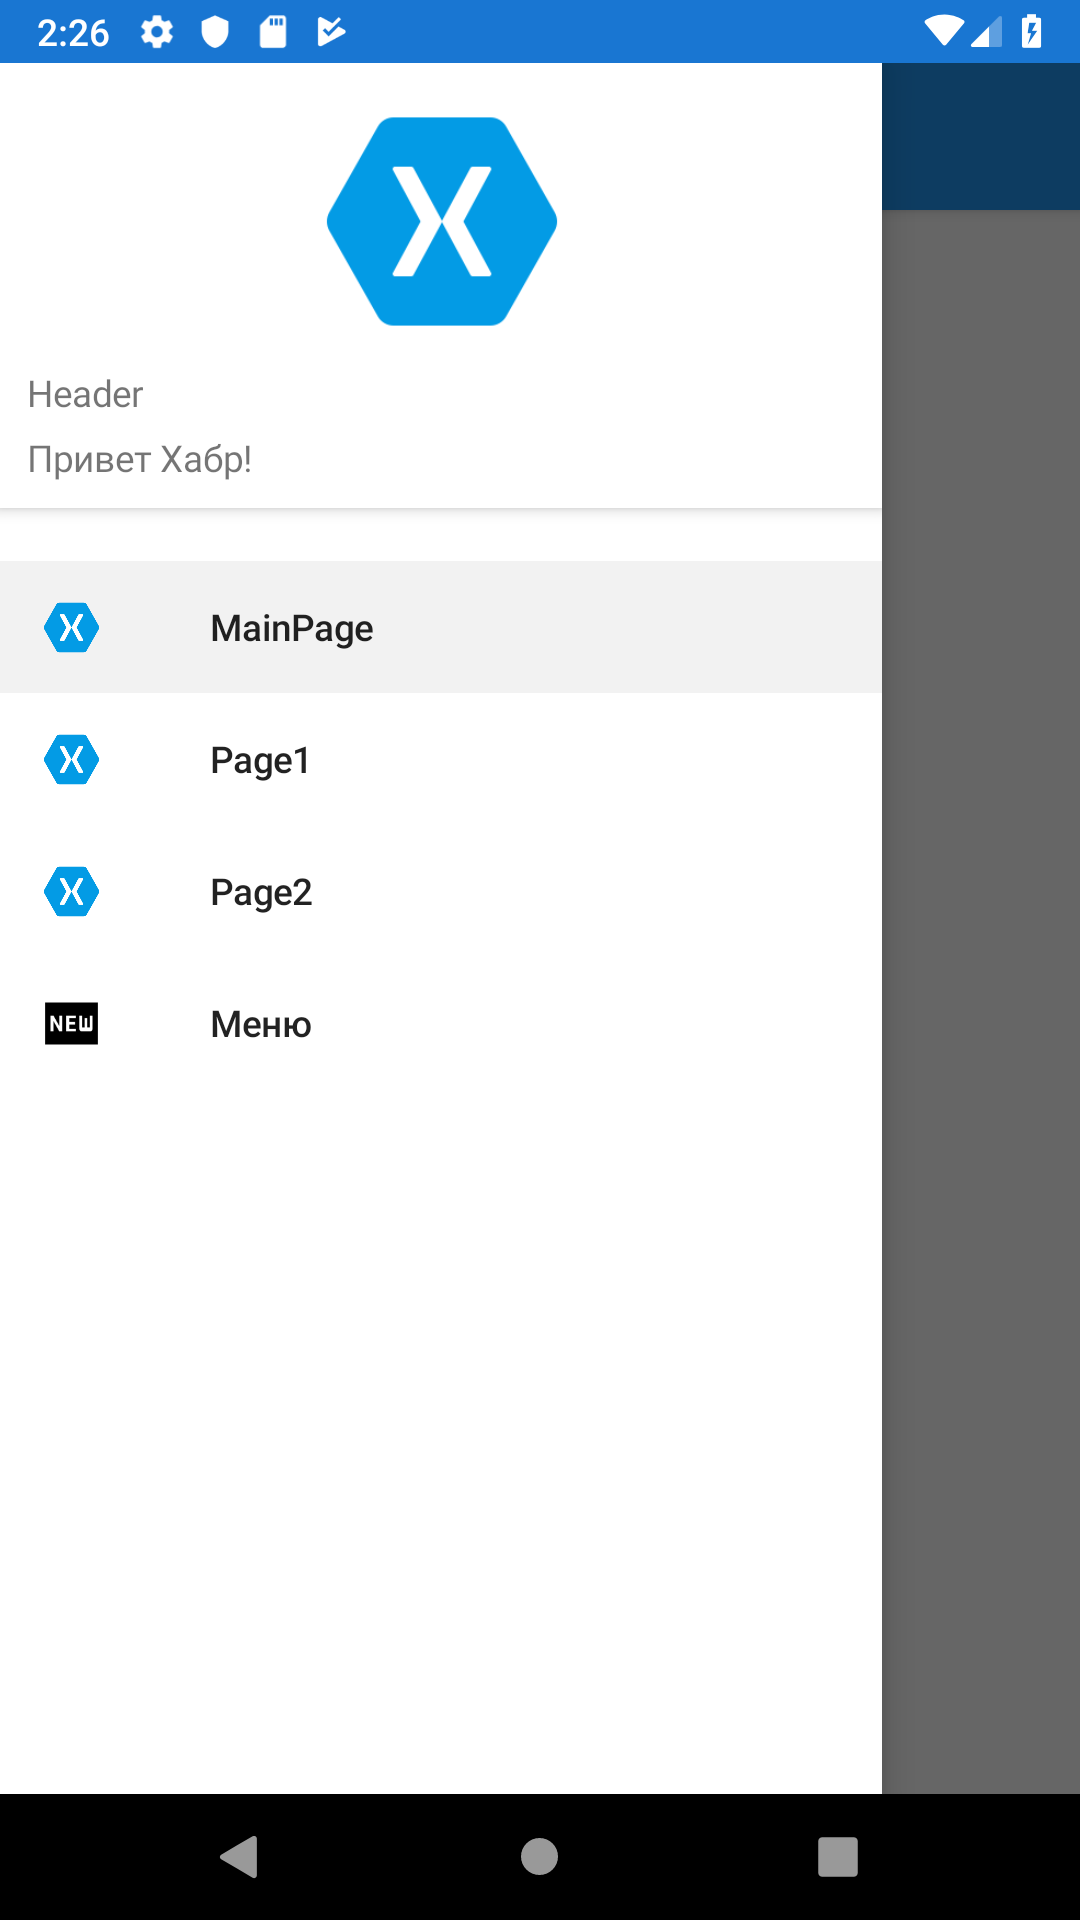
The side menu (often called the hamburger menu) is a pop-up menu that can be called up by pressing a button or with a special gesture and includes a header (Header), a list of pages (Flyout Items) and a menu (Flyout Menu)
AppShell.xaml
AppShell.xaml.cs

Xamarin.Forms Shell as a root template can support lower and upper tabs, as well as their combination:
AppShell.xaml.cs
As you can see, this is pretty simple. Another advantage is the efficient loading of pages, which allows you to initialize the page only when the user goes to it, which significantly speeds up the launch of the application.
Xamarin.Forms provides improved URI-based navigation, allowing you to go to any page in the application without following a strict hierarchy and go back without having to go through all the pages in the navigation stack. For the navigation to work, the page needs to be registered, you can do this in the XAML markup in FlyoutItem, Tab and ShellContent using the Route property
or in code
navigation is carried out using the command
As an example, we make changes to the following files:
AppShell.xaml
MainPage.xaml
MainPage.xaml.cs
Page2.xaml
Page2.xaml.cs
Xamarin.Forms Shell has built-in search functions provided by the SearchHandler class. To add a search function to the page, we will create a PetSearchHandler class derived from SearchHandler and override the OnQueryChanged and OnItemSelected methods. The OnQueryChanged method fires when a user enters text in a search field and takes two arguments: oldValue and newValue, which contain the previous and new search queries, respectively.
The SelectedItem method is executed when the user selects the search result and takes an object, in this case, Animal, as the parameter.
For example, create an Animal model.
Models / Animal.cs
PetData class that will contain a collection of our favorite cats and dogs
Data / PetData.cs
PetSearchHandler.cs
Add a Pets page where we set our PetSearchHandler
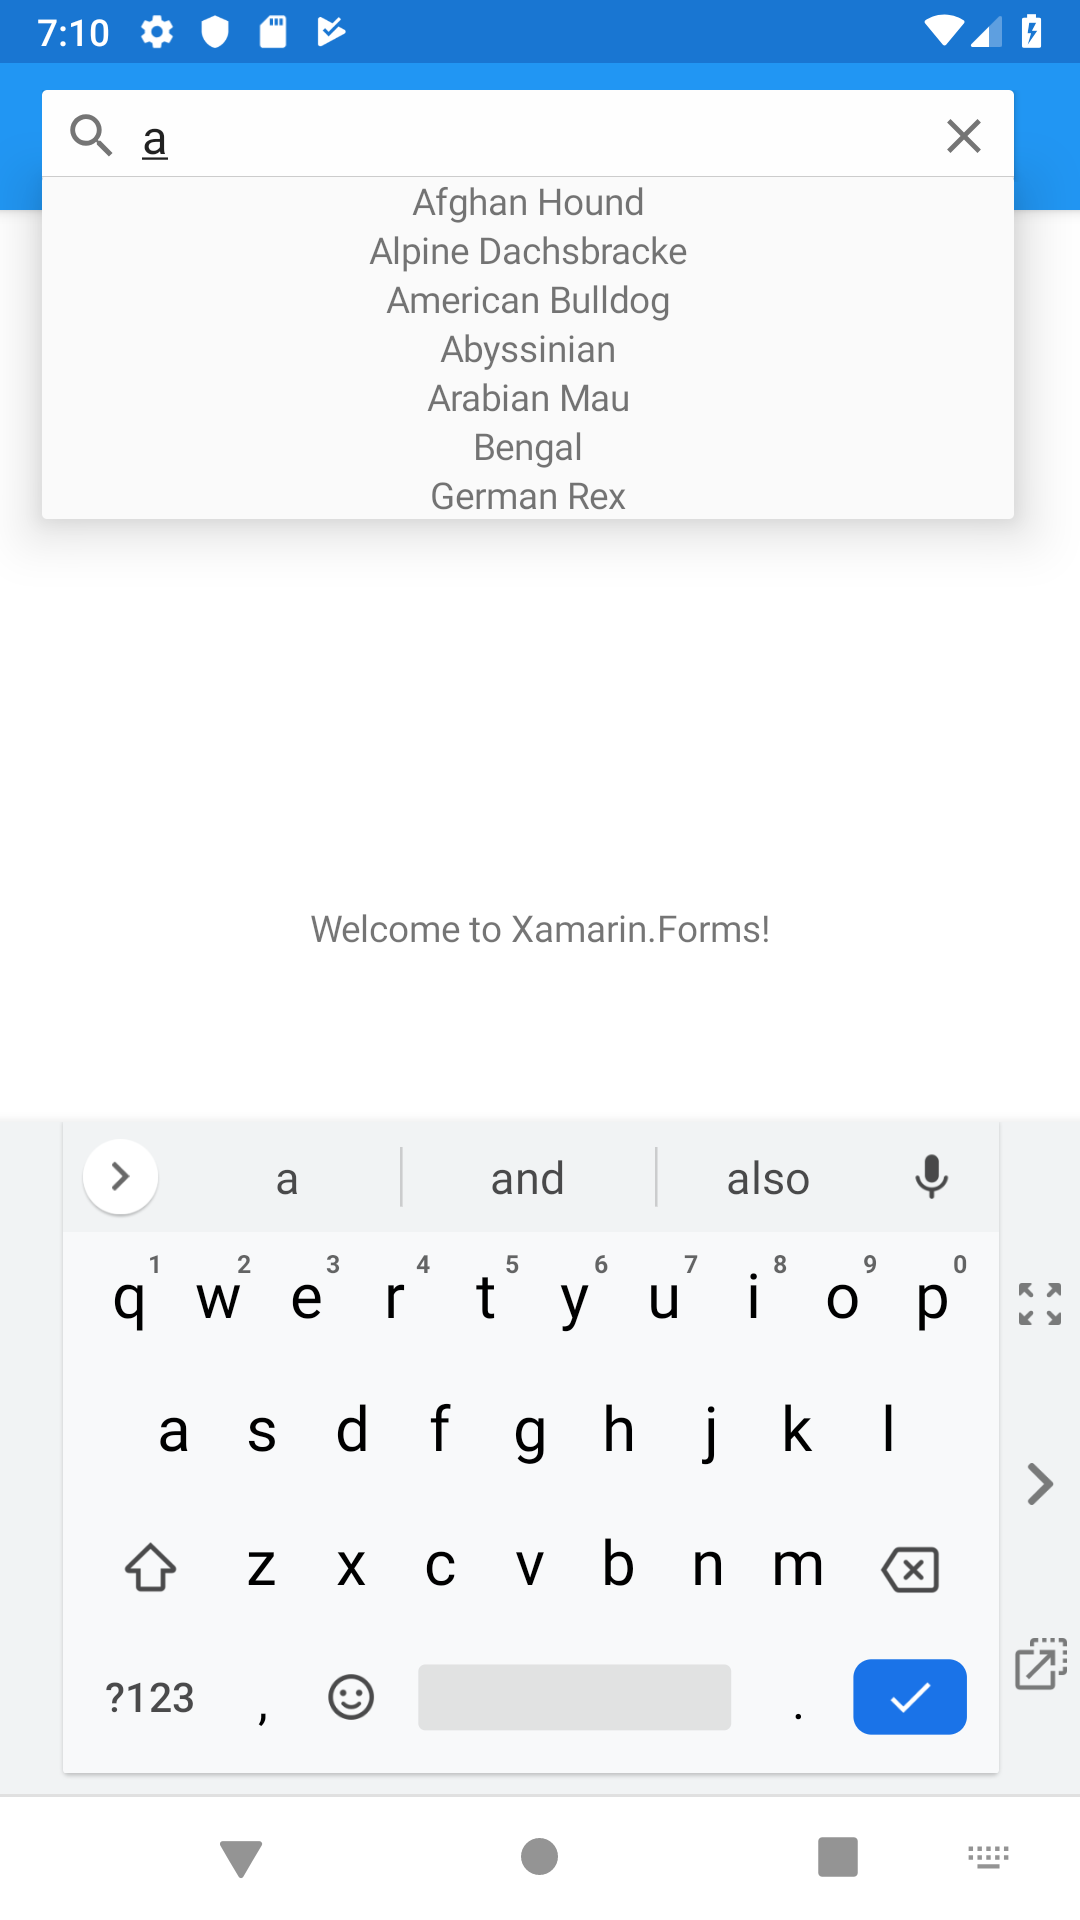
As a result, we should get a page with a search field in the navigation bar, when you enter a search phrase, a simple list of pet names is displayed.
If desired, we can easily customize the contents of the list cell by adding a picture and several text labels there:

Sources on github
Let's start by creating an empty Xamarin.Forms project in Visual Studio 2019. Please note, at the moment, Shell officially supports only 2 platforms: iOS and Android, UWP is still under development. I recommend immediately updating all nuget packages in the solution.
Next, create the Shell-derived class AppShell, to do this, add the XAML file to the general project with the following contents:
AppShell.xaml
<?xml version="1.0" encoding="utf-8" ?> <Shell xmlns="http://xamarin.com/schemas/2014/forms" xmlns:x="http://schemas.microsoft.com/winfx/2009/xaml" x:Class="HelloShell.AppShell"> </Shell>
AppShell.xaml.cs
namespace HelloShell { [XamlCompilation(XamlCompilationOptions.Compile)] public partial class AppShell : Shell { public AppShell() { InitializeComponent(); } } }
then in the file App.xaml.cs we indicate that AppShell will act as MainPage:
public App() { InitializeComponent(); //MainPage = new MainPage(); MainPage = new AppShell(); }
and a couple of ContentPage pages: Page1 and Page2. Also, images will be used in our test application, so we will add them to platform-dependent projects, for androids in the Resources => drawable folder, and for ios in the Resources folder.
Sidebar
The side menu (often called the hamburger menu) is a pop-up menu that can be called up by pressing a button or with a special gesture and includes a header (Header), a list of pages (Flyout Items) and a menu (Flyout Menu)
AppShell.xaml
<?xml version="1.0" encoding="utf-8" ?> <Shell xmlns="http://xamarin.com/schemas/2014/forms" xmlns:x="http://schemas.microsoft.com/winfx/2009/xaml" xmlns:pages="clr-namespace:HelloShell" x:Class="HelloShell.AppShell"> <Shell.FlyoutHeader> <StackLayout BackgroundColor="White" Padding="10"> <Image HeightRequest="100" Source="xamarin.png" /> <Label Text="Header" /> <Label Text=" !"/> </StackLayout> </Shell.FlyoutHeader> <FlyoutItem Title="MainPage" Icon="xamarin.png"> <ShellContent ContentTemplate="{DataTemplate pages:MainPage}"/> </FlyoutItem> <FlyoutItem Title="Page1" Icon="xamarin.png"> <ShellContent ContentTemplate="{DataTemplate pages:Page1}"/> </FlyoutItem> <FlyoutItem Title="Page2" Icon="xamarin.png"> <ShellContent ContentTemplate="{DataTemplate pages:Page2}"/> </FlyoutItem> <MenuItem Clicked="MenuItem_Clicked" Text="" IconImageSource="item.png" /> </Shell>
AppShell.xaml.cs
namespace HelloShell { [XamlCompilation(XamlCompilationOptions.Compile)] public partial class AppShell : Shell { public AppShell() { InitializeComponent(); } private async void MenuItem_Clicked(object sender, System.EventArgs e) { await DisplayAlert(""," !","OK"); } } }
Tabs
Xamarin.Forms Shell as a root template can support lower and upper tabs, as well as their combination:
AppShell.xaml.cs
<?xml version="1.0" encoding="utf-8" ?> <Shell xmlns="http://xamarin.com/schemas/2014/forms" xmlns:x="http://schemas.microsoft.com/winfx/2009/xaml" xmlns:pages="clr-namespace:HelloShell" x:Class="HelloShell.AppShell"> <TabBar> <Tab Title="MainPage" Icon="xamarin.png"> <ShellContent ContentTemplate="{DataTemplate pages:MainPage}" /> </Tab> <Tab Title="Page1" Icon="xamarin.png"> <ShellContent Title="Main Page" Icon="xamarin.png" ContentTemplate="{DataTemplate pages:MainPage}" /> <ShellContent Title="Page2" Icon="xamarin.png" ContentTemplate="{DataTemplate pages:Page2}" /> </Tab> <Tab IsEnabled="False" Title="Page2" Icon="xamarin.png"> <ShellContent ContentTemplate="{DataTemplate pages:Page2}" /> </Tab> </TabBar> </Shell>
As you can see, this is pretty simple. Another advantage is the efficient loading of pages, which allows you to initialize the page only when the user goes to it, which significantly speeds up the launch of the application.
Navigation
Xamarin.Forms provides improved URI-based navigation, allowing you to go to any page in the application without following a strict hierarchy and go back without having to go through all the pages in the navigation stack. For the navigation to work, the page needs to be registered, you can do this in the XAML markup in FlyoutItem, Tab and ShellContent using the Route property
<Shell ...> <FlyoutItem ... Route="page1"> <Tab ... Route="page2"> <ShellContent ... Route="mainpage" /> <ShellContent ... Route="page3" /> </Tab> <ShellContent ... Route="page4" /> <ShellContent ... Route="page5" /> </FlyoutItem> <ShellContent ... Route="about" /> ... </Shell>
or in code
Routing.RegisterRoute("page1", typeof(Page1));
navigation is carried out using the command
await Shell.Current.GoToAsync("//page2");
As an example, we make changes to the following files:
AppShell.xaml
<TabBar> <Tab Route="main" Title="MainPage" Icon="xamarin.png"> <ShellContent ContentTemplate="{DataTemplate pages:MainPage}" /> </Tab> <Tab Title="Page1" Icon="xamarin.png"> <ShellContent Title="Main Page" Icon="xamarin.png" ContentTemplate="{DataTemplate pages:MainPage}" /> <ShellContent Route="page2" Title="Page2" Icon="xamarin.png" ContentTemplate="{DataTemplate pages:Page2}" /> </Tab> <Tab IsEnabled="False" Title="Page2" Icon="xamarin.png"> <ShellContent ContentTemplate="{DataTemplate pages:Page2}" /> </Tab> </TabBar>
MainPage.xaml
<StackLayout VerticalOptions="CenterAndExpand"> <Button Text="Page2" Clicked="ToPage2" /> </StackLayout>
MainPage.xaml.cs
public partial class MainPage : ContentPage { public MainPage() { InitializeComponent(); } private async void ToPage2(object sender, EventArgs e) { await Shell.Current.GoToAsync("//page2"); } }
Page2.xaml
<ContentPage.Content> <StackLayout VerticalOptions="CenterAndExpand"> <Button Text="" Clicked="Back" /> </StackLayout> </ContentPage.Content>
Page2.xaml.cs
public partial class Page2 : ContentPage { public Page2() { InitializeComponent(); } private async void Back(object sender, EventArgs e) { await Shell.Current.GoToAsync("//main"); } }
Search
Xamarin.Forms Shell has built-in search functions provided by the SearchHandler class. To add a search function to the page, we will create a PetSearchHandler class derived from SearchHandler and override the OnQueryChanged and OnItemSelected methods. The OnQueryChanged method fires when a user enters text in a search field and takes two arguments: oldValue and newValue, which contain the previous and new search queries, respectively.
The SelectedItem method is executed when the user selects the search result and takes an object, in this case, Animal, as the parameter.
For example, create an Animal model.
Models / Animal.cs
public class Animal { public string Name { get; set; } public string ImageUrl { get; set; } }
PetData class that will contain a collection of our favorite cats and dogs
Data / PetData.cs
public static class PetData { public static IList<Animal> Pets { get; private set; } static PetData() { Pets = new List<Animal>(); Pets.Add(new Animal { Name = "Afghan Hound", ImageUrl = "https://upload.wikimedia.org/wikipedia/commons/6/69/Afghane.jpg" }); Pets.Add(new Animal { Name = "Alpine Dachsbracke", ImageUrl = "https://upload.wikimedia.org/wikipedia/commons/thumb/2/23/Alpejski_gończy_krótkonożny_g99.jpg/320px-Alpejski_gończy_krótkonożny_g99.jpg" }); Pets.Add(new Animal { Name = "American Bulldog", ImageUrl = "https://upload.wikimedia.org/wikipedia/commons/5/5e/American_Bulldog_600.jpg" }); Pets.Add(new Animal { Name = "Abyssinian", ImageUrl = "https://upload.wikimedia.org/wikipedia/commons/thumb/9/9b/Gustav_chocolate.jpg/168px-Gustav_chocolate.jpg" }); Pets.Add(new Animal { Name = "Arabian Mau", ImageUrl = "https://upload.wikimedia.org/wikipedia/commons/d/d3/Bex_Arabian_Mau.jpg" }); Pets.Add(new Animal { Name = "Bengal", ImageUrl = "https://upload.wikimedia.org/wikipedia/commons/thumb/b/ba/Paintedcats_Red_Star_standing.jpg/187px-Paintedcats_Red_Star_standing.jpg" }); Pets.Add(new Animal { Name = "Burmese", ImageUrl = "https://upload.wikimedia.org/wikipedia/commons/0/04/Blissandlucky11.jpg" }); Pets.Add(new Animal { Name = "Cyprus", ImageUrl = "https://upload.wikimedia.org/wikipedia/commons/thumb/b/b9/CyprusShorthair.jpg/320px-CyprusShorthair.jpg" }); Pets.Add(new Animal { Name = "German Rex", ImageUrl = "https://upload.wikimedia.org/wikipedia/commons/c/c7/German_rex_harry_%28cropped%29.jpg" }); } }
PetSearchHandler.cs
public class PetSearchHandler : SearchHandler { protected override void OnQueryChanged(string oldValue, string newValue) { base.OnQueryChanged(oldValue, newValue); if (string.IsNullOrWhiteSpace(newValue)) { ItemsSource = null; } else { ItemsSource = PetData.Pets .Where(pet => pet.Name.ToLower().Contains(newValue.ToLower())) .ToList<Animal>(); } } protected override async void OnItemSelected(object item) { base.OnItemSelected(item); var pet = item as Animal; if (pet is null) return; await App.Current.MainPage.DisplayAlert(" ",pet.Name,"ok"); } }
Add a Pets page where we set our PetSearchHandler
<?xml version="1.0" encoding="utf-8" ?> <ContentPage xmlns="http://xamarin.com/schemas/2014/forms" ... x:Class="HelloShell.Pets"> <Shell.SearchHandler> <controls:PetSearchHandler Placeholder="Enter search term" ShowsResults="true" DisplayMemberName="Name" /> </Shell.SearchHandler> <ContentPage.Content>
As a result, we should get a page with a search field in the navigation bar, when you enter a search phrase, a simple list of pet names is displayed.
If desired, we can easily customize the contents of the list cell by adding a picture and several text labels there:
<Shell.SearchHandler> <controls:PetSearchHandler Placeholder="Enter search term" ShowsResults="true"> <controls:PetSearchHandler.ItemTemplate> <DataTemplate> <StackLayout Padding="10" Orientation="Horizontal"> <Image Source="{Binding ImageUrl}" Aspect="AspectFill" HeightRequest="40" WidthRequest="40" /> <Label Text="{Binding Name}" FontAttributes="Bold" /> </StackLayout> </DataTemplate> </controls:PetSearchHandler.ItemTemplate> </controls:PetSearchHandler> </Shell.SearchHandler>
Sources on github
All Articles