Double VPN in one click. How to easily split the IP address of an entry and exit point

TL; DR This article describes the easiest way to configure a VPN server, whose IP address for connecting VPN clients is different from the IP address from which clients access the Internet.
Do you use a VPN to protect privacy on the Internet and rent your own server for this? At the same time, are you the only client that connects to this server all over the world? Is it so hard to find your real IP address, do you think? With the entry into force of the Spring package, it becomes much easier.
Double VPN is a popular topic around which there is a lot of speculation. Often this term is called completely different technology, but almost always it means Internet connection and access points spaced apart at the level of IP addresses. We will consider the easiest way to configure a VPN server in this mode, which does not require additional configuration on the server side and allows you to get maximum speed and the lowest latency.
Threat Model
In order to protect yourself from something, you need to clearly understand the threat model. We will not discuss new laws requiring providers to store all client traffic, but we can definitely say that connection data, the so-called Netflow, storage is quite simple, and it has been done successfully for a long time. That is, the fact of connecting a conditional IP address
1.1.1.1
to address
2.2.2.2
at a certain time of the day is recorded.
Having access to such information on the scale of the provider, city or country, it is enough to simply establish who is hiding behind the VPN.
To increase the level of privacy when using a VPN, you need to separate the connection point and the Internet access point at the IP level. In the picture above, our user is behind the fence under the scrutiny of Irina Yarovoy. All connections passing through the fence, Irina strictly remembers. The user, as a decent citizen, connects to the address
good.citizen.vpn
, while he returns back from the address
super.cool.guy.vpn
. As a result, for Irina, these two connections look unconnected.
What are dual VPNs?
Under the name of “dual” VPN, different things are often understood, but almost always it means nodes of connection and access to the Internet spaced geographically or at the network level. Sometimes it’s just a marketing trick of VPN providers, which means absolutely nothing, such services can be called “triple” and “quadruple” VPNs.
We will analyze the most typical schemes that are used in practice.
VPN between servers
The most common way. In this mode, the client establishes a VPN connection to only the first server. The tunnel to the second is configured on the first server, and all traffic from the client goes to the second server, and so on. There may be several intermediate servers. In this case, the tunnel between the servers can be installed using any other protocol other than the protocol through which the client is connected, for example IPsec, or without any encryption, such as GRE or IPIP. In this mode, all intermediate servers can be seen in the route trace . There is no way to check how the intermediate servers on the client side are connected, so you can only trust the provider.
Throughout the traffic route, the minimum MTU (Maximum transmission unit) remains equal to the value of the very first tunnel, and each intermediate server has access to the decrypted client traffic .

VPN through proxy
Also a fairly common way. Often used to mask VPN traffic under a different protocol, for example in China. This method is more convenient than a chain of proxies, because using a VPN it is easy to route all system traffic to the tunnel. There are also tools for intercepting system calls of programs and redirecting them to proxies: ProxyCap, Proxifier, but they are less stable because they sometimes miss requests and they bypass the proxy or work incorrectly with some programs.
In this mode, the proxy server is not visible in the route trace.

VPN inside VPN
The most paranoid and slowest way: all the tunnels rise on the client side, with each inside the other. This method requires tricky configuration of routes on the client side and the launch of all VPN clients in the right order. This is bad for latency and performance, but intermediate servers do not have access to the client’s open traffic. All encapsulation overheads are summarized, and the maximum packet size (MTU) that is ultimately available to the client decreases depending on the number of tunnels. Intermediate servers are not visible in the route trace.

Configure VDS
The easiest way to set up a VPN with split entry and exit points is to connect multiple IP addresses to a single virtual server. This method allows you to get maximum speed and minimum delays, since in fact traffic is terminated on one server. Here at Vdsina.ru you can do this yourself from the control panel. While IPv4 ends everywhere, we issue additional IP addresses even on servers for 60 rubles!
We will analyze the server configuration step by step.
Choose a server
We order VDS with a suitable tariff, in the necessary data center. Given our task, we will choose a data center further away, in the Netherlands;)

Connect an additional IP address
After purchasing an additional IP address, you need to configure it according to the instructions .

For clarity, we assign a PTR record to IP. This is the domain name that will be visible when the IP address is converted back to a domain. This can be any value, including a non-existent domain.
For examples, we will use the following values:
xxx.xxx.38.220 — super.cool.guy.vpn # ( ) xxx.xxx.39.154 — good.citizen.vpn # ( )

Two IP Verification
It is important to remember that the IP address that was originally set on the server will be the exit point, so the new address will be the entry point. Connect via SSH to the server and check which address is used as an external one.
To do this, it is easiest to use ifconfig.co service from the console. When requesting via curl, it returns the IP address from which the request was made.
$ curl ifconfig.co xxx.xxx.38.220
The last digits show that our external address really matches the exit point. Let's try to check the correct operation of the second IP as an entry point. To do this, simply use the SOCKS proxy function built into SSH.
Commands are executed on the client:
ssh -D 9999 root@good.citizen.vpn # curl -x socks5h://127.0.0.1:9999 ifconfig.co super.cool.guy.vpn
The first command establishes an SSH session with the address good.citizen.vpn and simultaneously activates a SOCKS proxy inside this session, which is available on the local port. The second makes a normal HTTP request through this proxy.
It’s important to remember that our examples use fictitious domain names for queries. They will be displayed only with a PTR resolution, and a full request to them cannot be made. Therefore, at this stage, you need to access the server through the IP address.
Configure IKEv2 Server
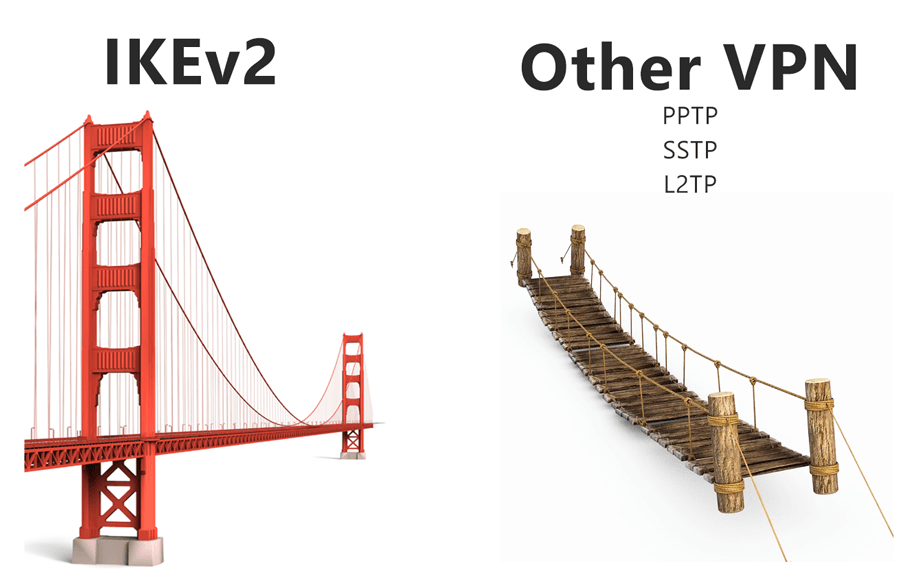
IPsec IKEv2 is a modern VPN protocol supported by almost all of the operating systems out of the box. It is used as the default protocol in Windows, macOS, and iOS. At the same time, it does not require the installation of third-party software and in most cases works faster than OpenVPN. There were already articles on setting up the IKEv2 server on the hub , but they all describe the use of self-signed certificates, and are inconvenient in that they require you to install the root certificate on the side of the VPN client.
We will analyze an example of server configuration using a trusted certificate from Let's Encrypt. This allows you not to install extraneous root certificates for the client, but to issue only a username and password.
Server preparation
We will use a server based on Ubuntu 18.04, but the instruction is also suitable for most modern distributions.
We update the system and install the necessary packages
apt update && apt upgrade apt install certbot strongswan libstrongswan-extra-plugins
Certificate Issue
To issue a trusted certificate, you need to direct the real domain to the IP address of the entry point. We will not consider this item in detail, since it is beyond the scope of the article. As an example, we will use the fictitious domain good.citizen.vpn
If you already have a web server on the server, use the appropriate method of issuing the certificate through certbot or another client for Let's Encrypt. This example assumes that the HTTP port (80) is not busy.
certbot certonly --standalone --agree-tos -d good.citizen.vpn
Answering the wizard’s questions? we will receive a signed certificate and key
# find /etc/letsencrypt/live/good.citizen.vpn/ /etc/letsencrypt/live/good.citizen.vpn/ /etc/letsencrypt/live/good.citizen.vpn/fullchain.pem /etc/letsencrypt/live/good.citizen.vpn/README /etc/letsencrypt/live/good.citizen.vpn/cert.pem /etc/letsencrypt/live/good.citizen.vpn/privkey.pem /etc/letsencrypt/live/good.citizen.vpn/chain.pem
For IKEv2 server authentication, the same X.509 certificates are used as for
Https. For Strongswan to be able to use these certificates, they must be copied to the /etc/ipsec.d folder.
Here's how the certificates should be located:
cp /etc/letsencrypt/live/good.citizen.vpn/cert.pem /etc/ipsec.d/certs/ cp /etc/letsencrypt/live/good.citizen.vpn/privkey.pem /etc/ipsec.d/private/ cp /etc/letsencrypt/live/good.citizen.vpn/chain.pem /etc/ipsec.d/cacerts/
Since letsencrypt certificates are re-issued frequently, doing it manually is inconvenient. Therefore, we automate this process using a hook for certbot.
The task of the script is to copy three files to the desired folder each time the certificate is updated, and then send the strongswan command to re-read the certificates.
Create the file /etc/letsencrypt/renewal-hooks/deploy/renew-copy.sh and make it executable.
#!/bin/sh set -e for domain in $RENEWED_DOMAINS; do case $domain in good.citizen.vpn) daemon_cert_root=/etc/ipsec.d/ # Make sure the certificate and private key files are # never world readable, even just for an instant while # we're copying them into daemon_cert_root. umask 077 cp "$RENEWED_LINEAGE/cert.pem" "$daemon_cert_root/certs/" cp "$RENEWED_LINEAGE/chain.pem" "$daemon_cert_root/cacerts/" cp "$RENEWED_LINEAGE/privkey.pem" "$daemon_cert_root/private/" # Reread certificates /usr/sbin/ipsec reload /usr/sbin/ipsec purgecerts /usr/sbin/ipsec rereadall ;; esac done
Now, after each reissue of the certificate, the script will copy the new files to the strongswan folders and send a command to the daemon to re-read the certificates.
Strongswan setup
Add the strongswan /etc/ipsec.conf config
config setup # uniqueids=no # Increase debug level # charondebug = ike 3, cfg 3 conn %default # ike=aes256-sha256-modp1024,aes256-sha256-modp2048 # "" dpdaction=clear dpddelay=35s dpdtimeout=2000s keyexchange=ikev2 auto=add rekey=no reauth=no fragmentation=yes #compress=yes # left - local (server) side leftcert=cert.pem # /etc/ipsec.d/certs/ leftsendcert=always # leftsubnet=0.0.0.0/0 # right - remote (client) side eap_identity=%identity # IP- VPN- rightsourceip=10.0.1.0/24 rightdns=8.8.8.8,1.1.1.1 # Windows and BlackBerry clients usually goes here conn ikev2-mschapv2 rightauth=eap-mschapv2 # Apple clients usually goes here conn ikev2-mschapv2-apple rightauth=eap-mschapv2 leftid=good.citizen.vpn
Logins and passwords of VPN clients are set in the /etc/ipsec.secrets file
In this file you also need to specify the name of the private key that we previously copied from the letsencrypt folder:
# /etc/ipsec.d/private/ : RSA privkey.pem # VPN # : EAP "" IrinaYarovaya : EAP "PleaseLoveMe123" Mizooleena : EAP "IwannaLoveToo3332"
At this stage, you can restart the strongswan server and check whether the new config has been activated:
$ systemctl restart strongswan $ ipsec statusall Virtual IP pools (size/online/offline): 10.0.1.0/24: 254/0/0 Listening IP addresses: xxx.xxx.38.220 Connections: ikev2-mschapv2: %any...%any IKEv2, dpddelay=35s ikev2-mschapv2: local: [CN=good.citizen.vpn] uses public key authentication ikev2-mschapv2: cert: "CN=good.citizen.vpn" ikev2-mschapv2: remote: uses EAP_MSCHAPV2 authentication with EAP identity '%any' ikev2-mschapv2: child: 0.0.0.0/0 === dynamic TUNNEL, dpdaction=clear ikev2-mschapv2-apple: %any...%any IKEv2, dpddelay=35s ikev2-mschapv2-apple: local: [good.citizen.vpn] uses public key authentication ikev2-mschapv2-apple: cert: "CN=good.citizen.vpn" ikev2-mschapv2-apple: remote: uses EAP_MSCHAPV2 authentication with EAP identity '%any' ikev2-mschapv2-apple: child: 0.0.0.0/0 === dynamic TUNNEL, dpdaction=clear
You can see that the config is successfully activated and the certificate is connected. At this stage, you can already connect to the VPN server, but it will be without access to the Internet. To release clients on the Internet, you need to enable forwarding and configure NAT.
NAT setup
We activate forwarding packages:
echo "net.ipv4.ip_forward=1" >> /etc/sysctl.conf sysctl -p
Turn on NAT. It is important to keep in mind that this is just an example of a minimal iptables configuration. Customize the rest of the rules according to your needs.
ethName0 - replace with your interface name
10.0.1.0/24 - the range of IP addresses that will be issued to VPN clients. We asked it in /etc/ipsec.conf
111.111.111.111 - the IP address of the exit point, in our example it is the address super.cool.guy.vpn
iptables -t nat -A POSTROUTING -s 10.0.1.0/24 -o ethName0 -j SNAT --to-source 111.111.111.111
Debugging
At this stage of the configuration, we should get a fully working server, to which clients can already connect. Before proceeding, it is better to verify this by checking the connection.
In case of connection problems, you can watch the log in real time:
journalctl -f -u strongswan
Startup on startup
If everything is successful, you can add strongswan to startup at startup:
systemctl enable strongswan
Saving iptables rules
To save iptables rules after reboot, there is a special iptables-persistent package. It is important to remember that it will save the current set of rules and add it to startup.
apt install iptables-persistent
Customer setup
Setting up on the client side is extremely simple - just tell the client the server address, username and password. For macOS and iOS, you can create autoconfiguration profiles that will be enough to activate in two clicks.
Windows setup
In new versions of Windows, IKEv2 is configured in a simple wizard, which can be accessed from the WiFi connection menu.

Windows does not set a default route for such a connection, so we will install it manually. In the properties of the VPN connection, go to the properties of TCP / IPv4 -> additionally and check the box "Use a gateway on a remote network"
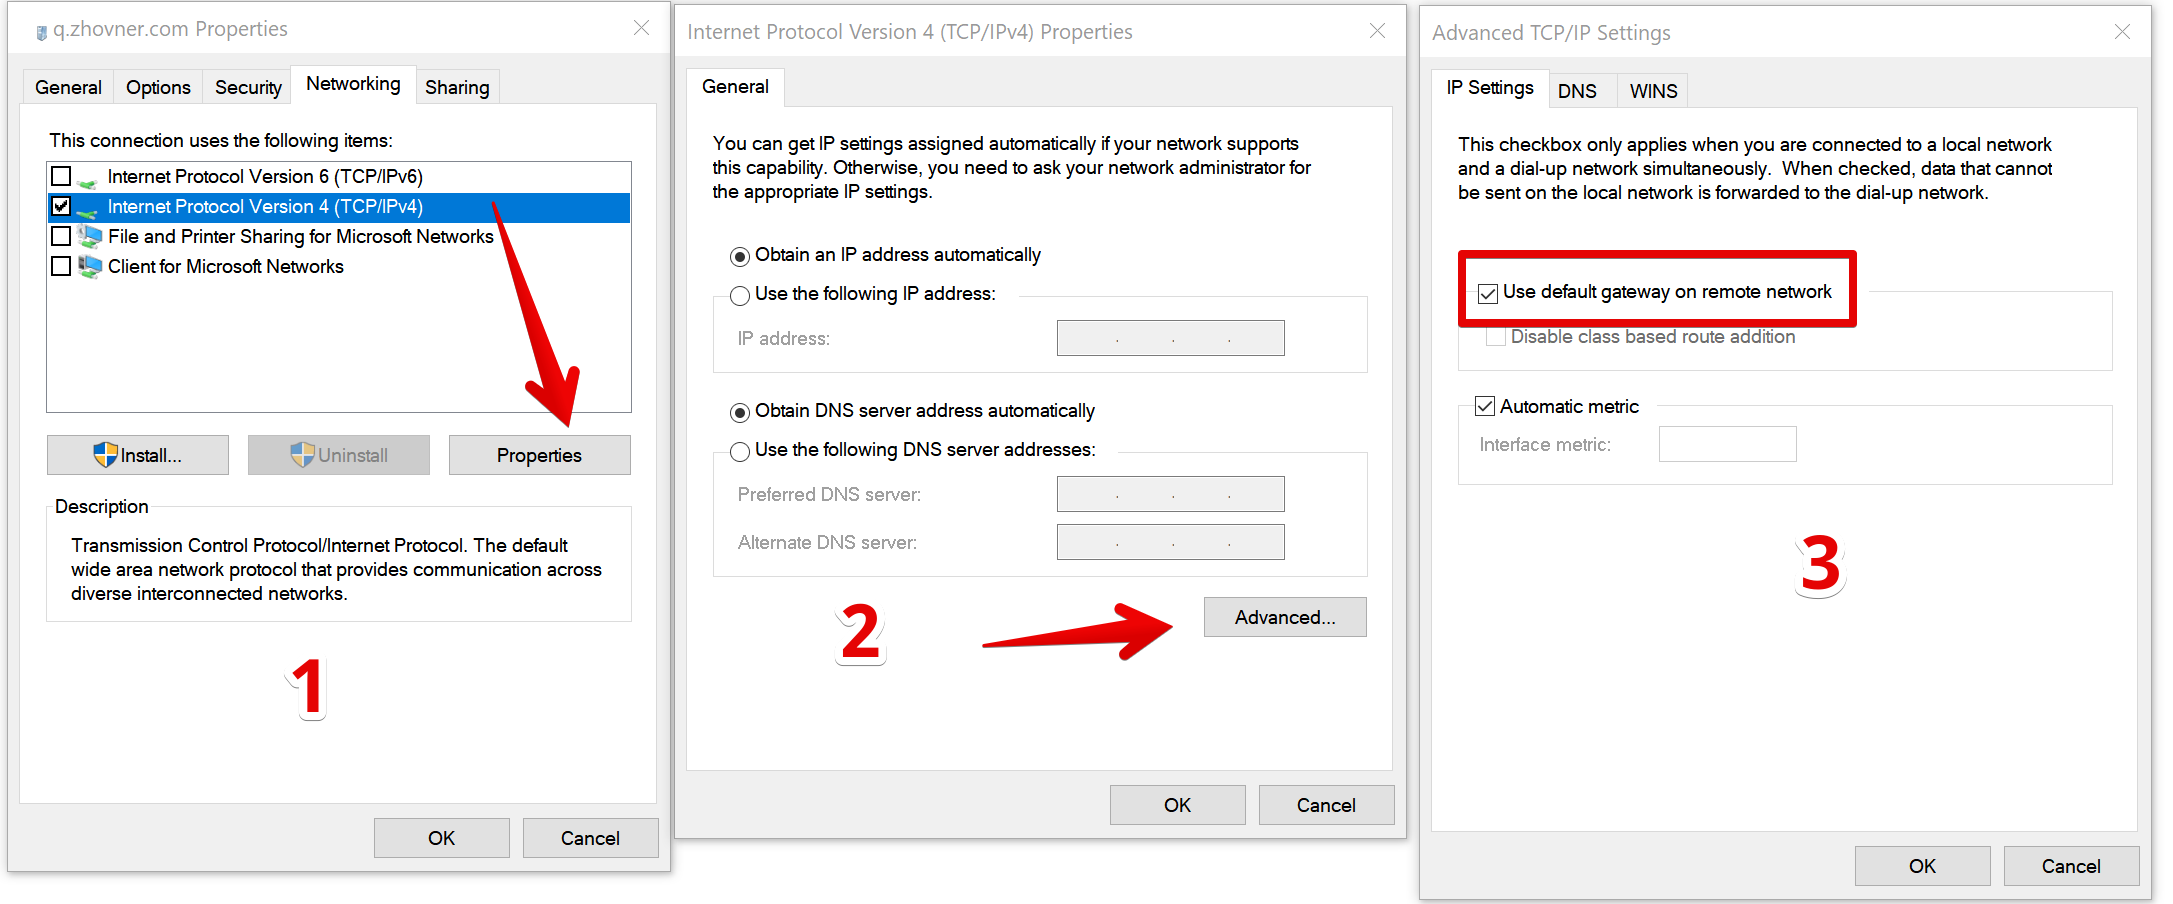
clickable
Windows does not set a default route for such a connection, so we will install it manually. In the properties of the VPN connection, go to the properties of TCP / IPv4 -> additionally and check the box "Use a gateway on a remote network"
clickable
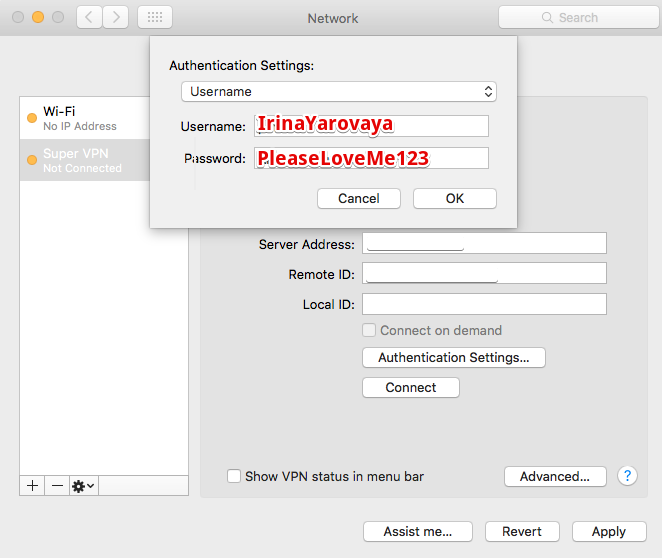
MacOS setup
MacOS supports IKEv2 starting with version 10.11 (El Capitan). Connection is created via the network settings menu.
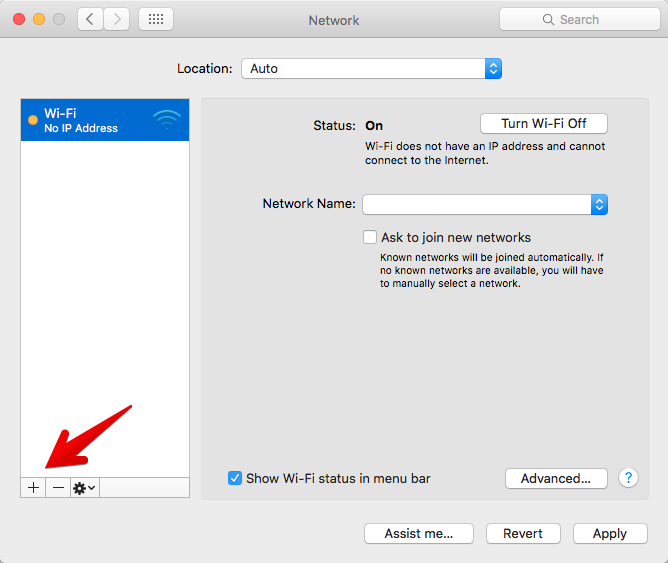
Add a new connection. As the name of the connection, specify any arbitrary name.

To authenticate a certificate, you must specify a domain name. At the same time, in the “Server Address” field, you can specify the IP address of the server, and the domain only in “Remote ID”, then the DNS resolution will not be performed for the connection, and it will happen a little faster.
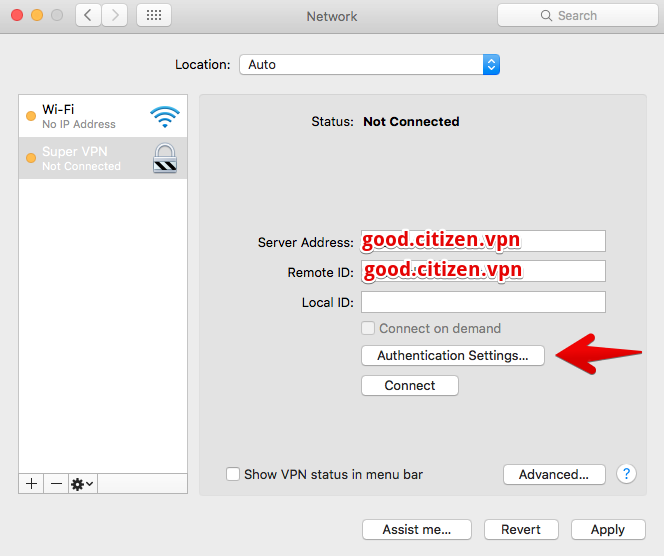
The user name and password are specified from the /etc/ipsec.secrets file
Add a new connection. As the name of the connection, specify any arbitrary name.
To authenticate a certificate, you must specify a domain name. At the same time, in the “Server Address” field, you can specify the IP address of the server, and the domain only in “Remote ID”, then the DNS resolution will not be performed for the connection, and it will happen a little faster.
The user name and password are specified from the /etc/ipsec.secrets file
IOS setup
IOS can be configured manually through the wizard, but it’s much more convenient to use the mobileconfig auto-configuration profile.
Manual tuning is similar in meaning to the desktop macOS:
Settings -> VPN -> Add VPN Configuration
Manual tuning is similar in meaning to the desktop macOS:
Settings -> VPN -> Add VPN Configuration
Auto Configuration Profile for Apple Devices 
Autoconfiguration profiles .mobileconfig is an XML configuration file that can configure anything from SSL certificates to VPN connections.
It is enough for the user to click on the file, and all the necessary settings will be installed automatically.
Example config to connect to our IKEv2 server.
To configure a file for your configuration, just edit a few parameters in this template:
AuthName - username from the /etc/ipsec.secrets file
AuthPassword - user password /etc/ipsec.secrets
RemoteAddress - domain or server IP address
RemoteIdentifier - domain for which the certificate is issued
<?xml version="1.0" encoding="UTF-8"?> <!DOCTYPE plist PUBLIC "-//Apple//DTD PLIST 1.0//EN" "http://www.apple.com/DTDs/PropertyList-1.0.dtd"> <plist version="1.0"> <dict> <key>PayloadContent</key> <array> <dict> <key>IKEv2</key> <dict> <!-- Username and password from ipsec.secrets --> <key>AuthName</key> <string>IrinaYarovaya</string> <key>AuthPassword</key> <string>PleaseLoveMe123</string> <!-- Hostname or IP address of VPN server. Chosing IP address instead of DNS name can avoid issues with client DNS resolvers and speed up connection process. --> <key>RemoteAddress</key> <string>123.123.123.123</string> <!-- leftid in ipsec.conf --> <key>RemoteIdentifier</key> <string>good.citizen.vpn</string> <key>AuthenticationMethod</key> <string>Certificate</string> <key>ChildSecurityAssociationParameters</key> <dict> <!-- in ipsec.conf this proposal is: ike=aes256-sha256-modp2048 --> <key>DiffieHellmanGroup</key> <integer>14</integer> <key>EncryptionAlgorithm</key> <string>AES-256</string> <key>IntegrityAlgorithm</key> <string>SHA2-256</string> <key>LifeTimeInMinutes</key> <integer>1440</integer> </dict> <key>DeadPeerDetectionRate</key> <!-- None (Disable) Low (keepalive sent every 30 minutes) Medium (keepalive sent every 10 minutes) High (keepalive sent every 1 minute) --> <string>High</string> <key>ExtendedAuthEnabled</key> <true/> <key>IKESecurityAssociationParameters</key> <dict> <key>DiffieHellmanGroup</key> <integer>14</integer> <key>EncryptionAlgorithm</key> <string>AES-256</string> <key>IntegrityAlgorithm</key> <string>SHA2-256</string> <key>LifeTimeInMinutes</key> <integer>1440</integer> </dict> <!-- Always On OnDemand Rule Cen be disabled in connection preferences by "On Demand" checkbox http://www.v2ex.com/t/137653 https://developer.apple.com/library/mac/featuredarticles/iPhoneConfigurationProfileRef/Introduction/Introduction.html https://github.com/iphoting/ovpnmcgen.rb --> <key>OnDemandEnabled</key> <integer>1</integer> <key>OnDemandRules</key> <array> <dict> <key>Action</key> <string>Connect</string> </dict> </array> </dict> <key>IPv4</key> <dict> <key>OverridePrimary</key> <integer>1</integer> </dict> <key>PayloadDescription</key> <string>Configures VPN settings</string> <key>PayloadDisplayName</key> <string>VPN</string> <key>PayloadIdentifier</key> <string>com.apple.vpn.managed.96C1C38F-D4D6-472E-BA90-9117ED8896B5</string> <key>PayloadType</key> <string>com.apple.vpn.managed</string> <key>PayloadUUID</key> <string>96C1C38F-D4D6-472E-BA90-9117ED8896B5</string> <key>PayloadVersion</key> <integer>1</integer> <!-- VPN connection name in Network Preferences --> <key>UserDefinedName</key> <string>London VPN</string> <key>VPNType</key> <string>IKEv2</string> </dict> </array> <!-- Set the name to whatever you like, it is used in the profile list on the device --> <key>PayloadDisplayName</key> <string>My Super IKEv2 VPN</string> <!-- A reverse-DNS style identifier (com.example.myprofile, for example) that identifies the profile. This string is used to determine whether a new profile should replace an existing one or should be added. --> <key>PayloadIdentifier</key> <string>vpn.googd.citizen</string> <!-- A globally unique identifier, use uuidgen on Linux/Mac OS X to generate it --> <key>PayloadUUID</key> <string>F3FAD91C-019C-4A79-87A1-CF334C583339</string> <key>PayloadType</key> <string>Configuration</string> <key>PayloadVersion</key> <integer>1</integer> </dict> </plist>
Android setup
Unfortunately, Android is the only one of the popular operating systems that still does not have built-in support for IKEv2. To connect, you can use the official Strongswan client from PlayMarket
Total
We showed the simplest server setup option with spaced entry and exit points. This configuration allows you to get the maximum VPN speed, since it does not use additional tunnels between the servers, despite the fact that the IP addresses of the entry and exit points are on different subnets. This approach allows you to experiment further by connecting more than two IP addresses to the server.
The IKEv2 protocol is perfect for using it on desktop OS for everyday work, as it is maximally natively integrated into the system and, all other things being equal, allows you to get more speed than through third-party VPN programs.

All Articles