Redis Scalability and Failover for DirectumRX Services
Redis is a database management system of the NoSQL class (non-relational DBMSs), located entirely in RAM. To access the data, the “key” - “value” model is used. Such a DBMS is often used to store caches in scalable services, for storing images and small data.
Redis DBMS was widely used due to:
The breadth of distribution and applicability of Redis can be estimated by the huge amount of documentation with all kinds of cases on the official website of the project .
If you use horizontal scaling of DirectumRX services, you must use the Redis fail-safe installation to work correctly with the DirectumRX storage service and DirectumRX web access service.

Redis will store operational data, caches and other information that is necessary for the services that are in scaling mode to operate so that the process of user interaction with the system does not depend on the installation with which he is currently working.
Redis will not store sensitive data and will not be under heavy load. But in the event of a Redis failure, users will experience many errors when switching between installations.
On the official Redis website, there are 2 ways to ensure horizontal scaling and fault tolerance:
Consider customizing these options.
The variant using the Redis Sentiel (Redis Tracking Node) was implemented in Redis 2.4 and consists in the use of the additional Redis Sentiel service to monitor the availability of the wizard. He also configures replica nodes in case of failure of the wizard. Determines which of the SLAVE nodes will become MASTER and perform the reconfiguration on the go.
Implements the classic scheme:

There can be many SLAVE nodes (up to 1000 according to the official website), for productive work it is recommended to use at least two SLAVE nodes.
Typically, the scheme is configured in such a way that the Redis Sentiel service is configured on the MASTER and SLAVE nodes, and if the MASTER node fails, the remaining monitoring nodes decide to introduce a new MASTER.
The current version of Redis is available for download from the official website of the product developer . However, the distribution package is available only for Linux on the site. At one time, the Microsoft project for porting Redis to Windows was developing, but at present the project stopped development on version 3.2.100, so in this article we will consider the most relevant deployment option - on Linux.
As test nodes, we will use two virtual hosts redis1 and redis2 with the installed Linux distribution of Debian 10.
First, update the package lists from the default repository and install Redis:
Check the version:
Let redis1 act as a MASTER node and redis2 act as a SLAVE node.
To do this, in the Redis configuration files we will write the necessary parameters that will allow you to create a replica (not yet fault-tolerant).
For redis1 in the configuration file /etc/redis/redis.conf, specify:
For redis2 in the configuration file /etc/redis/redis.conf, specify:
Restart the redis-server services on both nodes:
We check on the MASTER side that the nodes became replicas and received the necessary roles:
On the SLAVE side, we see the same situation:
Now you need to configure the replica so that it is automatically restored in case of failure of one of the nodes. To do this, we need the Redis Sentinel tracking service.
Based on the documentation , the Redis Sentinel monitoring service can perform the following operations:
For the purity of the experiment, we will place a witness service on a separate redis3 VM.
We connect the Redis repository in the same way and install the redis-sentinel package:
After installation, you need to make the settings in the configuration file of the monitoring node /etc/redis/sentinel.conf:
Restart the service after making the settings:
Check that the tracking service saw MASTER and SLAVE:
We start the experiments.
We will simulate a failure, stop the redis-server service on the redis1 node and get the current information of the monitoring node:
We see MASTER has changed.
We will restore the operation of the redis1 node and check its state:
We see that the node received the SLAVE role, and the redis2 node is a MASTER node.
Simulate the failure of the redis2 node and check the status of the witness node:
And the state of the redis1 node:
Great, the mechanism works. But now the question has arisen how we will connect our DirectumRX services, because they need a single node address. We will solve the situation using the HAProxy service.
Any proxy tcp service can act as a reverse proxy for Redis nodes. In this article, we will consider the use of HAProxy, since it is a specialized tool designed to provide high availability and load balancing, and is used by universally known online services. Read more about HAProxy on the developer page .
Install HAProxy on the redis3 node:
In the HAProxy configuration file /etc/haproxy/haproxy.cfg, add the settings for proxying requests to Redis nodes:
In this configuration, it is indicated that we will proxy any requests that come to all interfaces of the current virtual machine at the address on port 6379. We will transmit requests to the node that responds that it has the MASTER role.
Restart the haproxy service:
Let's try to connect using the redis-cli client and create a test key:
Stop the redis1 node and query again the list of keys:
We see that for some time the connection was disconnected, but then the connection was restored again and all the data remained in place.
Now it’s enough to register the reverse proxy address in the configuration files of DirectumRX services to connect to Redis.
The Redis Cluster clustering option, implemented for version redis 3.0 and higher, is a solution for creating and managing a cluster with data segmentation and replication. Performs tasks of node management, replication, data synchronization on nodes and ensuring access of the client application to the MASTER node in case of failure of one of several MASTER nodes.
Redis Cluster works in multimaster mode, each MASTER node can have one or more SLAVE nodes (up to 1000).
Scaling is the main function of the cluster. In addition, the cluster can guarantee the fault tolerance of the Redis service:
A situation may arise when Client 2 writes to node M2. M2 answers “OK” and tries to write to S2. At the same time, M2 does not wait for the correct completion of data exchange with S2, but responds to the client immediately. In this case, the S2 replica may not have all the data. Therefore, it is recommended to use several SLAVE replicas.
A situation may also arise when M1, M3 cease to “see” M2, and the client still continues to write data to M2. If the unavailability will continue for quite some time (the cluster-node-timeout parameter), then in this case S2 will be put into MASTER mode, and M2 will stop working on its own.
The official documentation recommends using 6 nodes - one Redis instance per node, which allows for greater reliability, but no one forbids using three nodes with the following connection topology:
If one of the physical nodes fails, the corresponding SLAVE replicas will go into the MASTER mode, and the operation will not be interrupted.
We implement 3 virtual machines (redis1, redis2 and redis3) on the test bench, each of which will run 2 Redis instances.
The client application will connect to a specific port specified in the client configuration file, therefore, MASTER - SLAVE pairs must work on the same ports.
For the pair M1 - S1 we will use port 6381
For the pair M2 - S2 we will use port 6382
For the pair M3 - S3 we will use port 6383
Prepare the configuration files
On redis1:
On redis2:
On redis3:
We will fill in the configuration files according to the template:
Run the launch of the Redis nodes:
Node redis1:
Node redis2:
Redis3 node:
To configure the cluster, you need to use the redis-cli client utility, passing it a list of ip: port pairs of servers that will play the roles of MASTER and SLAVE:
, where the option --cluster-replicas 1 tells you how many SLAVE each master will have, and they are automatically selected from the transferred list of replicas.
The cluster is correctly built. We will display information about the cluster:
To test a specific replica, as with Redis Sentiel, you can use the INFO replication command:
Let's try to create several keys and verify that these keys appeared on the replicas:
Check on M2:
And on the M3:
We will disable the redis1 node and check how S1 works:
We see information about the failure of M1 and S2 and that S3 has switched to MASTER mode.
Check where the keys are stored:
Keys that were previously stored on redis1 are now available on redis3.
Restore the operation of the redis1 node and check the state of the nodes M1 and S2:
The health of M1 and S2 has recovered, but now M1 is in SLAVE mode.
And the keys are also on the redis3 node:
The cluster is configured and Redis recovery is tested.
To access DirectumRX services, you will also need to configure reverse proxies, as in the case of setting up Redis Sentiel.
This article did not consider yet another way to increase Redis fault tolerance - using a third-party cluster resource manager, for example, Pacemaker . In this case, it will be possible to get by with two nodes, however, there is a high probability of data loss in the event of an emergency.
For a reverse proxy (in this case, HAProxy), it is also desirable to provide fault tolerance, but this issue was also beyond the scope of this article. If you are interested in the topic, these deployment options can also be considered as part of separate articles with step-by-step tuning and testing the results.
You may find the links below to find out more about the topic:
Redis cluster tutorial
Redis Sentinel Documentation
HAProxy Configuration Manual .
Redis DBMS was widely used due to:
- high speed, because all data is stored in RAM;
- cross-platform;
- distribution under the BSD license (applies to open source software).
The breadth of distribution and applicability of Redis can be estimated by the huge amount of documentation with all kinds of cases on the official website of the project .
If you use horizontal scaling of DirectumRX services, you must use the Redis fail-safe installation to work correctly with the DirectumRX storage service and DirectumRX web access service.
Redis will store operational data, caches and other information that is necessary for the services that are in scaling mode to operate so that the process of user interaction with the system does not depend on the installation with which he is currently working.
Redis will not store sensitive data and will not be under heavy load. But in the event of a Redis failure, users will experience many errors when switching between installations.
On the official Redis website, there are 2 ways to ensure horizontal scaling and fault tolerance:
- Using Redis Sentiel .
- Using Redis Cluster .
Consider customizing these options.
Configure Redis Sentiel
The variant using the Redis Sentiel (Redis Tracking Node) was implemented in Redis 2.4 and consists in the use of the additional Redis Sentiel service to monitor the availability of the wizard. He also configures replica nodes in case of failure of the wizard. Determines which of the SLAVE nodes will become MASTER and perform the reconfiguration on the go.
Implements the classic scheme:
There can be many SLAVE nodes (up to 1000 according to the official website), for productive work it is recommended to use at least two SLAVE nodes.
Typically, the scheme is configured in such a way that the Redis Sentiel service is configured on the MASTER and SLAVE nodes, and if the MASTER node fails, the remaining monitoring nodes decide to introduce a new MASTER.
The current version of Redis is available for download from the official website of the product developer . However, the distribution package is available only for Linux on the site. At one time, the Microsoft project for porting Redis to Windows was developing, but at present the project stopped development on version 3.2.100, so in this article we will consider the most relevant deployment option - on Linux.
As test nodes, we will use two virtual hosts redis1 and redis2 with the installed Linux distribution of Debian 10.
First, update the package lists from the default repository and install Redis:
apt-get update && apt-get upgrade apt install redis-server
Check the version:
root@redis1:/home/user# redis-server -v Redis server v=5.0.3 sha=00000000:0 malloc=jemalloc-5.1.0 bits=64 build=afa0decbb6de285f
Let redis1 act as a MASTER node and redis2 act as a SLAVE node.
To do this, in the Redis configuration files we will write the necessary parameters that will allow you to create a replica (not yet fault-tolerant).
For redis1 in the configuration file /etc/redis/redis.conf, specify:
# , MASTER . requirepass TestPass
For redis2 in the configuration file /etc/redis/redis.conf, specify:
# MASTER . slaveof redis1 6379 # . masterauth TestPass # , . requirepass TestPass
Restart the redis-server services on both nodes:
root@redis1:/etc/redis# /etc/init.d/redis-server stop [ ok ] Stopping redis-server (via systemctl): redis-server.service. root@redis1:/etc/redis# /etc/init.d/redis-server start [ ok ] Starting redis-server (via systemctl): redis-server.service. root@redis2:/etc/redis# /etc/init.d/redis-server stop [ ok ] Stopping redis-server (via systemctl): redis-server.service. root@redis2:/etc/redis# /etc/init.d/redis-server start [ ok ] Starting redis-server (via systemctl): redis-server.service.
We check on the MASTER side that the nodes became replicas and received the necessary roles:
root@redis1:/etc/redis# redis-cli -a TestPass info replication Warning: Using a password with '-a' or '-u' option on the command line interface may not be safe. # Replication role:master connected_slaves:1 slave0:ip=192.168.9.96,port=6379,state=online,offset=28,lag=0 master_replid:56b0a702d5823d107b0ca1ca2c80f8ef650a4b28 master_replid2:0000000000000000000000000000000000000000 master_repl_offset:28 second_repl_offset:-1 repl_backlog_active:1 repl_backlog_size:1048576 repl_backlog_first_byte_offset:1 repl_backlog_histlen:28
On the SLAVE side, we see the same situation:
root@redis2:/etc/redis# redis-cli -a TestPass info replication Warning: Using a password with '-a' or '-u' option on the command line interface may not be safe. # Replication role:slave master_host:redis1 master_port:6379 master_link_status:up master_last_io_seconds_ago:4 master_sync_in_progress:0 slave_repl_offset:14 slave_priority:100 slave_read_only:1 connected_slaves:0 master_replid:56b0a702d5823d107b0ca1ca2c80f8ef650a4b28 master_replid2:0000000000000000000000000000000000000000 master_repl_offset:14 second_repl_offset:-1 repl_backlog_active:1 repl_backlog_size:1048576 repl_backlog_first_byte_offset:1 repl_backlog_histlen:14
Now you need to configure the replica so that it is automatically restored in case of failure of one of the nodes. To do this, we need the Redis Sentinel tracking service.
Based on the documentation , the Redis Sentinel monitoring service can perform the following operations:
- Checks the availability of MASTER and SLAVE nodes and is able to send alerts about the inaccessibility of nodes.
- If the MASTER node fails, the witness node can put the SLAVE node in MASTER mode, as well as reconfigure the remaining SLAVE nodes, and they begin to work with the new MASTER.
- Makes changes to the configuration files of the MASTER and SLAVE nodes.
For the purity of the experiment, we will place a witness service on a separate redis3 VM.
We connect the Redis repository in the same way and install the redis-sentinel package:
apt install redis-sentinel
After installation, you need to make the settings in the configuration file of the monitoring node /etc/redis/sentinel.conf:
# redis1 6379. # 1 - , # MASTER-. # , # MASTER-. sentinel monitor master01 redis1 6379 1 # 3 , . sentinel down-after-milliseconds master01 3000 # MASTER- sentinel failover-timeout master01 6000 # , SLAVE- . # , , # . sentinel parallel-syncs master01 1 # . bind 192.168.9.97 127.0.0.1 ::1 # MASTER-. sentinel auth-pass master01 TestPass
Restart the service after making the settings:
root@redis3:/etc/redis# /etc/init.d/redis-sentinel restart [ ok ] Restarting redis-sentinel (via systemctl): redis-sentinel.service.
Check that the tracking service saw MASTER and SLAVE:
root@redis3:/etc/redis# redis-cli -p 26379 info sentinel # Sentinel sentinel_masters:1 sentinel_tilt:0 sentinel_running_scripts:0 sentinel_scripts_queue_length:0 sentinel_simulate_failure_flags:0 master0:name=master01,status=ok,address=192.168.9.95:6379,slaves=1,sentinels=1
We start the experiments.
We will simulate a failure, stop the redis-server service on the redis1 node and get the current information of the monitoring node:
root@redis3:/etc/redis# redis-cli -p 26379 info sentinel # Sentinel sentinel_masters:1 sentinel_tilt:0 sentinel_running_scripts:0 sentinel_scripts_queue_length:0 sentinel_simulate_failure_flags:0 master0:name=master01,status=ok,address=192.168.9.96:6379,slaves=1,sentinels=1
We see MASTER has changed.
We will restore the operation of the redis1 node and check its state:
root@redis3:/var/log/redis# redis-cli -h redis1 -p 6379 -a TestPass info replication Warning: Using a password with '-a' or '-u' option on the command line interface may not be safe. # Replication role:slave master_host:192.168.9.96 master_port:6379 master_link_status:up master_last_io_seconds_ago:1 master_sync_in_progress:0 slave_repl_offset:15977 slave_priority:100 slave_read_only:1 connected_slaves:0 master_replid:6c0c7d0eedccede56f211f2db74a98c4d0ff6d56 master_replid2:0000000000000000000000000000000000000000 master_repl_offset:15977 second_repl_offset:-1 repl_backlog_active:1 repl_backlog_size:1048576 repl_backlog_first_byte_offset:1 repl_backlog_histlen:15977
We see that the node received the SLAVE role, and the redis2 node is a MASTER node.
Simulate the failure of the redis2 node and check the status of the witness node:
root@redis3:/var/log/redis# redis-cli -p 26379 info sentinel # Sentinel sentinel_masters:1 sentinel_tilt:0 sentinel_running_scripts:0 sentinel_scripts_queue_length:0 sentinel_simulate_failure_flags:0 master0:name=master01,status=ok,address=192.168.9.95:6379,slaves=1,sentinels=1
And the state of the redis1 node:
root@redis3:/var/log/redis# redis-cli -h redis1 -p 6379 -a TestPass info replication Warning: Using a password with '-a' or '-u' option on the command line interface may not be safe. # Replication role:master connected_slaves:0 master_replid:6e9d67d6460815b925319c2bafb58bf2c435cffb master_replid2:6c0c7d0eedccede56f211f2db74a98c4d0ff6d56 master_repl_offset:33610 second_repl_offset:26483 repl_backlog_active:1 repl_backlog_size:1048576 repl_backlog_first_byte_offset:1 repl_backlog_histlen:33610
Great, the mechanism works. But now the question has arisen how we will connect our DirectumRX services, because they need a single node address. We will solve the situation using the HAProxy service.
Redis Node Proxying
Any proxy tcp service can act as a reverse proxy for Redis nodes. In this article, we will consider the use of HAProxy, since it is a specialized tool designed to provide high availability and load balancing, and is used by universally known online services. Read more about HAProxy on the developer page .
Install HAProxy on the redis3 node:
root@redis3:/var/log/redis# apt install haproxy
In the HAProxy configuration file /etc/haproxy/haproxy.cfg, add the settings for proxying requests to Redis nodes:
… frontend ft_redis bind *:6379 name redis mode tcp default_backend bk_redis backend bk_redis mode tcp option tcp-check tcp-check connect # , . tcp-check send AUTH\ TestPass\r\n tcp-check expect string +OK tcp-check send PING\r\n tcp-check expect string +PONG tcp-check send info\ replication\r\n # MASTER, .. SLAVE . tcp-check expect string role:master tcp-check send QUIT\r\n tcp-check expect string +OK server Redis1 redis1:6379 check inter 3s server Redis2 redis2:6379 check inter 3s
In this configuration, it is indicated that we will proxy any requests that come to all interfaces of the current virtual machine at the address on port 6379. We will transmit requests to the node that responds that it has the MASTER role.
Restart the haproxy service:
root@redis3:/etc/haproxy# /etc/init.d/haproxy restart
Let's try to connect using the redis-cli client and create a test key:
root@redis3:/etc/haproxy# redis-cli -p 6379 -a TestPass Warning: Using a password with '-a' or '-u' option on the command line interface may not be safe. 127.0.0.1:6379> SET TestKey "Some test string" OK 127.0.0.1:6379> GET TestKey "Some test string" 127.0.0.1:6379> info keyspace # Keyspace db0:keys=1,expires=0,avg_ttl=0
Stop the redis1 node and query again the list of keys:
127.0.0.1:6379> info keyspace Error: Server closed the connection (3.01s) 127.0.0.1:6379> info keyspace # Keyspace db0:keys=1,expires=0,avg_ttl=0 (2.01s) 127.0.0.1:6379> GET TestKey "Some test string"
We see that for some time the connection was disconnected, but then the connection was restored again and all the data remained in place.
Now it’s enough to register the reverse proxy address in the configuration files of DirectumRX services to connect to Redis.
Configure Redis Cluster
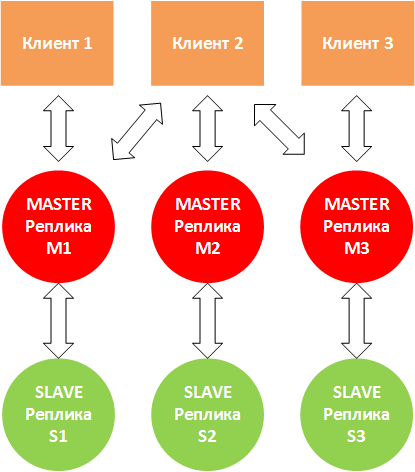
The Redis Cluster clustering option, implemented for version redis 3.0 and higher, is a solution for creating and managing a cluster with data segmentation and replication. Performs tasks of node management, replication, data synchronization on nodes and ensuring access of the client application to the MASTER node in case of failure of one of several MASTER nodes.
Redis Cluster works in multimaster mode, each MASTER node can have one or more SLAVE nodes (up to 1000).
Scaling is the main function of the cluster. In addition, the cluster can guarantee the fault tolerance of the Redis service:
- if some nodes do not work, the cluster redistributes the load from them to other nodes;
- if key nodes do not work, then the entire cluster ends.
A situation may arise when Client 2 writes to node M2. M2 answers “OK” and tries to write to S2. At the same time, M2 does not wait for the correct completion of data exchange with S2, but responds to the client immediately. In this case, the S2 replica may not have all the data. Therefore, it is recommended to use several SLAVE replicas.
A situation may also arise when M1, M3 cease to “see” M2, and the client still continues to write data to M2. If the unavailability will continue for quite some time (the cluster-node-timeout parameter), then in this case S2 will be put into MASTER mode, and M2 will stop working on its own.
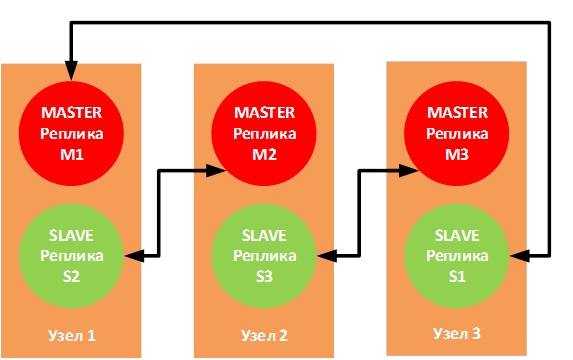
The official documentation recommends using 6 nodes - one Redis instance per node, which allows for greater reliability, but no one forbids using three nodes with the following connection topology:
If one of the physical nodes fails, the corresponding SLAVE replicas will go into the MASTER mode, and the operation will not be interrupted.
We implement 3 virtual machines (redis1, redis2 and redis3) on the test bench, each of which will run 2 Redis instances.
The client application will connect to a specific port specified in the client configuration file, therefore, MASTER - SLAVE pairs must work on the same ports.
For the pair M1 - S1 we will use port 6381
For the pair M2 - S2 we will use port 6382
For the pair M3 - S3 we will use port 6383
Prepare the configuration files
On redis1:
cp /etc/redis/redis.conf /etc/redis/m1_redis.conf cp /etc/redis/redis.conf /etc/redis/s2_redis.conf mv /etc/redis/redis.conf /etc/redis/redis.bak
On redis2:
cp /etc/redis/redis.conf /etc/redis/m2_redis.conf cp /etc/redis/redis.conf /etc/redis/s3_redis.conf mv /etc/redis/redis.conf /etc/redis/redis.bak
On redis3:
cp /etc/redis/redis.conf /etc/redis/m3_redis.conf cp /etc/redis/redis.conf /etc/redis/s1_redis.conf mv /etc/redis/redis.conf /etc/redis/redis.bak
We will fill in the configuration files according to the template:
bind <IP- > protected-mode no # , . port <> pidfile /var/run/redis_<>.pid # <yes/no> - Redis Cluster cluster-enabled yes # , : # , , . # . cluster-config-file nodes-<>.conf # , master- , # slaves # . cluster-node-timeout 15000
Run the launch of the Redis nodes:
Node redis1:
root@redis1:/etc/redis# redis-server /etc/redis/m1_redis.conf root@redis1:/etc/redis# redis-server /etc/redis/s2_redis.conf
Node redis2:
root@redis2:/etc/redis# redis-server /etc/redis/m2_redis.conf root@redis2:/etc/redis# redis-server /etc/redis/s3_redis.conf
Redis3 node:
root@redis3:/etc/redis# redis-server /etc/redis/m3_redis.conf root@redis3:/etc/redis# redis-server /etc/redis/s1_redis.conf
To configure the cluster, you need to use the redis-cli client utility, passing it a list of ip: port pairs of servers that will play the roles of MASTER and SLAVE:
redis-cli --cluster create redis1-ip:6381 redis2-ip:6382 redis3-ip:6383 redis1-ip:6382 redis2-ip:6383 redis3-ip:6381 --cluster-replicas 1
, where the option --cluster-replicas 1 tells you how many SLAVE each master will have, and they are automatically selected from the transferred list of replicas.
root@redis1:~/redis/src# redis-cli --cluster create 192.168.9.51:6381 192.168.9.52:6382 192.168.9.53:6383 192.168.9.51:6382 192.168.9.52:6383 192.168.9.53:6381 --cluster-replicas 1 >>> Performing hash slots allocation on 6 nodes... Master[0] -> Slots 0 - 5460 Master[1] -> Slots 5461 - 10922 Master[2] -> Slots 10923 - 16383 Adding replica 192.168.9.52:6383 to 192.168.9.51:6381 Adding replica 192.168.9.51:6382 to 192.168.9.52:6382 Adding replica 192.168.9.53:6381 to 192.168.9.53:6383 >>> Trying to optimize slaves allocation for anti-affinity [OK] Perfect anti-affinity obtained! M: e92cb96fd6c20db7509662a248902e3751ebe95f 192.168.9.51:6381 slots:[0-5460] (5461 slots) master M: d499af3672b3063c7239572ec311ad3160f280ae 192.168.9.52:6382 slots:[5461-10922] (5462 slots) master M: 3a41475e1613519c3ecdec695736a898262a24a5 192.168.9.53:6383 slots:[10923-16383] (5461 slots) master S: 182e5cffc9c31c231de69ddbaf507ec1fe17bb09 192.168.9.51:6382 replicates d499af3672b3063c7239572ec311ad3160f280ae S: 44f656062259005adea58bc5ad024071a050e192 192.168.9.52:6383 replicates 3a41475e1613519c3ecdec695736a898262a24a5 S: 485ffb786e9763955e6f10ffc59247690ad9bc11 192.168.9.53:6381 replicates e92cb96fd6c20db7509662a248902e3751ebe95f Can I set the above configuration? (type 'yes' to accept): yes >>> Nodes configuration updated >>> Assign a different config epoch to each node >>> Sending CLUSTER MEET messages to join the cluster Waiting for the cluster to join ..... >>> Performing Cluster Check (using node 192.168.9.51:6381) M: e92cb96fd6c20db7509662a248902e3751ebe95f 192.168.9.51:6381 slots:[0-5460] (5461 slots) master 1 additional replica(s) M: d499af3672b3063c7239572ec311ad3160f280ae 192.168.9.52:6382 slots:[5461-10922] (5462 slots) master 1 additional replica(s) S: 485ffb786e9763955e6f10ffc59247690ad9bc11 192.168.9.53:6381 slots: (0 slots) slave replicates e92cb96fd6c20db7509662a248902e3751ebe95f S: 182e5cffc9c31c231de69ddbaf507ec1fe17bb09 192.168.9.51:6382 slots: (0 slots) slave replicates d499af3672b3063c7239572ec311ad3160f280ae S: 44f656062259005adea58bc5ad024071a050e192 192.168.9.52:6383 slots: (0 slots) slave replicates 3a41475e1613519c3ecdec695736a898262a24a5 M: 3a41475e1613519c3ecdec695736a898262a24a5 192.168.9.53:6383 slots:[10923-16383] (5461 slots) master 1 additional replica(s) [OK] All nodes agree about slots configuration. >>> Check for open slots... >>> Check slots coverage... [OK] All 16384 slots covered.
The cluster is correctly built. We will display information about the cluster:
root@redis1:~/redis/src# redis-cli -c -h 192.168.9.51 -p 6381 192.168.9.51:6381> CLUSTER INFO cluster_state:ok cluster_slots_assigned:16384 cluster_slots_ok:16384 cluster_slots_pfail:0 cluster_slots_fail:0 cluster_known_nodes:6 cluster_size:3 cluster_current_epoch:6 cluster_my_epoch:1 cluster_stats_messages_ping_sent:1254 cluster_stats_messages_pong_sent:1243 cluster_stats_messages_sent:2497 cluster_stats_messages_ping_received:1238 cluster_stats_messages_pong_received:1254 cluster_stats_messages_meet_received:5 cluster_stats_messages_received:2497 192.168.9.51:6381>
To test a specific replica, as with Redis Sentiel, you can use the INFO replication command:
root@redis1:~/redis/src# redis-cli -c -h 192.168.9.51 -p 6381 192.168.9.51:6381> INFO replication # Replication role:master connected_slaves:1 slave0:ip=192.168.9.53,port=6381,state=online,offset=1946,lag=0 master_replid:59cd95d394dad9d0e49042637fdfd5290db4abfe master_replid2:0000000000000000000000000000000000000000 master_repl_offset:1946 second_repl_offset:-1 repl_backlog_active:1 repl_backlog_size:1048576 repl_backlog_first_byte_offset:1 repl_backlog_histlen:1946 192.168.9.51:6381>
Let's try to create several keys and verify that these keys appeared on the replicas:
192.168.9.51:6381> SET key1 test1 -> Redirected to slot [9189] located at 192.168.9.52:6382 OK 192.168.9.52:6382> SET key2 test2 -> Redirected to slot [4998] located at 192.168.9.51:6381 OK 192.168.9.51:6381> SET key3 test3 OK 192.168.9.51:6381>
Check on M2:
root@redis2:/home/user# redis-cli -c -h 192.168.9.52 -p 6382 192.168.9.52:6382> GET key1 "test1" 192.168.9.52:6382> GET key2 -> Redirected to slot [4998] located at 192.168.9.51:6381 "test2" 192.168.9.51:6381> GET key3 "test3" 192.168.9.51:6381>
And on the M3:
root@redis3:/home/user# redis-cli -c -h 192.168.9.53 -p 6383 192.168.9.53:6383> GET key1 -> Redirected to slot [9189] located at 192.168.9.52:6382 "test1" 192.168.9.52:6382> GET key2 -> Redirected to slot [4998] located at 192.168.9.51:6381 "test2" 192.168.9.51:6381> GET key3 "test3" 192.168.9.51:6381>
We will disable the redis1 node and check how S1 works:
192.168.9.52:6382> CLUSTER NODES <b>182e5cffc9c31c231de69ddbaf507ec1fe17bb09 192.168.9.51:6382@16382 slave,fail d499af3672b3063c7239572ec311ad3160f280ae 1569509904727 1569509900000 4 connected</b> 485ffb786e9763955e6f10ffc59247690ad9bc11 <i>192.168.9.53:6381@16381 master</i> - 0 1569510017272 7 connected 0-5460 44f656062259005adea58bc5ad024071a050e192 192.168.9.52:6383@16383 slave 3a41475e1613519c3ecdec695736a898262a24a5 0 1569510018274 5 connected <b>e92cb96fd6c20db7509662a248902e3751ebe95f 192.168.9.51:6381@16381 master,fail - 1569509906731 1569509901721 1 connected</b> 3a41475e1613519c3ecdec695736a898262a24a5 192.168.9.53:6383@16383 master - 0 1569510019275 3 connected 10923-16383 d499af3672b3063c7239572ec311ad3160f280ae 192.168.9.52:6382@16382 myself,master - 0 1569510017000 2 connected 5461-10922
We see information about the failure of M1 and S2 and that S3 has switched to MASTER mode.
Check where the keys are stored:
192.168.9.52:6382> GET key1 "test1" 192.168.9.52:6382> GET key2 -> Redirected to slot [4998] located at 192.168.9.53:6381 "test2" 192.168.9.53:6381> GET key3 "test3" 192.168.9.53:6381>
Keys that were previously stored on redis1 are now available on redis3.
Restore the operation of the redis1 node and check the state of the nodes M1 and S2:
192.168.9.53:6381> CLUSTER NODES <i>e92cb96fd6c20db7509662a248902e3751ebe95f 192.168.9.51:6381@16381 slave 485ffb786e9763955e6f10ffc59247690ad9bc11 0 1569511658217 7 connected 182e5cffc9c31c231de69ddbaf507ec1fe17bb09 192.168.9.51:6382@16382 slave d499af3672b3063c7239572ec311ad3160f280ae 0 1569511657000 4 connected</i> d499af3672b3063c7239572ec311ad3160f280ae 192.168.9.52:6382@16382 master - 0 1569511656000 2 connected 5461-10922 3a41475e1613519c3ecdec695736a898262a24a5 192.168.9.53:6383@16383 master - 0 1569511656000 3 connected 10923-16383 485ffb786e9763955e6f10ffc59247690ad9bc11 192.168.9.53:6381@16381 myself,master - 0 1569511656000 7 connected 0-5460 44f656062259005adea58bc5ad024071a050e192 192.168.9.52:6383@16383 slave 3a41475e1613519c3ecdec695736a898262a24a5 0 1569511657216 5 connected
The health of M1 and S2 has recovered, but now M1 is in SLAVE mode.
And the keys are also on the redis3 node:
192.168.9.53:6383> GET key1 -> Redirected to slot [9189] located at 192.168.9.52:6382 "test1" 192.168.9.52:6382> GET key2 -> Redirected to slot [4998] located at 192.168.9.53:6381 "test2" 192.168.9.53:6383> GET key3 -> Redirected to slot [935] located at 192.168.9.53:6381 "test3"
The cluster is configured and Redis recovery is tested.
To access DirectumRX services, you will also need to configure reverse proxies, as in the case of setting up Redis Sentiel.
Instead of a conclusion
This article did not consider yet another way to increase Redis fault tolerance - using a third-party cluster resource manager, for example, Pacemaker . In this case, it will be possible to get by with two nodes, however, there is a high probability of data loss in the event of an emergency.
For a reverse proxy (in this case, HAProxy), it is also desirable to provide fault tolerance, but this issue was also beyond the scope of this article. If you are interested in the topic, these deployment options can also be considered as part of separate articles with step-by-step tuning and testing the results.
You may find the links below to find out more about the topic:
Redis cluster tutorial
Redis Sentinel Documentation
HAProxy Configuration Manual .
All Articles