Getting to Know Swift with Snake

Hello! In anticipation of the launch of the course “iOS-developer. Basic course ” we organized another open lesson . This webinar is designed for people who have experience in developing in any languages and platforms, but still want to learn the Swift language and master the development for iOS. In the lesson, we examined in detail the syntax and key constructions of the Swift language , got acquainted with the main development tools.
Webinar participants learned:
- what is the Swift language, what are its features;
- How the Xcode development environment helps you get started
- how to create a simple game for iOS.
The webinar was hosted by Alexei Sobolevsky , an iOS developer at Yandex.
Do it yourself Snake
For work, we used the integrated development environment Xcode . This is a convenient, free, and functional environment created by Apple.
At the very beginning, we created a new project and selected the basic set of “Game” files:
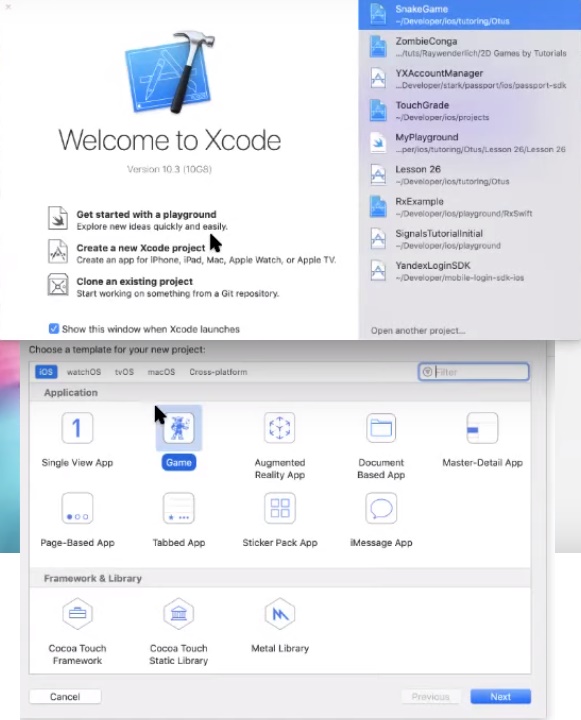
Without further ado, they called the project “Snake”. All settings were left by default, making sure that SpriteKit was in the Game Technology line.
Details of the creation of the project.
After performing the above actions, a list of files automatically created for our project will be displayed in the left part of the window. One of the most important files is AppDelegate.swift , which helps the system communicate with our code when any significant events for the application occur (launch, push, click on the link, etc.). Code of this file:
// // AppDelegate.swift // SnakeGame // // Created by Alexey Sobolevsky on 15/09/2019. // Copyright 2019 Alexey Sobolevsky. All rights reserved. // import UIKit @UIApplicationMain class AppDelegate: UIResponder, UIApplicationDelegate { var window: UIWindow? func application(_ application: UIApplication, didFinishLaunchingWithOptions launchOptions: [UIApplication.LaunchOptionsKey: Any]?) -> Bool { // Override point for customization after application launch. return true } }
Equally important files are GameScene.swift and GameViewController.swift . The GameScene class creates the scene, and the GameViewController is responsible for one screen of the application that we see (one screen - one GameViewController). Of course, this rule is not always supported, but in general it works. Since our application is quite simple, we will have only one GameViewController. We’ll start with him.
Writing a GameViewController
We will delete the default code. The view controller has several methods that work depending on the state of the screen. For example,
viewDidLoad()
triggered when all the screen elements have already loaded, and the screen is about to appear on the smartphone. Since we have a game, we must place a game scene in our view controller (this is where the snake will run and all other events of the game will occur).
Create a scene:
let scene = GameScene(size: view.bounds.size)
let is a constant and a keyword. Swift also uses the var keyword, which is required to define a variable. Using var , we can change the value of variables many times while the program is running. Using let, we cannot change the value of variables after initialization.
Now we need to make sure that the view in which we will place the created scene corresponds to the desired type. To do this, use the guard construct - this is the same as
if
, only the other way around (if not):
guard let skView = view as? SKView else { return }
After making sure that the screen element matches the desired type, we add our scene to it:
skView.presentScene(scene)
You also need to show the number of frames per second (FPS):
skView.showsFPS = true
Then display the number of elements of all types on the scene:
skView.showsNodeCount = true
And let's make the elements appear on the screen regardless of their order in the hierarchy of elements:
skView.ignoresSiblingOrder = true
And do not forget that our scene should stretch to the full width of the screen:
scene.scaleMode = .resizeFill
Here is the final code for the GameViewController.swift file:
import UIKit import SpriteKit import GameplayKit class GameViewController: UIViewController { override func viewWillLayoutSubviews() { super.viewWillLayoutSubviews() setup() } private func setup() { guard let skView = view as? SKView else { return } let scene = GameScene(size: view.bounds.size) skView.showsFPS = true skView.showsNodeCount = true skView.ignoresSiblingOrder = true scene.scaleMode = .resizeFill skView.presentScene(scene) } }
Details of the creation of the GameViewController.swift file.
So, we created the scene, but it is empty, so if we run the emulator now, we will see only a black screen.
Writing GameScene
Like last time, we delete most of the code, and then perform the necessary settings for the scene . It also has its own methods. For example, since we added our scene to the ViewController, we need the
didMove()
method:
override func didMove(to view: SKView) { setup(in: view) }
Further, when the game starts, the
Update()
method is called for each frame:
override func update(_ currentTime: TimeInterval) { snake?.move() }
And we also need some handlers for tapping the screen:
override func touchesEnded(_ touches: Set<UITouch>, with event: UIEvent?) { guard let touchedNode = findTouchedNode(with: touches) else { return }
override func touchesCancelled(_ touches: Set<UITouch>, with event: UIEvent?) { guard let touchedNode = findTouchedNode(with: touches) else { return }
As you know, Swift is famous for the presence of syntactic sugar . Syntactic sugar - these are technical aspects that simplify the life of the developer, speed up the writing of code. All this helps a lot in setting up the scene, which we are going to do now. First of all, set the color:
backgroundColor = SKColor.white
Since the snake works in a plane, we do not need physics, and you can turn it off so that the snake does not fall down due to gravity. Also, we do not need the game to spin, etc.:
physicsWorld.gravity = .zero physicsWorld.contactDelegate = self physicsBody = SKPhysicsBody(edgeLoopFrom: frame) physicsBody?.allowsRotation = false physicsBody?.categoryBitMask = CollisionCategories.edgeBody physicsBody?.collisionBitMask = CollisionCategories.snake | CollisionCategories.snakeHead view.showsPhysics = true
Now create the buttons:
let counterClockwiseButton = ControlsFactory.makeButton(at: CGPoint(x: scene.frame.minX + 30, y: scene.frame.minY + 50), name: .counterClockwiseButtonName) addChild(counterClockwiseButton) let clockwiseButton = ControlsFactory.makeButton(at: CGPoint(x: scene.frame.maxX - 90, y: scene.frame.minY + 50), name: .clockwiseButtonName) addChild(clockwiseButton)
When you have written a piece of code, you should consider whether the code can be improved or refactored so that it can be reused in the future. Look, we basically have two buttons on the screen, for the creation of which the same code is used. So, this code can be taken out in a separate function. To do this, create a new class and, accordingly, the ControlsFactory.swift file with the following code:
import SpriteKit final class ControlsFactory { static func makeButton(at position: CGPoint, name: String) -> SKShapeNode { let button = SKShapeNode() button.path = UIBezierPath(ovalIn: CGRect(x: 0, y: 0, width: 45, height: 45)).cgPath button.position = position button.fillColor = .gray button.strokeColor = UIColor.lightGray.withAlphaComponent(0.7) button.lineWidth = 10 button.name = name return button } }
To draw a random apple that our snake will “eat”, create the Apple class and the Apple.swift file:
import SpriteKit final class Apple: SKShapeNode { let diameter: CGFloat = 10 convenience init(at point: CGPoint) { self.init() path = UIBezierPath(ovalIn: CGRect(x: -diameter/2, y: -diameter/2, width: diameter, height: diameter)).cgPath fillColor = .red strokeColor = UIColor.red.withAlphaComponent(0.7) lineWidth = 5 position = point physicsBody = SKPhysicsBody(circleOfRadius: diameter / 2, center: .zero) physicsBody?.categoryBitMask = CollisionCategories.apple } }
And we describe our apple with the
createApple()
function in GameScene.swift :
private func createApple() { let padding: UInt32 = 15 let randX = CGFloat(arc4random_uniform(UInt32(gameFrameRect.maxX) - padding) + padding) let randY = CGFloat(arc4random_uniform(UInt32(gameFrameRect.maxY) - padding) + padding) let apple = Apple(at: CGPoint(x: randX, y: randY).relative(to: gameFrameRect)) gameFrameView.addChild(apple) }
Well, the turn has come for the snake. It will consist of two parts: the body ( SnakeBodyPart.swift ) and the head ( SnakeHead.swift ).
SnakeBodyPart.swift Code:
import SpriteKit class SnakeBodyPart: SKShapeNode { init(at point: CGPoint, diameter: CGFloat = 10.0) { super.init() path = UIBezierPath(ovalIn: CGRect(x: -diameter/2, y: -diameter/2, width: diameter, height: diameter)).cgPath fillColor = .green strokeColor = UIColor.green.withAlphaComponent(0.7) lineWidth = 5 position = point physicsBody = SKPhysicsBody(circleOfRadius: diameter - 4, center: .zero) physicsBody?.isDynamic = true physicsBody?.categoryBitMask = CollisionCategories.snake physicsBody?.contactTestBitMask = CollisionCategories.edgeBody | CollisionCategories.apple } required init?(coder aDecoder: NSCoder) { fatalError("init(coder:) has not been implemented") } }
SnakeHead.swift Code:
import SpriteKit final class SnakeHead: SnakeBodyPart { init(at point: CGPoint) { super.init(at: point, diameter: 20) physicsBody?.categoryBitMask = CollisionCategories.snakeHead physicsBody?.contactTestBitMask = CollisionCategories.edgeBody | CollisionCategories.apple } required init?(coder aDecoder: NSCoder) { fatalError("init(coder:) has not been implemented") } }
However, we will not bore you with a description of each line, because the details of creating the GameScene.swift file and other classes are well displayed in the video. We offer only to see the final code of GameScene.swift :
import SpriteKit import GameplayKit class GameScene: SKScene { var gameFrameRect: CGRect = .zero var gameFrameView: SKShapeNode! var startButton: SKLabelNode! var stopButton: SKLabelNode! var snake: Snake? override func didMove(to view: SKView) { setup(in: view) } override func update(_ currentTime: TimeInterval) { snake?.move() } override func touchesBegan(_ touches: Set<UITouch>, with event: UIEvent?) { guard let touchedNode = findTouchedNode(with: touches) else { return } if let shapeNode = touchedNode as? SKShapeNode, touchedNode.name == .counterClockwiseButtonName || touchedNode.name == .clockwiseButtonName { shapeNode.fillColor = .green if touchedNode.name == .counterClockwiseButtonName { snake?.moveCounterClockwise() } else if touchedNode.name == .clockwiseButtonName { snake?.moveClockwise() } } else if touchedNode.name == .startButtonName { start() } else if touchedNode.name == .stopButtonName { stop() } } override func touchesEnded(_ touches: Set<UITouch>, with event: UIEvent?) { guard let touchedNode = findTouchedNode(with: touches) else { return } if let shapeNode = touchedNode as? SKShapeNode, touchedNode.name == .counterClockwiseButtonName || touchedNode.name == .clockwiseButtonName { shapeNode.fillColor = .gray } } override func touchesCancelled(_ touches: Set<UITouch>, with event: UIEvent?) { guard let touchedNode = findTouchedNode(with: touches) else { return } if let shapeNode = touchedNode as? SKShapeNode, touchedNode.name == .counterClockwiseButtonName || touchedNode.name == .clockwiseButtonName { shapeNode.fillColor = .gray } } // MARK: - private func start() { guard let scene = scene else { return } snake = Snake(at: CGPoint(x: scene.frame.midX, y: scene.frame.midY)) gameFrameView.addChild(snake!) createApple() startButton.isHidden = true stopButton.isHidden = false } private func stop() { snake = nil gameFrameView.removeAllChildren() startButton.isHidden = false stopButton.isHidden = true } private func setup(in view: SKView) { backgroundColor = SKColor.white physicsWorld.gravity = .zero physicsWorld.contactDelegate = self physicsBody = SKPhysicsBody(edgeLoopFrom: frame) physicsBody?.allowsRotation = false physicsBody?.categoryBitMask = CollisionCategories.edgeBody physicsBody?.collisionBitMask = CollisionCategories.snake | CollisionCategories.snakeHead view.showsPhysics = true let margin: CGFloat = 20 let gameFrame = frame.inset(by: view.safeAreaInsets) gameFrameRect = CGRect(x: margin, y: margin + view.safeAreaInsets.top + 55, width: gameFrame.width - margin * 2, height: gameFrame.height - margin * 2 - 55) drawGameFrame() guard let scene = view.scene else { return } let counterClockwiseButton = ControlsFactory.makeButton(at: CGPoint(x: scene.frame.minX + 30, y: scene.frame.minY + 50), name: .counterClockwiseButtonName) addChild(counterClockwiseButton) let clockwiseButton = ControlsFactory.makeButton(at: CGPoint(x: scene.frame.maxX - 90, y: scene.frame.minY + 50), name: .clockwiseButtonName) addChild(clockwiseButton) startButton = SKLabelNode(text: "START") startButton.position = CGPoint(x: scene.frame.midX, y: 55) startButton.fontSize = 40 startButton.fontColor = .green startButton.name = .startButtonName addChild(startButton) stopButton = SKLabelNode(text: "STOP") stopButton.position = CGPoint(x: scene.frame.midX, y: 55) stopButton.fontSize = 40 stopButton.fontColor = .red stopButton.name = .stopButtonName stopButton.isHidden = true addChild(stopButton) } final func drawGameFrame() { gameFrameView = SKShapeNode(rect: gameFrameRect) gameFrameView.fillColor = .lightGray gameFrameView.lineWidth = 2 gameFrameView.strokeColor = .green addChild(gameFrameView) } private func findTouchedNode(with touches: Set<UITouch>) -> SKNode? { return touches.map { [unowned self] touch in touch.location(in: self) } .map { atPoint($0) } .first } private func createApple() { let padding: UInt32 = 15 let randX = CGFloat(arc4random_uniform(UInt32(gameFrameRect.maxX) - padding) + padding) let randY = CGFloat(arc4random_uniform(UInt32(gameFrameRect.maxY) - padding) + padding) let apple = Apple(at: CGPoint(x: randX, y: randY).relative(to: gameFrameRect)) gameFrameView.addChild(apple) } } // MARK: - SKPhysicsContactDelegate extension GameScene: SKPhysicsContactDelegate { func didBegin(_ contact: SKPhysicsContact) { var contactMask = contact.bodyA.categoryBitMask | contact.bodyB.categoryBitMask contactMask ^= CollisionCategories.snakeHead switch contactMask { case CollisionCategories.apple: let apple = contact.bodyA.node is Apple ? contact.bodyA.node : contact.bodyB.node snake?.addBodyPart() apple?.removeFromParent() createApple() case CollisionCategories.edgeBody: stop() break default: break } } } private extension String { static let counterClockwiseButtonName = "counterClockwiseButton" static let clockwiseButtonName = "clockwiseButton" static let startButtonName = "startButton" static let stopButtonName = "stopButton" }
The result of the work was the simplest Snake game:

It took us about an hour and a half to write the game. If you want to get programming skills in Swift, repeat all the steps yourself. By the way, here you will get full access to all code files that were used in this project.
All Articles