We translate the home network to DoH, or another click on the filtering nose
After the relatively recent announcement by Mozilla of the launch of support for DNS-over-HTTPS (DoH) in production on the network, disputes continue whether this is evil or good. In my opinion, the position of "evil" is based mainly on the fact that at the same time manipulating your DNS queries, even for purposes useful to you, will be difficult, so for now I remain in the position of "good."

In the Russian Federation, telecom operators, placed in very strict conditions by our legislation, are forced to build sophisticated multi-level systems for blocking access to content prohibited by Roskomnadzor in the Russian Federation, at one of the levels of which DNS interception is more or less successfully working. Using DoH will allow you to get around this level, which together with the use of VPN can make your life a little easier. Please note that a solution in itself cannot save you from blocking, because there is hardly a provider in Russia that relies only on filtering through DNS. You need some other option to get around blocking, for example, a VPN, one of the ones described in my previous articles.
Paradoxically, in the current panopticon, the telecom operator is not in danger of bypassing your locks (using special tools for this), so if you are afraid of harming him in this way, these fears are in vain.
But switching to a special browser to bypass DNS interception is not our way. Our way is to transfer all devices in your home network to DoH, quickly, efficiently and without unnecessary labor.
Disclaimer
Since it’s not very legitimate to publish methods of bypassing access to information prohibited on the territory of the Russian Federation, the purpose of this article will be to talk about a method that allows you to automate access to resources that are allowed on the territory of the Russian Federation, but because of someone’s actions that are not directly accessible through your provider. And access to other resources obtained as a result of actions from the article is an unfortunate side effect and the goal of the article is by no means.
TL; DR
We are deploying our own Pi-Hole-based DNS server using Cloudflare DoH for queries to the world. The goal is to encrypt all DNS queries and bypass operator filtering through DNS interception in this way. A useful bonus is filtering ads.
No magic know-how opens, a simple step-by-step instruction for those who do not want to understand all the intricacies themselves.
What do you need for this
- Trust Cloudflare. This is actually a very important point, because in the described implementation all of your DNS queries are processed by the Cloudflare service. If you do not trust him, you will have to implement another solution (and this is a little more complicated than the one described, but the goal of this article is not).
- To be able to support a constantly running Linux server in your home network that will handle the DNS queries of your devices. The Pi-Hole requirement is from 512M RAM (however, I did not check the work with a smaller volume). If your router or NAS is capable of virtual machines - this is an excellent option if the Raspberry Pi or another microcomputer on the ARM is lying somewhere on the shelf - no less good if the virtual farm on ESXi is buzzing on the mezzanines in the corridor - what I'm telling you, you and you know everything yourself. If you do not have any of this, the youngest solutions, such as Orange Pi Zero, in the secondary market can be found for units of hundreds of rubles or brought from Ali for plus or minus the same money. But the choice of platform is far beyond the scope of this article, so we believe that you have something. However, questions on this subject can be asked in the comments.
- You must be familiar with Linux and networking. Or at least want to get such an idea. Since I am not ready to embrace the vast this time, you will have to study some incomprehensible moments for you yourself. However, of course, I will answer specific questions in the comments and are unlikely to be the only one to answer, so do not hesitate to ask.
Initial data
The IPv4 address of our server on the home network is 192.168.1.10 and it is assigned as static.
Settings on Linux are performed from root (i.e., before starting the configuration, we run the sudo su - command).
Briefly - the logic of the solution
- Install and configure Pi-Hole
- Install and configure cloudflared
- Configure your home router
- We solve problems
Actually decision
1. Install and configure Pi-Hole
Pi-Hole is a well-known home platform designed primarily to combat advertising by blocking domain requests from a centrally updated list. Not that it was a necessary component of the solution, but if you started collecting home DNS, it becomes difficult to stop. But seriously - Pi-Hole may not be perfect, but it removes a large amount of headache from a person who needs to “work”.
To install Pi-Hole on an already running Linux server, we just need to run one command:
curl -sSL https://install.pi-hole.net | bash
And then the running script will guide you through the installation steps.
At the moment when he asks you about the choice of Upstream DNS Provider, you can choose any, because in the next step we will still change it. All other parameters can safely be left by default.
At the end of the installation, the script will show you a randomly generated password from the web interface, which it would be useful for you to write down.
If something went wrong during the installation, you can use the alternative methods described here .
2. Install and configure cloudflared
In order to switch to DNS over HTTPS, we use a standard solution from Cloudflare. Initially, the cloudflared daemon was created to lift the Argo tunnel from the subscriber’s side, allowing you to publish your web server to Cloudflare CDN, even if it is hosted on a private IP address behind NAT. But a very useful property of this daemon is its work as a DoH-proxy, and we use this property here.
Here, for installation, we need to make a little more effort, but also nothing particularly complicated.
We select and download the installer for our platform.
# For amd64 Debian/Ubuntu cd /tmp wget https://bin.equinox.io/c/VdrWdbjqyF/cloudflared-stable-linux-amd64.deb apt-get install ./cloudflared-stable-linux-amd64.deb cloudflared -v # For amd64 CentOS/RHEL/Fedora cd /tmp wget https://bin.equinox.io/c/VdrWdbjqyF/cloudflared-stable-linux-amd64.rpm yum install ./cloudflared-stable-linux-amd64.rpm cloudflared -v # For ARM cd /tmp wget https://bin.equinox.io/c/VdrWdbjqyF/cloudflared-stable-linux-arm.tgz tar -xvzf cloudflared-stable-linux-arm.tgz cp ./cloudflared /usr/local/bin chmod +x /usr/local/bin/cloudflared cloudflared -v
After executing the last command, we should get output similar to the following:
cloudflared version 2019.9.0 (built 2019-09-06-0333 UTC)
If you have one (of course, the version and build number may differ), then congratulations, the installation was successful. Now it's up to you to configure.
Create a user for the service:
useradd -s /usr/sbin/nologin -r -M cloudflared
Create the service configuration file / etc / default / cloudflared:
# Commandline args for cloudflared CLOUDFLARED_OPTS=--port 5053 --upstream https://1.1.1.1/dns-query --upstream https://1.0.0.1/dns-query
And we give rights to the newly created user to it and to the executable file:
chown cloudflared:cloudflared /etc/default/cloudflared chown cloudflared:cloudflared /usr/local/bin/cloudflared
Next, create the file /lib/systemd/system/cloudflared.service, which will give us the opportunity to integrate the service into systemd:
[Unit] Description=cloudflared DNS over HTTPS proxy After=syslog.target network-online.target [Service] Type=simple User=cloudflared EnvironmentFile=/etc/default/cloudflared ExecStart=/usr/local/bin/cloudflared proxy-dns $CLOUDFLARED_OPTS Restart=on-failure RestartSec=10 KillMode=process [Install] WantedBy=multi-user.target
We activate the service and run it:
systemctl enable cloudflared systemctl start cloudflared systemctl status cloudflared
If everything worked out, you will see that the service is in active (running) state.
You can check the operation of the service, for example with the dig command:
dig @127.0.0.1 -p 5053 google.com
In the answer section of the answer, you will see the IP address that your service received for google.com via DoH, something like:
google.com. 217 IN A 172.217.6.142
It remains only to connect the service to the Pi-Hole. To do this, you go to the Pi-Hole web interface (the password recorded in the first step is useful to you), go to the Settings - DNS menu item and make it look something like this:
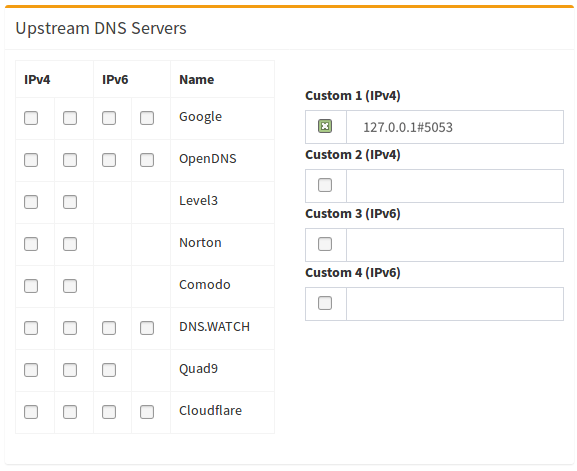
The main thing is to fill in the Custom field with the entry 127.0.0.1 # 5053 and leave the daw on it, removing it from all the others. After that, do not forget to scroll down the page and click Save.
If you forgot to write the password - it's okay, go to the server via ssh and run the command pihole -a -p , it will allow you to set a new password. Well, in general, look at the keys of the pihole team, there are a lot of interesting things. For example, a system update is done with one pihole -up command .
3. Set up your home router
Of course, I cannot close the entire variety of routers with this text. But for most home routers, the following points are true:
1) You can set a custom DNS server for the router in the WAN interface settings, even if the IP address is obtained from the provider dynamically
2) The router issues its address to internal clients as DNS and forwards their requests to the server specified in the WAN settings
Accordingly, in this case, it is necessary and sufficient for us to register the address of our Pi-Hole as a DNS server in the settings of the WAN interface of the home router. It is important that it be the only DNS server in the settings, if any else is specified - the router will balance requests between them according to the only principle known to it, and this situation is extremely inconvenient for debugging problems on the network.
If suddenly something went wrong and the service stopped working, it is enough to change the above setting to the address of your provider's DNS server or, for example, 8.8.8.8, and only then start to understand.
If your router is more intelligent and, for example, has the ability to specify in DHCP which address to distribute to clients as a DNS server, you can go on an alternative path and configure the distribution of the Pi-Hole address to clients directly. This will slightly offload the router, but it will complicate the above rollback from using the service.
If something does not work out - ask in the comments, we will find a solution.
4. We solve problems
In general, after completing the above points, you should already be fine, but there are nuances that my clients and I have sometimes encountered.
After you start using Pi-Hole, you may experience unusual feelings of reduced advertising on your devices (especially mobile). Do not be alarmed, this is what you intended. Also, some services may stop working the way you are familiar with and this will require your participation in the settings. For example, the Aliexpress website periodically tries to redirect you to the address best.aliexpress.com, which is on the list of advertisements, and this blocks all access to Ali.
Detecting such a problem is quite simple - if you are trying to access a blocked server, your browser will show you an error ERR_NAME_NOT_RESOLVED or the like, and a command line check through nslookup <server name> will return 0.0.0.0.
Solving the problem for a specific server is also easy - just add it to whitelist. To do this, go to http: //pi.hole/admin , log in, select Whitelist in the left menu and add the server we need. For example, I had to open s.click.aliexpress.com, as well as the group of sites in the miui.com domain, in addition to the best.aliexpress.com mentioned above, for Xiaomi services to work. You probably need something of your own. But keeping track of exactly what needs to be opened is not so difficult - on the service’s Dashboard main page and in Query Logs, you can always see which domain requests have been blocked and add them to whitelist.
It also happens regularly that Pi-Hole is installed on a server that already has some kind of web service running. In this case, you will not get access to the web-based management interface. How to resolve such a conflict depends on the specific situation, but the main solutions are:
- If the web server was not used, but just stood by default - find and disable
- If the web server is used and you know how to work with it, add the Pi-Hole web interface as a separate resource to your web server.
- You can also land the Pi-Hole web interface on a different port by correcting the server.port parameter in the /etc/lighttpd/lighttpd.conf file. But this will require remembering which port the server is running on, so I do not welcome such schemes.
Conclusion
As promised, he did not write anything new. For many readers, this scheme is understandable and obvious, and is either already implemented, or not implemented as unnecessary. Many others built something similar in a different way, using the same or other components. I suggest you consider this post more like a blank for your own decision, if you ever need it. But, having executed it as a step-by-step instruction, you will already receive a service that covers your basic needs for filtering ads and using DoH.
Traditionally, I will answer questions and help with the settings.
PS Note from GennPen - when using DoH, you become dependent on your internet connection and if you run out of money in your account, you won’t even be able to log into your provider's personal account to pay them. Therefore, for such sites in this solution, it is desirable to register static entries in Pi-Hole - this can be done in the console with the pihole -a -r command or simply manually in the / etc / hosts file. Unfortunately, the tool is not included in the web interface for this.
All Articles