Secure way to exchange JWT in ASP.NET Core + SPA
A.
JWT authentication (JSON Web Token) is a fairly uniform, consistent authentication and authentication mechanism between the server and clients. The advantage of JWT is that it allows us to manage state less and scales well. It is not surprising that authorization and authentication with its help is increasingly used in modern web applications.
When developing applications with JWT, the question often arises: where and how is it recommended to store the token? If we are developing a web application, we have two of the most common options:
Comparing these methods, we can say that they both store values in the client’s browser, both are fairly easy to use and represent a regular storage of key-value pairs. The difference is in the storage environment.
Web Storage (localStorage / sessionStorage) is accessible via JavaScript in the same domain. This means that any JavaScript code in your application has access to Web Storage, and this creates a vulnerability to cross-site scripting (XSS) attacks. As a storage engine, Web Storage provides no way to secure your data during storage and sharing. We can use it only for auxiliary data that we want to keep when updating (F5) or closing the tab: status and page number, filters, etc.
Tokens can also be transmitted through browser cookies. Cookies used with the httpOnly flag are not XSS affected. httpOnly is a flag for access to reading, writing and deleting cookies only on the server. They will not be accessible through JavaScript on the client, so the client will not know about the token, and authorization will be fully processed on the server side.
We can also set a secure flag to ensure that cookies are only transmitted via HTTPS. Given these advantages, my choice fell on cookies.
This article describes an approach to implementing authorization and authentication using httpOnly secure cookies + JSON Web Token in ASP.NET Core Web Api in conjunction with SPA. The option is considered in which the server and client are in different origin.
To correctly configure and debug client-server relationships via HTTPS, I strongly recommend that you immediately configure the local development environment so that both the client and server have an HTTPS connection.
If you don’t do this right away and try to build relationships without an HTTPS connection, then in the future a great many details will come up without which secure cookies and additional secure-policies in production with HTTPS will not work correctly.
I will show an example of configuring HTTPS on OS Windows 10, server - ASP.NET Core, SPA - React.
You can configure HTTPS in ASP.NET Core using the Configure for HTTPS flag when creating a project or, if we did not do this during creation, enable the corresponding option in Properties.
To configure SPA, you need to modify the script to "start" , setting it to "set HTTPS = true" . My setup is as follows:
I advise you to look at setting up HTTPS for the development environment in other environments at create-react-app.dev/docs/using-https-in-development
In this case, the most common implementation of JWT from the documentation or from any article, with additional settings
as our development environment uses HTTPS:
ConfigureServices
Important : CORS-policy must contain
. This is necessary to receive a request from XMLHttpRequest.withCredentials and send cookies back to the client. More on this will be written later. Other options are configured depending on the needs of the project.
If the server and client are on the same origin, then the entire configuration below is not needed.
ConfigureServices
Configure
Force cookie-policy to httpOnly and secure.
If possible, set
- This improves cookie security for application types that do not rely on cross-origin requests.
Configure
This part is a concept. We are going to do two things:
To do this, we need:
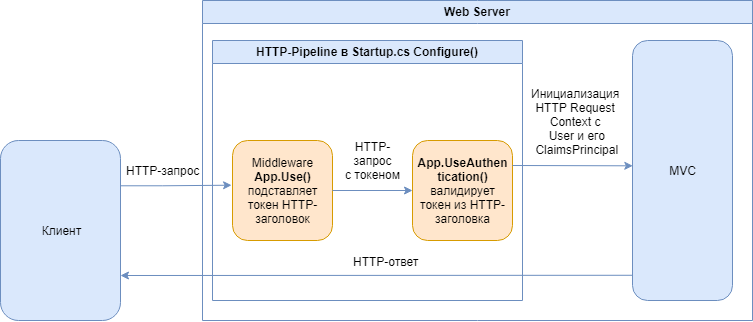
The main idea is to implement Custom Middleware to insert a token into an incoming HTTP request. After user authorization, we save the cookie under a certain key, for example: ".AspNetCore.Application.Id" . I recommend setting a name that has nothing to do with authorization or tokens - in this case, a cookie with a token will look like some kind of unremarkable system constant for the AspNetCore application. So there is a higher chance that the attacker will see many system variables and, without understanding which authorization mechanism is used, will go further. Of course, if he does not read this article and does not specifically look out for such a constant.
Next, we need to insert this token into all subsequent incoming HTTP requests. To do this, we will write a few lines of Middleware code. This is nothing but an HTTP pipeline.
Configure
We can take this logic to a separate Middleware service so as not to clog Startup.cs, the idea will not change.
In order to write the value in cookies, we just need to add the following line to the authorization logic:
Using our cookie-policies, these cookies will automatically be sent as httpOnly and secure. No need to redefine their policy in cookie options.
In CookieOptions, you can set MaxAge to specify a lifetime. It is useful to specify along with JWT Lifetime when issuing the token so that the cookie disappears after a while. The remaining properties of CookieOptions are configured depending on the requirements of the project.
For greater security, I recommend adding the following headers to Middleware:
I have described far from all the headlines. There are plenty more ways to achieve greater web application security. I advise you to focus on the security checklist from the securityheaders.com resource.
When the client and server are located on different origin, additional configuration is also required on the client. Each request must be wrapped using XMLHttpRequest.withCredentials .
I wrapped my methods as follows:
We can wrap our request config in any way, the main thing is that withCredentials = true is there .
The XMLHttpRequest.withCredentials property determines whether cross-domain requests should be generated using credentials such as cookies, authorization headers, or TLS certificates.
This flag is also used to determine whether cookies sent in the response will be ignored. XMLHttpRequest from another domain cannot set a cookie on its own domain if the withCredentials flag is not set to true before creating this request.
In other words, if you do not specify this attribute, then our cookie will not be saved by the browser, i.e. we will not be able to send the cookie back to the server, and the server will not find the desired cookie with JWT and will not sign the Bearer Token in our HTTP pipeline.
I have described an XSS-resistant token exchange method above. Let's go over and look at the result of the implemented functionality.
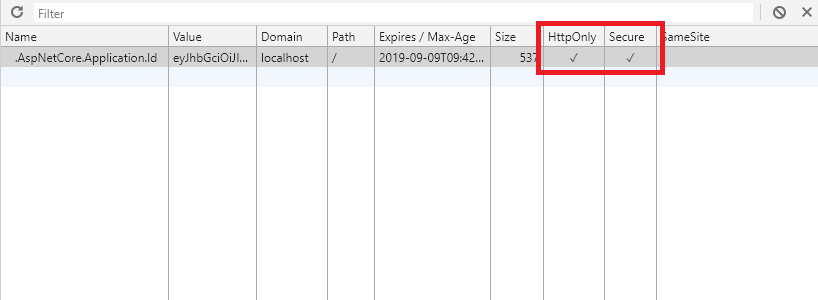
If you go into Developer Tools, we see the coveted flags httpOnly and secure :
Let's crush-test, try to get the cookies out of the client:

We are observing '', i.e. cookies are not accessible from the document space, which makes it impossible to read them with scripts.
We can try to get these cookies with the help of additional tools or extensions, but all the tools I tried have called exactly the native implementation from the document space.
Startup instructions are in README.MD
Middleware services
ConfigureServices
Configure
To protect our API methods, you must add the
attribute for the controller or
for the method.
Introduction
JWT authentication (JSON Web Token) is a fairly uniform, consistent authentication and authentication mechanism between the server and clients. The advantage of JWT is that it allows us to manage state less and scales well. It is not surprising that authorization and authentication with its help is increasingly used in modern web applications.
When developing applications with JWT, the question often arises: where and how is it recommended to store the token? If we are developing a web application, we have two of the most common options:
- HTML5 Web Storage (localStorage or sessionStorage)
- Cookies
Comparing these methods, we can say that they both store values in the client’s browser, both are fairly easy to use and represent a regular storage of key-value pairs. The difference is in the storage environment.
Web Storage (localStorage / sessionStorage) is accessible via JavaScript in the same domain. This means that any JavaScript code in your application has access to Web Storage, and this creates a vulnerability to cross-site scripting (XSS) attacks. As a storage engine, Web Storage provides no way to secure your data during storage and sharing. We can use it only for auxiliary data that we want to keep when updating (F5) or closing the tab: status and page number, filters, etc.
Tokens can also be transmitted through browser cookies. Cookies used with the httpOnly flag are not XSS affected. httpOnly is a flag for access to reading, writing and deleting cookies only on the server. They will not be accessible through JavaScript on the client, so the client will not know about the token, and authorization will be fully processed on the server side.
We can also set a secure flag to ensure that cookies are only transmitted via HTTPS. Given these advantages, my choice fell on cookies.
This article describes an approach to implementing authorization and authentication using httpOnly secure cookies + JSON Web Token in ASP.NET Core Web Api in conjunction with SPA. The option is considered in which the server and client are in different origin.
Setting Up Your Local Development Environment
To correctly configure and debug client-server relationships via HTTPS, I strongly recommend that you immediately configure the local development environment so that both the client and server have an HTTPS connection.
If you don’t do this right away and try to build relationships without an HTTPS connection, then in the future a great many details will come up without which secure cookies and additional secure-policies in production with HTTPS will not work correctly.
I will show an example of configuring HTTPS on OS Windows 10, server - ASP.NET Core, SPA - React.
You can configure HTTPS in ASP.NET Core using the Configure for HTTPS flag when creating a project or, if we did not do this during creation, enable the corresponding option in Properties.
To configure SPA, you need to modify the script to "start" , setting it to "set HTTPS = true" . My setup is as follows:
'start': 'set HTTPS=true&&rimraf ./build&&react-scripts start'
I advise you to look at setting up HTTPS for the development environment in other environments at create-react-app.dev/docs/using-https-in-development
Configure ASP.NET Core Server
JWT setup
In this case, the most common implementation of JWT from the documentation or from any article, with additional settings
options.RequireHttpsMetadata = true;
as our development environment uses HTTPS:
ConfigureServices
services.AddAuthentication(options => { options.DefaultAuthenticateScheme = JwtBearerDefaults.AuthenticationScheme; options.DefaultSignInScheme = JwtBearerDefaults.AuthenticationScheme; options.DefaultChallengeScheme = JwtBearerDefaults.AuthenticationScheme; }) .AddJwtBearer(JwtBearerDefaults.AuthenticationScheme, options => { options.RequireHttpsMetadata = true; options.SaveToken = true; options.TokenValidationParameters = new TokenValidationParameters { // . }; });
Configuring a CORS policy
Important : CORS-policy must contain
AllowCredentials()
. This is necessary to receive a request from XMLHttpRequest.withCredentials and send cookies back to the client. More on this will be written later. Other options are configured depending on the needs of the project.
If the server and client are on the same origin, then the entire configuration below is not needed.
ConfigureServices
services.AddCors();
Configure
app.UseCors(x => x .WithOrigins("https://localhost:3000") // SPA .AllowCredentials() .AllowAnyMethod() .AllowAnyHeader());
Setting cookie policy
Force cookie-policy to httpOnly and secure.
If possible, set
MinimumSameSitePolicy = SameSiteMode.Strict;
- This improves cookie security for application types that do not rely on cross-origin requests.
Configure
app.UseCookiePolicy(new CookiePolicyOptions { MinimumSameSitePolicy = SameSiteMode.Strict, HttpOnly = HttpOnlyPolicy.Always, Secure = CookieSecurePolicy.Always });
The idea of a secure token exchange
This part is a concept. We are going to do two things:
- Toss a token into an HTTP request using httpOnly and secure flags.
- Receive and validate client application tokens from an HTTP request.
To do this, we need:
- Write the token in the httpOnly cookie when logging in and delete it from there when logging in.
- If there is a token in cookies, substitute the token in the HTTP header of each subsequent request.
- If there is no token in cookies, then the header will be empty, and the request will not be authorized.
Middleware
The main idea is to implement Custom Middleware to insert a token into an incoming HTTP request. After user authorization, we save the cookie under a certain key, for example: ".AspNetCore.Application.Id" . I recommend setting a name that has nothing to do with authorization or tokens - in this case, a cookie with a token will look like some kind of unremarkable system constant for the AspNetCore application. So there is a higher chance that the attacker will see many system variables and, without understanding which authorization mechanism is used, will go further. Of course, if he does not read this article and does not specifically look out for such a constant.
Next, we need to insert this token into all subsequent incoming HTTP requests. To do this, we will write a few lines of Middleware code. This is nothing but an HTTP pipeline.
Configure
app.Use(async (context, next) => { var token = context.Request.Cookies[".AspNetCore.Application.Id"]; if (!string.IsNullOrEmpty(token)) context.Request.Headers.Add("Authorization", "Bearer " + token); await next(); }); app.UseAuthentication();
We can take this logic to a separate Middleware service so as not to clog Startup.cs, the idea will not change.
In order to write the value in cookies, we just need to add the following line to the authorization logic:
if (result.Succeeded) HttpContext.Response.Cookies.Append(".AspNetCore.Application.Id", token, new CookieOptions { MaxAge = TimeSpan.FromMinutes(60) });
Using our cookie-policies, these cookies will automatically be sent as httpOnly and secure. No need to redefine their policy in cookie options.
In CookieOptions, you can set MaxAge to specify a lifetime. It is useful to specify along with JWT Lifetime when issuing the token so that the cookie disappears after a while. The remaining properties of CookieOptions are configured depending on the requirements of the project.
For greater security, I recommend adding the following headers to Middleware:
context.Response.Headers.Add("X-Content-Type-Options", "nosniff"); context.Response.Headers.Add("X-Xss-Protection", "1"); context.Response.Headers.Add("X-Frame-Options", "DENY");
- The X-Content-Type-Options header is used to protect against MIME sniffing vulnerabilities. This vulnerability could occur when a site allows users to download content, but the user disguises a certain type of file as something else. This can give attackers the ability to execute cross-site scripting scripts or compromise a website.
- All modern browsers have built-in XSS filtering capabilities that try to catch the XSS vulnerabilities before the page is fully displayed to us. By default, they are enabled in the browser, but the user may be trickier and disable them. Using the X-XSS-Protection header, we can actually tell the browser to ignore what the user has done and apply the built-in filter.
- X-Frame-Options tells the browser that if your site is placed inside an HTML frame, then do not display anything. This is very important when trying to protect yourself from clickjacking attempts.
I have described far from all the headlines. There are plenty more ways to achieve greater web application security. I advise you to focus on the security checklist from the securityheaders.com resource.
SPA client setup
When the client and server are located on different origin, additional configuration is also required on the client. Each request must be wrapped using XMLHttpRequest.withCredentials .
I wrapped my methods as follows:
import axios from "axios"; const api = axios.create({ baseURL: process.env.REACT_APP_API_URL }); api.interceptors.request.use(request => requestInterceptor(request)) const requestInterceptor = (request) => { request.withCredentials = true; return request; } export default api;
We can wrap our request config in any way, the main thing is that withCredentials = true is there .
The XMLHttpRequest.withCredentials property determines whether cross-domain requests should be generated using credentials such as cookies, authorization headers, or TLS certificates.
This flag is also used to determine whether cookies sent in the response will be ignored. XMLHttpRequest from another domain cannot set a cookie on its own domain if the withCredentials flag is not set to true before creating this request.
In other words, if you do not specify this attribute, then our cookie will not be saved by the browser, i.e. we will not be able to send the cookie back to the server, and the server will not find the desired cookie with JWT and will not sign the Bearer Token in our HTTP pipeline.
What is all this for?
I have described an XSS-resistant token exchange method above. Let's go over and look at the result of the implemented functionality.
If you go into Developer Tools, we see the coveted flags httpOnly and secure :
Let's crush-test, try to get the cookies out of the client:
We are observing '', i.e. cookies are not accessible from the document space, which makes it impossible to read them with scripts.
We can try to get these cookies with the help of additional tools or extensions, but all the tools I tried have called exactly the native implementation from the document space.
Demo project
Startup instructions are in README.MD
UPD: Protection against CSRF
Configure ASP.NET Core Server
Middleware services
XsrfProtectionMiddleware.cs
public class XsrfProtectionMiddleware { private readonly IAntiforgery _antiforgery; private readonly RequestDelegate _next; public XsrfProtectionMiddleware(RequestDelegate next, IAntiforgery antiforgery) { _next = next; _antiforgery = antiforgery; } public async Task InvokeAsync(HttpContext context) { context.Response.Cookies.Append( ".AspNetCore.Xsrf", _antiforgery.GetAndStoreTokens(context).RequestToken, new CookieOptions {HttpOnly = false, Secure = true, MaxAge = TimeSpan.FromMinutes(60)}); await _next(context); } }
MiddlewareExtensions.cs
public static class MiddlewareExtensions { public static IApplicationBuilder UseXsrfProtection(this IApplicationBuilder builder, IAntiforgery antiforgery) => builder.UseMiddleware<XsrfProtectionMiddleware>(antiforgery); }
ConfigureServices
services.AddAntiforgery(options => { options.HeaderName = "x-xsrf-token"; }); services.AddMvc();
Configure
app.UseAuthentication(); app.UseXsrfProtection(antiforgery);
SPA setup
api.axios.js
import axios from "axios"; import cookie from 'react-cookies'; const api = axios.create({ baseURL: process.env.REACT_APP_API_URL }); api.interceptors.request.use(request => requestInterceptor(request)) const requestInterceptor = (request) => { request.headers['x-xsrf-token'] = cookie.load('.AspNetCore.Xsrf') return request; } export default api;
Using
To protect our API methods, you must add the
[AutoValidateAntiforgeryToken]
attribute for the controller or
[ValidateAntiForgeryToken]
for the method.
All Articles