tinc-boot - full-mesh network without pain

Automatic, secure, distributed, with transitive connections (that is, forwarding messages when there is no direct access between subscribers), without a single point of failure, peer, time-tested, low resource consumption, full-mesh VPN network with the ability to "punch" NAT - is it possible?
Right answers:
- yes, with pain if you use tinc.
- yes, easy if you use tinc + tinc-boot
Tinc description
Unfortunately, a little information was published about Tinc VPN on Habré, but a couple of relevant articles can still be found:
- Our recipe for a fail-safe VPN server based on tinc, OpenVPN, Linux from Flant
- List of Full-Mesh VPN Solutions from the respected ValdikSS
From the English-language articles can be distinguished:
- How To Install Tinc and Set Up a Basic VPN on Ubuntu 14.04 from Digital Ocean
- How to Set up tinc, a Peer-to-Peer VPN from Linode
The original source is better to consider the original Tinc man documentation
So (a free reprint from the official site), Tinc VPN is a service ( tincd
daemon) that ensures the functioning of a private network by tunneling and encrypting traffic between nodes. Source code is open and available under the GPL2 license. Like the classic (OpenVPN) solution, the created virtual network is available at the IP level (OSI 3), which means that, in the general case, making changes to the applications is not required.
Key Features:
- encryption, authentication and compression of traffic;
- a fully automatic full-mesh solution, which includes building connections to network nodes in an all-with-all mode or, if this is not applicable, forwarding messages between intermediate hosts;
- punch NAT;
- the ability to connect isolated networks at the ethernet level (virtual switch);
- multiple OS support: Linux, FreeBSD, OS X, Solaris, Windows, etc.
There are two branches of tinc development: 1.0.x (in almost all repositories) and 1.1 (eternal beta). The article uses version 1.0.x everywhere.
Tinc 1.1x provides several new key features: perfect forward security, simplified client connectivity (actually replacingtinc-boot
) and a generally more thoughtful design.
However, at the moment, a stable version - 1.0.x is indicated and highlighted on the official website, so when using all the advantages of the 1.1 branch, you should evaluate all the advantages and disadvantages of using a non-final version.
From my point of view, one of the strongest possibilities is to forward messages when direct connection is not possible. At the same time, routing tables are built automatically. Even nodes without a public address can pass traffic through themselves.

Consider the situation with three servers (China, Russia, Singapore) and three clients (Russia, China and the Philippines):
- servers have a public address, clients behind NAT;
- ILV during the next ban of probable proxies The Telegram blocked all the hosters except the "friendly" China;
- the network border of China <-> RF is unstable and may fall (due to ILV and / or due to the Chinese censor);
- connections to Singapore are conditionally stable (personal experience);
- Manila (Philippines) is not a threat to anyone, and therefore it is allowed for everyone (due to the distance from everyone and everything).
Using the traffic exchange between Shanghai and Moscow as an example, consider the Tinc scenarios (approximately):
- Native situation: Moscow <-> russia-srv <-> china-srv <-> Shanghai
- ILV closed connection to China: Moscow <-> russia-srv <-> Manila <-> Singapore <-> Shanghai
- (after 2) in case of server failure in Singapore, traffic is transferred to the server in China and vice versa.
Whenever possible, Tinc attempts to establish a direct connection between the two nodes behind NAT by punching.
A brief introduction to tinc configuration
Tinc is positioned as an easy-to-configure service. However, something went wrong - to create a new node, it is minimally necessary:
- Describe the host configuration (type, name) (
tinc.conf
); - describe the configuration file (served subnets, public addresses) (
hosts/
); - create a key;
- create a script that sets the node address and related parameters (
tinc-up
); - It is advisable to create a script that clears the created parameters after stopping (
tinc-down
).
In addition to this, when connecting to an existing network, you must obtain the existing host keys and provide your own.
Ie: for the second node

For the third

When using two-way synchronization (for example, unison
), the number of additional operations increases to N pieces, where N is the number of public nodes.
We must pay tribute to the developers of Tinc - for inclusion in the network, just exchange keys
with only one of the nodes (bootnode). After starting the service and connecting to the participant, tinc will get the topology
network and will be able to work with all subscribers.
However , if the boot host has become unavailable, and tinc has restarted, then there is no way
will connect to the virtual network.
Moreover, the enormous possibilities of tinc, together with the academic documentation of this (well described, but few examples), provide an extensive field for making mistakes.
Reasons to create tinc-boot
If we generalize the problems described above and formulate them as tasks, then we get:
- the ability to create a new site with minimal effort is needed;
- potentially, it is necessary to make it possible to give the average specialist (enikey) one small line to create a new node and connect to the network;
- it is necessary to provide automatic distribution of keys between all active nodes;
- it is necessary to provide a simplified key exchange procedure between the bootnod and the new client.
bootnode - a node with a public address (see above);
Due to the requirements of claim 2, it can be argued that after the key exchange between the bootnode and the new node, and after
connecting the host to the network, the distribution of the new key will happen automatically.
It is these tasks that tinc-boot performs.
tinc-boot is a self-contained, apart from tinc
, open source application that provides:
- simple creation of a new node;
- automatic connection to an existing network;
- setting the majority of parameters by default;
- key distribution to honey nodes.
Architecture
The tinc-boot
executable file consists of four components: a bootnode server, a key distribution management server and RPC management commands for it, as well as a node generation module.
Node Generation Module
The node generation module ( tinc-boot gen
) creates all the necessary files for tinc to run successfully.
Simplified, its algorithm can be described as follows:
- Define the host name, network, IP parameters, port, subnet mask, etc.
- Normalize them (tinc has a limit on some values) and create the missing ones
- Check parameters
- If necessary, install tinc-boot on the system (disableable)
- Create
tinc-up
,tinc-down
,subnet-up
,subnet-down
- Create
tinc.conf
configurationtinc.conf
- Create
hosts/
- Perform key generation
- Perform key exchange with bootnode
- Encrypt and sign your own host file with a public key, a random initialization vector (nounce) and host name using xchacha20poly1305, where the encryption key is the result of the sha256 function from the token
- Send data via HTTP protocol to bootnode
- Decipher the received answer and the
X-Node
header containing the name of the boot node using the original nounce and the same algorithm - If successful, save the received key in
hosts/
and add aConnectTo
entry to the configuration file (i.e. a recommendation where to connect) - Otherwise, use the following address in the list of the boot node and repeat from step 2
- Show recommendations for starting a service
Conversion via SHA-256 is used only to normalize the key to 32 bytes
For the very first node (that is, when there is nothing to specify as the boot address), step 9 is skipped. Flag --standalone
.
Example 1 - creating the first public site
The public address is 1.2.3.4
sudo tinc-boot gen --standalone -a 1.2.3.4
- the
-a
flag allows you to specify publicly available addresses
Example 1 - adding a non-public node to the network
The boot node will be taken from the example above. The host must have tinc-boot bootnode running (described later).
sudo tinc-boot gen --token "MY TOKEN" http://1.2.3.4:8655
- the
--token
flag sets the authorization token
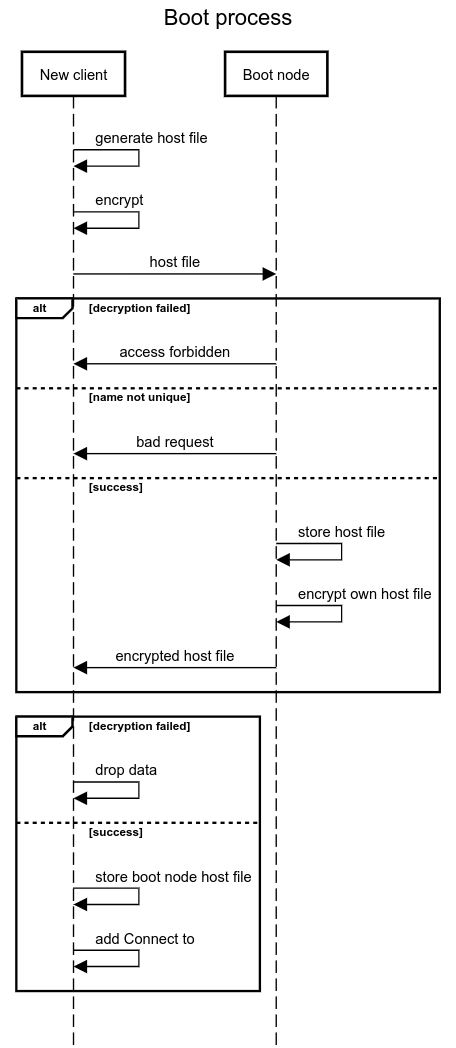
Bootstrap module
The tinc-boot bootnode
raises an HTTP server with an API for primary key exchange with new clients.
By default, port 8655
.
Simplified, the algorithm can be described as follows:
- Accept a request from a client
- Decrypt and verify the request using xchacha20poly1305, using the initialization vector passed during the request, and where the encryption key is the result of the sha256 function from the token
- Check name
- Save file if there is no file with the same name yet
- Encrypt and sign your own host file and name using the algorithm described above
- Return to item 1
Together, the primary key exchange process is as follows:
Example 1 - starting the download node
It is assumed that the initial initialization of the node was carried out ( tinc-boot gen
)
tinc-boot bootnode --token "MY TOKEN"
- the
--token
flag sets the authorization token. It should be the same for clients connecting to the host.
Example 2 - starting the download node as a service
tinc-boot bootnode --service --token "MY TOKEN"
- the
--service
flag--service
to create a systemd service (by default, for this exampletinc-boot-dnet.service
) - the
--token
flag sets the authorization token. It should be the same for clients connecting to the host.
Key distribution module
The key distribution module ( tinc-boot monitor
) raises an HTTP server with an API for exchanging keys with other nodes inside the VPN . It is fixed to the address issued by the network (the default port is 1655
, there will be no conflicts with several networks, since each network has / must have its own address).
The module starts and works completely automatically: you do not need to work with it in manual mode.
This module starts automatically when the network is up (in the tinc-up
script) and automatically stops when it stops (in the tinc-down
script).
Supports operations:
-
GET /
- give your node file -
POST /rpc/watch?node=<>&subnet=<>
- pick up a file from another node, assuming there is a similar service running on it. By default, attempts are timed out at 10 seconds, every 30 seconds until success or cancellation. -
POST /rpc/forget?node=<>
- leave attempts (if any) to pick up the file from another node -
POST /rpc/kill
- terminates the service
In addition, every minute (by default) and when a new configuration file is received, indexing of the saved nodes is made for new public nodes. When nodes with the Address
flag are detected, an entry is added to the tinc.conf
configuration file to recommend connection when restarting.
Key Distribution Module (Management)
Commands for requesting ( tinc-boot watch
) and canceling the request ( tinc-boot forget
) of the configuration file from other nodes are executed automatically when a new node is detected ( subnet-up
script) and stopped ( subnet-down
script), respectively.
In the process of stopping the service, the tinc-down
script is tinc-down
in which the tinc-boot kill
command stops the key distribution module.
Instead of total
This utility was created under the influence of cognitive dissonance between the genius of Tinc developers and the linearly growing complexity of setting up new nodes.
The main ideas in the development process were:
- if something can be automated, it must be automated;
- default values should cover at least 80% of use (Pareto principle);
- any value can be redefined using flags as well as using environment variables;
- the utility should help, and not cause a desire to call all the punishment of heaven on the creator;
- using an authorization token for initial initialization is an obvious risk, however, to the extent possible, it was minimized due to total cryptography and authentication (even the host name in the response header cannot be replaced).
A little chronology:
- The first time I used tinc more than 4 years ago. Studied a significant amount of material. Set up an ideal (in my opinion) network
- After half a year, tinc was replaced in favor of zerotier, as a more convenient / flexible tool
- 2 years ago, I made ansible playbook to deploy tinc
- A month later, my script broke down on incremental deployment (i.e. when it is not possible to access all network nodes, which means distributing keys)
- Two weeks ago, I wrote a bash-script script that was the prototype for
tinc-boot
- 3 days ago after the second iteration, the first (0.0.1 to be exact) version of the utility was born
- 1 day ago, I reduced the installation of a new node to one line:
curl -L https://github.com/reddec/tinc-boot/releases/latest/download/tinc-boot_linux_amd64.tar.gz | sudo tar -xz -C /usr/local/bin/ tinc-boot
curl -L https://github.com/reddec/tinc-boot/releases/latest/download/tinc-boot_linux_amd64.tar.gz | sudo tar -xz -C /usr/local/bin/ tinc-boot
- Soon, the possibility of an even simpler connection to the network will be added (without sacrificing security)
During development, I actively tested on real servers and clients (the picture from the tinc work description above is taken from real life). Now the system works flawlessly, and all third-party VPN services are now disabled.
The application code is written in GO and is open under the MPL 2.0 license. The license (free translation) allows commercial (if suddenly someone needs) use without opening the source product. The only requirement is that the changes must be transferred to the project.
Pool requests are welcome.
useful links
All Articles