Reducing bundle sizes with Webpack Analyzer and React Lazy / Suspense
As the complexity of client applications grows, the size of their bundles becomes more and more. In this situation, people suffer the most, forced, for various reasons, to use slow Internet connections. Moreover, every day it only gets worse.

The author of the article, the translation of which we publish today, works in Wix. He wants to talk about how he was able to reduce the size of one bundle by about 80% using Webpack Analyzer and React Lazy / Suspense.
If you have just started working on your new web application, then you are probably trying to focus on making it, so to speak, “take off the ground”, trying to make it work. You probably don't pay much attention to performance or bundle size. I can understand that. However, my experience suggests that performance and size of bundles should be taken care of from the very beginning. A good application architecture and timely “reflection on the future of the project” will save you, in the long run, a lot of time and help not to accumulate serious technical debt. Obviously, it is difficult to “foresee” everything in advance, but you should try very hard to do everything right from the first day of work on the project.
Here are a couple of great tools that I think should be used from the start. These tools will help you recognize “problematic” NPM packages even before they occupy any important place in the application.
Bundlephobia is a site that lets you know how much a certain NPM package will increase the size of a bundle. This is a great tool to help the programmer make the right decisions regarding the choice of third-party packages that he may need. Bundlephobia helps design the application architecture so that its size does not turn out to be too large. The following figure shows the results of checking a popular library for working with time, which is called moment. You can see that this library is quite large - almost 66 Kb in compressed form. For many users working on high-speed Internet, this is nothing. However, it is worth paying attention to how the download time of this package in 2G / 3G networks becomes. It, respectively, is 2.2 and 1.32 seconds. And, pay attention, we are talking only about this one package.
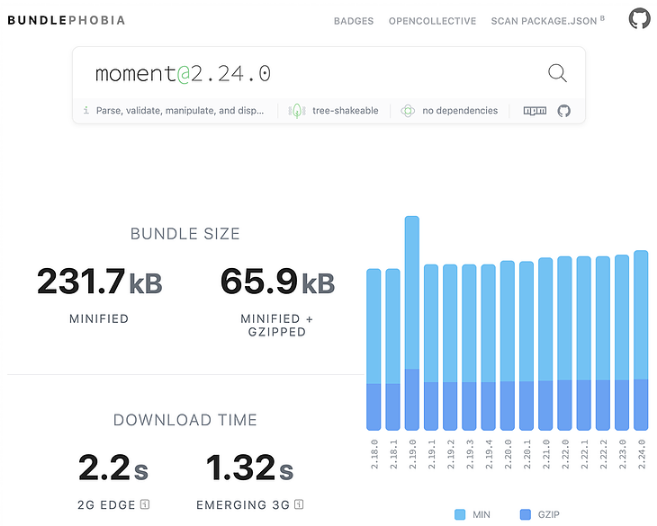
Bundlephobia moment package analysis results
Import Cost is a very interesting extension for many popular code editors (it has over a million downloads for VS Code ). It can show the "cost" of imported packages. I especially like it that it helps to identify problem areas of the application right while working on it. The following figure (taken from the Import Cost GitHub page) shows an excellent example of the impact on project dimensions of a different approach to importing entities. So, importing the only
property from Lodash leads to the import of the entire library (70 Kb) into the project. And if you directly import the
function, then only 2 Kb will be added to the project size. Read more about Import Cost here .

The "cost" of importing into the project the entire Lodash library and only one specific function from this library
So, you have created your wonderful application. It works great on your high-speed Internet and on your most powerful computer, full of RAM. You released it into the real world. After a while, complaints began to come from you or from your own analysts. These complaints related to application load times. Something similar recently happened to me when we, at Wix, unveiled a new feature that I was working on.
In order to get you up to speed a bit, let's talk about this new opportunity. This is a new progress bar located at the top of the side panel of the user site settings interface. The purpose of this mechanism is to draw the user's attention to the various steps that he needs to perform in order for his business project to have a better chance of success (connecting SEO, adding regions to which goods are delivered, adding the first product , and so on).
The progress bar is updated automatically by connecting to the server using web sockets. When the user completes all the recommended steps, a pop-up window appears with congratulations. After this window is closed, the progress bar is hidden and is never displayed again when working with the site in which you used it. This is what we just talked about.

Progress Bar and Congratulations Window
What happened? Why did our analysts complain to me that the page load time has increased? When I examined the state of affairs using the Network tab of the Chrome Developer Tools, it immediately became clear to me that my bundle was pretty big. Namely - its size was 190 Kb.
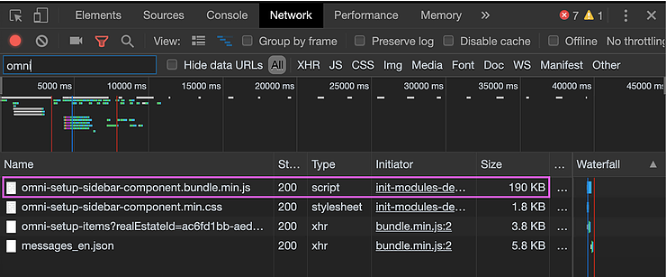
Bundle size found using Chrome Developer Tools
“Why does this little thing need a relatively large bundle?” I thought then. But the truth - why?
After I realized that the size of the bundle is too large, it's time to find out the reason for this. This is where Webpack Bundle Analyzer came in handy - a great tool for identifying problem areas of bundles. It opens a new browser tab and displays dependency information.
This is what happened after I analyzed the bundle with this tool.
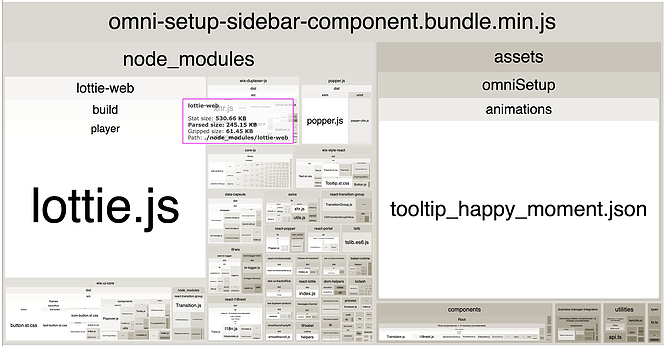
Webpack Bundle Analyzer Results
With the help of the analyzer, I was able to detect the "criminal". The lottie-web package was used here, which added 61.45 Kb to the size of the bundle. Lottie is a very nice JavaScript library that allows using standard browser tools to output animations created in Adobe After Effect. In my case, it was so that our designer needed a nice animation, which was performed when the window with congratulations appeared. He created this animation and gave it to me in the form of a JSON file, which I transferred to the Lottie package and got a beautiful animation. In addition to the lottie-web package, I also had a JSON file with animation descriptions. The size of this file was 26 Kb. As a result, the Lottie library, the JSON file, and also some auxiliary small dependencies “cost” me approximately 94 Kb. And this is just an animation of the window with congratulations to the user. The user, when he saw these congratulations, should have been happy. All this made me sad.
After I discovered the cause of the problem, it's time to solve this problem. It was clear that it was not necessary to load at the very beginning of the work everything that was required for the animation. In fact, there was a considerable chance that during the current session of the user, he would not have to show a window with congratulations. Then I got acquainted with the recently appeared React Lazy / Suspense technologies and thought that now I probably had a good opportunity to test them.
If you are not familiar with the concept of “lazy” components, then be aware that their meaning is to divide the application into small pieces of code. Downloading these fragments is performed only when they are needed. In my case, this was expressed in the fact that I needed to select from the main functional of the progress bar the component that was responsible for showing the congratulations. Downloading this component was necessary only when the user completed the recommended sequence of steps.
React 16.6.0 (and newer versions) has a simple API that is designed to render lazy components. These are React.lazy and React.Suspense . Consider an example:
We have a component that displays the
element, and in it there is a
component that wraps the
component. If you look at the first line of this example, you can see that
not imported directly into the code. Typically, an import like this looks like
.
Instead, the import command is designed as a function that takes a file path. This mechanism works because Webpack has built-in code separation tools. When a similar construction is present in the code, a promise is returned, which, after downloading the file, is resolved with the contents of this file. Our import team is wrapped in a
function.
In the rendering materials returned by
,
wrapped in a
component that has a
property. In our case, it turns out that when rendering reaches
, loading of the corresponding component begins. In the meantime, what is written to the
property is rendered. In this example, this is the text
That, in fact, is all. These mechanisms just do their job.
True, there are a couple of features that you need to consider when working with Lazy / Suspense.
Yes, it helped! Code splitting worked just amazingly. Let's take a look at the results of the analysis of the new bundle using Webpack.
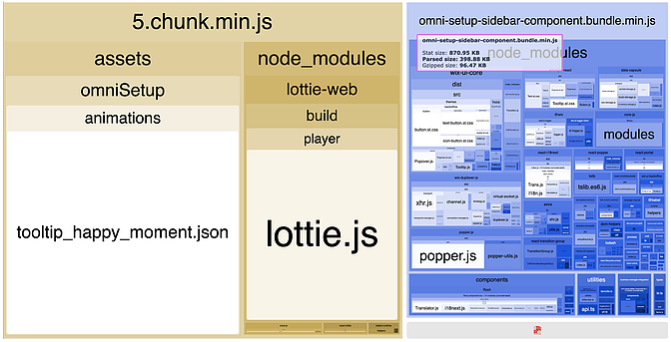
Webpack Bundle Analyzer Results after Code Splitting
As you can see, the size of my bundle decreased by about 50% - to 96 Kb. Fine!
So what, now the problem is solved? No Unfortunately. When I looked at the page, it turned out that the pop-up window with congratulations lost positioning.
The congratulations window is not displayed where you need it
The problem was that I “asked” the window to open by changing the state of the React component. Meanwhile, I have already rendered
(that is, I have not rendered anything) using the
component. After the lazy loading of the necessary data, the relevant materials were added to the DOM. However, the positioning of the popup has already been done. As a result, due to the fact that the properties of the corresponding component did not change, this component “did not know” that it needed to solve the problem regarding positioning. If I changed the size of the browser window, the pop-up window appeared in the right place due to the fact that the corresponding component was observing changes in properties and events of resizing the window, initiating, if necessary, re-positioning.
How to solve this problem? The solution was to eliminate the "intermediary."
I had to first load the “lazy" component, and only then write to the state that would inform the window with congratulations that it needs to open. I was able to do this using the same Webpack code sharing mechanisms, but now - without implementing imports using
:
This function is called after my component, through the mechanism of web sockets, is informed that it needs to show a window with congratulations. I used the Webpack
function (second line of code). If you remember, I said above that this function returns a promise, as a result I was able to use the
construct.
After the component has finished loading, I write it to the instance of my component (with the command
). This gives me the opportunity to use it later when rendering. Note that I can now use named exports. In my case, I used, in the above line, the name
. And finally, and it is no less important than everything else, I “tell” the window that it needs to open, changing its state accordingly after I know that the component is ready for work.
As a result, the rendering code now takes the following form:
Note that the command
returns
- what I previously wrote to the instance of my component. Now this is a normal synchronous render function, the same as those that you have used a million times. And now the window with congratulations is displayed exactly where it should be displayed. And the thing is that it opens only after its contents are ready for use.
If the idea in the heading of this section aroused a hefty question mark in your imagination, then be aware that this is the case. The product defines the architecture.
The point is that the product defines what should be visible and interactive when the component is first rendered. This helps the developer to figure out what exactly he can separate from the main code and load later, when necessary. I thought about the situation and “remembered” that after the user completes the recommended steps to configure the site, or if he is not the site administrator, I don’t need to show him the progress bar and what’s with it connected. Now, using this information, I was able to continue the separation of the bundle. Here's what I got.

The continued separation of the bundle
After that, the bundle size was only 38 Kb. And I remind you that we started with 190 Kb. There is a reduction in the size of the bundle by 80%. And by the way, I already see other possibilities for code separation. I can't wait to continue optimizing the bundle.
Developers have the ability to strive to stay in their “comfort zone” and not delve into anything other than the device of the code itself and its functionality. However, a programmer who uses the tools described above, thinks creatively and works closely with other specialists, may be able to improve the performance of his application by significantly reducing the size of the bundle containing what is needed to start working with this application.
Dear readers! Do you use code splitting to increase the loading speed of your web applications?


The author of the article, the translation of which we publish today, works in Wix. He wants to talk about how he was able to reduce the size of one bundle by about 80% using Webpack Analyzer and React Lazy / Suspense.
How early is optimization to start?
If you have just started working on your new web application, then you are probably trying to focus on making it, so to speak, “take off the ground”, trying to make it work. You probably don't pay much attention to performance or bundle size. I can understand that. However, my experience suggests that performance and size of bundles should be taken care of from the very beginning. A good application architecture and timely “reflection on the future of the project” will save you, in the long run, a lot of time and help not to accumulate serious technical debt. Obviously, it is difficult to “foresee” everything in advance, but you should try very hard to do everything right from the first day of work on the project.
Here are a couple of great tools that I think should be used from the start. These tools will help you recognize “problematic” NPM packages even before they occupy any important place in the application.
▍Bundlephobia
Bundlephobia is a site that lets you know how much a certain NPM package will increase the size of a bundle. This is a great tool to help the programmer make the right decisions regarding the choice of third-party packages that he may need. Bundlephobia helps design the application architecture so that its size does not turn out to be too large. The following figure shows the results of checking a popular library for working with time, which is called moment. You can see that this library is quite large - almost 66 Kb in compressed form. For many users working on high-speed Internet, this is nothing. However, it is worth paying attention to how the download time of this package in 2G / 3G networks becomes. It, respectively, is 2.2 and 1.32 seconds. And, pay attention, we are talking only about this one package.
Bundlephobia moment package analysis results
▍Import Cost
Import Cost is a very interesting extension for many popular code editors (it has over a million downloads for VS Code ). It can show the "cost" of imported packages. I especially like it that it helps to identify problem areas of the application right while working on it. The following figure (taken from the Import Cost GitHub page) shows an excellent example of the impact on project dimensions of a different approach to importing entities. So, importing the only
uniqueId
property from Lodash leads to the import of the entire library (70 Kb) into the project. And if you directly import the
uniqueId
function, then only 2 Kb will be added to the project size. Read more about Import Cost here .
The "cost" of importing into the project the entire Lodash library and only one specific function from this library
The case of unreasonably large bundles
So, you have created your wonderful application. It works great on your high-speed Internet and on your most powerful computer, full of RAM. You released it into the real world. After a while, complaints began to come from you or from your own analysts. These complaints related to application load times. Something similar recently happened to me when we, at Wix, unveiled a new feature that I was working on.
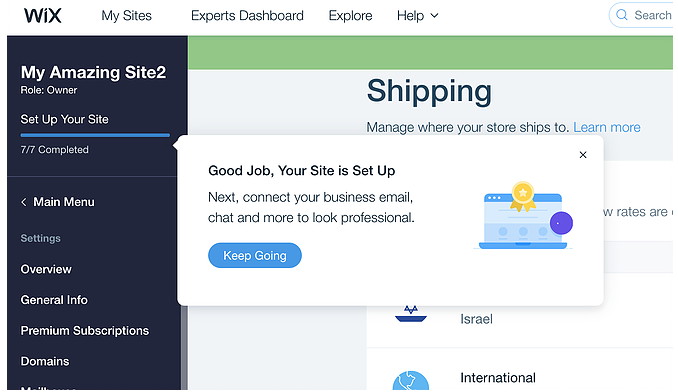
In order to get you up to speed a bit, let's talk about this new opportunity. This is a new progress bar located at the top of the side panel of the user site settings interface. The purpose of this mechanism is to draw the user's attention to the various steps that he needs to perform in order for his business project to have a better chance of success (connecting SEO, adding regions to which goods are delivered, adding the first product , and so on).
The progress bar is updated automatically by connecting to the server using web sockets. When the user completes all the recommended steps, a pop-up window appears with congratulations. After this window is closed, the progress bar is hidden and is never displayed again when working with the site in which you used it. This is what we just talked about.
Progress Bar and Congratulations Window
What happened? Why did our analysts complain to me that the page load time has increased? When I examined the state of affairs using the Network tab of the Chrome Developer Tools, it immediately became clear to me that my bundle was pretty big. Namely - its size was 190 Kb.
Bundle size found using Chrome Developer Tools
“Why does this little thing need a relatively large bundle?” I thought then. But the truth - why?
▍Search for problem spots in the bundle
After I realized that the size of the bundle is too large, it's time to find out the reason for this. This is where Webpack Bundle Analyzer came in handy - a great tool for identifying problem areas of bundles. It opens a new browser tab and displays dependency information.
This is what happened after I analyzed the bundle with this tool.
Webpack Bundle Analyzer Results
With the help of the analyzer, I was able to detect the "criminal". The lottie-web package was used here, which added 61.45 Kb to the size of the bundle. Lottie is a very nice JavaScript library that allows using standard browser tools to output animations created in Adobe After Effect. In my case, it was so that our designer needed a nice animation, which was performed when the window with congratulations appeared. He created this animation and gave it to me in the form of a JSON file, which I transferred to the Lottie package and got a beautiful animation. In addition to the lottie-web package, I also had a JSON file with animation descriptions. The size of this file was 26 Kb. As a result, the Lottie library, the JSON file, and also some auxiliary small dependencies “cost” me approximately 94 Kb. And this is just an animation of the window with congratulations to the user. The user, when he saw these congratulations, should have been happy. All this made me sad.
React Lazy / Suspense technology comes to the rescue
After I discovered the cause of the problem, it's time to solve this problem. It was clear that it was not necessary to load at the very beginning of the work everything that was required for the animation. In fact, there was a considerable chance that during the current session of the user, he would not have to show a window with congratulations. Then I got acquainted with the recently appeared React Lazy / Suspense technologies and thought that now I probably had a good opportunity to test them.
If you are not familiar with the concept of “lazy” components, then be aware that their meaning is to divide the application into small pieces of code. Downloading these fragments is performed only when they are needed. In my case, this was expressed in the fact that I needed to select from the main functional of the progress bar the component that was responsible for showing the congratulations. Downloading this component was necessary only when the user completed the recommended sequence of steps.
React 16.6.0 (and newer versions) has a simple API that is designed to render lazy components. These are React.lazy and React.Suspense . Consider an example:
const OtherComponent = React.lazy(() => import('./OtherComponent')); function MyComponent() { return ( <div> <React.Suspense fallback={<div>Loading...</div>}> <OtherComponent /> </React.Suspense> </div> ); }
We have a component that displays the
<div>
element, and in it there is a
Suspense
component that wraps the
OtherComponent
component. If you look at the first line of this example, you can see that
OtherComponent
not imported directly into the code. Typically, an import like this looks like
import OtherComponent from './OtherComponent';
.
Instead, the import command is designed as a function that takes a file path. This mechanism works because Webpack has built-in code separation tools. When a similar construction is present in the code, a promise is returned, which, after downloading the file, is resolved with the contents of this file. Our import team is wrapped in a
React.lazy
function.
In the rendering materials returned by
MyComponent
,
OtherComponent
wrapped in a
React.Suspense
component that has a
fallback
property. In our case, it turns out that when rendering reaches
OtherComponent
, loading of the corresponding component begins. In the meantime, what is written to the
fallback
property is rendered. In this example, this is the text
Loading…
That, in fact, is all. These mechanisms just do their job.
True, there are a couple of features that you need to consider when working with Lazy / Suspense.
- A component that is imported in a "lazy" way must contain the default export, which will be the component's entry point. Named exports cannot be used here.
- You need to wrap the component imported using the
React.lazy
function in theReact.Suspense
component. TheReact.Suspense
componentReact.Suspense
to provide thefallback
property. Otherwise, an error will occur. However, if you simply don’t want to render anything until the component has finished lazy loading, you can simply writenull
infallback
without trying to bypass in some tricky way the need to write something in this property.
Did using React Lazy / Suspense help me?
Yes, it helped! Code splitting worked just amazingly. Let's take a look at the results of the analysis of the new bundle using Webpack.
Webpack Bundle Analyzer Results after Code Splitting
As you can see, the size of my bundle decreased by about 50% - to 96 Kb. Fine!
So what, now the problem is solved? No Unfortunately. When I looked at the page, it turned out that the pop-up window with congratulations lost positioning.
The congratulations window is not displayed where you need it
The problem was that I “asked” the window to open by changing the state of the React component. Meanwhile, I have already rendered
null
(that is, I have not rendered anything) using the
React.Suspense
component. After the lazy loading of the necessary data, the relevant materials were added to the DOM. However, the positioning of the popup has already been done. As a result, due to the fact that the properties of the corresponding component did not change, this component “did not know” that it needed to solve the problem regarding positioning. If I changed the size of the browser window, the pop-up window appeared in the right place due to the fact that the corresponding component was observing changes in properties and events of resizing the window, initiating, if necessary, re-positioning.
How to solve this problem? The solution was to eliminate the "intermediary."
I had to first load the “lazy" component, and only then write to the state that would inform the window with congratulations that it needs to open. I was able to do this using the same Webpack code sharing mechanisms, but now - without implementing imports using
React.lazy
:
async loadAndSetHappyMoment() { const component = await import( '../SidebarHappyMoment/SidebarHappyMoment.component' ); this.SidebarHappyMoment = component.SidebarHappyMoment; this.setState({ tooltipLevel: TooltipLevel.happyMoment, }); }
This function is called after my component, through the mechanism of web sockets, is informed that it needs to show a window with congratulations. I used the Webpack
import
function (second line of code). If you remember, I said above that this function returns a promise, as a result I was able to use the
async/await
construct.
After the component has finished loading, I write it to the instance of my component (with the command
this.SidebarHappyMoment = component.SidebarHappyMoment;
). This gives me the opportunity to use it later when rendering. Note that I can now use named exports. In my case, I used, in the above line, the name
SidebarHappyMoment
. And finally, and it is no less important than everything else, I “tell” the window that it needs to open, changing its state accordingly after I know that the component is ready for work.
As a result, the rendering code now takes the following form:
renderTooltip() { if (this.state.tooltipLevel === TooltipLevel.happyMoment) { return <this.SidebarHappyMoment />; } // ... }
Note that the command
return <this.SidebarHappyMoment />;
returns
this.SidebarHappyMoment
- what I previously wrote to the instance of my component. Now this is a normal synchronous render function, the same as those that you have used a million times. And now the window with congratulations is displayed exactly where it should be displayed. And the thing is that it opens only after its contents are ready for use.
Product defines architecture
If the idea in the heading of this section aroused a hefty question mark in your imagination, then be aware that this is the case. The product defines the architecture.
The point is that the product defines what should be visible and interactive when the component is first rendered. This helps the developer to figure out what exactly he can separate from the main code and load later, when necessary. I thought about the situation and “remembered” that after the user completes the recommended steps to configure the site, or if he is not the site administrator, I don’t need to show him the progress bar and what’s with it connected. Now, using this information, I was able to continue the separation of the bundle. Here's what I got.
The continued separation of the bundle
After that, the bundle size was only 38 Kb. And I remind you that we started with 190 Kb. There is a reduction in the size of the bundle by 80%. And by the way, I already see other possibilities for code separation. I can't wait to continue optimizing the bundle.
Summary
Developers have the ability to strive to stay in their “comfort zone” and not delve into anything other than the device of the code itself and its functionality. However, a programmer who uses the tools described above, thinks creatively and works closely with other specialists, may be able to improve the performance of his application by significantly reducing the size of the bundle containing what is needed to start working with this application.
Dear readers! Do you use code splitting to increase the loading speed of your web applications?
All Articles