Creating a Slack Application Using 8base Features

Slack is a great application for internal communication between teams. One of the features that we can easily expand it by creating and integrating chat bots and slash chat commands that allow users to interact with external services. An excellent Slack bot, very popular and useful, is the GitHub bot, which publishes updates on pull requests, commits, and ish on the channel.
In this article, we will create a Slack bot that publishes updates when creating an order on the invented e-commerce platform that we manage.
E-commerce platform is a serverless application created using 8base . In this article, we will use 8base functions to listen for Create events in a data model using triggers.
A trigger is a type of function that is triggered in response to a data mutation event: creating , updating, or deleting an object. 8base provides two types of triggers, depending on whether the developer wants to execute the function before or after changing the data: trigger.before and trigger.after.
You will need
- Basic understanding of React and Node.js. Before you begin, make sure you have Node and npm / yarn installed .
- We will use some GraphQL queries in the project, so familiarity with GraphQL is useful .
- Create an 8base account (if you have not already done so) by visiting their website .
Preparing 8base Environment
Create an account or log in to 8base . For new accounts, 8base provides free 30-day access.

2. After logging in, go to the data page and click "New Table" to start configuring the backend.

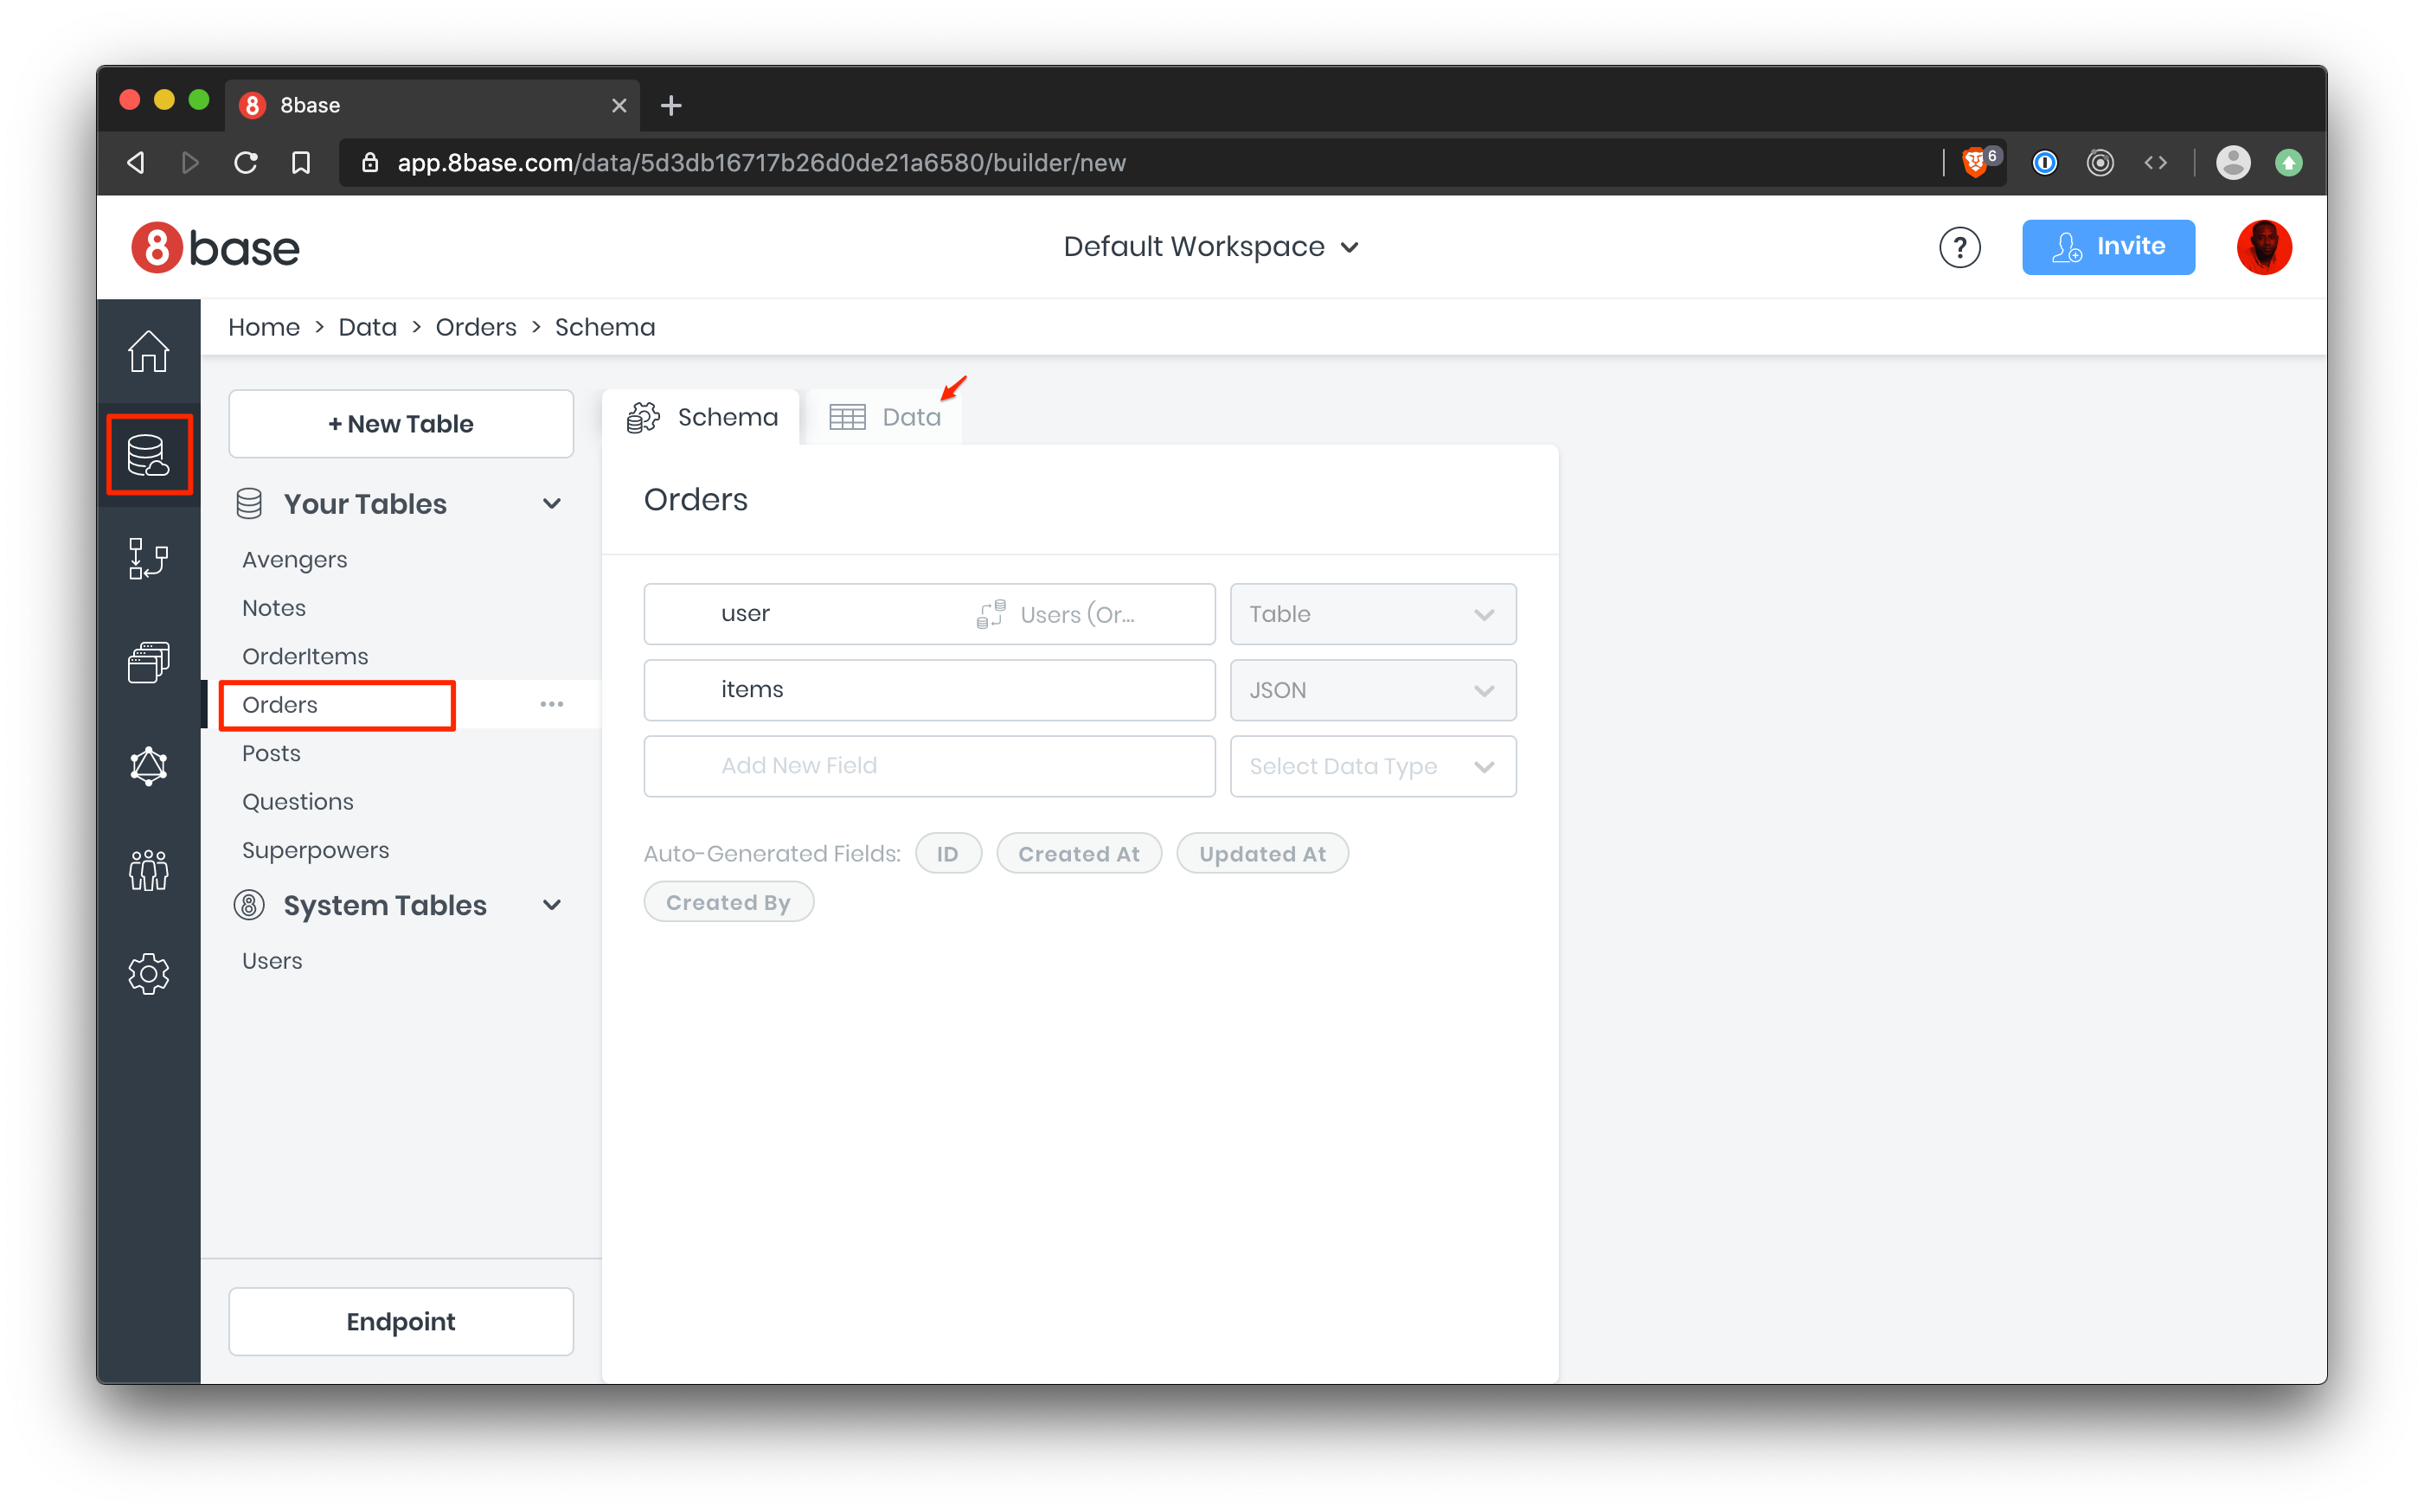
3. After loading a new table, you will see a diagram and you can start defining the fields. Next, create a table called Orders, consisting of the following fields:
- user : the type of the field is Table. In the right section, select the Users table and in the Relation Field Name field specify “orders”. Then select the “Allow multiple Orders per User ” check box.

- items: field type is JSON. This field contains information about the products that the user buys, for example, price, name and image.
Our layout is quite simple and should cover the necessary functions. Next, let's set up the Slack App and install it.
Create a Slack Application
Start by logging into your Slack or create a new one for this guide. Visit the Slack API Console to create a new Slack app.

Call this Slack app after our fictional e-commerce platform called Shop Quick .
After we created the application in our workshop, we can temporarily postpone the Slack application and work on creating the 8base function, which will listen to the events of the creation of new orders on the Shop Quick platform.
Create an 8base Function
The 8base platform offers features that facilitate the creation of serverless applications. For this Slack application, we need custom logic and integrations that cannot be implemented only with CRUD. In our case, we want to send messages to Slack when creating a new order. We can achieve this using the 8base functions, listening to the Create, Update and Delete events, we will use triggers.
A trigger is a function that is triggered in response to a data mutation event: when an object is created, updated, or deleted. There are two types of triggers, depending on whether they are executed before or after data changes: trigger.before and trigger.after.
In our case, we will call our function after creating the order. Therefore, we must specify Orders.create. Possible values for the data event are create, update, and delete.
8base CLI
CLI 8base allows you to write custom JavaScript or TypeScript to efficiently add logic, focusing only on what is unique to your application, while avoiding boilerplate code.
The 8base Command Line Interface (CLI) makes it easy to add custom server logic to your applications right from the terminal. Install the CLI by running the following command in a terminal:
npm install -g 8base
After installing the CLI globally, you need to be logged in to give the CLI access to your 8base account. Run the following command to log in:
8base login
When you run this command, a browser window will appear for CLI authorization. Logging in provides CLI access to your 8base account. You can find other commands offered by the CLI by running the help command:
8base help
Next, we initialize the 8base project using the CLI by running the following command in your terminal:
8base init shop-quick-functions
After the command is executed, a new folder will be created. The folder structure should look like this:
├── src/ | ├── function1.ts | └── function2.js ├── 8base.yml └── package.json
The CLI loads a regular Node project, which allows you to install dependencies using npm or yarn. In addition, the 8base CLI comes with Webpack and TypeScript pre-configured out of the box so you can write JavaScript or TypeScript code.
We set up custom functions and permissions in 8base.yml. We change the current setting of the 8base.yml file in accordance with our needs. Open the file and make the following changes:
functions: notifySlack: handler: code: src/notifySlack.js type: trigger.after operation: Orders.create
The file structure is similar to any YAML file. The first block we will look at is a function block; we will put all the function definitions that we will create in this block. For example, the notifySlack function we created; The function has the following properties:
- handler : relative file path to the notifySlack function handler.
- operation : the parameter determines which data type and event the trigger should listen to.
- type : whether they are started before or after data changes. There are two types: trigger.before and trigger.after.
The next step is to create a handler file to start receiving events after the trigger. To send updates to Slack we will use the chat.postMessage method. Messages will be sent using the HTTP post method - each request to the chat.postMessage method will be signed by the OAuth access token of your bot. Visit the details page for your application, click the OAuth & Permissions link in the sidebar navigation.

Copy the token and go to the Environment Variables tab on the 8base settings page. Your functions have access to all created environment variables. Always store your confidential values and credentials here, and do not place them directly in the source code database. Create a new variable called SLACK_ACCESS_TOKEN, paste the copied token and save it.

Now let's add the code to the editor. Create a file called utils.js in the src directory. Open the file in your favorite editor and copy the following into it:
/* src/utils.js */export const sendMessage = (order) => { const message = `A new order was just created`; const messageBody = dataBuilder(order); const body = { channel: 'general', attachments: messageBody, text: message }; console.log('Message body', { body }); console.log('Sending message request'); return makeRequest(body); };
Thus, the sendMessage function accepts an order with one argument, which is an object containing the fields that we created for the Order model. Now we need to create a new message using the order object, so we pass the object to a function called dataBuilder. The dataBuilder function returns an object in the format of Slack attachments .
Then we create the request body, which contains the workspace channel into which we publish the message, the attachments returned from dataBuilder, and finally the text. Next, the request to publish the message is sent by the makeRequest function.
Let's create the dataBuilder function, copy the fragment below and update the utils.js file:
/* src/utils.js */ export const sendMessage = (order) => { ...}; const dataBuilder = (order) => { const { items } = order; const itemSections = items.map((item) => { return { type: 'section', text: item.name, color: '#3AA3E3', accessory: { type: 'image', image_url: item.image, alt_text: item.name, }, }; }); const data = [ { type: 'section', text: { type: 'mrkdwn', text: `*There are ${items.length} items in the order*`, }, }, ...itemSections, ]; return data; };
The dataBuilder function takes an order object and creates a section for each item in the order using the name and image of the item. You can use Message Builder to preview the formatting of messages and attachments in real time.
Next, we will add the makeRequest function, which sends the message body to the Slack workshop.
Copy the following snippet into utils.js file:
/* src/utils.js */ import fetch from 'node-fetch'; export const sendMessage = (order) => { ... }; const dataBuilder = (order) => { ... }; const makeRequest = (data) => { const url = 'https://slack.com/api/chat.postMessage'; const headers = { Authorization: `Bearer ${process.env.SLACK_ACCESS_TOKEN}`, 'Content-type': 'application/json', }; return fetch(url, { method: 'post', body: JSON.stringify(data), headers, }); };
First install the node-fetch package by running the following command:
npm install node-fetch
We import the package and use it in the makeRequest function. As part of the function, we will add all the necessary headers to the request. The request must be signed with the Bearer Authorization header. The token will be obtained from the environment variable that we created earlier. Finally, we return the POST request using the fetch API.
Now we have everything you need to send a message to the Slack warspace using a bot. Let's create the function handler that we referenced in the 8base.yml file above.
Create a file called notifySlack.js in the src directory, open the file and copy the code into it:
/* src/notifySlack.js */ import { sendMessage } from './utils'; module.exports = async (event) => { try { console.log('Sending notification to slack'); const res = await sendMessage(event.data); console.log('Notification sent successfully'); } catch (error) { console.log(error); } return { data: event.data, }; };
In the file, we use the sendMessage utility function that we created. The 8base function handler passes two arguments: an event and a context. The structure of the event object depends on the type of function, and the context object contains useful properties and methods, which you can read about here .
In our case, the event object will contain the created Order, which consists of two user and items fields. An Order object is a property of the event object data, and we pass this object to the sendMessage function to notify Slack.
The function call is wrapped in try / catch because we do not want any errors to cause the function to terminate. Finally, we return the event data at the end of the function.
With this data, we can indicate the subject and body of the message, and then send mail using the transporter we created. Save the file and deploy the function using the 8base CLI by running the following command:
# deploy while in project root directory 8base deploy
After successfully laying out the function, you should see the following output from the terminal:
➜ 8base deploy deploy done. Time: 15,553 ms.
Debugging features
It is important to have logs in your functions so that you can easily debug functions and keep track of what is going on there. 8base has a page for viewing all the functions attached to your profile. You can easily view all the logs coming from each function.
Go to 8base Dashboard and click Logic in the side menu. On the logic page, you can view all the laid out functions.

For a specific function, click View Logs to see all the logs. Next, we install the Slack application and test it.
Installing and testing the Slack app
Let's finish the last step and install the Slack application in the workspace. To do this, return to the Slack app console and click Install App on the side navigation bar.

On the page, you will see a warning about adding a feature or authority to install the application. Click on it and add permission.
After successfully installing the application, we can test the function and the application. Go to the 8base Data page, click the Orders table in the sidebar. In the Order table viewer, click on the DATA tab, here we can add new rows to the table.
In the data table, press the {+} button and create a new row.

You can fill in the product field with the following data:
[{ "name": "Food product", "image": "https://static.pexels.com/photos/368893/pexels-photo-368893.jpeg", "price": 4 }, { "name": "The real fruit", "image": "https://static.pexels.com/photos/368893/pexels-photo-368883.jpeg", "price": 20 }]
Click Add Row to create a new order. Then go to the workshop where you installed the Slack App, click on the #general channel and you will see a new message from the bot.
It should look like this:
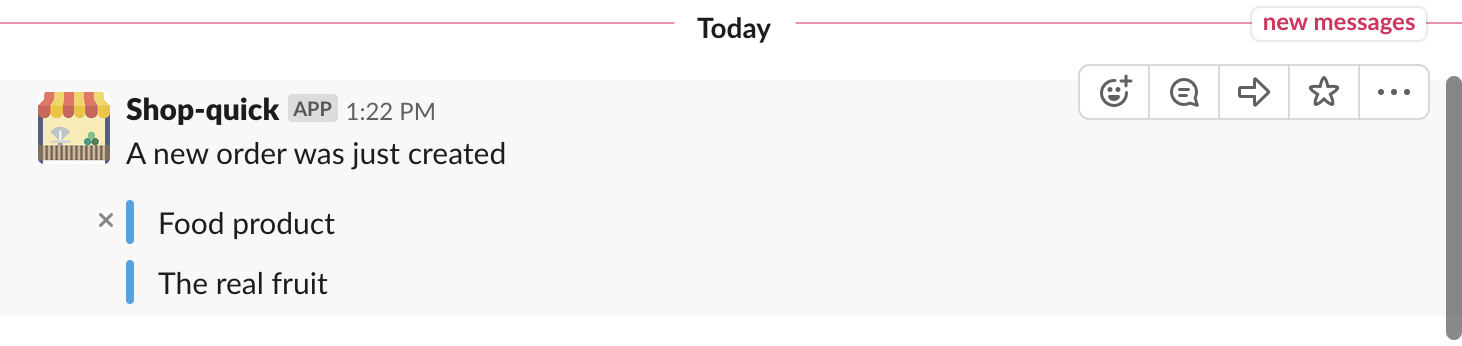
New notification from 8base bot on Slack channel
Final words
Creating a Slack application is a good idea; Slack is the primary means of communication for most teams, and can allow you to have all the information you need for daily work.
For this article, using the 8base functionality, we created a simple Slack application that sends messages about new orders in the system. Sent messages were pretty simple. Slack has rich formatting for its messages, and you can complicate them so that they contain more information. Read more about 8base features here . See the code in this article on GitHub .
Thanks for reading.
All Articles