"CAD for everyone, for free, and let no one go ..." or the first steps in programming FreeCAD in Python
Perhaps you already came across my notes on the first steps in CAD programming using the example of NanoCAD.
It should be noted that for a person who does not know how to program and knows CAD at the level of "electronic culman" it was an amazing adventure. However, NanoCAD is still primarily a commercial product. Its free version has not been updated, for about six years and has become outdated in terms of development opportunities.
But I really wanted to, as in one wonderful story: “Happiness is for everyone, in vain, and let no one go offended!” Therefore, it was decided to heed the advice of a combat comrade DrZugrik and install FreeCAD for yourself.
So, in hot pursuit I am writing material for you, in just one day I learned how to make this CAD software friends with Anaconda, wrote a simple script in Python that draws a small square with text and tested it for working on Windows and Linux. What am I actually ready to tell you in steps and show, so that you can do it too.
Want to get to know a charming couple of Python and FreeCAD? Then you are welcome under cat.
Content:
Part I: Introduction.
Part II: Standard Installation and First Sample
Part III: Now make Friends FreeCad with Anaconda
Part IV: Writing a Simple Library
Part V: Conclusion
Oddly enough, on Habré there are very few publications devoted to FreeCAD, a good article was published by Eddy_Em "Meet: FreeCAD" , and several more works in which the hero of our article is mentioned in passing.
To begin with, just two words about the program. I will not duplicate the information from the official website , but simply describe in broad strokes why I turned my attention to this CAD.
So, FreeCAD is an open source computer-aided design system, primarily focused on three-dimensional parametric modeling. At the time of writing, the latest version of the program is 0.18.3. Do not be confused that the value of the release number is far from one. FreeCAD is long and actively developed and is currently quite functional. Moreover, as I understand it for a long time, it has a certain popularity among people involved in 3D modeling and printing, especially among self-made ideological ones who are interested in open source / open hardware and all kinds of DIY.
But if you suddenly do not understand 3D modeling at all, then this is not a reason to bypass FreeCAD. CAD functionality is divided into specific modules - Workbench, among which there is also the usual 2D drawing, including a workbench for decorating sheet frames and even a workbench for implementing the BIM concept.
In fact, the program has a “wagon and a small cart”, but today we will try to do something completely primitive, only to “whet the appetite”.
FreeCAD is available for all three common operating systems, but since I am deprived of the "Apple" technique, we will only consider options for Windows 10 and Linux Mint.
The easiest way to start programming for FreeCAD is to download the distribution kit and install it in a standard way for the operating system. In this case, we will have at our disposal a Python interpreter pre-installed with the program (at the time of writing the Python article version 3.6.6).
It’s even easier to start programming for FreeCAD than for NanoCAD or AutoCAD, just open the View tab -> Panel -> and turn on the Python console. Actually, that’s all, you can safely program.
But first, let's try to draw something using regular means. For example, a circle.
Pay attention to the console output

FreeCAD hides nothing under the hood, all the key operations for drawing a circle are displayed in the console. You can even now just copy the code and draw a second circle, a little to the right.
Let's try to enter a variable and draw another circle, for which we copy the console output and paste it line by line making a small modification.
As you can see now there are two circles, and, as planned, one to the right of the coordinate "x" of the base point of the first circle multiplied by 5.

But the capabilities of CAD are not limited to the standard use as a "culman". Using the API, FreeCAD can be integrated into your own program and used with or without a graphical interface, but we will look at this issue some other time.
In the meantime, imagine this situation, let's say you are fond of machine learning and data analysis in Python and have already installed the Anaconda distribution kit , then you will probably be very pleased to learn that thanks to the guys from conda-forge you can combine all the features of this distribution kit and FreeCAD.
The link provides guidance on how to install it if you use mini-conda, and you and I will install it in the full-fledged “Anaconda” through its navigator.
So, open Anaconda-Navigator, go to the Environments tab and create a new environment by clicking on the Create button. The name of the environment, you can give any, I called - "freecad". We select the necessary version of Python and create a new environment.

But this is not enough, you need to add the conda-forge channel, just type in the field that appears after clicking the Add button "conda-forge" and let the system update the list of packages.

Almost done now it remains to install FreeCAD itself
Click LMB on the name of the package and select which version we want to install, as in the picture below (I really already have it installed)

After a tedious wait, you will have the FreeCad distribution kit fully installed, the desired version will only have to be launched.
In the simplest case, without startup parameters, you need to start the conda console with our environment, and start CAD with the FreeCAD command of the same name.

An empty FreeCAD window will open in which we select a workbench for two-dimensional drawing.

As you can see, now the version of Python is not at all what it was with a standard installation.

Let's create a new document (Control + N). It will come in handy for testing our mini library.
Our library will be primitive. In essence, we will create a command that will draw a rectangle in which arbitrary text specified by the user will be entered.
Create a file (I called mine “drawhabr.py”) and write the following code into it:
Or you can just copy the file from GitHub
The code is very simple, but I think it’s worth explaining some points.
We import the necessary libraries, and then create the class.
Since I have not yet learned how to handle mouse input, we will enter the coordinates for the object and text directly into the console from the keyboard. This is implemented by standard Python methods. Then in the constructor of the class we call our function (method), which will draw it all.
Of the features of FreeCAD in the class constructor, two commands can be distinguished:
The first one selects the space of the active workspace for us, and the second, after installing the object, writes us a message at the very bottom of the program window (on a gray bar, not to be confused with the Python console)
The method code is also intuitive. But I’ll explain for reliability.
Required in case the user enters an empty string. Without this, the word Label will be entered in the text and the rectangle will have an incorrect length.
Define the coordinates of the base point of the day of our frame surrounding the text.
Let me remind you that the data is taken from the input to the console.
Please note that we are working with a three-dimensional coordinate of the form FreeCAD.Vector (x, y, z), but in this example we can neglect the Z coordinate. Other parameters related to the rotation of the frame are not touching.
create the text using the Draft.makeText command, passing it the text that you entered into the console.
Take coordinates with a slight offset from the base point of the frame.
In a good way, it was necessary to learn how to process the frame (border) of the text using the API parameters, after which, based on it, calculate the width and height of our framing frame. But since I myself just got acquainted with the program, I solved the problem by the working-peasant method. We will fix the font height, assign it the style of the monospace font (Courier) and, depending on this, determine the length and width of the frame that we draw around the text.
It remains only to substitute our parameters in the drawing function of the rectangle
that, in fact, is all.
It remains only to connect our library. To do this, you can simply copy it to the folder in which the rest of the Python libraries for the selected environment are located.
For example, for Windows 10, the path may be as follows (significant from the installation location of Anaconda):
C: \ Users \ YourUsernameName \ Anaconda3 \ envs \ freecad \ Lib
For Linux, the path would be something like this:
/home/ourUserName/anaconda3/envs/freecad/lib/python3.7
All left to load our library.
To do this, first enter the name of our module in the console (without file extension)
And then call the class constructor
That's all there is to lead, function parameters and enjoy the result.
Just in case, here is a screenshot confirming that everything works on Linux too.

Today, we have taken only a small step along the path to understanding the FreeCAD API.
Despite the fact that, in my opinion, for two-dimensional drawing and development of projects, FreeCAD is not as familiar as AutoCAD (NanoCAD) or other common CAD systems, but it is much easier to program it.
Even despite some lack of documentation and the need to update some articles with examples in Wiki FreeCAD, it was still possible for an unprepared person with minimal knowledge in Python to understand its API and run the first program.
And given the fact that developers are not greedy and, if necessary, even allow commercial development using FreeCAD under the LGPL license and in combination with all the power of Python libraries (for example, from the same Anaconda distribution kit), program development using FreeCAD looks interesting challenge.
If I understand that you are interested in this topic, I’ll try to make a mini-cycle of notes by analogy with Nanocad
It should be noted that for a person who does not know how to program and knows CAD at the level of "electronic culman" it was an amazing adventure. However, NanoCAD is still primarily a commercial product. Its free version has not been updated, for about six years and has become outdated in terms of development opportunities.
But I really wanted to, as in one wonderful story: “Happiness is for everyone, in vain, and let no one go offended!” Therefore, it was decided to heed the advice of a combat comrade DrZugrik and install FreeCAD for yourself.
So, in hot pursuit I am writing material for you, in just one day I learned how to make this CAD software friends with Anaconda, wrote a simple script in Python that draws a small square with text and tested it for working on Windows and Linux. What am I actually ready to tell you in steps and show, so that you can do it too.
Want to get to know a charming couple of Python and FreeCAD? Then you are welcome under cat.
Content:
Part I: Introduction.
Part II: Standard Installation and First Sample
Part III: Now make Friends FreeCad with Anaconda
Part IV: Writing a Simple Library
Part V: Conclusion
Part I: Introduction
Oddly enough, on Habré there are very few publications devoted to FreeCAD, a good article was published by Eddy_Em "Meet: FreeCAD" , and several more works in which the hero of our article is mentioned in passing.
To begin with, just two words about the program. I will not duplicate the information from the official website , but simply describe in broad strokes why I turned my attention to this CAD.
So, FreeCAD is an open source computer-aided design system, primarily focused on three-dimensional parametric modeling. At the time of writing, the latest version of the program is 0.18.3. Do not be confused that the value of the release number is far from one. FreeCAD is long and actively developed and is currently quite functional. Moreover, as I understand it for a long time, it has a certain popularity among people involved in 3D modeling and printing, especially among self-made ideological ones who are interested in open source / open hardware and all kinds of DIY.
But if you suddenly do not understand 3D modeling at all, then this is not a reason to bypass FreeCAD. CAD functionality is divided into specific modules - Workbench, among which there is also the usual 2D drawing, including a workbench for decorating sheet frames and even a workbench for implementing the BIM concept.
In fact, the program has a “wagon and a small cart”, but today we will try to do something completely primitive, only to “whet the appetite”.
Part II: Standard Installation and First Sample
FreeCAD is available for all three common operating systems, but since I am deprived of the "Apple" technique, we will only consider options for Windows 10 and Linux Mint.
The easiest way to start programming for FreeCAD is to download the distribution kit and install it in a standard way for the operating system. In this case, we will have at our disposal a Python interpreter pre-installed with the program (at the time of writing the Python article version 3.6.6).
It’s even easier to start programming for FreeCAD than for NanoCAD or AutoCAD, just open the View tab -> Panel -> and turn on the Python console. Actually, that’s all, you can safely program.
But first, let's try to draw something using regular means. For example, a circle.
Pay attention to the console output
Gui.activateWorkbench("DraftWorkbench") >>> App.newDocument("") >>> App.setActiveDocument("____________________") >>> App.ActiveDocument=App.getDocument("____________________") >>> Gui.ActiveDocument=Gui.getDocument("____________________") >>> Gui.activeDocument().activeView().viewDefaultOrientation() >>> import Draft >>> pl=FreeCAD.Placement() >>> pl.Rotation.Q=(0.0,0.0,1.5308084989341915e-17,1.0) >>> pl.Base=FreeCAD.Vector(-1.0610677003860474,-0.31207874417305,0.0) >>> circle = Draft.makeCircle(radius=0.8633861373365326,placement=pl,face=False,support=None) >>> Draft.autogroup(circle
FreeCAD hides nothing under the hood, all the key operations for drawing a circle are displayed in the console. You can even now just copy the code and draw a second circle, a little to the right.
Let's try to enter a variable and draw another circle, for which we copy the console output and paste it line by line making a small modification.
x=-1.0610677003860474 pl=FreeCAD.Placement() pl.Rotation.Q=(0.0,0.0,1.5308084989341915e-17,1.0) pl.Base=FreeCAD.Vector(x*5,-0.31207874417305,0.0) circle = Draft.makeCircle(radius=0.8633861373365326,placement=pl,face=False,support=None)
As you can see now there are two circles, and, as planned, one to the right of the coordinate "x" of the base point of the first circle multiplied by 5.
Part III: Now make Friends FreeCad with Anaconda
But the capabilities of CAD are not limited to the standard use as a "culman". Using the API, FreeCAD can be integrated into your own program and used with or without a graphical interface, but we will look at this issue some other time.
In the meantime, imagine this situation, let's say you are fond of machine learning and data analysis in Python and have already installed the Anaconda distribution kit , then you will probably be very pleased to learn that thanks to the guys from conda-forge you can combine all the features of this distribution kit and FreeCAD.
The link provides guidance on how to install it if you use mini-conda, and you and I will install it in the full-fledged “Anaconda” through its navigator.
So, open Anaconda-Navigator, go to the Environments tab and create a new environment by clicking on the Create button. The name of the environment, you can give any, I called - "freecad". We select the necessary version of Python and create a new environment.
But this is not enough, you need to add the conda-forge channel, just type in the field that appears after clicking the Add button "conda-forge" and let the system update the list of packages.
Almost done now it remains to install FreeCAD itself
Click LMB on the name of the package and select which version we want to install, as in the picture below (I really already have it installed)
After a tedious wait, you will have the FreeCad distribution kit fully installed, the desired version will only have to be launched.
In the simplest case, without startup parameters, you need to start the conda console with our environment, and start CAD with the FreeCAD command of the same name.
An empty FreeCAD window will open in which we select a workbench for two-dimensional drawing.
As you can see, now the version of Python is not at all what it was with a standard installation.
Let's create a new document (Control + N). It will come in handy for testing our mini library.
Part IV: Writing a Simple Library
Our library will be primitive. In essence, we will create a command that will draw a rectangle in which arbitrary text specified by the user will be entered.
Create a file (I called mine “drawhabr.py”) and write the following code into it:
#Simple lib for test Python API in FreeCad #Tested on Python 3.7. and FreeCad 0.18.3 #Designed for article - https://habr.com/ru/post/464113/ import FreeCAD, FreeCADGui, Part, Draft class stamp: "This class creates a rectangle with text. Coordinates are set by entering into the console." def __init__(self): self.view = FreeCADGui.ActiveDocument.ActiveView x=float(input("set x point ")) y=float(input("set y point ")) mtext=str(input("input text ")) self.drawstamp(mtext, x , y ) FreeCAD.Console.PrintMessage("\r\n Your object was successfully created") def drawstamp(self, mtext,x=0,y=0 ): "Method for placing a figure in model space." if (mtext==""): mtext="Hello Habr!" point=FreeCAD.Placement(FreeCAD.Vector(x,y,0), FreeCAD.Rotation(0,0,0), FreeCAD.Vector(0,0,0)) text = Draft.makeText(mtext,point=FreeCAD.Vector(x+0.25,y+0.55,0.0)) fontsize = 1.0 textwidth=(len(mtext)*fontsize*0.6)+0.35 textheight=fontsize+0.5 text.ViewObject.FontSize = fontsize text.ViewObject.FontName = "Courier" rec = Draft.makeRectangle(length=textwidth,height=textheight,placement=point,face=False,support=None)
Or you can just copy the file from GitHub
The code is very simple, but I think it’s worth explaining some points.
import FreeCAD, FreeCADGui, Part, Draft
We import the necessary libraries, and then create the class.
Since I have not yet learned how to handle mouse input, we will enter the coordinates for the object and text directly into the console from the keyboard. This is implemented by standard Python methods. Then in the constructor of the class we call our function (method), which will draw it all.
Of the features of FreeCAD in the class constructor, two commands can be distinguished:
self.view = FreeCADGui.ActiveDocument.ActiveView FreeCAD.Console.PrintMessage("\r\n Your object was successfully created")
The first one selects the space of the active workspace for us, and the second, after installing the object, writes us a message at the very bottom of the program window (on a gray bar, not to be confused with the Python console)
The method code is also intuitive. But I’ll explain for reliability.
def drawstamp(self, mtext,x=0,y=0 ): "Method for placing a figure in model space." if (mtext==""): mtext="Hello Habr!"
Required in case the user enters an empty string. Without this, the word Label will be entered in the text and the rectangle will have an incorrect length.
point=FreeCAD.Placement(FreeCAD.Vector(x,y,0), FreeCAD.Rotation(0,0,0), FreeCAD.Vector(0,0,0))
Define the coordinates of the base point of the day of our frame surrounding the text.
Let me remind you that the data is taken from the input to the console.
Please note that we are working with a three-dimensional coordinate of the form FreeCAD.Vector (x, y, z), but in this example we can neglect the Z coordinate. Other parameters related to the rotation of the frame are not touching.
text = Draft.makeText(mtext,point=FreeCAD.Vector(x+0.25,y+0.55,0.0))
create the text using the Draft.makeText command, passing it the text that you entered into the console.
Take coordinates with a slight offset from the base point of the frame.
In a good way, it was necessary to learn how to process the frame (border) of the text using the API parameters, after which, based on it, calculate the width and height of our framing frame. But since I myself just got acquainted with the program, I solved the problem by the working-peasant method. We will fix the font height, assign it the style of the monospace font (Courier) and, depending on this, determine the length and width of the frame that we draw around the text.
text = Draft.makeText(mtext,point=FreeCAD.Vector(x+0.25,y+0.55,0.0)) fontsize = 1.0 textwidth=(len(mtext)*fontsize*0.6)+0.35 textheight=fontsize+0.5 text.ViewObject.FontSize = fontsize text.ViewObject.FontName = "Courier"
It remains only to substitute our parameters in the drawing function of the rectangle
rec = Draft.makeRectangle(length=textwidth,height=textheight,placement=point,face=False,support=None)
that, in fact, is all.
It remains only to connect our library. To do this, you can simply copy it to the folder in which the rest of the Python libraries for the selected environment are located.
For example, for Windows 10, the path may be as follows (significant from the installation location of Anaconda):
C: \ Users \ YourUsernameName \ Anaconda3 \ envs \ freecad \ Lib
For Linux, the path would be something like this:
/home/ourUserName/anaconda3/envs/freecad/lib/python3.7
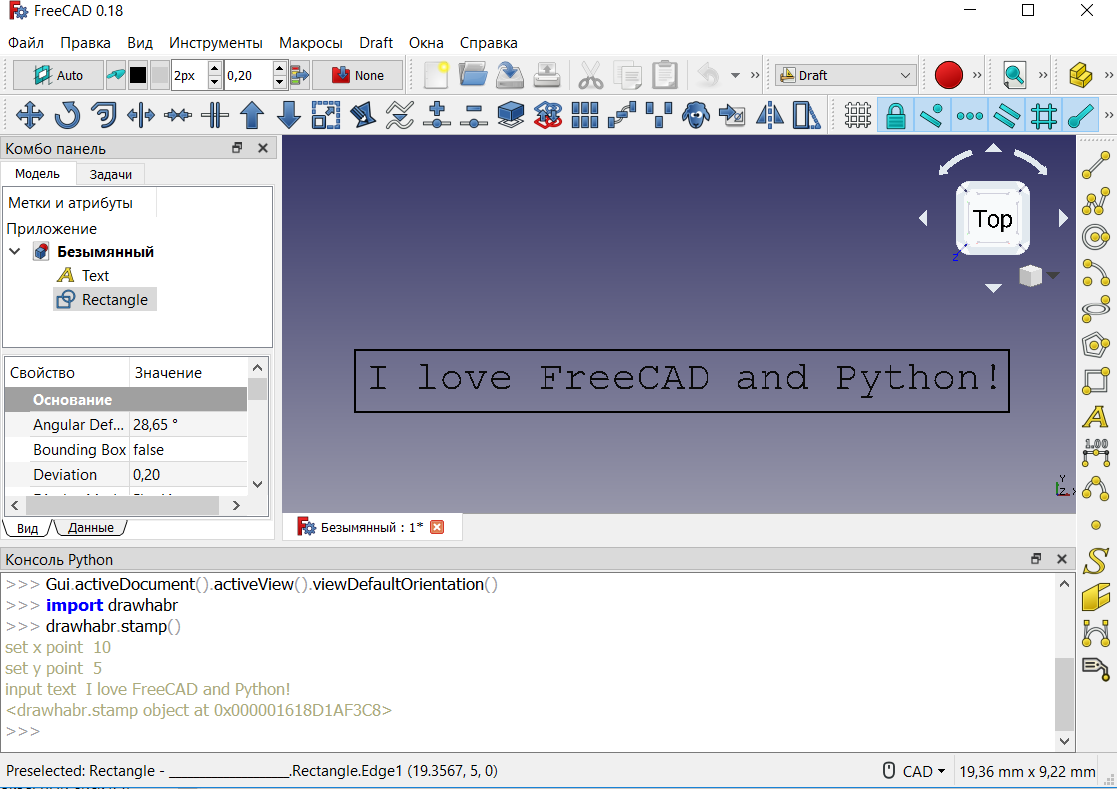
All left to load our library.
To do this, first enter the name of our module in the console (without file extension)
import drawhabr
And then call the class constructor
drawhabr.stamp()
That's all there is to lead, function parameters and enjoy the result.
Just in case, here is a screenshot confirming that everything works on Linux too.
Part V: Conclusion
Today, we have taken only a small step along the path to understanding the FreeCAD API.
Despite the fact that, in my opinion, for two-dimensional drawing and development of projects, FreeCAD is not as familiar as AutoCAD (NanoCAD) or other common CAD systems, but it is much easier to program it.
Even despite some lack of documentation and the need to update some articles with examples in Wiki FreeCAD, it was still possible for an unprepared person with minimal knowledge in Python to understand its API and run the first program.
And given the fact that developers are not greedy and, if necessary, even allow commercial development using FreeCAD under the LGPL license and in combination with all the power of Python libraries (for example, from the same Anaconda distribution kit), program development using FreeCAD looks interesting challenge.
If I understand that you are interested in this topic, I’ll try to make a mini-cycle of notes by analogy with Nanocad
NanoCAD Programming Series
- Scarless Face or First Steps in Multicad.NET API 7 (for Nanocad 8.1)
- “Like a ram to a new gate” or custom “pseudo-3D” objects in NanoCAD using MultiCAD.NET API
- “I am following you” or how to make SCADA from CADa (MultiCAD.NET API)
- “The truth is in fault” or try to program NanoCAD under Linux (MultiCAD.NET API)
- “Hello, New Year!” Or we program NanoCAD using Visual Basic .NET
- “... They want to know what will happen” or write a fortune-telling ball in CAD NanoCAD in C # (MultiCAD .NET API)
All Articles